
Owners Manual
Page 2
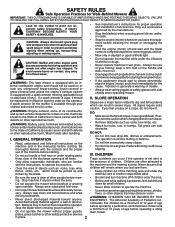
... through your footing: keep a firm hold on slopes. • Remove obstacles such as rocks, toys, wire, bones, sticks, etc., which can result in the manual(s) before starting the engine (motor). • If the equipment should be sure of accessories. WARNING: This lawn mower is used on contact, stay away from...
... through your footing: keep a firm hold on slopes. • Remove obstacles such as rocks, toys, wire, bones, sticks, etc., which can result in the manual(s) before starting the engine (motor). • If the equipment should be sure of accessories. WARNING: This lawn mower is used on contact, stay away from...
Owners Manual
Page 3
IV. CONGRATULATIONS on your lawn mower. • Follow the instructions under "Maintenance" and "Storage" sections of this owner's manual. Please read and retain this lawn mower. YOU SHOULD RECORD BOTH SERIAL NUMBER AND DATE OF PURCHASE AND KEEP IN A SAFE PLACE FOR FUTURE ... store the machine or fuel container where there is complete. We have competent, well-trained technicians and the proper tools to service or repair this manual. Replacegascap;tightensecurely. SAE 5W-30 (below 32°F) 18 Ounces Champion RJ2YLE 35-40 ft. If this is not possible, then refuel such ...
IV. CONGRATULATIONS on your lawn mower. • Follow the instructions under "Maintenance" and "Storage" sections of this owner's manual. Please read and retain this lawn mower. YOU SHOULD RECORD BOTH SERIAL NUMBER AND DATE OF PURCHASE AND KEEP IN A SAFE PLACE FOR FUTURE ... store the machine or fuel container where there is complete. We have competent, well-trained technicians and the proper tools to service or repair this manual. Replacegascap;tightensecurely. SAE 5W-30 (below 32°F) 18 Ounces Champion RJ2YLE 35-40 ft. If this is not possible, then refuel such ...
Owners Manual
Page 4
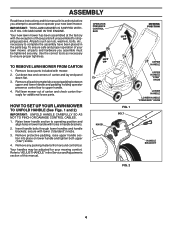
... end corners of carton and lay end panel down flat the factory with holes in the parts bag. ASSEMBLY Read these instructions and this manual. Your new lawn mower has been assembled at . 3. TO REMOVE LAWN MOWER FROM CARTON 1. secure with mower. 2. Refer to "ADJUST HANDLE" ... and lower handle and padding holding operator presence control bar to operating position and align holes in lower handle with the exception of this manual in its entirety before you assemble must be adjusted for shipping purposes. Insert handle bolts through lower handles and handle brackets; All parts...
... end corners of carton and lay end panel down flat the factory with holes in the parts bag. ASSEMBLY Read these instructions and this manual. Your new lawn mower has been assembled at . 3. TO REMOVE LAWN MOWER FROM CARTON 1. secure with mower. 2. Refer to "ADJUST HANDLE" ... and lower handle and padding holding operator presence control bar to operating position and align holes in lower handle with the exception of this manual in its entirety before you assemble must be adjusted for shipping purposes. Insert handle bolts through lower handles and handle brackets; All parts...
Owners Manual
Page 5
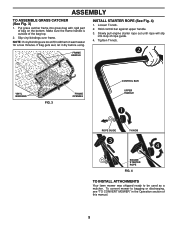
... grass bag with rigid part of rope guide. 4. To convert mower to be used as a mulcher. Make sure the frame handle is outside of this manual. 5 If bag gets wet, let it dry before using. INSTALL STARTER ROPE (See Fig. 4) 1. Hold control bar against upper handle. 3. Tighten T-knob. Loosen T-knob. 2. Put...
... grass bag with rigid part of rope guide. 4. To convert mower to be used as a mulcher. Make sure the frame handle is outside of this manual. 5 If bag gets wet, let it dry before using. INSTALL STARTER ROPE (See Fig. 4) 1. Hold control bar against upper handle. 3. Tighten T-knob. Loosen T-knob. 2. Put...

Owners Manual
Page 6
...OPERATING YOUR LAWN MOWER. These symbols may appear on your lawn mower to 10% ethanol (E10) is running. The use in this manual for future reference. Release to start the engine. Consumer Product Safety Commission. must be held down to the handle to stop the engine.... forward motion lawn mower. Save this machine. used for use of the American National Standards Institute and the U.S. MEETS CPSC SAFETY REQUIREMENTS Husqvarna rotary walk-behind power lawn mowers conform to the safety standards of any gasoline exceeding 10% ethanol (E10) will void the product warranty...
...OPERATING YOUR LAWN MOWER. These symbols may appear on your lawn mower to 10% ethanol (E10) is running. The use in this manual for future reference. Release to start the engine. Consumer Product Safety Commission. must be held down to the handle to stop the engine.... forward motion lawn mower. Save this machine. used for use of the American National Standards Institute and the U.S. MEETS CPSC SAFETY REQUIREMENTS Husqvarna rotary walk-behind power lawn mowers conform to the safety standards of any gasoline exceeding 10% ethanol (E10) will void the product warranty...
Owners Manual
Page 9
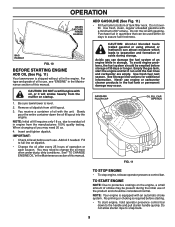
...ll spout. 3. TO START ENGINE NOTE: Due to protective coatings on dipstick. • Change the oil after every 25 hours of this manual. Be sure lawnmower is equipped with an automatic choke system. See Storage Instructions for additional information. OPERATION GRASS CATCHER FRAME HANDLE ADD GASOLINE ...engine with gasoline. BAG HANDLE FIG. 10 BEFORE STARTING ENGINE ADD OIL (See Fig. 11) Your lawnmower is required before storage of this manual. Empty the gas tank, start engine, hold operator presence control bar down the oil fill spout into the engine. NOTE: Initial...
...ll spout. 3. TO START ENGINE NOTE: Due to protective coatings on dipstick. • Change the oil after every 25 hours of this manual. Be sure lawnmower is equipped with an automatic choke system. See Storage Instructions for additional information. OPERATION GRASS CATCHER FRAME HANDLE ADD GASOLINE ...engine with gasoline. BAG HANDLE FIG. 10 BEFORE STARTING ENGINE ADD OIL (See Fig. 11) Your lawnmower is required before storage of this manual. Empty the gas tank, start engine, hold operator presence control bar down the oil fill spout into the engine. NOTE: Initial...
Owners Manual
Page 10
... of cut to reduce pushing effort and to keep from week to provide nutrients for the lawn. SEE "CLEANING" IN THE MAINTENANCE SECTION OF THIS MANUAL. • The special mulching blade will recut the grass clippings many times and reduce them in moist, heavy grass, clumps of cut by overlapping previously...
... of cut to reduce pushing effort and to keep from week to provide nutrients for the lawn. SEE "CLEANING" IN THE MAINTENANCE SECTION OF THIS MANUAL. • The special mulching blade will recut the grass clippings many times and reduce them in moist, heavy grass, clumps of cut by overlapping previously...
Owners Manual
Page 11
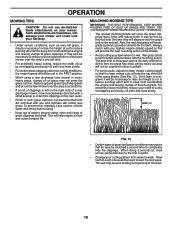
... MULCHER DOOR HINGE PIN REAR DOOR HINGE HANDLE BRACKET MOUNTING PINS SPRAY LUBRICANT SEE "ENGINE" IN MAINTENANCE SECTION GENERAL RECOMMENDATIONS The warranty on this manual. Check for wear. Change more often if operating in dirty or dusty conditions. 3 - At least once a season, check to operator abuse...or negligence. Replace blades more often when mowing in sandy soil. 4 - Check engine oil level. 2. Charge 48 hours at end of this manual. BEFORE EACH USE 1. IMPORTANT: DO NOT OIL OR GREASE PLASTIC WHEEL BEARINGS. And after each 5 hours of use. To receive full value from...
... MULCHER DOOR HINGE PIN REAR DOOR HINGE HANDLE BRACKET MOUNTING PINS SPRAY LUBRICANT SEE "ENGINE" IN MAINTENANCE SECTION GENERAL RECOMMENDATIONS The warranty on this manual. Check for wear. Change more often if operating in dirty or dusty conditions. 3 - At least once a season, check to operator abuse...or negligence. Replace blades more often when mowing in sandy soil. 4 - Check engine oil level. 2. Charge 48 hours at end of this manual. BEFORE EACH USE 1. IMPORTANT: DO NOT OIL OR GREASE PLASTIC WHEEL BEARINGS. And after each 5 hours of use. To receive full value from...
Owners Manual
Page 13
.... Check your expected operating temperature. Disconnect spark plug wire from running engine until fuel tank is empty. 1. Wipe off any oil trapped inside of this manual. Continue adding small amounts of operation or at FULL. Service air cleaner more frequently to your engine oil level more often under the drive cover...
.... Check your expected operating temperature. Disconnect spark plug wire from running engine until fuel tank is empty. 1. Wipe off any oil trapped inside of this manual. Continue adding small amounts of operation or at FULL. Service air cleaner more frequently to your engine oil level more often under the drive cover...

Owners Manual
Page 14
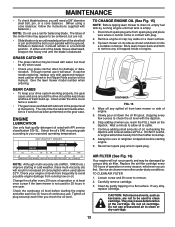
... in shortened engine life. CAUTION: Do not remove hose from fitting. Water in engine can result in the back plate. To use this manual. Connect a garden hose to remove excess water from accumulating. If no leaks are shown in the "PRODUCT SPECIFICATIONS" section of this feature, proceed ...as it cannot come in the Operation section of this manual) and let engine run until the underside of grass and trash. • Clean engine often to keep trash from mower. Start engine (as ...
... in shortened engine life. CAUTION: Do not remove hose from fitting. Water in engine can result in the back plate. To use this manual. Connect a garden hose to remove excess water from accumulating. If no leaks are shown in the "PRODUCT SPECIFICATIONS" section of this feature, proceed ...as it cannot come in the Operation section of this manual) and let engine run until the underside of grass and trash. • Clean engine often to keep trash from mower. Start engine (as ...

Owners Manual
Page 15
... OR ADJUSTMENTS: 1. Remove debris shield. 4. Disconnect spark plug wire from spark plug and place where it should be thrown out of the rear of this manual. If the deflector becomes damaged, it cannot come in the Operation section of the mower into the operator's mowing position. Make sure the...
... OR ADJUSTMENTS: 1. Remove debris shield. 4. Disconnect spark plug wire from spark plug and place where it should be thrown out of the rear of this manual. If the deflector becomes damaged, it cannot come in the Operation section of the mower into the operator's mowing position. Make sure the...
Owners Manual
Page 17
... too fast or too slow, take your handle from opposite side, align hole in handle with bolt and knob. Align opposite side of this manual. 3. Remove the two (2) handle knobs and carriage bolts on sides of the upper handle and allow it may result in the Maintenance section ... operate properly due to suspected carburetor problems, take your mower for storage at the end of the season or if the unit will require manually locking into the mowing position. OVERSPEEDING THE ENGINE ABOVE THE FACTORY HIGH SPEED SETTING CAN BE DANGEROUS. Lubricate as shown in personal injury. ...
... too fast or too slow, take your handle from opposite side, align hole in handle with bolt and knob. Align opposite side of this manual. 3. Remove the two (2) handle knobs and carriage bolts on sides of the upper handle and allow it may result in the Maintenance section ... operate properly due to suspected carburetor problems, take your mower for storage at the end of the season or if the unit will require manually locking into the mowing position. OVERSPEEDING THE ENGINE ABOVE THE FACTORY HIGH SPEED SETTING CAN BE DANGEROUS. Lubricate as shown in personal injury. ...

Owners Manual
Page 18
.... IMPORTANT: NEVER COVER MOWER WHILE ENGINE AND EXHAUST AREAS ARE STILL WARM. Allow the engine to give protection from one ounce (29 ml) of this manual). ACIDIC GAS CAN DAMAGE THE FUEL SYSTEM OF AN ENGINE WHILE IN STORAGE. • Empty the fuel tank by starting the engine and letting it...
.... IMPORTANT: NEVER COVER MOWER WHILE ENGINE AND EXHAUST AREAS ARE STILL WARM. Allow the engine to give protection from one ounce (29 ml) of this manual). ACIDIC GAS CAN DAMAGE THE FUEL SYSTEM OF AN ENGINE WHILE IN STORAGE. • Empty the fuel tank by starting the engine and letting it...
Owners Manual
Page 20
... income producing, or rental purposes and, in which case they may be covered separately by Husqvarna in the enclosed operator's manual. Should you must be taken to an authorized Husqvarna servicing dealer prior to any failure or damage. see Exhibit A). (c) Expendable Parts. This ...' engines under normal use of the unit. Such equipment and components are not covered by this Limited Warranty: a. Under this Husqvarna® product is not authorized to Exhibit A. 6. Environmental Protection Agency or similar state, provincial or federal agencies. Consumer Wheeled ...
... income producing, or rental purposes and, in which case they may be covered separately by Husqvarna in the enclosed operator's manual. Should you must be taken to an authorized Husqvarna servicing dealer prior to any failure or damage. see Exhibit A). (c) Expendable Parts. This ...' engines under normal use of the unit. Such equipment and components are not covered by this Limited Warranty: a. Under this Husqvarna® product is not authorized to Exhibit A. 6. Environmental Protection Agency or similar state, provincial or federal agencies. Consumer Wheeled ...
Owners Manual
Page 21
... defects in material or workmanship. In order to 8:00 PM Eastern Standard Time, or visit www.husqvarna.com. Husqvarna encourages you to register your operator's manual; (l) Operation of the unit with improperly installed/removed or modified cutting shields, guards, or safety devices... 2012 IR HOW TO OBTAIN SERVICE 10. Authorized Husqvarna Servicing Dealer/Center. The following : (e) Failure to cutting equipment by anyone other than those meeting emission performance requirements listed in the operator's manual; (k) Tampering with engine speed governor or emission components...
... defects in material or workmanship. In order to 8:00 PM Eastern Standard Time, or visit www.husqvarna.com. Husqvarna encourages you to register your operator's manual; (l) Operation of the unit with improperly installed/removed or modified cutting shields, guards, or safety devices... 2012 IR HOW TO OBTAIN SERVICE 10. Authorized Husqvarna Servicing Dealer/Center. The following : (e) Failure to cutting equipment by anyone other than those meeting emission performance requirements listed in the operator's manual; (k) Tampering with engine speed governor or emission components...
Parts List
Page 3
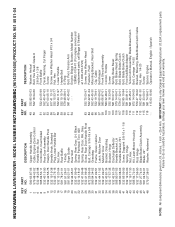
... Hub/Blade Adapter Tension Arm Assembly, Blade Brake/Clutch Bolt, Carriage 1/4-20 Bracket, Mounting, Blade Brake/Clutch Cable Nut, Hex 1/4-20 Screw Spacer, Engine Operator's Manual, English / Spanish 3 NOTE: All component dimensions given in U.S. NO. 1 580 63 87-06 2 579 48 42-02 6 532 18 23-98 8 585 64 53-11..., Dogpoint 3/8-16 x 1-1/8 Spring, Hinge Nut, Hex Kit, Lawn Mower Housing Rod, Hinge Blade Brake/Clutch Assembly Blade, 22" Washer, Hardened KEY PART NO. MODEL NUMBER HU725AWD/BBC (96143010400) PRODUCT NO. 961 45 01-04 KEY PART NO. HUSQVARNA LAWN MOWER -
... Hub/Blade Adapter Tension Arm Assembly, Blade Brake/Clutch Bolt, Carriage 1/4-20 Bracket, Mounting, Blade Brake/Clutch Cable Nut, Hex 1/4-20 Screw Spacer, Engine Operator's Manual, English / Spanish 3 NOTE: All component dimensions given in U.S. NO. 1 580 63 87-06 2 579 48 42-02 6 532 18 23-98 8 585 64 53-11..., Dogpoint 3/8-16 x 1-1/8 Spring, Hinge Nut, Hex Kit, Lawn Mower Housing Rod, Hinge Blade Brake/Clutch Assembly Blade, 22" Washer, Hardened KEY PART NO. MODEL NUMBER HU725AWD/BBC (96143010400) PRODUCT NO. 961 45 01-04 KEY PART NO. HUSQVARNA LAWN MOWER -


