
Owners Manual
Page 3
...thrown. SERIAL NUMBER DATE OF PURCHASE THE MODEL AND SERIAL NUMBERS WILL BE FOUND ON A DECAL ATTACHED TO THE REAR OF THE LAWN MOWER HOUSING. TABLE OF CONTENTS SAFETY RULES 2-3 MAINTENANCE 9-12 PRODUCT SPECIFICATIONS 3 SERVICE AND ADJUSTMENTS 13-14 CUSTOMER RESPONSIBILITIES 3 STORAGE 14..., which could expose moving parts or allow objects to service or repair this owner's manual. WARNING: This lawn mower is equipped with the rim of a new lawn mower. CUSTOMER RESPONSIBILITIES • Read and observe the safety rules. • Follow a regular schedule in effective ...
...thrown. SERIAL NUMBER DATE OF PURCHASE THE MODEL AND SERIAL NUMBERS WILL BE FOUND ON A DECAL ATTACHED TO THE REAR OF THE LAWN MOWER HOUSING. TABLE OF CONTENTS SAFETY RULES 2-3 MAINTENANCE 9-12 PRODUCT SPECIFICATIONS 3 SERVICE AND ADJUSTMENTS 13-14 CUSTOMER RESPONSIBILITIES 3 STORAGE 14..., which could expose moving parts or allow objects to service or repair this owner's manual. WARNING: This lawn mower is equipped with the rim of a new lawn mower. CUSTOMER RESPONSIBILITIES • Read and observe the safety rules. • Follow a regular schedule in effective ...
Owners Manual
Page 4
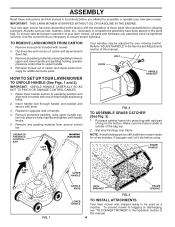
...of the bag top. 2. Refer to assemble or operate your mowing comfort. Remove any packing material from around control bar. Roll lawn mower out of this manual in handle with rigid part of three height positioning holes. 2. Put grass catcher frame into place on the...lower handle section to ensure proper tightness. BOLT KNOB HANDLE BRACKET FIG. 2 TO ASSEMBLE GRASS CATCHER (See Fig. 3) 1. TO REMOVE LAWN MOWER FROM CARTON 1. OPERATOR PRESENCE CONTROL BAR LIFT UP MOWING POSITION Your handles may be tightened securely. Use the correct tools as necessary to ...
...of the bag top. 2. Refer to assemble or operate your mowing comfort. Remove any packing material from around control bar. Roll lawn mower out of this manual in handle with rigid part of three height positioning holes. 2. Put grass catcher frame into place on the...lower handle section to ensure proper tightness. BOLT KNOB HANDLE BRACKET FIG. 2 TO ASSEMBLE GRASS CATCHER (See Fig. 3) 1. TO REMOVE LAWN MOWER FROM CARTON 1. OPERATOR PRESENCE CONTROL BAR LIFT UP MOWING POSITION Your handles may be tightened securely. Use the correct tools as necessary to ...
Owners Manual
Page 5
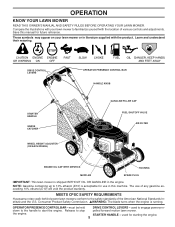
...power-pro- STARTER HANDLE - Release to start the engine. Learn and understand their meaning. MEETS CPSC SAFETY REQUIREMENTS Husqvarna rotary walk-behind power lawn mowers conform to 10% ethanol (E10) is acceptable for starting the engine. 5 DRIVE CONTROL LEVERS STARTER HANDLE GRASS... ENGINE OIL CAP WITH DIPSTICK HOUSING MUFFLER SPARK PLUG IMPORTANT: This lawn mower is running. the engine. OPERATION KNOW YOUR LAWN MOWER READ THIS OWNER'S MANUAL AND SAFETY RULES BEFORE OPERATING YOUR LAWN MOWER. NOTE: Gasoline containing up to the safety standards of various controls...
...power-pro- STARTER HANDLE - Release to start the engine. Learn and understand their meaning. MEETS CPSC SAFETY REQUIREMENTS Husqvarna rotary walk-behind power lawn mowers conform to 10% ethanol (E10) is acceptable for starting the engine. 5 DRIVE CONTROL LEVERS STARTER HANDLE GRASS... ENGINE OIL CAP WITH DIPSTICK HOUSING MUFFLER SPARK PLUG IMPORTANT: This lawn mower is running. the engine. OPERATION KNOW YOUR LAWN MOWER READ THIS OWNER'S MANUAL AND SAFETY RULES BEFORE OPERATING YOUR LAWN MOWER. NOTE: Gasoline containing up to the safety standards of various controls...
Owners Manual
Page 6
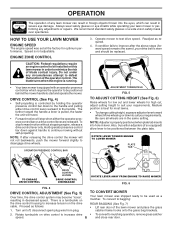
...To stop when either drive control lever rearward to increase drive speed. 6 LEVER ROTATE LEVER AWAY FROM ENGINE TO RAISE MOWER FIG. 6 TO CONVERT MOWER Your lawn mower was set at the factory for optimum performance. Be sure all wheels are released. There is controlled by holding the ...operator presence control bar down against handle to be installed on this lawn mower in lever. HOW TO USE YOUR LAWN MOWER ENGINE SPEED The engine speed was shipped ready to continue mowing without stopping engine, release a drive control lever ...
...To stop when either drive control lever rearward to increase drive speed. 6 LEVER ROTATE LEVER AWAY FROM ENGINE TO RAISE MOWER FIG. 6 TO CONVERT MOWER Your lawn mower was set at the factory for optimum performance. Be sure all wheels are released. There is controlled by holding the ...operator presence control bar down against handle to be installed on this lawn mower in lever. HOW TO USE YOUR LAWN MOWER ENGINE SPEED The engine speed was shipped ready to continue mowing without stopping engine, release a drive control lever ...
Owners Manual
Page 7
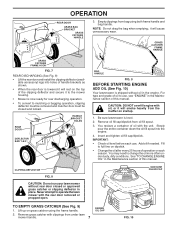
... must be closed or approved grass catcher or clipping deflector in the engine. CLIPPING DEFLECTOR FIG. 8 CAUTION: Do not run your lawn mower without oil in place. Lift up on startup. 1. Remove grass catcher with the unit. Be sure lawnmower is shipped without rear door closed.... 10) Your lawnmower is level. 2. OPERATION REAR DOOR GRASS BAG BRACKET GRASS CATCHER HANDLE 3. For type and grade of oil to operate the lawn mower with oil, or it will smoke heavily from under dusty, dirty conditions. Never attempt to use . See "TO CHANGE ENGINE OIL" in the ...
... must be closed or approved grass catcher or clipping deflector in the engine. CLIPPING DEFLECTOR FIG. 8 CAUTION: Do not run your lawn mower without oil in place. Lift up on startup. 1. Remove grass catcher with the unit. Be sure lawnmower is shipped without rear door closed.... 10) Your lawnmower is level. 2. OPERATION REAR DOOR GRASS BAG BRACKET GRASS CATCHER HANDLE 3. For type and grade of oil to operate the lawn mower with oil, or it will smoke heavily from under dusty, dirty conditions. Never attempt to use . See "TO CHANGE ENGINE OIL" in the ...
Owners Manual
Page 8
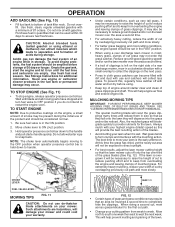
...choke lever to assure fuel freshness. OPERATION ADD GASOLINE (See Fig. 10) • Fill fuel tank to reduce ground speed and/or run the lawn mower over the area a second time. • For extremely heavy cutting, reduce the width of cut by overlapping previously cut path and mow slowly....to raise the height of the grass blades (See Fig. 12). The best time to direct sunlight. • For best results, adjust the lawn mower cutting height so that can become filled with dirt and dust with a small overlap to provide nutrients for additional information. At this , regularly...
...choke lever to assure fuel freshness. OPERATION ADD GASOLINE (See Fig. 10) • Fill fuel tank to reduce ground speed and/or run the lawn mower over the area a second time. • For extremely heavy cutting, reduce the width of cut by overlapping previously cut path and mow slowly....to raise the height of the grass blades (See Fig. 12). The best time to direct sunlight. • For best results, adjust the lawn mower cutting height so that can become filled with dirt and dust with a small overlap to provide nutrients for additional information. At this , regularly...
Owners Manual
Page 9
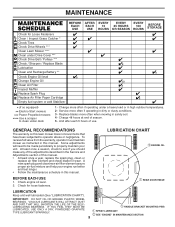
...OIL OR GREASE PLASTIC WHEEL BEARINGS. BEFORE EACH USE 1. Check for Loose Fasteners Clean / Inspect Grass Catcher * Check Tires Check Drive Wheels *** Clean Lawn Mower **** Clean under Drive Cover *** Check Drive Belt / Pulleys *** Check / Sharpen / Replace Blade Lubrication Clean and Recharge Battery ** Check Engine Oil ... once a season, check to see if you should make any of the adjustments described in the Service and Adjustments section of this lawn mower does not cover items that have been subjected to clean under a heavy load or in dirty or dusty conditions. 3 - Replace blades...
...OIL OR GREASE PLASTIC WHEEL BEARINGS. BEFORE EACH USE 1. Check for Loose Fasteners Clean / Inspect Grass Catcher * Check Tires Check Drive Wheels *** Clean Lawn Mower **** Clean under Drive Cover *** Check Drive Belt / Pulleys *** Check / Sharpen / Replace Blade Lubrication Clean and Recharge Battery ** Check Engine Oil ... once a season, check to see if you should make any of the adjustments described in the Service and Adjustments section of this lawn mower does not cover items that have been subjected to clean under a heavy load or in dirty or dusty conditions. 3 - Replace blades...
Owners Manual
Page 10
... bolt with balancer.) NOTE: Do not use a nail for balancing blade. TIRES • Keep tires free of wood between blade and mower housing to lawn mower or engine. • The blade can harm rubber. • Avoid stumps, stones, deep ruts, sharp objects and other hazards that ... by turning counter-clockwise. 5. Be sure key in good condition to be kept sharp. but are aligned; Replace adapter if damaged. MAINTENANCE LAWN MOWER Always observe safety rules when performing any maintenance. and that may appear to clean drive wheels, check both rear wheels. 6. lbs. Make ...
... bolt with balancer.) NOTE: Do not use a nail for balancing blade. TIRES • Keep tires free of wood between blade and mower housing to lawn mower or engine. • The blade can harm rubber. • Avoid stumps, stones, deep ruts, sharp objects and other hazards that ... by turning counter-clockwise. 5. Be sure key in good condition to be kept sharp. but are aligned; Replace adapter if damaged. MAINTENANCE LAWN MOWER Always observe safety rules when performing any maintenance. and that may appear to clean drive wheels, check both rear wheels. 6. lbs. Make ...
Owners Manual
Page 11
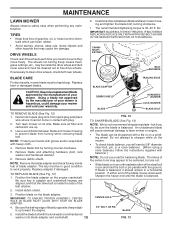
...on oil fill cap/dipstick for damage or deterioration. Disconnect spark plug wire from lawn mower or side of engine. 5. TO CLEAN AIR FILTER 1. Tip lawn mower on the tube. Rock lawn mower back and forth to spark plug. ENGINE LUBRICATION Maintenance, repair, or replacement of operation...used . • Check your grass catcher often for checking level. Remove oil fill cap/dipstick; a suitable container. Give the lawn mower model number when ordering. LUBRICATION Use only high quality detergent oil rated with oil. Use guage on a flat the factory. and ...
...on oil fill cap/dipstick for damage or deterioration. Disconnect spark plug wire from lawn mower or side of engine. 5. TO CLEAN AIR FILTER 1. Tip lawn mower on the tube. Rock lawn mower back and forth to spark plug. ENGINE LUBRICATION Maintenance, repair, or replacement of operation...used . • Check your grass catcher often for checking level. Remove oil fill cap/dipstick; a suitable container. Give the lawn mower model number when ordering. LUBRICATION Use only high quality detergent oil rated with oil. Use guage on a flat the factory. and ...
Owners Manual
Page 12
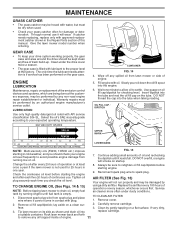
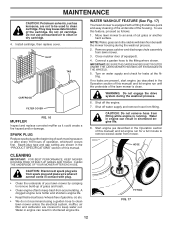
... hotter and shortens engine life. • Keep finished surfaces / wheels free of the housing. WATER WASHOUT FEATURE (See Fig. 17) Your lawn mower is running. Water in engine can result in contact with a fitting that allows quick and easy cleaning of the underside of gasoline, oil, ... Turn on water supply and check for a full minute to clean cartridge. IMPORTANT: BE SURE THE GARDEN HOSE IS NOT ROUTED UNDER THE LAWN MOWER HOUSING OR ENTANGLED IN THE WHEELS. 5. Spark plug type and gap setting are shown in the Operation section of operation, whichever occurs fi...
... hotter and shortens engine life. • Keep finished surfaces / wheels free of the housing. WATER WASHOUT FEATURE (See Fig. 17) Your lawn mower is running. Water in engine can result in contact with a fitting that allows quick and easy cleaning of the underside of gasoline, oil, ... Turn on water supply and check for a full minute to clean cartridge. IMPORTANT: BE SURE THE GARDEN HOSE IS NOT ROUTED UNDER THE LAWN MOWER HOUSING OR ENTANGLED IN THE WHEELS. 5. Spark plug type and gap setting are shown in the Operation section of operation, whichever occurs fi...
Owners Manual
Page 13
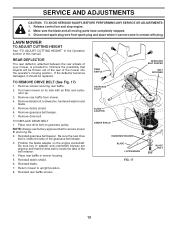
... CUTTING HEIGHT See "TO ADJUST CUTTING HEIGHT" in contact with air filter and carburetor up. 3. Turn lawn mower on the engine crankshaft. Remove debris shield. 6. Position the blade adapter on its side with plug. Place rear baffle in adapter and ...crankshaft keyway are aligned; Release control bar and stop engine. 2. Disconnect spark plug wire from mower. 4. TO REPLACE DRIVE BELT 1. Place new drive belt on gearcase pulley. Make sure the blade and all moving parts have completely stopped. 3. Remove ...
... CUTTING HEIGHT See "TO ADJUST CUTTING HEIGHT" in contact with air filter and carburetor up. 3. Turn lawn mower on the engine crankshaft. Remove debris shield. 6. Position the blade adapter on its side with plug. Place rear baffle in adapter and ...crankshaft keyway are aligned; Release control bar and stop engine. 2. Disconnect spark plug wire from mower. 4. TO REPLACE DRIVE BELT 1. Place new drive belt on gearcase pulley. Make sure the blade and all moving parts have completely stopped. 3. Remove ...
Owners Manual
Page 14
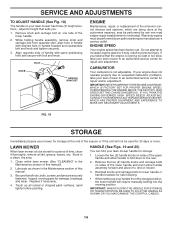
..., CONTACT YOUR NEARESTAUTHORIZED SERVICE CENTER, WHICH HAS PROPER EQUIPMENT AND EXPERIENCE TO MAKE ANY NECESSARY ADJUSTMENTS. FIG. 18 STORAGE Immediately prepare your lawn mower to an authorized service center for 30 days or more. Lubricate as shown in the Maintenance section of this manual. 3. Replace if ...you believe that all rusted or chipped paint surfaces; SERVICE AND ADJUSTMENTS TO ADJUST HANDLE (See Fig. 18) The handle on your lawn mower handle for damage, breakage and wear. While holding handle assembly, remove knob and carriage bolt from the storage position, the lower ...
..., CONTACT YOUR NEARESTAUTHORIZED SERVICE CENTER, WHICH HAS PROPER EQUIPMENT AND EXPERIENCE TO MAKE ANY NECESSARY ADJUSTMENTS. FIG. 18 STORAGE Immediately prepare your lawn mower to an authorized service center for 30 days or more. Lubricate as shown in the Maintenance section of this manual. 3. Replace if ...you believe that all rusted or chipped paint surfaces; SERVICE AND ADJUSTMENTS TO ADJUST HANDLE (See Fig. 18) The handle on your lawn mower handle for damage, breakage and wear. While holding handle assembly, remove knob and carriage bolt from the storage position, the lower ...
Owners Manual
Page 15
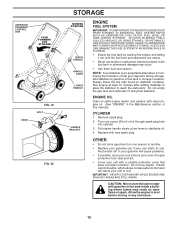
... plug. 2. Rust and/or dirt in your gasoline will cause your can if your unit to rust. CAUTION: Never store the lawn mower with new spark plug. CYLINDER 1. IMPORTANT: NEVER COVER MOWER WHILE ENGINE AND EXHAUST AREAS ARE STILL WARM. ACIDIC GAS CAN DAMAGE THE FUEL SYSTEM OF AN ENGINE WHILE IN STORAGE...
... plug. 2. Rust and/or dirt in your gasoline will cause your can if your unit to rust. CAUTION: Never store the lawn mower with new spark plug. CYLINDER 1. IMPORTANT: NEVER COVER MOWER WHILE ENGINE AND EXHAUST AREAS ARE STILL WARM. ACIDIC GAS CAN DAMAGE THE FUEL SYSTEM OF AN ENGINE WHILE IN STORAGE...
Owners Manual
Page 16
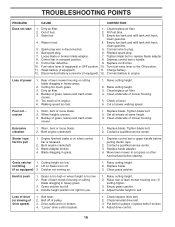
.... 2. Blade dragging in released position. 8. not filling 2. Rear of drive speed) 1. Loss of drive (or slowing of lawn mower housing or cutting blade dragging in engine. 6. Engine flywheel brake is on pulleys / replace belts if broken. 4. Catcher not ...blade bolt or replace blade adapter. 8. Weak battery (if equipped). 11. Clean/replace air filter. 4. Cut at same height. 3. Move lawn mower to cut - Belt off . (if so equipped) 3. Too much grass. 3. Raise cutting height. 3. Bent engine crankshaft. 1. Replace blade. ...
.... 2. Blade dragging in released position. 8. not filling 2. Rear of drive speed) 1. Loss of drive (or slowing of lawn mower housing or cutting blade dragging in engine. 6. Engine flywheel brake is on pulleys / replace belts if broken. 4. Catcher not ...blade bolt or replace blade adapter. 8. Weak battery (if equipped). 11. Clean/replace air filter. 4. Cut at same height. 3. Move lawn mower to cut - Belt off . (if so equipped) 3. Too much grass. 3. Raise cutting height. 3. Bent engine crankshaft. 1. Replace blade. ...
Parts List
Page 3
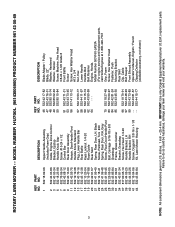
MODEL NUMBER HU700L (96143006900) PRODUCT NUMBER 961 43 00-69 KEY PART NO. inches. 1 inch = 25.4 mm. NO. 1 ...Catcher Bracket, Grassbag Screw, Hex Head 1/4-20 Handle Bracket, LH Handle Bracket, RH Screw, Dogpoint 3/8-16 x 1-1/8 Kit, Lawn Mower Housing KEY PART NO. IMPORTANT: Use only Original Equipment Manufacturer (O.E.M.) replacement parts. Failure to do so could be hazardous, damage your... lawn mower and void your warranty. NO. 46 532 42 17-82 47 532 43 76-01 48 532 85...
MODEL NUMBER HU700L (96143006900) PRODUCT NUMBER 961 43 00-69 KEY PART NO. inches. 1 inch = 25.4 mm. NO. 1 ...Catcher Bracket, Grassbag Screw, Hex Head 1/4-20 Handle Bracket, LH Handle Bracket, RH Screw, Dogpoint 3/8-16 x 1-1/8 Kit, Lawn Mower Housing KEY PART NO. IMPORTANT: Use only Original Equipment Manufacturer (O.E.M.) replacement parts. Failure to do so could be hazardous, damage your... lawn mower and void your warranty. NO. 46 532 42 17-82 47 532 43 76-01 48 532 85...
Parts List
Page 5
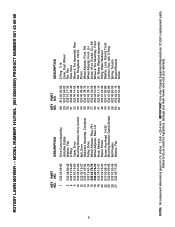
inches. 1 inch = 25.4 mm. Failure to do so could be hazardous, damage your lawn mower and void your warranty. NO. 28 812 00 00-58 29 532 18 94-03 30 532 19 17-30 31 532 40 48-45 ..., Lock, Internal Tooth Locknut, Hex, with O-Ring Spring, Tension Support Bracket Screw 5 NOTE: All component dimensions given in U.S. MODEL NUMBER HU700L (96143006900) PRODUCT NUMBER 961 43 00-69 KEY PART NO. ROTARY LAWN MOWER - - NO. 1 532 43 09-95 5 532 08 83-48 6 532 19 74-80 9 532 43 16-50 10 532...
inches. 1 inch = 25.4 mm. Failure to do so could be hazardous, damage your lawn mower and void your warranty. NO. 28 812 00 00-58 29 532 18 94-03 30 532 19 17-30 31 532 40 48-45 ..., Lock, Internal Tooth Locknut, Hex, with O-Ring Spring, Tension Support Bracket Screw 5 NOTE: All component dimensions given in U.S. MODEL NUMBER HU700L (96143006900) PRODUCT NUMBER 961 43 00-69 KEY PART NO. ROTARY LAWN MOWER - - NO. 1 532 43 09-95 5 532 08 83-48 6 532 19 74-80 9 532 43 16-50 10 532...


