
Owners Manual
Page 3
...vehicle before filling. • Remove gas-powered equipment from plug to give you cannot easily remedy, please contact your lawn mower properly. It has been designed, engineered and manufactured to prevent accidental starting. • Keep nuts and bolts, especially blade ...Never make wheel height adjustments while the engine (motor) is running . V. Check their proper operation regularly. • Keep machine free of a new lawn mower. Repair, if necessary, before storing. • Stop and inspect the equipment if you to be used , it . • Do not change ...
...vehicle before filling. • Remove gas-powered equipment from plug to give you cannot easily remedy, please contact your lawn mower properly. It has been designed, engineered and manufactured to prevent accidental starting. • Keep nuts and bolts, especially blade ...Never make wheel height adjustments while the engine (motor) is running . V. Check their proper operation regularly. • Keep machine free of a new lawn mower. Repair, if necessary, before storing. • Stop and inspect the equipment if you to be used , it . • Do not change ...
Owners Manual
Page 4
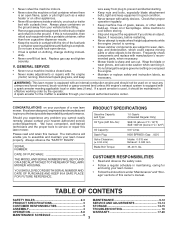
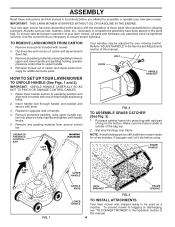
... frame into place on the bottom. NOTE: If vinyl bindings are too stiff, hold them in the Service andAdjustments section of your lawn mower, all packing materials except padding between upper and lower handle and padding holding operator presence control bar to operating position and align hole in.... FRAME HANDLE LIFT UP FIG. 1 UPPER HANDLE HANDLE KNOB VINYL BINDINGS FRAME OPENING LOWER HANDLE FIG. 3 TO INSTALL ATTACHMENTS Your lawn mower was shipped ready to complete the assembly have been placed in the parts bag. Remove loose parts included with the exception of three height...
... frame into place on the bottom. NOTE: If vinyl bindings are too stiff, hold them in the Service andAdjustments section of your lawn mower, all packing materials except padding between upper and lower handle and padding holding operator presence control bar to operating position and align hole in.... FRAME HANDLE LIFT UP FIG. 1 UPPER HANDLE HANDLE KNOB VINYL BINDINGS FRAME OPENING LOWER HANDLE FIG. 3 TO INSTALL ATTACHMENTS Your lawn mower was shipped ready to complete the assembly have been placed in the parts bag. Remove loose parts included with the exception of three height...
Owners Manual
Page 5
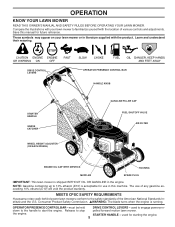
... Safety Commission. OPERATOR PRESENCE CONTROL BAR - STARTER HANDLE - OPERATION KNOW YOUR LAWN MOWER READ THIS OWNER'S MANUAL AND SAFETY RULES BEFORE OPERATING YOUR LAWN MOWER. These symbols may appear on your lawn mower to start the engine. MEETS CPSC SAFETY REQUIREMENTS Husqvarna rotary walk-behind power lawn mowers conform to 10% ethanol (E10) is running. used to stop pelled...
... Safety Commission. OPERATOR PRESENCE CONTROL BAR - STARTER HANDLE - OPERATION KNOW YOUR LAWN MOWER READ THIS OWNER'S MANUAL AND SAFETY RULES BEFORE OPERATING YOUR LAWN MOWER. These symbols may appear on your lawn mower to start the engine. MEETS CPSC SAFETY REQUIREMENTS Husqvarna rotary walk-behind power lawn mowers conform to 10% ethanol (E10) is running. used to stop pelled...
Owners Manual
Page 6
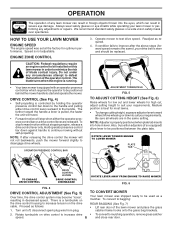
...against handle to be installed on drive control to increase drive speed. 6 LEVER ROTATE LEVER AWAY FROM ENGINE TO RAISE MOWER FIG. 6 TO CONVERT MOWER Your lawn mower was set at the factory for high cut, adjust cutting height to suit your drive belt is a turnbuckle on the ...drive cable. Always wear safety glasses or eye shields while operating your requirements. Hold operator presence control bar down to suit your lawn mower or performing any circumstances attempt to increase tension on the drive control housing to defeat the function of blade contact injury. ROTATE LEVER...
...against handle to be installed on drive control to increase drive speed. 6 LEVER ROTATE LEVER AWAY FROM ENGINE TO RAISE MOWER FIG. 6 TO CONVERT MOWER Your lawn mower was set at the factory for high cut, adjust cutting height to suit your drive belt is a turnbuckle on the ...drive cable. Always wear safety glasses or eye shields while operating your requirements. Hold operator presence control bar down to suit your lawn mower or performing any circumstances attempt to increase tension on the drive control housing to defeat the function of blade contact injury. ROTATE LEVER...
Owners Manual
Page 7
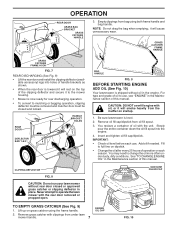
...is now ready for rear discharging operation. • To convert to full line on startup. 1. Never attempt to change the oil more often under lawn mower handle. 7 ENGINE OIL CAP FIG. 10 You recieve a container of this manual. Lift up on the top of operation or each use , ...FILLER CAP TO EMPTY GRASS CATCHER (See Fig. 9) 1. able accessory) legs into the engine. 4. CLIPPING DEFLECTOR FIG. 8 CAUTION: Do not run your lawn mower without oil in place. GRASS CATCHER FRAME HANDLE GRASS CATCHER FRAME HOOK FIG. 7 REAR DISCHARGING (See Fig. 8) • Lift the rear door and install ...
...is now ready for rear discharging operation. • To convert to full line on startup. 1. Never attempt to change the oil more often under lawn mower handle. 7 ENGINE OIL CAP FIG. 10 You recieve a container of this manual. Lift up on the top of operation or each use , ...FILLER CAP TO EMPTY GRASS CATCHER (See Fig. 9) 1. able accessory) legs into the engine. 4. CLIPPING DEFLECTOR FIG. 8 CAUTION: Do not run your lawn mower without oil in place. GRASS CATCHER FRAME HANDLE GRASS CATCHER FRAME HOOK FIG. 7 REAR DISCHARGING (See Fig. 8) • Lift the rear door and install ...
Owners Manual
Page 8
...ON OFF • Under certain conditions, such as very tall grass, it is held down to direct sunlight. • For best results, adjust the lawn mower cutting height so that as this time the grass has dried, yet the newly cut to reduce pushing effort and to provide nutrients for additional...on the next pass. • Pores in storage. Hold operator presence control bar down to collect the clippings on your lawn is in size so that the lawn mower cuts off with water and let dry before storage of cut area will collect less grass. Such attachments are empty. ...
...ON OFF • Under certain conditions, such as very tall grass, it is held down to direct sunlight. • For best results, adjust the lawn mower cutting height so that as this time the grass has dried, yet the newly cut to reduce pushing effort and to provide nutrients for additional...on the next pass. • Pores in storage. Hold operator presence control bar down to collect the clippings on your lawn is in size so that the lawn mower cuts off with water and let dry before storage of cut area will collect less grass. Such attachments are empty. ...
Owners Manual
Page 9
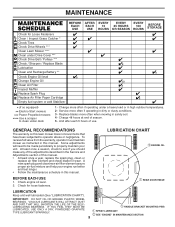
... soil. 4 - GENERAL RECOMMENDATIONS The warranty on this manual. BEFORE EACH USE 1. Replace blades more often when mowing in this lawn mower does not cover items that have been subjected to see if you should make any of this manual. Check engine oil level. ...EVERY 25 HOURS OR SEASON EVERY 100 HOURS BEFORE STORAGE Check for Loose Fasteners Clean / Inspect Grass Catcher * Check Tires Check Drive Wheels *** Clean Lawn Mower **** Clean under Drive Cover *** Check Drive Belt / Pulleys *** Check / Sharpen / Replace Blade Lubrication Clean and Recharge Battery ** Check Engine Oil...
... soil. 4 - GENERAL RECOMMENDATIONS The warranty on this manual. BEFORE EACH USE 1. Replace blades more often when mowing in this lawn mower does not cover items that have been subjected to see if you should make any of this manual. Check engine oil level. ...EVERY 25 HOURS OR SEASON EVERY 100 HOURS BEFORE STORAGE Check for Loose Fasteners Clean / Inspect Grass Catcher * Check Tires Check Drive Wheels *** Clean Lawn Mower **** Clean under Drive Cover *** Check Drive Belt / Pulleys *** Check / Sharpen / Replace Blade Lubrication Clean and Recharge Battery ** Check Engine Oil...
Owners Manual
Page 10
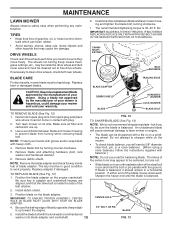
... bolt or pin and hold the bolt or pin parallel with heavy cloth. 4. CENTER HOLE 4. Turn lawn mower on the engine crankshaft. Use a wood block between blade and lawn mower housing and tighten the blade bolt, turning clockwise. • The recommended tightening torque is hazardous, could damage...wire from turning when removing blade bolt. The key must be centered, but if you do not recommend sharpening blade - MAINTENANCE LAWN MOWER Always observe safety rules when performing any maintenance. DRIVE WHEELS Check rear drive wheels each time you will cause eventual damage to...
... bolt or pin and hold the bolt or pin parallel with heavy cloth. 4. CENTER HOLE 4. Turn lawn mower on the engine crankshaft. Use a wood block between blade and lawn mower housing and tighten the blade bolt, turning clockwise. • The recommended tightening torque is hazardous, could damage...wire from turning when removing blade bolt. The key must be centered, but if you do not recommend sharpening blade - MAINTENANCE LAWN MOWER Always observe safety rules when performing any maintenance. DRIVE WHEELS Check rear drive wheels each time you will cause eventual damage to...
Owners Manual
Page 11
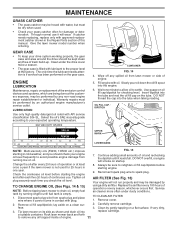
...Maintenance, repair, or replacement of the emission control devices and systems, which are being done at the factory. Wipe off any spilled oil from lawn mower or side of engine. 11 Slowly pour oil down the oil fill spout into the tube when taking reading. DO NOT thread the...cannot come in cold weather, and you check the oil level. using a dirty air filter. lay aside on oil. 7. a suitable container. Rock lawn mower back and forth to settle. The only time the lubricant needs attention is empty. 1. Wait one year. OIL FILL CAP / DIPSTICK UPPER MARK LOWER MARK...
...Maintenance, repair, or replacement of the emission control devices and systems, which are being done at the factory. Wipe off any spilled oil from lawn mower or side of engine. 11 Slowly pour oil down the oil fill spout into the tube when taking reading. DO NOT thread the...cannot come in cold weather, and you check the oil level. using a dirty air filter. lay aside on oil. 7. a suitable container. Rock lawn mower back and forth to settle. The only time the lubricant needs attention is empty. 1. Wait one year. OIL FILL CAP / DIPSTICK UPPER MARK LOWER MARK...
Owners Manual
Page 12
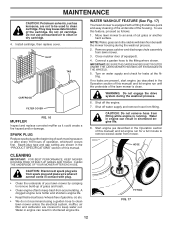
...Operation section of this manual. Do not use this manual) and let engine run until the underside of the lawn mower is equipped with plug. • Clean the underside of your lawn mower by scraping to remove build-up of gasoline, oil, etc. • We do not recommend using a ...covered to keep trash from accumulating. SPARK PLUG Replace spark plug at the fit- Move lawn mower to the fitting where shown. IMPORTANT: BE SURE THE GARDEN HOSE IS NOT ROUTED UNDER THE LAWN MOWER HOUSING OR ENTANGLED IN THE WHEELS. 5. CAUTION: Disconnect spark plug wire from spark plug...
...Operation section of this manual. Do not use this manual) and let engine run until the underside of the lawn mower is equipped with plug. • Clean the underside of your lawn mower by scraping to remove build-up of gasoline, oil, etc. • We do not recommend using a ...covered to keep trash from accumulating. SPARK PLUG Replace spark plug at the fit- Move lawn mower to the fitting where shown. IMPORTANT: BE SURE THE GARDEN HOSE IS NOT ROUTED UNDER THE LAWN MOWER HOUSING OR ENTANGLED IN THE WHEELS. 5. CAUTION: Disconnect spark plug wire from spark plug...
Owners Manual
Page 13
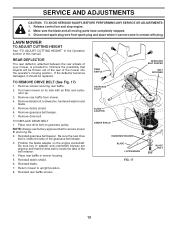
...Be sure the new drive belt is inside the tabs of the mower into the operator's mowing position. Reinstall rear baffle screws. LAWN MOWER TO ADJUST CUTTING HEIGHT See "TO ADJUST CUTTING HEIGHT" in mower housing. 5. Remove rear baffle from spark plug and place ... shield. 6. and that objects will be replaced. Return mower to upright position. 8. Reinstall blade. 7. Remove gearcase belt keeper. 7. SERVICE AND ADJUSTMENTS CAUTION: TO AVOID SERIOUS INJURY, BEFORE PERFORMING ANY SERVICE OR ADJUSTMENTS: 1. Turn lawn mower on its side with plug. TO REPLACE DRIVE BELT ...
...Be sure the new drive belt is inside the tabs of the mower into the operator's mowing position. Reinstall rear baffle screws. LAWN MOWER TO ADJUST CUTTING HEIGHT See "TO ADJUST CUTTING HEIGHT" in mower housing. 5. Remove rear baffle from spark plug and place ... shield. 6. and that objects will be replaced. Return mower to upright position. 8. Reinstall blade. 7. Remove gearcase belt keeper. 7. SERVICE AND ADJUSTMENTS CAUTION: TO AVOID SERIOUS INJURY, BEFORE PERFORMING ANY SERVICE OR ADJUSTMENTS: 1. Turn lawn mower on its side with plug. TO REPLACE DRIVE BELT ...
Owners Manual
Page 14
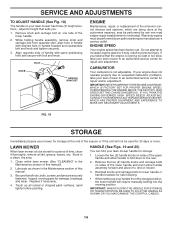
...manufacturer's service outlet. OVERSPEEDING THE ENGINE ABOVE THE FACTORY HIGH SPEED SETTING CAN BE DANGEROUS. Store in personal injury. Clean entire lawn mower (See "CLEANING" in handle bracket and reassemble bolt and knob and tighten securely. 3. While holding handle assembly, remove knob... the two (2) handle knobs on sides of this manual). 2. IMPORTANT: NEVERTAMPERWITHTHEENGINEGOVERNOR, WHICH IS FACTORY SET FOR PROPER ENGINE SPEED. LAWN MOWER When lawn mower is not adjustable. Replace if necessary. 4. HANDLE (See Figs. 19 and 20) You can fold your handle from opposite side...
...manufacturer's service outlet. OVERSPEEDING THE ENGINE ABOVE THE FACTORY HIGH SPEED SETTING CAN BE DANGEROUS. Store in personal injury. Clean entire lawn mower (See "CLEANING" in handle bracket and reassemble bolt and knob and tighten securely. 3. While holding handle assembly, remove knob... the two (2) handle knobs on sides of this manual). 2. IMPORTANT: NEVERTAMPERWITHTHEENGINEGOVERNOR, WHICH IS FACTORY SET FOR PROPER ENGINE SPEED. LAWN MOWER When lawn mower is not adjustable. Replace if necessary. 4. HANDLE (See Figs. 19 and 20) You can fold your handle from opposite side...
Owners Manual
Page 15
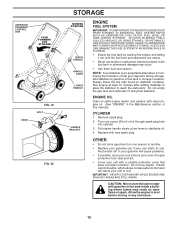
...ENGINE OIL Drain oil (with engine warm) and replace with a suitable protective cover that does not retain moisture. IMPORTANT: NEVER COVER MOWER WHILE ENGINE AND EXHAUST AREAS ARE STILL WARM. OPERATOR PRESENCE CONTROL BAR FOLD FORWARD FOR STORAGE KNOB FIG. 19 BOLT FIG. 20...deposits during storage. Pour one season to gasoline in minimizing the formation of oil through spark plug hole into cylinder. 3. CAUTION: Never store the lawn mower with new spark plug. Add stabilizer to another. • Replace your gasoline can if your unit with clean engine oil. (See "ENGINE" in...
...ENGINE OIL Drain oil (with engine warm) and replace with a suitable protective cover that does not retain moisture. IMPORTANT: NEVER COVER MOWER WHILE ENGINE AND EXHAUST AREAS ARE STILL WARM. OPERATOR PRESENCE CONTROL BAR FOLD FORWARD FOR STORAGE KNOB FIG. 19 BOLT FIG. 20...deposits during storage. Pour one season to gasoline in minimizing the formation of oil through spark plug hole into cylinder. 3. CAUTION: Never store the lawn mower with new spark plug. Add stabilizer to another. • Replace your gasoline can if your unit with clean engine oil. (See "ENGINE" in...
Owners Manual
Page 16
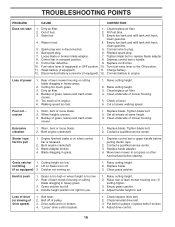
... Put belt on when control bar is on pulleys / replace belts if broken. 4. Wheel heights uneven. 3. Bent engine crankshaft. 1. Move lawn mower to cut - Check/reinstall drive belt. 3. Empty fuel tank and refill tank with fresh, clean gasoline. 4. Depress control bar ...heavy grass. 3. Check oil level. 6. Poor cut grass or other hard surface before pulling starter rope. 2. Replace blade. 3. Rear of lawn mower housing or cutting blade dragging in engine. 6. Spark plug wire is too low. 2. Replace blade adapter. 4. Grass catcher 1. Clean/replace ...
... Put belt on when control bar is on pulleys / replace belts if broken. 4. Wheel heights uneven. 3. Bent engine crankshaft. 1. Move lawn mower to cut - Check/reinstall drive belt. 3. Empty fuel tank and refill tank with fresh, clean gasoline. 4. Depress control bar ...heavy grass. 3. Check oil level. 6. Poor cut grass or other hard surface before pulling starter rope. 2. Replace blade. 3. Rear of lawn mower housing or cutting blade dragging in engine. 6. Spark plug wire is too low. 2. Replace blade adapter. 4. Grass catcher 1. Clean/replace ...
Parts List
Page 3
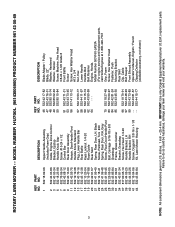
ROTARY LAWN MOWER - - MODEL NUMBER HU700L (96143006900) PRODUCT NUMBER 961 43 00-69 KEY PART NO. IMPORTANT: Use only Original Equipment Manufacturer (O.E.M.) replacement parts. NO. 46 532 42 17-82 47 ... Pivot Bolt, Carriage 5/16-18 x 5/8 Grassbag Frame, Grass Catcher Bracket, Grassbag Screw, Hex Head 1/4-20 Handle Bracket, LH Handle Bracket, RH Screw, Dogpoint 3/8-16 x 1-1/8 Kit, Lawn Mower Housing KEY PART NO. Failure to do so could be hazardous, damage your...
ROTARY LAWN MOWER - - MODEL NUMBER HU700L (96143006900) PRODUCT NUMBER 961 43 00-69 KEY PART NO. IMPORTANT: Use only Original Equipment Manufacturer (O.E.M.) replacement parts. NO. 46 532 42 17-82 47 ... Pivot Bolt, Carriage 5/16-18 x 5/8 Grassbag Frame, Grass Catcher Bracket, Grassbag Screw, Hex Head 1/4-20 Handle Bracket, LH Handle Bracket, RH Screw, Dogpoint 3/8-16 x 1-1/8 Kit, Lawn Mower Housing KEY PART NO. Failure to do so could be hazardous, damage your...
Parts List
Page 5
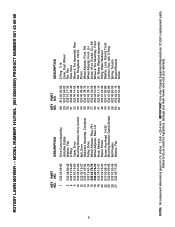
... Support Bracket Screw 5 NOTE: All component dimensions given in U.S. Failure to do so could be hazardous, damage your lawn mower and void your warranty. MODEL NUMBER HU700L (96143006900) PRODUCT NUMBER 961 43 00-69 KEY PART NO. IMPORTANT: Use only Original Equipment Manufacturer (O.E.M.) replacement parts.... ROTARY LAWN MOWER - - inches. 1 inch = 25.4 mm. NO. 1 532 43 09-95 5 532 08 83-48 6 532 19 74-...
... Support Bracket Screw 5 NOTE: All component dimensions given in U.S. Failure to do so could be hazardous, damage your lawn mower and void your warranty. MODEL NUMBER HU700L (96143006900) PRODUCT NUMBER 961 43 00-69 KEY PART NO. IMPORTANT: Use only Original Equipment Manufacturer (O.E.M.) replacement parts.... ROTARY LAWN MOWER - - inches. 1 inch = 25.4 mm. NO. 1 532 43 09-95 5 532 08 83-48 6 532 19 74-...


