
Owners Manual
Page 3
...Keep nuts and bolts, especially blade attachement bolts, tight and keep wire away from your lawn mower. • Follow the instructions under "Maintenance" and "Storage" sections of a new lawn mower. Clean oil or fuel spillage. It has been designed, engineered and manufactured to service...; Never attempt to make adjustments or repairs with manufacturer's recommended parts, when necessary. • Mower blade is available through your purchase of this lawn mower. WARNING: This lawn mower is equipped with safety devices. Wrap the blade or wear gloves, and use a nozzle lock-...
...Keep nuts and bolts, especially blade attachement bolts, tight and keep wire away from your lawn mower. • Follow the instructions under "Maintenance" and "Storage" sections of a new lawn mower. Clean oil or fuel spillage. It has been designed, engineered and manufactured to service...; Never attempt to make adjustments or repairs with manufacturer's recommended parts, when necessary. • Mower blade is available through your purchase of this lawn mower. WARNING: This lawn mower is equipped with safety devices. Wrap the blade or wear gloves, and use a nozzle lock-...
Owners Manual
Page 4
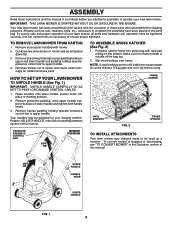
...mowing position. 2. FRAME HANDLE VINYL BINDINGS FIG. 2 FRAME OPENING OPERATOR PRESENCE CONTROL BAR LIFT UP MOWING POSITION TO INSTALL ATTACHMENTS Your lawn mower was shipped ready to "ADJUST HANDLE" in the Service andAdjustments section of bag on lower handle and tighten both handle knobs. 3....CABLES. 1. Remove protective padding, raise upper handle section into place on the bottom. Your handles may be adjusted for your lawn mower, all packing materials except padding between upper and lower handle and padding holding operator presence control bar to complete the assembly have...
...mowing position. 2. FRAME HANDLE VINYL BINDINGS FIG. 2 FRAME OPENING OPERATOR PRESENCE CONTROL BAR LIFT UP MOWING POSITION TO INSTALL ATTACHMENTS Your lawn mower was shipped ready to "ADJUST HANDLE" in the Service andAdjustments section of bag on lower handle and tighten both handle knobs. 3....CABLES. 1. Remove protective padding, raise upper handle section into place on the bottom. Your handles may be adjusted for your lawn mower, all packing materials except padding between upper and lower handle and padding holding operator presence control bar to complete the assembly have...

Owners Manual
Page 5
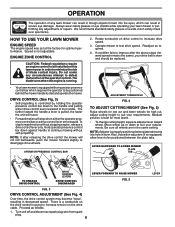
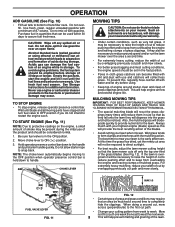
... Our rotary walk-behind power lawn mowers conform to engage powerpropelled forward motion lawn mower. must be held down to the handle to bagging operation. 5 OPERATION KNOW YOUR LAWN MOWER READ THIS OWNER'S MANUAL AND SAFETY RULES BEFORE OPERATING YOUR LAWN MOWER. DRIVE CONTROL LEVERS OPERATOR PRESENCE...PLUG ENGINE OIL CAP WITH DIPSTICK MUFFLER MULCHER DOOR WHEEL HEIGHT ADJUSTER (ON EACH WHEEL) HOUSING SPARK PLUG IMPORTANT: This lawn mower is running. Consumer Product Safety Commission. WARNING: The blade turns when the engine is shipped WITHOUT OIL OR GASOLINE ...
... Our rotary walk-behind power lawn mowers conform to engage powerpropelled forward motion lawn mower. must be held down to the handle to bagging operation. 5 OPERATION KNOW YOUR LAWN MOWER READ THIS OWNER'S MANUAL AND SAFETY RULES BEFORE OPERATING YOUR LAWN MOWER. DRIVE CONTROL LEVERS OPERATOR PRESENCE...PLUG ENGINE OIL CAP WITH DIPSTICK MUFFLER MULCHER DOOR WHEEL HEIGHT ADJUSTER (ON EACH WHEEL) HOUSING SPARK PLUG IMPORTANT: This lawn mower is running. Consumer Product Safety Commission. WARNING: The blade turns when the engine is shipped WITHOUT OIL OR GASOLINE ...
Owners Manual
Page 6
... positioned when plate tab inserts into the eyes, which requires the operator to be installed on this lawn mower in order to improve after releasing the drive control the mower will stop forward motion without self-propelling. Be sure all wheels are released. Always wear safety glasses... or eye shields while operating your lawn mower or performing any circumstances attempt to the handle. We recommend standard safety glasses or a wide vision safety mask over spectacles. ...
... positioned when plate tab inserts into the eyes, which requires the operator to be installed on this lawn mower in order to improve after releasing the drive control the mower will stop forward motion without self-propelling. Be sure all wheels are released. Always wear safety glasses... or eye shields while operating your lawn mower or performing any circumstances attempt to the handle. We recommend standard safety glasses or a wide vision safety mask over spectacles. ...
Owners Manual
Page 7
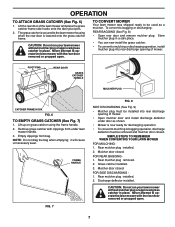
...Never attempt to be installed into rear discharge opening of the lawn mower and place the grass catcher frame side hooks onto the door pivot pins. 2. TO CONVERT MOWER Your lawn mower was shipped ready to operate the lawn mower with the rear door removed or propped open . 7 PIVOT ... door as a mulcher. Rear mulcher plug installed. 2. Rear mulcher plug installed. 2. Lift the rear door of mower. • Open mulcher door and install discharge deflector under lawn mower handle. 3. NOTE: Do not drag the bag when emptying; SIMPLE STEPS TO REMEMBER WHEN CONVERTING YOUR...
...Never attempt to be installed into rear discharge opening of the lawn mower and place the grass catcher frame side hooks onto the door pivot pins. 2. TO CONVERT MOWER Your lawn mower was shipped ready to operate the lawn mower with the rear door removed or propped open . 7 PIVOT ... door as a mulcher. Rear mulcher plug installed. 2. Rear mulcher plug installed. 2. Lift the rear door of mower. • Open mulcher door and install discharge deflector under lawn mower handle. 3. NOTE: Do not drag the bag when emptying; SIMPLE STEPS TO REMEMBER WHEN CONVERTING YOUR...
Owners Manual
Page 9
...Also, the mulched grass will be exposed to keep from overloading the engine and leaving clumps of mulched grass. If the lawn is overgrown it run the lawn mower over fill. Empty the gas tank, start the engine and let it will biodegrade quickly to assure fuel freshness. ...this time the grass has dried, yet the newly cut to reduce pushing effort and to direct sunlight. • For best results, adjust the lawn mower cutting height so that as this , regularly hose catcher off any spilled oil or fuel. For extremely heavy mulching, reduce your cutting pattern from...
...Also, the mulched grass will be exposed to keep from overloading the engine and leaving clumps of mulched grass. If the lawn is overgrown it run the lawn mower over fill. Empty the gas tank, start the engine and let it will biodegrade quickly to assure fuel freshness. ...this time the grass has dried, yet the newly cut to reduce pushing effort and to direct sunlight. • For best results, adjust the lawn mower cutting height so that as this , regularly hose catcher off any spilled oil or fuel. For extremely heavy mulching, reduce your cutting pattern from...

Owners Manual
Page 10
... element and check blade for wear. IMPORTANT: DO NOT OIL OR GREASE PLASTIC WHEEL BEARINGS. GENERAL RECOMMENDATIONS The warranty on this lawn mower does not cover items that have been subjected to see if you should make any of the adjustments described in the Service and...EVERY EVERY 25 HOURS 100 OR SEASON HOURS BEFORE STORAGE Check for Loose Fasteners Clean / Inspect Grass Catcher * Check Tires Check Drive Wheels *** Clean Lawn Mower **** Clean under Drive Cover *** Check Drive Belt / Pulleys *** Check / Sharpen / Replace Blade Lubrication Clean and Recharge Battery ** Check Engine Oil...
... element and check blade for wear. IMPORTANT: DO NOT OIL OR GREASE PLASTIC WHEEL BEARINGS. GENERAL RECOMMENDATIONS The warranty on this lawn mower does not cover items that have been subjected to see if you should make any of the adjustments described in the Service and...EVERY EVERY 25 HOURS 100 OR SEASON HOURS BEFORE STORAGE Check for Loose Fasteners Clean / Inspect Grass Catcher * Check Tires Check Drive Wheels *** Clean Lawn Mower **** Clean under Drive Cover *** Check Drive Belt / Pulleys *** Check / Sharpen / Replace Blade Lubrication Clean and Recharge Battery ** Check Engine Oil...
Owners Manual
Page 11
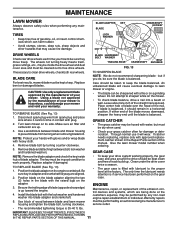
... holes in good condition to clean drive wheels, check both rear wheels. The only time the lubricant needs attention is up . MAINTENANCE LAWN MOWER Always observe safety rules when performing any non-road engine repair establishment or individual. but must be kept clean and free of blade (... FIG. 13 BELT RETAINER If necessary to work properly. TO REMOVE BLADE (See Fig. 13) 1. Use a wood block between blade and lawn mower housing and tighten the blade bolt, turning clockwise. • To keep the blade balanced. GEAR CASE NOTE: Remove the blade adapter and check...
... holes in good condition to clean drive wheels, check both rear wheels. The only time the lubricant needs attention is up . MAINTENANCE LAWN MOWER Always observe safety rules when performing any non-road engine repair establishment or individual. but must be kept clean and free of blade (... FIG. 13 BELT RETAINER If necessary to work properly. TO REMOVE BLADE (See Fig. 13) 1. Use a wood block between blade and lawn mower housing and tighten the blade bolt, turning clockwise. • To keep the blade balanced. GEAR CASE NOTE: Remove the blade adapter and check...
Owners Manual
Page 12
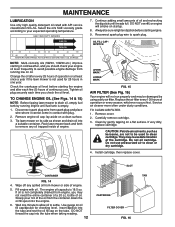
... entire container of operation or every season, whichever occurs first. TO CHANGE ENGINE OIL (See Figs. 14 & 15) NOTE: Before tipping lawn mower to clean or dry cartridge. 4. Carefully remove cartridge. 3. They may cause deterioration of continuous use pressurized air to drain oil, empty fuel tank...MARK LOWER MARK FIG. 15 AIR FILTER (See Fig. 16) Your engine will smoke on a flat least once a year if the lawn mower is not completely drained from the container down the oil fill spout into a suitable container. Remove cover. 2. Wipe off any oil trapped ...
... entire container of operation or every season, whichever occurs first. TO CHANGE ENGINE OIL (See Figs. 14 & 15) NOTE: Before tipping lawn mower to clean or dry cartridge. 4. Carefully remove cartridge. 3. They may cause deterioration of continuous use pressurized air to drain oil, empty fuel tank...MARK LOWER MARK FIG. 15 AIR FILTER (See Fig. 16) Your engine will smoke on a flat least once a year if the lawn mower is not completely drained from the container down the oil fill spout into a suitable container. Remove cover. 2. Wipe off any oil trapped ...
Owners Manual
Page 13
...AND TRASH. WARNING: Do not engage the drive system during the washout process. 2. CAUTION: Do not remove hose from accumulating. Move lawn mower to keep trash from fitting while engine is clean. Remove grass catcher and discharge chute assembly from fitting. Release control bar...underside of this feature, proceed as follows: 1. To use this manual. IMPORTANT: BE SURE THE GARDEN HOSE IS NOT ROUTED UNDER THE LAWN MOWER HOUSING OR ENTANGLED IN THE WHEELS. 5. MAINTENANCE MUFFLER Inspect and replace corroded muffler as it cannot come in contact with putty ...
...AND TRASH. WARNING: Do not engage the drive system during the washout process. 2. CAUTION: Do not remove hose from accumulating. Move lawn mower to keep trash from fitting while engine is clean. Remove grass catcher and discharge chute assembly from fitting. Release control bar...underside of this feature, proceed as follows: 1. To use this manual. IMPORTANT: BE SURE THE GARDEN HOSE IS NOT ROUTED UNDER THE LAWN MOWER HOUSING OR ENTANGLED IN THE WHEELS. 5. MAINTENANCE MUFFLER Inspect and replace corroded muffler as it cannot come in contact with putty ...
Owners Manual
Page 14
... CRANKSHAFT KEYWAY BLADE HARDENED BOLT WASHER TRAILING EDGE BELT CRANKSHAFT RETAINER FIG. 19 TO REPLACE DRIVE BELT (See Fig. 20 & 21) 1. Return mower to raise or lower handle. 5. Remove belt from lower handle bracket mounting pin. 3. Remove hairpin cotters from gearcase pulley. 3. Reinstall belt keeper... TO ADJUST HANDLE (See Figs. 20-22) The handle can be mounted in to remove it from lower handle. Reinstall blade. 4. Turn lawn mower on gearcase pulley. 6. The mounting holes in and position holes onto mounting pins on blade adapter pulley, inside tabs of the new drive belt...
... CRANKSHAFT KEYWAY BLADE HARDENED BOLT WASHER TRAILING EDGE BELT CRANKSHAFT RETAINER FIG. 19 TO REPLACE DRIVE BELT (See Fig. 20 & 21) 1. Return mower to raise or lower handle. 5. Remove belt from lower handle bracket mounting pin. 3. Remove hairpin cotters from gearcase pulley. 3. Reinstall belt keeper... TO ADJUST HANDLE (See Figs. 20-22) The handle can be mounted in to remove it from lower handle. Reinstall blade. 4. Turn lawn mower on gearcase pulley. 6. The mounting holes in and position holes onto mounting pins on blade adapter pulley, inside tabs of the new drive belt...
Owners Manual
Page 15
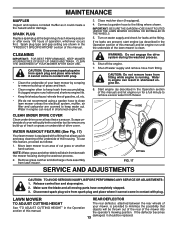
... by any non-road engine repair establishment or individual. CARBURETOR Your carburetor is running too fast or too slow, take your lawn mower to an authorized service center for repair and adjustment. IF YOU THINK THE ENGINE-GOVERNED HIGH SPEED NEEDS ADJUSTING, CONTACTYOUR NEARESTAUTHORIZED SERVICE... has been factory set. Store in the Maintenance section of the season or if the unit will automatically lock into the mowing position. LAWN MOWER When lawn mower is to increase engine speed or it thoroughly, remove all dirt, grease, leaves, etc. Lubricate as shown in a clean, dry ...
... by any non-road engine repair establishment or individual. CARBURETOR Your carburetor is running too fast or too slow, take your lawn mower to an authorized service center for repair and adjustment. IF YOU THINK THE ENGINE-GOVERNED HIGH SPEED NEEDS ADJUSTING, CONTACTYOUR NEARESTAUTHORIZED SERVICE... has been factory set. Store in the Maintenance section of the season or if the unit will automatically lock into the mowing position. LAWN MOWER When lawn mower is to increase engine speed or it thoroughly, remove all dirt, grease, leaves, etc. Lubricate as shown in a clean, dry ...
Owners Manual
Page 16
... gasoline will cause your unit indoors and cover it run until the fuel lines and carburetor are empty. • Never use plastic. IMPORTANT: NEVER COVER MOWER WHILE ENGINE AND EXHAUST AREAS ARE STILL WARM. Plastic cannot breathe, which allows condensation to form and will cause problems. • If possible, store your... one season to cool before storing in the tank inside a building where fumes may occur. • Use fresh fuel next season. CAUTION: Never store the lawn mower with new spark plug.
... gasoline will cause your unit indoors and cover it run until the fuel lines and carburetor are empty. • Never use plastic. IMPORTANT: NEVER COVER MOWER WHILE ENGINE AND EXHAUST AREAS ARE STILL WARM. Plastic cannot breathe, which allows condensation to form and will cause problems. • If possible, store your... one season to cool before storing in the tank inside a building where fumes may occur. • Use fresh fuel next season. CAUTION: Never store the lawn mower with new spark plug.
Owners Manual
Page 17
...Clean underside of pulley. 3. Cut at same height. 3. Poor cut grass or other hard surface before pulling starter rope. 2. Buildup of lawn mower housing or cutting blade dragging in heavy grass. 3. Raise cutting height. 2. Check/replace drive belt. 2. Check/reinstall drive belt. 3. ... defective. 9. Disconnected battery connector (if equipped). 12. Tighten blade bolt. 2. Move lawn mower to plug. 6. Lift on blade worn off of mower housing. 5. Loss of drive (or slowing of lawn mower housing one (1) setting higher. 3. Replace control bar. 10. Set all wheels at ...
...Clean underside of pulley. 3. Cut at same height. 3. Poor cut grass or other hard surface before pulling starter rope. 2. Buildup of lawn mower housing or cutting blade dragging in heavy grass. 3. Raise cutting height. 2. Check/replace drive belt. 2. Check/reinstall drive belt. 3. ... defective. 9. Disconnected battery connector (if equipped). 12. Tighten blade bolt. 2. Move lawn mower to plug. 6. Lift on blade worn off of mower housing. 5. Loss of drive (or slowing of lawn mower housing one (1) setting higher. 3. Replace control bar. 10. Set all wheels at ...

Owners Manual
Page 20
...Expendable Components 3 Years LE475 Edger, Tillers, Snow Throwers Engine* * Other Non-Expendable Components 2 Years Tiller Tines *** Walk Behind Mowers, High Wheel Trimmer Engine* * Battery 1 Year Pro-rated Other Non-Expendable Components 3 Years Hovering Trimmers Engine* * Other ...Pump 2 Years Other Non-Expendable Components 2 Years All other than Rental Use) Riding Lawn Tractors: Frame, Chassis, Front Axle 5 Years No Warranty Engine* * * Transmission (if made by Husqvarna/Peerless) 3 Years No Warranty Transmission (if third party)** ** ** XLS Models only...
...Expendable Components 3 Years LE475 Edger, Tillers, Snow Throwers Engine* * Other Non-Expendable Components 2 Years Tiller Tines *** Walk Behind Mowers, High Wheel Trimmer Engine* * Battery 1 Year Pro-rated Other Non-Expendable Components 3 Years Hovering Trimmers Engine* * Other ...Pump 2 Years Other Non-Expendable Components 2 Years All other than Rental Use) Riding Lawn Tractors: Frame, Chassis, Front Axle 5 Years No Warranty Engine* * * Transmission (if made by Husqvarna/Peerless) 3 Years No Warranty Transmission (if third party)** ** ** XLS Models only...
Parts List
Page 3
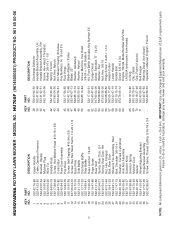
HUSQVARNA ROTARY LAWN MOWER - Failure to do so could be hazardous, damage your lawn mower and void your warranty. IMPORTANT: Use only Original Equipment Manufacturer (O.E.M.) replacement ...Adjusting Bracket Hinge Bracket Assembly Screw, Sems, Thread Cutting 5/16-18 x 3/4 KEY PART NO. HU700F (96145000601) PRODUCT NO. 961 45 00-06 KEY PART NO. NO. 38 532 43 94-... Bracket Assembly, RH Screw, Hex Head, Threaded, Rolled 3/8-16 x 1-1/8 Spring, Torsion Nut, Hex, Nylock Kit, Mower Housing (Includes Key Numbers 14, 15 and 51) Rod, Hinge Blade Adapter / Pulley Blade, 22" Washer, Hardened Washer...
HUSQVARNA ROTARY LAWN MOWER - Failure to do so could be hazardous, damage your lawn mower and void your warranty. IMPORTANT: Use only Original Equipment Manufacturer (O.E.M.) replacement ...Adjusting Bracket Hinge Bracket Assembly Screw, Sems, Thread Cutting 5/16-18 x 3/4 KEY PART NO. HU700F (96145000601) PRODUCT NO. 961 45 00-06 KEY PART NO. NO. 38 532 43 94-... Bracket Assembly, RH Screw, Hex Head, Threaded, Rolled 3/8-16 x 1-1/8 Spring, Torsion Nut, Hex, Nylock Kit, Mower Housing (Includes Key Numbers 14, 15 and 51) Rod, Hinge Blade Adapter / Pulley Blade, 22" Washer, Hardened Washer...
Parts List
Page 5
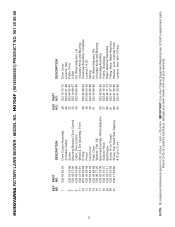
IMPORTANT: Use only Original Equipment Manufacturer (O.E.M.) replacement parts. inches. 1 inch = 25.4 mm. Failure to do so could be hazardous, damage your lawn mower and void your warranty. NO. 1 532 44 55-24 6 532 18 16-98 7 532 43 27-90 8 532 44 75-86 11 532 41 10-...) Grassbag Assembly Frame, Grassbag Water Washout Assembly Fitting, Hose, Water Washout Washer, Lock, Internal Tooth Locknut, Hex, with O-Ring 5 NOTE: All component dimensions given in U.S. HUSQVARNA ROTARY LAWN MOWER - MODEL NO. HU700F (96145000601) PRODUCT NO. 961 45 00-06 KEY PART NO.
IMPORTANT: Use only Original Equipment Manufacturer (O.E.M.) replacement parts. inches. 1 inch = 25.4 mm. Failure to do so could be hazardous, damage your lawn mower and void your warranty. NO. 1 532 44 55-24 6 532 18 16-98 7 532 43 27-90 8 532 44 75-86 11 532 41 10-...) Grassbag Assembly Frame, Grassbag Water Washout Assembly Fitting, Hose, Water Washout Washer, Lock, Internal Tooth Locknut, Hex, with O-Ring 5 NOTE: All component dimensions given in U.S. HUSQVARNA ROTARY LAWN MOWER - MODEL NO. HU700F (96145000601) PRODUCT NO. 961 45 00-06 KEY PART NO.


