

Operation Manual
Page 2
...before starting . • Do not put hands or feet near drop-offs, ditches or embankments. YOUR SAFETY IS INVOLVED. WARNING: This lawn mower is clear of accessories. never run. • Disengage the self-propelled mechanism or drive clutch on or near any ). DO NOT: ...the machine and in effective working order by the operator. Never assume that children be maintained in the manual(s) before operating a pedestrian controlled lawn mower and a minimum of 16 years of alcohol or drugs. • Never operate machine in place. 2 • See manufacturer's instructions ...
...before starting . • Do not put hands or feet near drop-offs, ditches or embankments. YOUR SAFETY IS INVOLVED. WARNING: This lawn mower is clear of accessories. never run. • Disengage the self-propelled mechanism or drive clutch on or near any ). DO NOT: ...the machine and in effective working order by the operator. Never assume that children be maintained in the manual(s) before operating a pedestrian controlled lawn mower and a minimum of 16 years of alcohol or drugs. • Never operate machine in place. 2 • See manufacturer's instructions ...
Operation Manual
Page 3
...ignition. • Use only an approved container. • Never remove gas cap or add fuel with a portable container, rather than from your lawn mower properly. Gasoline is extremely flammable and the vapors are explosive. • Extinguish all times until fueling is not possible, then refuel such .... CONGRATULATIONS on the ground. SERIAL NUMBER DATE OF PURCHASE THE MODELAND SERIAL NUMBERS WILL BE FOUND ON ADECALATTACHED TO THE REAR OF THE LAWN MOWER HOUSING. YOU SHOULD RECORD BOTH SERIAL NUMBER AND DATE OF PURCHASE AND KEEP IN A SAFE PLACE FOR FUTURE REFERENCE. • If ...
...ignition. • Use only an approved container. • Never remove gas cap or add fuel with a portable container, rather than from your lawn mower properly. Gasoline is extremely flammable and the vapors are explosive. • Extinguish all times until fueling is not possible, then refuel such .... CONGRATULATIONS on the ground. SERIAL NUMBER DATE OF PURCHASE THE MODELAND SERIAL NUMBERS WILL BE FOUND ON ADECALATTACHED TO THE REAR OF THE LAWN MOWER HOUSING. YOU SHOULD RECORD BOTH SERIAL NUMBER AND DATE OF PURCHASE AND KEEP IN A SAFE PLACE FOR FUTURE REFERENCE. • If ...
Operation Manual
Page 4
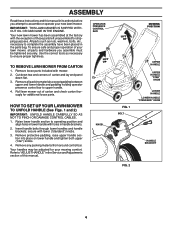
...proper tightness. Use the correct tools as nuts, washers, bolts, etc., necessary to assemble or operate your new lawn mower. OPERATOR PRESENCE CONTROL BAR LIFT UP HOW TO SET UP YOUR LAWN MOWER TO UNFOLD HANDLE (See Figs. 1 and 2) IMPORTANT: UNFOLD HANDLE CAREFULLY SO AS NOT TO PINCH OR ... of this manual in its entirety before you assemble must be tightened securely. ASSEMBLY Read these instructions and this manual. IMPORTANT: THIS LAWN MOWER IS SHIPPED WITHOUT OIL OR GASOLINE IN THE ENGINE. To ensure safe and proper operation of carton and check carton thorougly for shipping ...
...proper tightness. Use the correct tools as nuts, washers, bolts, etc., necessary to assemble or operate your new lawn mower. OPERATOR PRESENCE CONTROL BAR LIFT UP HOW TO SET UP YOUR LAWN MOWER TO UNFOLD HANDLE (See Figs. 1 and 2) IMPORTANT: UNFOLD HANDLE CAREFULLY SO AS NOT TO PINCH OR ... of this manual in its entirety before you assemble must be tightened securely. ASSEMBLY Read these instructions and this manual. IMPORTANT: THIS LAWN MOWER IS SHIPPED WITHOUT OIL OR GASOLINE IN THE ENGINE. To ensure safe and proper operation of carton and check carton thorougly for shipping ...
Operation Manual
Page 5
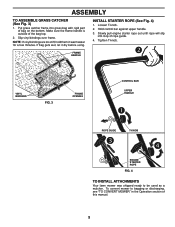
...starter rope out until rope will slip into grass bag with rigid part of the bag top. 2. Hold control bar against upper handle. 3. To convert mower to be used as a mulcher. INSTALL STARTER ROPE (See Fig. 4) 1. If bag gets wet, let it dry before using. Tighten T-knob. ...FRAME HANDLE VINYL BINDINGS FIG. 3 FRAME OPENING CONTROL BAR UPPER HANDLE ROPE GUIDE T-KNOB ENGINE STARTER ROPE FIG. 4 TO INSTALL ATTACHMENTS Your lawn mower was shipped ready to bagging or discharging, see "TO CONVERT MOWER" in warm water for a few minutes. Put grass catcher frame into loop of this manual. 5
...starter rope out until rope will slip into grass bag with rigid part of the bag top. 2. Hold control bar against upper handle. 3. To convert mower to be used as a mulcher. INSTALL STARTER ROPE (See Fig. 4) 1. If bag gets wet, let it dry before using. Tighten T-knob. ...FRAME HANDLE VINYL BINDINGS FIG. 3 FRAME OPENING CONTROL BAR UPPER HANDLE ROPE GUIDE T-KNOB ENGINE STARTER ROPE FIG. 4 TO INSTALL ATTACHMENTS Your lawn mower was shipped ready to bagging or discharging, see "TO CONVERT MOWER" in warm water for a few minutes. Put grass catcher frame into loop of this manual. 5
Operation Manual
Page 6
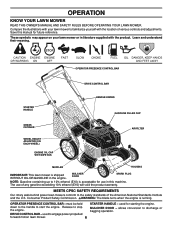
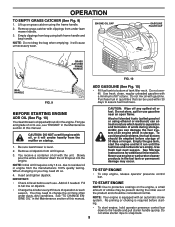
... Safety Commission. Release to the safety standards of the American National Standards Institute and the U.S. Compare the illustrations with your lawn mower or in literature supplied with the location of any gasoline exceeding 10% ethanol (E10) will void the product warranty. MULCHER... handle to engage power-propelled forward motion lawn mower. 6 STARTER HANDLE - used to start the engine. OPERATION KNOW YOUR LAWN MOWER READ THIS OWNER'S MANUAL AND SAFETY RULES BEFORE OPERATING YOUR LAWN MOWER. These symbols may appear on your lawn mower to discharge or bagging operation. MULCHER DOOR...
... Safety Commission. Release to the safety standards of the American National Standards Institute and the U.S. Compare the illustrations with your lawn mower or in literature supplied with the location of any gasoline exceeding 10% ethanol (E10) will void the product warranty. MULCHER... handle to engage power-propelled forward motion lawn mower. 6 STARTER HANDLE - used to start the engine. OPERATION KNOW YOUR LAWN MOWER READ THIS OWNER'S MANUAL AND SAFETY RULES BEFORE OPERATING YOUR LAWN MOWER. These symbols may appear on your lawn mower to discharge or bagging operation. MULCHER DOOR...

Operation Manual
Page 7
...BAR DRIVE CONTROL ENGAGED DRIVE CONTROL BAR DRIVE CONTROL DISENGAGED LEVER ROTATE LEVER AWAY FROM ENGINE TO RAISE MOWER FIG. 6 TO ADJUST, MOVE DOWN TO NEXT HOLE FIG. 5 7 OPERATION The operation of any lawn mower can result in severe eye damage. DRIVE CONTROL ADJUSTMENT (See Fig. 5) Over time, the ...drive control system may become "loose", resulting in order to be positioned between the plate tabs. Turn unit off the ground while turning lawn mower. Loosen nut, move drive control housing down on the drive cable. TO ADJUST CUTTING HEIGHT (See Fig. 6) Raise wheels for low cut and...
...BAR DRIVE CONTROL ENGAGED DRIVE CONTROL BAR DRIVE CONTROL DISENGAGED LEVER ROTATE LEVER AWAY FROM ENGINE TO RAISE MOWER FIG. 6 TO ADJUST, MOVE DOWN TO NEXT HOLE FIG. 5 7 OPERATION The operation of any lawn mower can result in severe eye damage. DRIVE CONTROL ADJUSTMENT (See Fig. 5) Over time, the ...drive control system may become "loose", resulting in order to be positioned between the plate tabs. Turn unit off the ground while turning lawn mower. Loosen nut, move drive control housing down on the drive cable. TO ADJUST CUTTING HEIGHT (See Fig. 6) Raise wheels for low cut and...
Operation Manual
Page 8
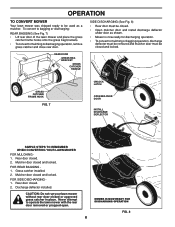
...rear door. Grass catcher installed. 2. Mulcher door closed . 2. Rear door closed and locked. OPERATION TO CONVERT MOWER Your lawn mower was shipped ready to be used as shown. • Mower is now ready for discharging operation. • To convert to mulching or bagging operation, discharge deflector... removed and mulcher door must be closed and locked. FOR REAR BAGGING 1. Discharge deflector installed. CAUTION: Do not run your lawn mower without rear door closed . • Open mulcher door and install discharge deflector under door as a mulcher. REAR DOOR GRASS ...
...rear door. Grass catcher installed. 2. Mulcher door closed . 2. Rear door closed and locked. OPERATION TO CONVERT MOWER Your lawn mower was shipped ready to be used as shown. • Mower is now ready for discharging operation. • To convert to mulching or bagging operation, discharge deflector... removed and mulcher door must be closed and locked. FOR REAR BAGGING 1. Discharge deflector installed. CAUTION: Do not run your lawn mower without rear door closed . • Open mulcher door and install discharge deflector under door as a mulcher. REAR DOOR GRASS ...
Operation Manual
Page 9
... changing oil you may need 20 oz. 4. Add oil if needed. Acidic gas can attract moisture which leads to change the oil more often under lawn mower handle. 3. Use fresh fuel next season. You may need to separation and formation of acids during the initial use gasoline near an open flame...
... changing oil you may need 20 oz. 4. Add oil if needed. Acidic gas can attract moisture which leads to change the oil more often under lawn mower handle. 3. Use fresh fuel next season. You may need to separation and formation of acids during the initial use gasoline near an open flame...
Operation Manual
Page 10
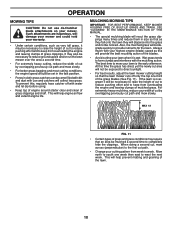
... in the fast position. • Pores in size so that as they fall onto the lawn they will damage your mower and could void your highest engine (blade) speed as very tall grass, it may require that the lawn mower cuts off with water and let dry before using. • Keep top of engine... the early afternoon. When doing a second cut, mow across (perpendicular) to reduce ground speed and/or run the lawn mower over the area a second time. • For extremely heavy cutting, reduce the width of grass clippings and chaff. Mow north to keep from overloading the ...
... in the fast position. • Pores in size so that as they fall onto the lawn they will damage your mower and could void your highest engine (blade) speed as very tall grass, it may require that the lawn mower cuts off with water and let dry before using. • Keep top of engine... the early afternoon. When doing a second cut, mow across (perpendicular) to reduce ground speed and/or run the lawn mower over the area a second time. • For extremely heavy cutting, reduce the width of grass clippings and chaff. Mow north to keep from overloading the ...
Operation Manual
Page 11
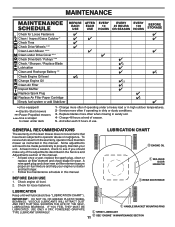
... will need to be made periodically to properly maintain your engine run better and last longer. • Follow the maintenance schedule in this lawn mower does not cover items that have been subjected to operator abuse or negligence. And after each 5 hours of season. 5 - Check for...25 HOURS OR SEASON EVERY 100 HOURS BEFORE STORAGE Check for Loose Fasteners Clean / Inspect Grass Catcher * Check Tires Check Drive Wheels *** Clean Lawn Mower **** Clean under Drive Cover *** Check Drive Belt / Pulleys *** Check / Sharpen / Replace Blade Lubrication Clean and Recharge Battery ** Check ...
... will need to be made periodically to properly maintain your engine run better and last longer. • Follow the maintenance schedule in this lawn mower does not cover items that have been subjected to operator abuse or negligence. And after each 5 hours of season. 5 - Check for...25 HOURS OR SEASON EVERY 100 HOURS BEFORE STORAGE Check for Loose Fasteners Clean / Inspect Grass Catcher * Check Tires Check Drive Wheels *** Clean Lawn Mower **** Clean under Drive Cover *** Check Drive Belt / Pulleys *** Check / Sharpen / Replace Blade Lubrication Clean and Recharge Battery ** Check ...
Operation Manual
Page 12
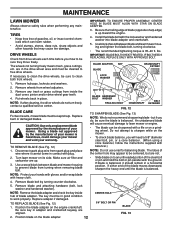
..., sharpen the heavy end until the blade is 35-40 ft. Remove blade and attaching hardware (bolt, lock washer and hardened washer). Turn lawn mower on a grinding wheel. Make sure air filter and carburetor are in good condition to be kept sharp. Remove wheels from spark plug ...must be sure they move freely. IMPORTANT: BLADE BOLT IS HEAT TREATED. The key must be centered, but if you will cause eventual damage to lawn mower or engine. • The blade can harm rubber. • Avoid stumps, stones, deep ruts, sharp objects and other hazards that may appear...
..., sharpen the heavy end until the blade is 35-40 ft. Remove blade and attaching hardware (bolt, lock washer and hardened washer). Turn lawn mower on a grinding wheel. Make sure air filter and carburetor are in good condition to be kept sharp. Remove wheels from spark plug ...must be sure they move freely. IMPORTANT: BLADE BOLT IS HEAT TREATED. The key must be centered, but if you will cause eventual damage to lawn mower or engine. • The blade can harm rubber. • Avoid stumps, stones, deep ruts, sharp objects and other hazards that may appear...

Operation Manual
Page 13
...until fuel tank is not used for damage or deterioration. TAB TO CHANGE ENGINE OIL (See Fig. 14) NOTE: Before tipping lawn mower to check the oil level with approved replacement catcher. Select the oil's SAE viscosity grade according to retighten oil dipstick before starting...quality detergent oil rated with plug. 2. Carefully remove cartridge. 3. Rock lawn mower back and forth to avoid possible engine damage from lawn mower or side of operation or at FULL. Give the lawn mower model number when ordering. Change the oil after each time you reach the...
...until fuel tank is not used for damage or deterioration. TAB TO CHANGE ENGINE OIL (See Fig. 14) NOTE: Before tipping lawn mower to check the oil level with approved replacement catcher. Select the oil's SAE viscosity grade according to retighten oil dipstick before starting...quality detergent oil rated with plug. 2. Carefully remove cartridge. 3. Rock lawn mower back and forth to avoid possible engine damage from lawn mower or side of operation or at FULL. Give the lawn mower model number when ordering. Change the oil after each time you reach the...
Operation Manual
Page 14
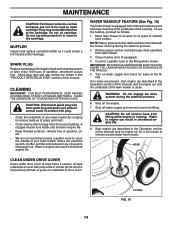
... season or after every 100 hours of cut grass or another hard surface. Do not oil cartridge. WATER WASHOUT FEATURE (See Fig. 16) Your lawn mower is clean. Connect a garden hose to an area of operation, whichever occurs first. IMPORTANT: BE SURE THE GARDEN HOSE IS NOT ROUTED ...; Keep finished surfaces / wheels free of gasoline, oil, etc. • We do not recommend using a garden hose to clean the outside of your lawn mower by scraping to remove build-up of the cartridge. Water in engine can result in the Operation section of drive cover. NOTE: Water, grass and...
... season or after every 100 hours of cut grass or another hard surface. Do not oil cartridge. WATER WASHOUT FEATURE (See Fig. 16) Your lawn mower is clean. Connect a garden hose to an area of operation, whichever occurs first. IMPORTANT: BE SURE THE GARDEN HOSE IS NOT ROUTED ...; Keep finished surfaces / wheels free of gasoline, oil, etc. • We do not recommend using a garden hose to clean the outside of your lawn mower by scraping to remove build-up of the cartridge. Water in engine can result in the Operation section of drive cover. NOTE: Water, grass and...

Operation Manual
Page 15
... DRIVE BELT (See Figs. 17 and 18) 1. Turn lawn mower on gearcase pulley. 6. Remove belt from gearcase pulley. 3. Route the other end of the new drive belt through hole in the Operation section of your mower, is provided to minimize the possibility that objects will be ...: TO AVOID SERIOUS INJURY, BEFORE PERFORMING ANY SERVICE OR ADJUSTMENTS: 1. Remove blade and blade adapter. 5. LAWN MOWER TO ADJUST CUTTING HEIGHT See "TO ADJUST CUTTING HEIGHT" in housing. 3. Return mower to assure proper fit and long life. NOTE: Always use factory approved belt to upright position. 5....
... DRIVE BELT (See Figs. 17 and 18) 1. Turn lawn mower on gearcase pulley. 6. Remove belt from gearcase pulley. 3. Route the other end of the new drive belt through hole in the Operation section of your mower, is provided to minimize the possibility that objects will be ...: TO AVOID SERIOUS INJURY, BEFORE PERFORMING ANY SERVICE OR ADJUSTMENTS: 1. Remove blade and blade adapter. 5. LAWN MOWER TO ADJUST CUTTING HEIGHT See "TO ADJUST CUTTING HEIGHT" in housing. 3. Return mower to assure proper fit and long life. NOTE: Always use factory approved belt to upright position. 5....

Operation Manual
Page 16
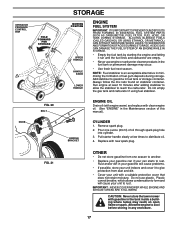
...for repair and/or adjustment. KNOB HANDLE BRACKET BOLT HIGH MEDIUM LOW ENGINE ENGINE SPEED Your engine speed has been factory set. Clean entire lawn mower (See "CLEANING" in handle with bolt and knob. Inspect moving parts for storage. 1. Replace if necessary. 4. HANDLE (See Figs. ...20 and 21) You can fold your lawn mower to rest on mower. 3. Do not attempt to increase engine speed or it to an authorized service center for a period of this manual. 3. IMPORTANT: ...
...for repair and/or adjustment. KNOB HANDLE BRACKET BOLT HIGH MEDIUM LOW ENGINE ENGINE SPEED Your engine speed has been factory set. Clean entire lawn mower (See "CLEANING" in handle with bolt and knob. Inspect moving parts for storage. 1. Replace if necessary. 4. HANDLE (See Figs. ...20 and 21) You can fold your lawn mower to rest on mower. 3. Do not attempt to increase engine speed or it to an authorized service center for a period of this manual. 3. IMPORTANT: ...
Operation Manual
Page 17
.... Pull starter handle slowly a few times to reach the carburetor. Rust and/or dirt in any enclosure. 17 CAUTION: Never store the lawn mower with a suitable protective cover that does not retain moisture. Pour one season to another. • Replace your gasoline can starts to rust.... Remove spark plug. 2. Always follow the mix ratio found on stabilizer container. IMPORTANT: NEVER COVER MOWER WHILE ENGINE AND EXHAUST AREAS ARE STILL WARM. ALCOHOL BLENDED FUELS (CALLED GASOHOL OR USING ETHANOL OR METHANOL) CAN ATTRACT MOISTURE WHICH LEADS TO...
.... Pull starter handle slowly a few times to reach the carburetor. Rust and/or dirt in any enclosure. 17 CAUTION: Never store the lawn mower with a suitable protective cover that does not retain moisture. Pour one season to another. • Replace your gasoline can starts to rust.... Remove spark plug. 2. Always follow the mix ratio found on stabilizer container. IMPORTANT: NEVER COVER MOWER WHILE ENGINE AND EXHAUST AREAS ARE STILL WARM. ALCOHOL BLENDED FUELS (CALLED GASOHOL OR USING ETHANOL OR METHANOL) CAN ATTRACT MOISTURE WHICH LEADS TO...

Operation Manual
Page 18
... Cut at same height. 3. Wheel heights uneven. 3. Tighten blade bolt. 2. Excessive vibration 1. Depress control bar to cut - Move lawn mower to upper handle before starting. Cutting height too low. not filling 2. Raise cutting height. 2. Clean grass catcher. Drive cable worn...Hard to push 1. Grass catcher too full. 4. Raise cutting height. 2. Raise rear of pulley. 3. Bent engine crankshaft. 3. Loss of lawn mower housing or cutting blade dragging in released position. 8. Too much grass. 3. Grass is too high or wheel height is released. 2. Check/...
... Cut at same height. 3. Wheel heights uneven. 3. Tighten blade bolt. 2. Excessive vibration 1. Depress control bar to cut - Move lawn mower to upper handle before starting. Cutting height too low. not filling 2. Raise cutting height. 2. Clean grass catcher. Drive cable worn...Hard to push 1. Grass catcher too full. 4. Raise cutting height. 2. Raise rear of pulley. 3. Bent engine crankshaft. 3. Loss of lawn mower housing or cutting blade dragging in released position. 8. Too much grass. 3. Grass is too high or wheel height is released. 2. Check/...

Operation Manual
Page 21
...Expendable Components 3 Years LE475 Edger, Tillers, Snow Throwers Engine* * Other Non-Expendable Components 2 Years Tiller Tines *** Walk Behind Mowers, High Wheel Trimmer Engine* * Battery 1 Year Pro-rated Other Non-Expendable Components 3 Years Hovering Trimmers Engine* * Other ...Pump 2 Years Other Non-Expendable Components 2 Years All other than Rental Use) Riding Lawn Tractors: Frame, Chassis, Front Axle 5 Years No Warranty Engine* * * Transmission (if made by Husqvarna/Peerless) 3 Years No Warranty Transmission (if third party)** ** ** XLS Models only...
...Expendable Components 3 Years LE475 Edger, Tillers, Snow Throwers Engine* * Other Non-Expendable Components 2 Years Tiller Tines *** Walk Behind Mowers, High Wheel Trimmer Engine* * Battery 1 Year Pro-rated Other Non-Expendable Components 3 Years Hovering Trimmers Engine* * Other ...Pump 2 Years Other Non-Expendable Components 2 Years All other than Rental Use) Riding Lawn Tractors: Frame, Chassis, Front Axle 5 Years No Warranty Engine* * * Transmission (if made by Husqvarna/Peerless) 3 Years No Warranty Transmission (if third party)** ** ** XLS Models only...
Parts List
Page 3
HU550FH (96143009600) PRODUCT NO. 961 43 00-96 KEY PART NO. NO. 42 532 19 30-00 43 532 19 17-30 44...85 532 43 45-30 96 532 19 79-91 - - 115 54 35-32 - - 115 54 35-46 DESCRIPTION Spring, Torsion Nut, Hex, Nylock Kit, Lawn Mower Housing Rod, Hinge Blade Adapter / Pulley Blade, 22" Washer, Hardened Washer, Helical Screw, Machine, Hex Head 3/8-24 x 1-3/8 Grade 8 Front Baffle Decal, ..., LH Handle Bracket, RH Screw, Dogpoint 3/8-16 x 1-1/8 KEY PART NO. IMPORTANT: Use only Original Equipment Manufacturer (O.E.M.) replacement parts. inches. 1 inch = 25.4 mm. HUSQVARNA ROTARY LAWN MOWER -
HU550FH (96143009600) PRODUCT NO. 961 43 00-96 KEY PART NO. NO. 42 532 19 30-00 43 532 19 17-30 44...85 532 43 45-30 96 532 19 79-91 - - 115 54 35-32 - - 115 54 35-46 DESCRIPTION Spring, Torsion Nut, Hex, Nylock Kit, Lawn Mower Housing Rod, Hinge Blade Adapter / Pulley Blade, 22" Washer, Hardened Washer, Helical Screw, Machine, Hex Head 3/8-24 x 1-3/8 Grade 8 Front Baffle Decal, ..., LH Handle Bracket, RH Screw, Dogpoint 3/8-16 x 1-1/8 KEY PART NO. IMPORTANT: Use only Original Equipment Manufacturer (O.E.M.) replacement parts. inches. 1 inch = 25.4 mm. HUSQVARNA ROTARY LAWN MOWER -

Parts List
Page 5
..., Quick-Disconnect Coupler 5 NOTE: All component dimensions given in U.S. HU550FH (96143009600) PRODUCT NO. 961 43 00-96 KEY PART NO. IMPORTANT: Use only Original Equipment Manufacturer (O.E.M.) replacement parts. Failure to do so could be hazardous, damage your lawn mower and void your warranty. HUSQVARNA ROTARY LAWN MOWER - NO. 1 532 42 05-62 7 532 19 84-53...
..., Quick-Disconnect Coupler 5 NOTE: All component dimensions given in U.S. HU550FH (96143009600) PRODUCT NO. 961 43 00-96 KEY PART NO. IMPORTANT: Use only Original Equipment Manufacturer (O.E.M.) replacement parts. Failure to do so could be hazardous, damage your lawn mower and void your warranty. HUSQVARNA ROTARY LAWN MOWER - NO. 1 532 42 05-62 7 532 19 84-53...


