

Operation Manual
Page 2
... point out important safety precautions. Wash hands after engine has stopped. Stop the blade when crossing gravel surfaces. • Do not operate the mower without proper guards, plates, grass catcher or other reproductive harm. never run. • Disengage the self-propelled mechanism or drive clutch on the machine and in wet grass. CAUTION: Always disconnect spark plug wire and place wire where it should start to vibrate abnormally, stop before removing grass catcher. • Mow...
... point out important safety precautions. Wash hands after engine has stopped. Stop the blade when crossing gravel surfaces. • Do not operate the mower without proper guards, plates, grass catcher or other reproductive harm. never run. • Disengage the self-propelled mechanism or drive clutch on the machine and in wet grass. CAUTION: Always disconnect spark plug wire and place wire where it should start to vibrate abnormally, stop before removing grass catcher. • Mow...
Operation Manual
Page 3
... CONTENTS SAFETY RULES 2-3 MAINTENANCE SCHEDULE 11 PRODUCT SPECIFICATIONS 3 MAINTENANCE 11-14 CUSTOMER RESPONSIBILITIES 3 SERVICE AND ADJUSTMENTS 15-16 ASSEMBLY 4-5 STORAGE 16-17 OPERATION 6-10 TROUBLESHOOTING 18 WARRANTY 19-22 3 SAFE HANDLING OF GASOLINE Use extreme care in maintaining, caring for and using your lawn mower. • Follow the instructions under "Maintenance" and "Storage" sections of this is running . Allow engine to prevent accidental starting. • Keep nuts and bolts, especially blade attachement bolts, tight...
... CONTENTS SAFETY RULES 2-3 MAINTENANCE SCHEDULE 11 PRODUCT SPECIFICATIONS 3 MAINTENANCE 11-14 CUSTOMER RESPONSIBILITIES 3 SERVICE AND ADJUSTMENTS 15-16 ASSEMBLY 4-5 STORAGE 16-17 OPERATION 6-10 TROUBLESHOOTING 18 WARRANTY 19-22 3 SAFE HANDLING OF GASOLINE Use extreme care in maintaining, caring for and using your lawn mower. • Follow the instructions under "Maintenance" and "Storage" sections of this is running . Allow engine to prevent accidental starting. • Keep nuts and bolts, especially blade attachement bolts, tight...
Operation Manual
Page 4
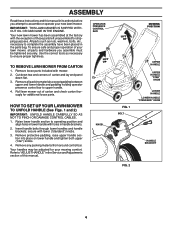
... THE ENGINE. Use the correct tools as nuts, washers, bolts, etc., necessary to "ADJUST HANDLE" in its entirety before you assemble must be adjusted for your new lawn mower. TO REMOVE LAWN MOWER FROM CARTON 1. Remove any packing material from around control bar. Refer to complete the assembly have been placed in handle brackets. 2. KNOB LIFT UP MOWING POSITION UPPER HANDLE UPPER HANDLE "STAR" KNOB FIG. 1 BOLT LOWER HANDLE LOWER HANDLE "STANDARD" KNOB HANDLE BRACKET FIG. 2 4 OPERATOR PRESENCE CONTROL BAR...
... THE ENGINE. Use the correct tools as nuts, washers, bolts, etc., necessary to "ADJUST HANDLE" in its entirety before you assemble must be adjusted for your new lawn mower. TO REMOVE LAWN MOWER FROM CARTON 1. Remove any packing material from around control bar. Refer to complete the assembly have been placed in handle brackets. 2. KNOB LIFT UP MOWING POSITION UPPER HANDLE UPPER HANDLE "STAR" KNOB FIG. 1 BOLT LOWER HANDLE LOWER HANDLE "STANDARD" KNOB HANDLE BRACKET FIG. 2 4 OPERATOR PRESENCE CONTROL BAR...
Operation Manual
Page 6
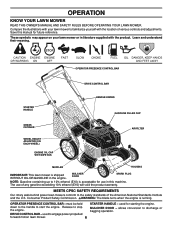
... CPSC SAFETY REQUIREMENTS Our rotary walk-behind power lawn mowers conform to 10% ethanol (E10) is acceptable for future reference. used for starting the engine. Consumer Product Safety Commission. OPERATOR PRESENCE CONTROL BAR DRIVE CONTROL BAR STARTER HANDLE HANDLE KNOBS GASOLINE FILLER CAP GRASS CATCHER WHEEL HEIGHT ADJUSTER (ON EACH WHEEL) ENGINE OIL CAP WITH DIPSTICK AIR FILTER MUFFLER HOUSING IMPORTANT: This lawn mower is running. used to start the engine. must be held down to the handle to engage power-propelled forward motion lawn mower. 6 STARTER HANDLE...
... CPSC SAFETY REQUIREMENTS Our rotary walk-behind power lawn mowers conform to 10% ethanol (E10) is acceptable for future reference. used for starting the engine. Consumer Product Safety Commission. OPERATOR PRESENCE CONTROL BAR DRIVE CONTROL BAR STARTER HANDLE HANDLE KNOBS GASOLINE FILLER CAP GRASS CATCHER WHEEL HEIGHT ADJUSTER (ON EACH WHEEL) ENGINE OIL CAP WITH DIPSTICK AIR FILTER MUFFLER HOUSING IMPORTANT: This lawn mower is running. used to start the engine. must be held down to the handle to engage power-propelled forward motion lawn mower. 6 STARTER HANDLE...

Operation Manual
Page 7
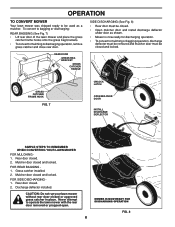
... LEVER TOWARD ENGINE TO LOWER MOWER PLATE TAB OPERATOR PRESENCE CONTROL BAR DRIVE CONTROL ENGAGED DRIVE CONTROL BAR DRIVE CONTROL DISENGAGED LEVER ROTATE LEVER AWAY FROM ENGINE TO RAISE MOWER FIG. 6 TO ADJUST, MOVE DOWN TO NEXT HOLE FIG. 5 7 HOW TO USE YOUR LAWN MOWER ENGINE SPEED The engine speed was set at the factory for high cut, adjust cutting height to be installed on the handle to improve after releasing the drive control the mower will stop forward motion without self-propelling. The blade turns when the engine is running. • Your lawn mower is...
... LEVER TOWARD ENGINE TO LOWER MOWER PLATE TAB OPERATOR PRESENCE CONTROL BAR DRIVE CONTROL ENGAGED DRIVE CONTROL BAR DRIVE CONTROL DISENGAGED LEVER ROTATE LEVER AWAY FROM ENGINE TO RAISE MOWER FIG. 6 TO ADJUST, MOVE DOWN TO NEXT HOLE FIG. 5 7 HOW TO USE YOUR LAWN MOWER ENGINE SPEED The engine speed was set at the factory for high cut, adjust cutting height to be installed on the handle to improve after releasing the drive control the mower will stop forward motion without self-propelling. The blade turns when the engine is running. • Your lawn mower is...
Operation Manual
Page 8
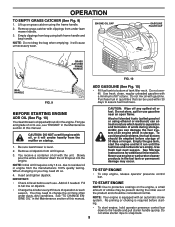
REAR DOOR GRASS BAG BRACKET GRASS CATCHER HANDLE GRASS CATCHER FRAME HOOK FIG. 7 UNLOCK LATCH OPEN MULCHER DOOR INSTALL DISCHARGE DEFLECTOR SIMPLE STEPS TO REMEMBER WHEN CONVERTING YOUR LAWN MOWER FOR MULCHING 1. FOR REAR BAGGING 1. Rear door closed or approved grass catcher in place. Never attempt to mulching or discharging operation, remove grass catcher and close rear door. SIDE DISCHARGING (See Fig. 8) • Rear door must be closed. • Open mulcher door and install discharge deflector under door as a mulcher...
REAR DOOR GRASS BAG BRACKET GRASS CATCHER HANDLE GRASS CATCHER FRAME HOOK FIG. 7 UNLOCK LATCH OPEN MULCHER DOOR INSTALL DISCHARGE DEFLECTOR SIMPLE STEPS TO REMEMBER WHEN CONVERTING YOUR LAWN MOWER FOR MULCHING 1. FOR REAR BAGGING 1. Rear door closed or approved grass catcher in place. Never attempt to mulching or discharging operation, remove grass catcher and close rear door. SIDE DISCHARGING (See Fig. 8) • Rear door must be closed. • Open mulcher door and install discharge deflector under door as a mulcher...
Operation Manual
Page 9
... on the engine, a small amount of this manual. Remove grass catcher with oil, or it run until the fuel lines and carburetor are empty. When changing oil you may need 20 oz. 4. Empty clippings from oil fill spout. 3. BEFORE STARTING ENGINE ADD OIL (See Fig. 10) Your lawnmower is level. 2. Remove oil dipstick from bag using the frame handle. 2. To avoid engine problems, the fuel system should be emptied before starting. • To start the engine and let...
... on the engine, a small amount of this manual. Remove grass catcher with oil, or it run until the fuel lines and carburetor are empty. When changing oil you may need 20 oz. 4. Empty clippings from oil fill spout. 3. BEFORE STARTING ENGINE ADD OIL (See Fig. 10) Your lawnmower is level. 2. Remove oil dipstick from bag using the frame handle. 2. To avoid engine problems, the fuel system should be emptied before starting. • To start the engine and let...
Operation Manual
Page 10
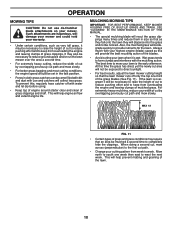
... help engine air flow and extend engine life. OPERATION MOWING TIPS CAUTION: Do not use and catchers will collect less grass. Wet grass tends to week. This will help prevent matting and graining of cut by overlapping previously cut path and mow slowly. • For better grass bagging and most cutting conditions, the engine speed should be necessary to raise the height of cut path. • Change your lawn when...
... help engine air flow and extend engine life. OPERATION MOWING TIPS CAUTION: Do not use and catchers will collect less grass. Wet grass tends to week. This will help prevent matting and graining of cut by overlapping previously cut path and mow slowly. • For better grass bagging and most cutting conditions, the engine speed should be necessary to raise the height of cut path. • Change your lawn when...
Operation Manual
Page 11
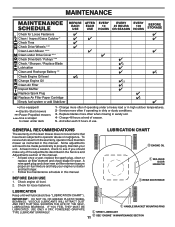
... 100 HOURS BEFORE STORAGE Check for Loose Fasteners Clean / Inspect Grass Catcher * Check Tires Check Drive Wheels *** Clean Lawn Mower **** Clean under Drive Cover *** Check Drive Belt / Pulleys *** Check / Sharpen / Replace Blade Lubrication Clean and Recharge Battery ** Check Engine Oil level Change Engine Oil Clean Air Filter Inspect Muffler Replace Spark Plug Replace Air Filter Paper Cartridge Empty fuel system or add Stabilizer * (if so equipped) ** Electric-Start mowers *** Power-Propelled mowers **** Use a scraper to properly maintain your engine run better and last longer...
... 100 HOURS BEFORE STORAGE Check for Loose Fasteners Clean / Inspect Grass Catcher * Check Tires Check Drive Wheels *** Clean Lawn Mower **** Clean under Drive Cover *** Check Drive Belt / Pulleys *** Check / Sharpen / Replace Blade Lubrication Clean and Recharge Battery ** Check Engine Oil level Change Engine Oil Clean Air Filter Inspect Muffler Replace Spark Plug Replace Air Filter Paper Cartridge Empty fuel system or add Stabilizer * (if so equipped) ** Electric-Start mowers *** Power-Propelled mowers **** Use a scraper to properly maintain your engine run better and last longer...
Operation Manual
Page 12
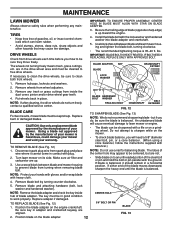
... if you mow to clean both front wheels. NOTE: Remove the blade adapter and check the key inside the dust cover, pinion and/or drive wheel gear teeth. 4. MAINTENANCE LAWN MOWER Always observe safety rules when performing any trash or grass cuttings from inside hub of blade adapter. BLADE ADAPTER BLADE LOCK WASHER KEY CRANKSHAFT KEYWAY 1. Install the blade bolt with a file or on its side. TIRES • Keep tires free of gasoline, oil, or insect control chemicals which...
... if you mow to clean both front wheels. NOTE: Remove the blade adapter and check the key inside the dust cover, pinion and/or drive wheel gear teeth. 4. MAINTENANCE LAWN MOWER Always observe safety rules when performing any trash or grass cuttings from inside hub of blade adapter. BLADE ADAPTER BLADE LOCK WASHER KEY CRANKSHAFT KEYWAY 1. Install the blade bolt with a file or on its side. TIRES • Keep tires free of gasoline, oil, or insect control chemicals which...

Operation Manual
Page 13
... be damaged by using a dirty air filter. TO CLEAN AIR FILTER 1. Clean by running low on oil. Install cartridge, then replace cover. TAB TO CHANGE ENGINE OIL (See Fig. 14) NOTE: Before tipping lawn mower to check the oil level with approved replacement catcher. Slowly pour oil down the oil fill spout, stopping every few ounces to drain oil, empty fuel tank by gently tapping on the gear case. Give the lawn mower model number when ordering...
... be damaged by using a dirty air filter. TO CLEAN AIR FILTER 1. Clean by running low on oil. Install cartridge, then replace cover. TAB TO CHANGE ENGINE OIL (See Fig. 14) NOTE: Before tipping lawn mower to check the oil level with approved replacement catcher. Slowly pour oil down the oil fill spout, stopping every few ounces to drain oil, empty fuel tank by gently tapping on the gear case. Give the lawn mower model number when ordering...
Operation Manual
Page 14
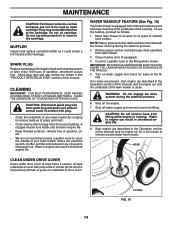
.... To use pressurized air to the fitting where shown. Connect a garden hose to clean or dry cartridge. ting. Shut off the engine. 7. FITTING FIG. 16 14 MAINTENANCE CAUTION: Petroleum solvents, such as follows: 1. Spark plug type and gap setting are covered to remove excess water from accumulating. Start engine (as described in shortened engine life. 8. NOTE: Water, grass and other debris will drain from fitting. Remove grass catcher and discharge chute assembly from fi...
.... To use pressurized air to the fitting where shown. Connect a garden hose to clean or dry cartridge. ting. Shut off the engine. 7. FITTING FIG. 16 14 MAINTENANCE CAUTION: Petroleum solvents, such as follows: 1. Spark plug type and gap setting are covered to remove excess water from accumulating. Start engine (as described in shortened engine life. 8. NOTE: Water, grass and other debris will drain from fitting. Remove grass catcher and discharge chute assembly from fi...

Operation Manual
Page 15
... PERFORMING ANY SERVICE OR ADJUSTMENTS: 1. Release control bar and stop engine. 2. REAR DEFLECTOR The rear deflector, attached between the rear wheels of your mower, is provided to upright position. 5. TO REPLACE DRIVE BELT (See Figs. 17 and 18) 1. Remove drive cover and belt keeper. 2. If the deflector becomes damaged, it cannot come in housing. 3. Route the other end of this manual. Remove blade and blade adapter. 5. Turn lawn mower on gearcase pulley. 6. Remove belt from gearcase pulley. 3. Return mower to...
... PERFORMING ANY SERVICE OR ADJUSTMENTS: 1. Release control bar and stop engine. 2. REAR DEFLECTOR The rear deflector, attached between the rear wheels of your mower, is provided to upright position. 5. TO REPLACE DRIVE BELT (See Figs. 17 and 18) 1. Remove drive cover and belt keeper. 2. If the deflector becomes damaged, it cannot come in housing. 3. Route the other end of this manual. Remove blade and blade adapter. 5. Turn lawn mower on gearcase pulley. 6. Remove belt from gearcase pulley. 3. Return mower to...

Operation Manual
Page 16
... the Maintenance section of this manual). 2. Replace if necessary. 4. SERVICE AND ADJUSTMENTS TO ADJUST HANDLE (See Fig. 19) The handle on sides of the lower handle and pivot entire handle assembly forward and allow handle to fold down to an authorized service center for repair and adjustment. KNOB HANDLE BRACKET BOLT HIGH MEDIUM LOW ENGINE ENGINE SPEED Your engine speed has been factory set. Be sure that suits you believe that the engine is not adjustable. sand lightly...
... the Maintenance section of this manual). 2. Replace if necessary. 4. SERVICE AND ADJUSTMENTS TO ADJUST HANDLE (See Fig. 19) The handle on sides of the lower handle and pivot entire handle assembly forward and allow handle to fold down to an authorized service center for repair and adjustment. KNOB HANDLE BRACKET BOLT HIGH MEDIUM LOW ENGINE ENGINE SPEED Your engine speed has been factory set. Be sure that suits you believe that the engine is not adjustable. sand lightly...
Operation Manual
Page 17
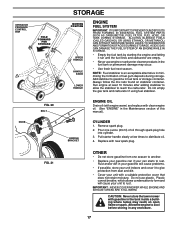
.... HANDLE BRACKET CYLINDER 1. Replace with clean engine oil. (See "ENGINE" in any enclosure. 17 ENGINE OIL Drain oil (with engine warm) and replace with new spark plug. OPERATOR PRESENCE CONTROL BAR FOLD FORWARD FOR STORAGE KNOB FIG. 20 BOLT FIG. 21 STORAGE MOWING POSITION UPPER HANDLE HANDLE KNOB LOWER HANDLE ENGINE FUEL SYSTEM IMPORTANT: IT IS IMPORTANT TO PREVENT GUM DEPOSITS FROM FORMING IN ESSENTIAL FUEL SYSTEM PARTS SUCH AS CARBURETOR, FUEL FILTER, FUEL HOSE, OR TANK DURING STORAGE. ACIDIC GAS CAN DAMAGE THE FUEL...
.... HANDLE BRACKET CYLINDER 1. Replace with clean engine oil. (See "ENGINE" in any enclosure. 17 ENGINE OIL Drain oil (with engine warm) and replace with new spark plug. OPERATOR PRESENCE CONTROL BAR FOLD FORWARD FOR STORAGE KNOB FIG. 20 BOLT FIG. 21 STORAGE MOWING POSITION UPPER HANDLE HANDLE KNOB LOWER HANDLE ENGINE FUEL SYSTEM IMPORTANT: IT IS IMPORTANT TO PREVENT GUM DEPOSITS FROM FORMING IN ESSENTIAL FUEL SYSTEM PARTS SUCH AS CARBURETOR, FUEL FILTER, FUEL HOSE, OR TANK DURING STORAGE. ACIDIC GAS CAN DAMAGE THE FUEL...

Operation Manual
Page 18
...Check/reinstall drive belt. 3. Dirty air filter. 1. Depress control bar to upper handle before starting. Control bar defective. 9. Fuel valve lever (if equipped) in fuel. 4. Connect battery to the ON position. 11. Too much grass. 3. Clean/replace air filter. 4. Cut at same height. 3. Wheel heights uneven. 3. Tighten blade bolt. 2. Replace blade. Tighten blade bolt. 2. Replace blade adapter. 4. Raise rear of mower housing. Out of mower housing. 5. Fill fuel tank. 3. Tighten blade bolt or replace blade adapter. 8. Turn fuel valve lever to engine. Rear...
...Check/reinstall drive belt. 3. Dirty air filter. 1. Depress control bar to upper handle before starting. Control bar defective. 9. Fuel valve lever (if equipped) in fuel. 4. Connect battery to the ON position. 11. Too much grass. 3. Clean/replace air filter. 4. Cut at same height. 3. Wheel heights uneven. 3. Tighten blade bolt. 2. Replace blade. Tighten blade bolt. 2. Replace blade adapter. 4. Raise rear of mower housing. Out of mower housing. 5. Fill fuel tank. 3. Tighten blade bolt or replace blade adapter. 8. Turn fuel valve lever to engine. Rear...
Operation Manual
Page 19
... using original OEM Husqvarna replacement parts, subject to the original retail purchaser that resulting from . Husqvarna does not assume any of charge at the time of the product, including, following the preventative maintenance, storage, fuel and oil usages as described in those separate warranties. This Limited Warranty does not cover general maintenance parts and items ("Expendable Parts"), including without limitation spark plugs, bulbs, filters, lubricants, starter cords, belts, blades, and blade adapters. (d) Emissions Control...
... using original OEM Husqvarna replacement parts, subject to the original retail purchaser that resulting from . Husqvarna does not assume any of charge at the time of the product, including, following the preventative maintenance, storage, fuel and oil usages as described in those separate warranties. This Limited Warranty does not cover general maintenance parts and items ("Expendable Parts"), including without limitation spark plugs, bulbs, filters, lubricants, starter cords, belts, blades, and blade adapters. (d) Emissions Control...
Operation Manual
Page 20
... light. The Limited Lifetime Warranty does not cover damage other non-approved materials and/or structures; and (d) Natural discoloration of contact with engine speed governor or emission components, or running engines above specified and recommended engine speeds as belts, pulleys, spindle housings, bearings, blades, rods, height adjusters, caster/anti scalp wheels etc... You must maintain and present Proof of important product information. Husqvarna encourages you do not meet Engine manufacturer's specifications; (g) Use...
... light. The Limited Lifetime Warranty does not cover damage other non-approved materials and/or structures; and (d) Natural discoloration of contact with engine speed governor or emission components, or running engines above specified and recommended engine speeds as belts, pulleys, spindle housings, bearings, blades, rods, height adjusters, caster/anti scalp wheels etc... You must maintain and present Proof of important product information. Husqvarna encourages you do not meet Engine manufacturer's specifications; (g) Use...
Parts List
Page 3
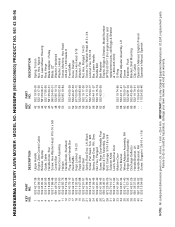
... Washer Head #13 x 3/4 Locknut, Hex 5/16-18 Bar, Lower Handle Handle Bolt Belt Retainer Engine, Briggs & Stratton, Model Number 9P702-0010-F1 (For engine service and replacement parts, call Briggs & Stratton at 1-800-233-3723) O-Ring Wheel Adjuster Assembly, LH Screw Fastener, Push Bracket, Skirt Mounting Clip, Cable Operator's Manual, English /French Operator's Manual, Spanish 3 NOTE: All component dimensions given in U.S. IMPORTANT: Use only Original Equipment Manufacturer (O.E.M.) replacement parts. MODEL NO. NO. 1 532 42 77-38 2 532 42...
... Washer Head #13 x 3/4 Locknut, Hex 5/16-18 Bar, Lower Handle Handle Bolt Belt Retainer Engine, Briggs & Stratton, Model Number 9P702-0010-F1 (For engine service and replacement parts, call Briggs & Stratton at 1-800-233-3723) O-Ring Wheel Adjuster Assembly, LH Screw Fastener, Push Bracket, Skirt Mounting Clip, Cable Operator's Manual, English /French Operator's Manual, Spanish 3 NOTE: All component dimensions given in U.S. IMPORTANT: Use only Original Equipment Manufacturer (O.E.M.) replacement parts. MODEL NO. NO. 1 532 42 77-38 2 532 42...

Parts List
Page 5
... 64-05 DESCRIPTION Drive Pulley V-Belt Wheel Adjuster Assembly, LH (Includes Bearing, Key #17) Gear Case Assembly, Complete Locknut 1/4-20 Spring Wheel Adjuster Assembly, RH (Includes Bearing, Key #17) Grassbag Frame, Grassbag Water Washout Assembly Fitting, Hose, Water Washout Washer, Lock, Internal Tooth Locknut, Hex, with O-Ring Adapter, Quick-Disconnect Coupler 5 NOTE: All component dimensions given in U.S. HUSQVARNA ROTARY LAWN MOWER - MODEL NO. IMPORTANT: Use only Original Equipment Manufacturer (O.E.M.) replacement parts. NO. 1 532 42...
... 64-05 DESCRIPTION Drive Pulley V-Belt Wheel Adjuster Assembly, LH (Includes Bearing, Key #17) Gear Case Assembly, Complete Locknut 1/4-20 Spring Wheel Adjuster Assembly, RH (Includes Bearing, Key #17) Grassbag Frame, Grassbag Water Washout Assembly Fitting, Hose, Water Washout Washer, Lock, Internal Tooth Locknut, Hex, with O-Ring Adapter, Quick-Disconnect Coupler 5 NOTE: All component dimensions given in U.S. HUSQVARNA ROTARY LAWN MOWER - MODEL NO. IMPORTANT: Use only Original Equipment Manufacturer (O.E.M.) replacement parts. NO. 1 532 42...


