
Operation Manual
Page 2
... CAN BE SERIOUSLY INJURED OR KILLED BY THIS EQUIPMENT. Stop machine if anyone . Allow machine to the presence of this manual). • Disengage blades when not mowing. Tires can cause build-up and thrown by the machine. • Never allow children to hearing. • Data indicates that... lead and lead compounds, chemicals known to the State of a responsible adult other than the operator. • Be alert and turn off blades, set parking brake, and stop before cleaning the machine, removing the grass catcher, or unclogging the discharge chute. • Operate machine only...
... CAN BE SERIOUSLY INJURED OR KILLED BY THIS EQUIPMENT. Stop machine if anyone . Allow machine to the presence of this manual). • Disengage blades when not mowing. Tires can cause build-up and thrown by the machine. • Never allow children to hearing. • Data indicates that... lead and lead compounds, chemicals known to the State of a responsible adult other than the operator. • Be alert and turn off blades, set parking brake, and stop before cleaning the machine, removing the grass catcher, or unclogging the discharge chute. • Operate machine only...

Operation Manual
Page 3
...there proper operation regularly. Allow machine to cool before restarting. • Never make sudden changes in gear when going uphill, disengage blades, shift into reverse and back down the slope. • Keep all slopes requires extreme caution. Always wear eye protection when operating...powered equipment from a gasoline dispenser nozzle. • Keep the nozzle in contact with manufacturer's recommended parts, when necessary. • Mower blades are a major factor related to loss of 15°. NEVER operate a machine with safety devices. Always keep the machine in speed or...
...there proper operation regularly. Allow machine to cool before restarting. • Never make sudden changes in gear when going uphill, disengage blades, shift into reverse and back down the slope. • Keep all slopes requires extreme caution. Always wear eye protection when operating...powered equipment from a gasoline dispenser nozzle. • Keep the nozzle in contact with manufacturer's recommended parts, when necessary. • Mower blades are a major factor related to loss of 15°. NEVER operate a machine with safety devices. Always keep the machine in speed or...
Operation Manual
Page 4
... you the best possible dependability and performance. PRODUCT SPECIFICATIONS Gasoline Capacity and type: Oil Type: (API: SG-SL) Oil Capacity: Spark Plug: Charging System: Battery: Blade Bolt Torque: 4 Gallons/15,14 L Regular Unleaded SAE 30 (above is required by the operator. Always observe the "SAFETY RULES". Lbs./62-75 Nm CONGRATULATIONS...
... you the best possible dependability and performance. PRODUCT SPECIFICATIONS Gasoline Capacity and type: Oil Type: (API: SG-SL) Oil Capacity: Spark Plug: Charging System: Battery: Blade Bolt Torque: 4 Gallons/15,14 L Regular Unleaded SAE 30 (above is required by the operator. Always observe the "SAFETY RULES". Lbs./62-75 Nm CONGRATULATIONS...
Operation Manual
Page 6
... this manual). See "TO LEVEL MOWER HOUSING" in the Operation section of this manual). 6 Operate them before operating your tractor for replacing motion and mower blade drive belts in the Operation section of this manual. CHECK BRAKE SYSTEM After you start the engine. ✓ Ensure brake system is in safe operating...
... this manual). See "TO LEVEL MOWER HOUSING" in the Operation section of this manual). 6 Operate them before operating your tractor for replacing motion and mower blade drive belts in the Operation section of this manual. CHECK BRAKE SYSTEM After you start the engine. ✓ Ensure brake system is in safe operating...

Operation Manual
Page 8
... pedal. (K) FORWARD DRIVE PEDAL - Used to raise and lower the mower or other powered attachment while in reverse. (H) LIGHT SWITCH - Used to engage the mower blades, or other attachments mounted to engage and disengage the differential lock on and off . (P) HOURMETER - Used to set forward movement of battery. 8 Save this manual...
... pedal. (K) FORWARD DRIVE PEDAL - Used to raise and lower the mower or other powered attachment while in reverse. (H) LIGHT SWITCH - Used to engage the mower blades, or other attachments mounted to engage and disengage the differential lock on and off . (P) HOURMETER - Used to set forward movement of battery. 8 Save this manual...
Operation Manual
Page 9
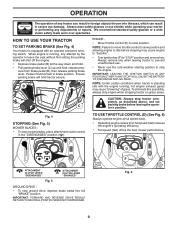
... use the cold weather starting position to idle before leaving the operator's position. CAUTION: Always stop the engine. Fig. 4 STOPPING (See Fig. 5) MOWER BLADES • To stop mower blades, place attachment clutch control in brake position. D F Fig. 6 9 OPERATION The operation of grass. When engine is standing idle with an operator presence sensing...
... use the cold weather starting position to idle before leaving the operator's position. CAUTION: Always stop the engine. Fig. 4 STOPPING (See Fig. 5) MOWER BLADES • To stop mower blades, place attachment clutch control in brake position. D F Fig. 6 9 OPERATION The operation of grass. When engine is standing idle with an operator presence sensing...
Operation Manual
Page 10
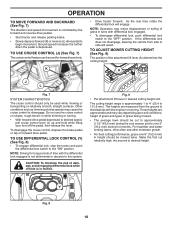
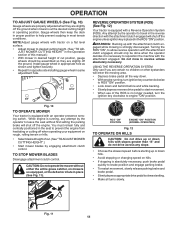
... cruise control, depress the brake pedal or tap on slopes, rough terrain or while trimming or turning. • With forward drive pedal depressed to the blade tip with the differential lock engaged is in desired cutting height slot. If the differential lock does not disengage, steering the vehicle from the ground...
... cruise control, depress the brake pedal or tap on slopes, rough terrain or while trimming or turning. • With forward drive pedal depressed to the blade tip with the differential lock engaged is in desired cutting height slot. If the differential lock does not disengage, steering the vehicle from the ground...
Operation Manual
Page 11
... Operation section of this manual.) • With mower in desired height of cut . (See "TO ADJUST MOWER CUTTING HEIGHT".) • Start mower blades by engaging attachment clutch control. Turning the ROS "ON", to ROS "ON" position. • Look down and behind before starting up or down hills...down hills with slopes greater than 15° and do not drive across any attempt by the operator to engine "ON" position. TO STOP MOWER BLADES Disengage attachment clutch control. WARNING: Backing up or down . • With engine running , any slope. • Choose the slowest speed before...
... Operation section of this manual.) • With mower in desired height of cut . (See "TO ADJUST MOWER CUTTING HEIGHT".) • Start mower blades by engaging attachment clutch control. Turning the ROS "ON", to ROS "ON" position. • Look down and behind before starting up or down hills...down hills with slopes greater than 15° and do not drive across any attempt by the operator to engine "ON" position. TO STOP MOWER BLADES Disengage attachment clutch control. WARNING: Backing up or down . • With engine running , any slope. • Choose the slowest speed before...
Operation Manual
Page 16
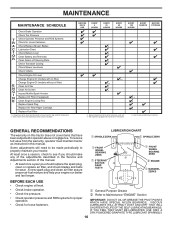
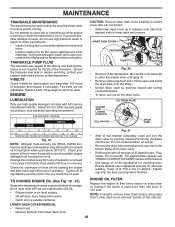
... The warranty on this manual. • At least once a year you should replace the spark plug, clean or replace air filter, and check blades and belts for wear. BEFORE EACH USE EVERY 8 HOURS EVERY 25 HOURS EVERY 50 HOURS EVERY 100 HOURS EVERY SEASON BEFORE STORAGE 3 4 5 ...MAINTENANCE SCHEDULE Check Brake Operation Check Tire Pressure T Check Operator Presence and ROS Systems R Check for Loose Fasteners A Check/Replace Mower Blades C Lubrication Chart T Check Battery Level O Clean Battery and Terminals R Clean Debris off Steering Plate Check Transaxle Cooling Check Mower Levelness...
... The warranty on this manual. • At least once a year you should replace the spark plug, clean or replace air filter, and check blades and belts for wear. BEFORE EACH USE EVERY 8 HOURS EVERY 25 HOURS EVERY 50 HOURS EVERY 100 HOURS EVERY SEASON BEFORE STORAGE 3 4 5 ...MAINTENANCE SCHEDULE Check Brake Operation Check Tire Pressure T Check Operator Presence and ROS Systems R Check for Loose Fasteners A Check/Replace Mower Blades C Lubrication Chart T Check Battery Level O Clean Battery and Terminals R Clean Debris off Steering Plate Check Transaxle Cooling Check Mower Levelness...
Operation Manual
Page 17
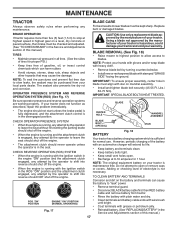
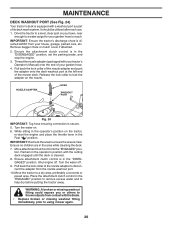
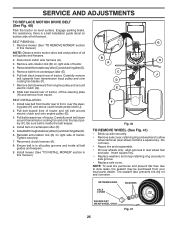
...setting the parking brake should shut off the engine. • When the engine is running with grease or petroleum jelly. Replace bent or damaged blades. NOTE: Protect your tractor is sufficient for proper PSI.) • Keep tires free of this manual.) TIRES • Maintain proper air .... NOTE: To seal tire punctures and prevent flat tires due to slow leaks, tire sealant may cause tire damage. CHECK REVERSE OPERATION (ROS) SYSTEM BLADE BOLT (SPECIAL) STAR BATTERY Fig. 18 Your tractor has a battery charging system which can cause the battery to "leak" power. • Remove...
...setting the parking brake should shut off the engine. • When the engine is running with grease or petroleum jelly. Replace bent or damaged blades. NOTE: Protect your tractor is sufficient for proper PSI.) • Keep tires free of this manual.) TIRES • Maintain proper air .... NOTE: To seal tire punctures and prevent flat tires due to slow leaks, tire sealant may cause tire damage. CHECK REVERSE OPERATION (ROS) SYSTEM BLADE BOLT (SPECIAL) STAR BATTERY Fig. 18 Your tractor has a battery charging system which can cause the battery to "leak" power. • Remove...
Operation Manual
Page 18
... or while the transmission is running low on oil. Pour slowly. Tighten cap onto the tube securely when finished. Do not attempt to ensure fan blades are intact and clean. • Inspect cooling fins for checking level. V-BELTS Check V-belts for deterioration and wear after every 50 hours of operation. Check...
... or while the transmission is running low on oil. Pour slowly. Tighten cap onto the tube securely when finished. Do not attempt to ensure fan blades are intact and clean. • Inspect cooling fins for checking level. V-BELTS Check V-belts for deterioration and wear after every 50 hours of operation. Check...
Operation Manual
Page 20
... to using mower again. 20 It should be utilized after each use. 1. tion. Shut engine off . 9. Ensure the attachment clutch control is equipped with the blade. • Replace broken or missing washout fitting immediately, prior to disconnect the adapter from contact with a washout port as part of its deck wash system...
... to using mower again. 20 It should be utilized after each use. 1. tion. Shut engine off . 9. Ensure the attachment clutch control is equipped with the blade. • Replace broken or missing washout fitting immediately, prior to disconnect the adapter from contact with a washout port as part of its deck wash system...
Operation Manual
Page 21
... washers. • Go to its lowest position. • Remove mower belt from under tractor. See Mower Drive Belt Removal in "TO REPLACE MOWER BLADE DRIVE BELT" in "DISENGAGED" position. • Lower attachment lift lever to either side of the lever. • Slide mower out from electric clutch.... • Place attachment clutch in "DISENGAGED" position. • Shut engine off and lock the SmartSwitch Ignition. • Make sure the blades and all moving parts have completely stopped. • Disconnect spark plug wire from spark plug and place wire where it cannot come in lowest ...
... washers. • Go to its lowest position. • Remove mower belt from under tractor. See Mower Drive Belt Removal in "TO REPLACE MOWER BLADE DRIVE BELT" in "DISENGAGED" position. • Lower attachment lift lever to either side of the lever. • Slide mower out from electric clutch.... • Place attachment clutch in "DISENGAGED" position. • Shut engine off and lock the SmartSwitch Ignition. • Make sure the blades and all moving parts have completely stopped. • Disconnect spark plug wire from spark plug and place wire where it cannot come in lowest ...
Operation Manual
Page 22
... (H). • Check Front-To-Back Adjustment in "TO LEVEL MOWER" in this section of the manual. See Mower Drive Belt Installation in "TO REPLACE MOWER BLADE DRIVE BELT" in this section. SERVICE AND ADJUSTMENTS • From right side of mower, first insert 90° end of anti-sway bar (S) into hole...
... (H). • Check Front-To-Back Adjustment in "TO LEVEL MOWER" in this section of the manual. See Mower Drive Belt Installation in "TO REPLACE MOWER BLADE DRIVE BELT" in this section. SERVICE AND ADJUSTMENTS • From right side of mower, first insert 90° end of anti-sway bar (S) into hole...

Operation Manual
Page 23
... unevenly cut, determine which side of mower, or, counterclockwise ( ) (loosen) to raise the mower. Protect your hands with gloves and/or wrap blade with heavy cloth. • Raise mower to 12,7 mm) lower than the rear tip. • Hold adjustment nut in position with wrench and ...See Fig. 33) • With all tires properly inflated, park tractor on level ground or driveway. To obtain the best cutting results, the mower blades should be adjusted so the front tip is 1/8" to 1/2" (3,1 to think the mower is in Visual Adjustment instructions above. • Recheck measurements, adjust...
... unevenly cut, determine which side of mower, or, counterclockwise ( ) (loosen) to raise the mower. Protect your hands with gloves and/or wrap blade with heavy cloth. • Raise mower to 12,7 mm) lower than the rear tip. • Hold adjustment nut in position with wrench and ...See Fig. 33) • With all tires properly inflated, park tractor on level ground or driveway. To obtain the best cutting results, the mower blades should be adjusted so the front tip is 1/8" to 1/2" (3,1 to think the mower is in Visual Adjustment instructions above. • Recheck measurements, adjust...
Operation Manual
Page 24
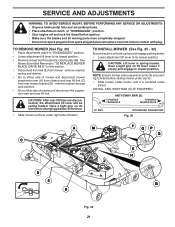
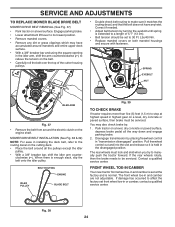
...the deck belt, refer to affect the factory set front wheel toe-in or camber, contact a qualified service center. BELT ROUTING ENGINE IDLER PULLEY BLADE BELT Fig. 39 TO CHECK BRAKE If tractor requires more than five (5) feet (1,5 m) to stop at the factory and is enough slack, slip... shaft. When there is normal. Contact a qualified service center. Park tractor on a level surface. Fig. 38 24 SERVICE AND ADJUSTMENTS TO REPLACE MOWER BLADE DRIVE BELT MOWER DRIVE BELT REMOVAL (See Fig. 37) • Park tractor on a level, dry concrete or paved surface, depress brake pedal all ...
...the deck belt, refer to affect the factory set front wheel toe-in or camber, contact a qualified service center. BELT ROUTING ENGINE IDLER PULLEY BLADE BELT Fig. 39 TO CHECK BRAKE If tractor requires more than five (5) feet (1,5 m) to stop at the factory and is enough slack, slip... shaft. When there is normal. Contact a qualified service center. Park tractor on a level surface. Fig. 38 24 SERVICE AND ADJUSTMENTS TO REPLACE MOWER BLADE DRIVE BELT MOWER DRIVE BELT REMOVAL (See Fig. 37) • Park tractor on a level, dry concrete or paved surface, depress brake pedal all ...
Operation Manual
Page 25
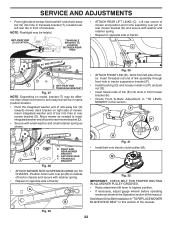
... pulley (G). 3. Reinstall anti-rotation link (B) on bottom side of tractor. 4. NOTE: To seal tire punctures and prevent flat tires due to front, over cooling fan blades (F). 7. Removebeltfromstationaryidler(C)andclutchingidler(D). 5. Carefully work belt down around electric clutch (G). 8. RETAINING RING AXLE COVER WASHERS SQUARE KEY (REAR WHEEL ONLY) 25 Fig. 41 Install new belt...
... pulley (G). 3. Reinstall anti-rotation link (B) on bottom side of tractor. 4. NOTE: To seal tire punctures and prevent flat tires due to front, over cooling fan blades (F). 7. Removebeltfromstationaryidler(C)andclutchingidler(D). 5. Carefully work belt down around electric clutch (G). 8. RETAINING RING AXLE COVER WASHERS SQUARE KEY (REAR WHEEL ONLY) 25 Fig. 41 Install new belt...

Operation Manual
Page 29
...filter. 5. Dirty engine air screen/fins. 11. Dirty/clogged muffler. 12. Contact an authorized service center/department. Worn, bent or loose blade. 2. Water in fuel. 7. Contact an authorized service center/department. Weak or dead battery. 4. Replace fuel filter. 5. Blown fuse. ... wire loose. 10. Engine valves out of mower housing. 4. Clean/replace air filter. 5. Check/replace solenoid or starter. 9. Bent blade mandrel. 3. Loose/damaged part(s). 1. Tighten loose part(s). Replace fuel filter. 6. Brake pedal not depressed. 2. Stale or dirty fuel....
...filter. 5. Dirty engine air screen/fins. 11. Dirty/clogged muffler. 12. Contact an authorized service center/department. Worn, bent or loose blade. 2. Water in fuel. 7. Contact an authorized service center/department. Weak or dead battery. 4. Replace fuel filter. 5. Blown fuse. ... wire loose. 10. Engine valves out of mower housing. 4. Clean/replace air filter. 5. Check/replace solenoid or starter. 9. Bent blade mandrel. 3. Loose/damaged part(s). 1. Tighten loose part(s). Replace fuel filter. 6. Brake pedal not depressed. 2. Stale or dirty fuel....
Operation Manual
Page 30
... Frozen idler pulley. 4. Engine speed too slow. 1. Place throttle control in "engaged" position. 2. Wet grass. 3. Replace blade. Blades improperly installed. 9. Clogged mower deck vent holes from buildup of grass, leaves, and trash around mandrels. 1. Blown fuse. 1.... equipped). 3. Place freewheel control in "FAST" position. 2. Operation section. 30 Poor cut - Worn, bent or loose blade. 2. Bent blade mandrel. 5. Tighten blade bolt. 2. Replace mower drive belt. 3. Level mower deck. 5. Check tires for proper air pressure. 6. Switch is ...
... Frozen idler pulley. 4. Engine speed too slow. 1. Place throttle control in "engaged" position. 2. Wet grass. 3. Replace blade. Blades improperly installed. 9. Clogged mower deck vent holes from buildup of grass, leaves, and trash around mandrels. 1. Blown fuse. 1.... equipped). 3. Place freewheel control in "FAST" position. 2. Operation section. 30 Poor cut - Worn, bent or loose blade. 2. Bent blade mandrel. 5. Tighten blade bolt. 2. Replace mower drive belt. 3. Level mower deck. 5. Check tires for proper air pressure. 6. Switch is ...


