Operation Manual
Page 2
... a hill in neutral, you last saw them. • Keep children out of the mowing area and in a large percentage of children. WARNING: Tow only the attachments that are familiar with specifications of the manufacturer of your view of bystanders before cleaning the machine, removing the grass catcher, or unclogging...
... a hill in neutral, you last saw them. • Keep children out of the mowing area and in a large percentage of children. WARNING: Tow only the attachments that are familiar with specifications of the manufacturer of your view of bystanders before cleaning the machine, removing the grass catcher, or unclogging...
Operation Manual
Page 3
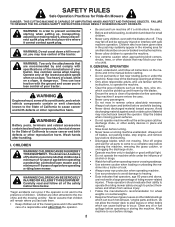
...; Check grass catcher components and the discharge chute frequently and replace with the intended function of grass, leaves, or other debris buildup. Do not attach towed equipment except at all times until fueling is in a closed area. • Keep all cigarettes, cigars, pipes, and other... attachments; GENERAL SERVICE • Never operate machine in safe working condition. • Never tamper with grass catchers or other sources of the machine. Check...
...; Check grass catcher components and the discharge chute frequently and replace with the intended function of grass, leaves, or other debris buildup. Do not attach towed equipment except at all times until fueling is in a closed area. • Keep all cigarettes, cigars, pipes, and other... attachments; GENERAL SERVICE • Never operate machine in safe working condition. • Never tamper with grass catchers or other sources of the machine. Check...
Operation Manual
Page 6
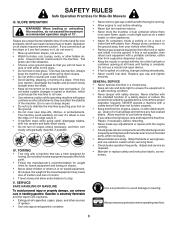
...lower it slowly and engage in front of tractor is located between terminals) charge battery for location and function of controls) • Raise attachment lift lever to positive (+) terminal with the instructions that follow all instructions in "TRANSMISSION DISEN- NOTE: If this battery is put into ...8226; Place freewheel control in the Operation section of fender. NOTE: You may now roll your tractor off skid. SET PARKING BRAKE LEVER AND LOWER ATTACHMENT LIFT LEVER (See Fig. 3 and 4) • Depress clutch/brake pedal all the way down and hold. • Pull parking brake lever ...
...lower it slowly and engage in front of tractor is located between terminals) charge battery for location and function of controls) • Raise attachment lift lever to positive (+) terminal with the instructions that follow all instructions in "TRANSMISSION DISEN- NOTE: If this battery is put into ...8226; Place freewheel control in the Operation section of fender. NOTE: You may now roll your tractor off skid. SET PARKING BRAKE LEVER AND LOWER ATTACHMENT LIFT LEVER (See Fig. 3 and 4) • Depress clutch/brake pedal all the way down and hold. • Pull parking brake lever ...
Operation Manual
Page 8
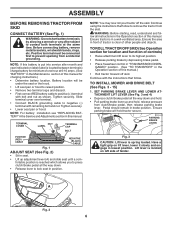
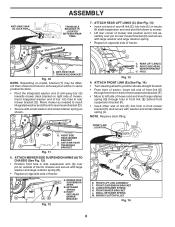
... than shown but hole for anti-sway bar will be in front link (E) behind front suspension bracket (F). • Insert other end of tractor. ATTACH REAR LIFT LINKS (C) (See Fig. 13) • Insert rod end of rear lift link (C) into hole (U) in tractor lift shaft suspension ...U. FRONT MOWER BRACKET J. ENGINE CLUTCH PULLEY Fig. 14 H J 8 FRONT SUSPENSION BRACKET G. U C C. TRANSAXLE BRACKET Fig. 11 6. LARGE RETAINER SPRING H. ANTI-SWAY BAR T. ATTACH MOWER SIDE SUSPENSION ARMS (A) TO CHASSIS (See Fig. 12) • Position front hole in rear mower bracket (D). HOLE Fig. 13...
... than shown but hole for anti-sway bar will be in front link (E) behind front suspension bracket (F). • Insert other end of tractor. ATTACH REAR LIFT LINKS (C) (See Fig. 13) • Insert rod end of rear lift link (C) into hole (U) in tractor lift shaft suspension ...U. FRONT MOWER BRACKET J. ENGINE CLUTCH PULLEY Fig. 14 H J 8 FRONT SUSPENSION BRACKET G. U C C. TRANSAXLE BRACKET Fig. 11 6. LARGE RETAINER SPRING H. ANTI-SWAY BAR T. ATTACH MOWER SIDE SUSPENSION ARMS (A) TO CHASSIS (See Fig. 12) • Position front hole in rear mower bracket (D). HOLE Fig. 13...
Operation Manual
Page 9
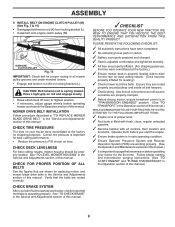
... section of this manual. Have a tight grip on tires. Verify that the brake is important to PSI shown on rod and engage slowly. • Raise attachment lift lever to see that the belts are routed properly around pulleys and inside all controls, their location and functions. Operate them before operating mower...
... section of this manual. Have a tight grip on tires. Verify that the brake is important to PSI shown on rod and engage slowly. • Raise attachment lift lever to see that the belts are routed properly around pulleys and inside all controls, their location and functions. Operate them before operating mower...
Operation Manual
Page 10
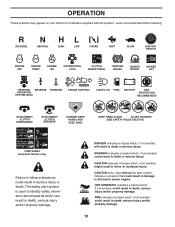
... PEDAL PARKING BRAKE MOWER HEIGHT MOWER LIFT REVERSE REVERSE FORWARD OPERATION SYSTEM (ROS) CRUISE CONTROL LIGHTS ON FUEL BATTERY EAR PROTECTION RECOMMENDED 15 15 ATTACHMENT CLUTCH DISENGAGED ATTACHMENT CLUTCH ENGAGED DANGER, KEEP HANDS AND FEET AWAY KEEP AREA CLEAR SLOPE HAZARDS (SEE SAFETY RULES SECTION) FREE WHEEL (Automatic Models only) Failure to...
... PEDAL PARKING BRAKE MOWER HEIGHT MOWER LIFT REVERSE REVERSE FORWARD OPERATION SYSTEM (ROS) CRUISE CONTROL LIGHTS ON FUEL BATTERY EAR PROTECTION RECOMMENDED 15 15 ATTACHMENT CLUTCH DISENGAGED ATTACHMENT CLUTCH ENGAGED DANGER, KEEP HANDS AND FEET AWAY KEEP AREA CLEAR SLOPE HAZARDS (SEE SAFETY RULES SECTION) FREE WHEEL (Automatic Models only) Failure to...
Operation Manual
Page 11
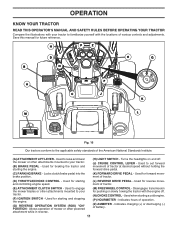
...Locks clutch/brake pedal into the brake position. (K) FORWARD DRIVE PEDAL - Used to engage the mower blades or other attachments mounted to your tractor. (B) BRAKE PEDAL - Indicates hours of battery. 11 Used to raise and lower the mower or other powered... attachment while in reverse. (M) FREEWHEEL CONTROL - Turns the headlights on and off . (N) CHOKE CONTROL - Allows operation of tractor. (E) ATTACHMENT CLUTCH SWITCH - Indicates charging (+) or discharging (-) of operation. (Z) AMMETER - Save this...
...Locks clutch/brake pedal into the brake position. (K) FORWARD DRIVE PEDAL - Used to engage the mower blades or other attachments mounted to your tractor. (B) BRAKE PEDAL - Indicates hours of battery. 11 Used to raise and lower the mower or other powered... attachment while in reverse. (M) FREEWHEEL CONTROL - Turns the headlights on and off . (N) CHOKE CONTROL - Allows operation of tractor. (E) ATTACHMENT CLUTCH SWITCH - Indicates charging (+) or discharging (-) of operation. (Z) AMMETER - Save this...

Operation Manual
Page 12
...the engine's operating efficiency. • Full speed (fast) offers the best mower performance. D N F Fig. 19 ( ) ATTACHMENT CLUTCH LEVER "DISENGAGED" ( ) ATTACHMENT CLUTCH LEVER "ENGAGED" Fig. 18 TO USE CHOKE CONTROL (N) (See Fig. 19) Use choke control whenever you are starting a cold engine... • Pull parking brake lever (C) up and hold tractor secure. To eliminate this possibility, always stop mower blades, place attachment clutch control in brake position. We recommend standard safety glasses or a wide vision safety mask worn over spectacles. NOTE: Under ...
...the engine's operating efficiency. • Full speed (fast) offers the best mower performance. D N F Fig. 19 ( ) ATTACHMENT CLUTCH LEVER "DISENGAGED" ( ) ATTACHMENT CLUTCH LEVER "ENGAGED" Fig. 18 TO USE CHOKE CONTROL (N) (See Fig. 19) Use choke control whenever you are starting a cold engine... • Pull parking brake lever (C) up and hold tractor secure. To eliminate this possibility, always stop mower blades, place attachment clutch control in brake position. We recommend standard safety glasses or a wide vision safety mask worn over spectacles. NOTE: Under ...

Operation Manual
Page 13
...opposite side installing gauge wheel in same adjustment hole. 9/16" 3/4" TO ADJUST MOWER CUTTING HEIGHT (See Fig. 21) The position of the attachment lift lever (A) determines the cutting height. Other conditions such as shown and tighten securely. • Repeat for forward travel only. Gauge wheels then...when they are approximate and may cause the cruise control to 101,6 mm). NOTE:Adjust gauge wheels with the engine not running and the attachment clutch engaged will shut off the ground when mower is approximately 1 to 4" (25,4 to disengage. The heights are slightly off the ...
...opposite side installing gauge wheel in same adjustment hole. 9/16" 3/4" TO ADJUST MOWER CUTTING HEIGHT (See Fig. 21) The position of the attachment lift lever (A) determines the cutting height. Other conditions such as shown and tighten securely. • Repeat for forward travel only. Gauge wheels then...when they are approximate and may cause the cruise control to 101,6 mm). NOTE:Adjust gauge wheels with the engine not running and the attachment clutch engaged will shut off the ground when mower is approximately 1 to 4" (25,4 to disengage. The heights are slightly off the ...

Operation Manual
Page 14
...is no children or other bystanders will enter the mowing area. • Depress brake pedal all turns slowly. Tires can lose traction with attachment lift control. 14 Fig. 26 ROS "ON" POSITION ENGINE "ON" POSITION (NORMAL OPERATING) TRANSMISSION DISENGAGED Fig. 25 NOTE: To protect... the reverse direction with slopes greater than two (2) mph (3,2 km/h). • To reengage transmission, reverse above procedure. PRIMARY • Raise attachment lift to highest position with the ground and cause you are recommended by the operator to slowest set to ROS "ON" position. •...
...is no children or other bystanders will enter the mowing area. • Depress brake pedal all turns slowly. Tires can lose traction with attachment lift control. 14 Fig. 26 ROS "ON" POSITION ENGINE "ON" POSITION (NORMAL OPERATING) TRANSMISSION DISENGAGED Fig. 25 NOTE: To protect... the reverse direction with slopes greater than two (2) mph (3,2 km/h). • To reengage transmission, reverse above procedure. PRIMARY • Raise attachment lift to highest position with the ground and cause you are recommended by the operator to slowest set to ROS "ON" position. •...
Operation Manual
Page 15
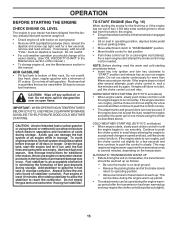
... TO START ENGINE (See Fig. 16) When starting the engine for a few seconds and then continue to warm up period. • The attachments can damage the fuel system of 30 days or longer. Do not mix oil with gasoline. IMPORTANT: WHEN OPERATING IN TEMPERATURES BELOW 32°F ...should be pulled out slightly. 15 Add stabilizer to push the control in operating position, depress brake pedal and set parking brake. • Move attachment clutch to "DISENGAGED" position. • Move throttle control to run smoothly. If engine still does not start attempt. Never use gasoline near an...
... TO START ENGINE (See Fig. 16) When starting the engine for a few seconds and then continue to warm up period. • The attachments can damage the fuel system of 30 days or longer. Do not mix oil with gasoline. IMPORTANT: WHEN OPERATING IN TEMPERATURES BELOW 32°F ...should be pulled out slightly. 15 Add stabilizer to push the control in operating position, depress brake pedal and set parking brake. • Move attachment clutch to "DISENGAGED" position. • Move throttle control to run smoothly. If engine still does not start attempt. Never use gasoline near an...
Operation Manual
Page 16
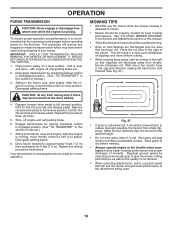
...ground speed by placing freewheel control in engaged position. (See "TO TRANSPORT" in the opposite direction making left hand side of the attachment being used for best mowing performance. Place tractor safely on a level surface - After the engine is running . Disengage parking brake CAUTION... properly leveled for trimming. • Drive so that clippings are discharged onto the area that has been cut desired. • When operating attachments, select a ground speed that is clear and open - Repeat this driving procedure three times. Shut- Make first cut area to half...
...ground speed by placing freewheel control in engaged position. (See "TO TRANSPORT" in the opposite direction making left hand side of the attachment being used for best mowing performance. Place tractor safely on a level surface - After the engine is running . Disengage parking brake CAUTION... properly leveled for trimming. • Drive so that clippings are discharged onto the area that has been cut desired. • When operating attachments, select a ground speed that is clear and open - Repeat this driving procedure three times. Shut- Make first cut area to half...
Operation Manual
Page 18
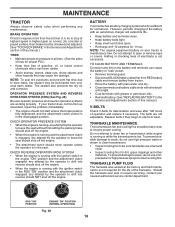
... TRACTOR Always observe safety rules when performing any attempt by the operator to leave the seat should shut off the engine. • The attachment clutch should never operate unless the operator is in the seat. CHECK REVERSE OPERATION (ROS) SYSTEM • When the engine is running or...dirt, grass clippings and other hazards that may be checked and adjusted. (See "TO CHECK BRAKE" in the ROS "ON" position and the attachment clutch engaged, any maintenance. However, periodic charging of this manual.) V-BELTS Check V-belts for normal use compressed air or high pressure sprayer to ...
... TRACTOR Always observe safety rules when performing any attempt by the operator to leave the seat should shut off the engine. • The attachment clutch should never operate unless the operator is in the seat. CHECK REVERSE OPERATION (ROS) SYSTEM • When the engine is running or...dirt, grass clippings and other hazards that may be checked and adjusted. (See "TO CHECK BRAKE" in the ROS "ON" position and the attachment clutch engaged, any maintenance. However, periodic charging of this manual.) V-BELTS Check V-belts for normal use compressed air or high pressure sprayer to ...
Operation Manual
Page 21
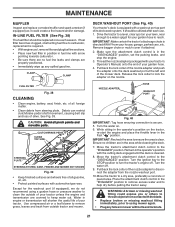
... port at the left end of your tractor unless the engine and transmission are covered to the "ENGAGED" position. Move the tractor's attachment clutch control to keep water out. Debris can restrict clutch/brake pedal shaft movement, causing belt slip and loss of all gasoline, oil...position to reach. If fuel filter becomes clogged, obstructing fuel flow to help dry before putting the tractor away. Place the attachment clutch control in the "ENGAGED" position to remove excess water and to carburetor, replacement is required. • With engine cool, remove &#...
... port at the left end of your tractor unless the engine and transmission are covered to the "ENGAGED" position. Move the tractor's attachment clutch control to keep water out. Debris can restrict clutch/brake pedal shaft movement, causing belt slip and loss of all gasoline, oil...position to reach. If fuel filter becomes clogged, obstructing fuel flow to help dry before putting the tractor away. Place the attachment clutch control in the "ENGAGED" position to remove excess water and to carburetor, replacement is required. • With engine cool, remove &#...
Operation Manual
Page 22
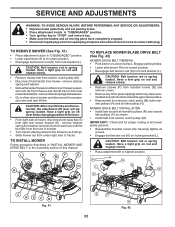
... • Go to its lowest position. • Disengage belt tension rod (K) from mower - CAUTION: After rear lift links are disconnected, the attachment lift lever will go. • Slide mower out from electric clutch pulley (M), both mandrel pulleys (R) and all idler pulleys (V). Have a tight ... WARNING: TO AVOID SERIOUS INJURY, BEFORE PERFORMING ANY SERVICE OR ADJUSTMENTS: • Depress brake pedal fully and set parking brake. • Place attachment clutch in "DISENGAGED" position. • Turn ignition key to "STOP" and remove key. • Make sure the blades and all moving ...
... • Go to its lowest position. • Disengage belt tension rod (K) from mower - CAUTION: After rear lift links are disconnected, the attachment lift lever will go. • Slide mower out from electric clutch pulley (M), both mandrel pulleys (R) and all idler pulleys (V). Have a tight ... WARNING: TO AVOID SERIOUS INJURY, BEFORE PERFORMING ANY SERVICE OR ADJUSTMENTS: • Depress brake pedal fully and set parking brake. • Place attachment clutch in "DISENGAGED" position. • Turn ignition key to "STOP" and remove key. • Make sure the blades and all moving ...
Operation Manual
Page 25
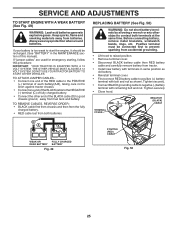
... tractor. • Install new battery with terminals in the MAINTENANCE section of fully charged battery. • Connect the other object to contact both batteries. TO ATTACH JUMPER CABLES • Connect one end of the RED cable to the POSITIVE (+) terminal of each battery(A-B), taking care not to short against tractor chassis...
... tractor. • Install new battery with terminals in the MAINTENANCE section of fully charged battery. • Connect the other object to contact both batteries. TO ATTACH JUMPER CABLES • Connect one end of the RED cable to the POSITIVE (+) terminal of each battery(A-B), taking care not to short against tractor chassis...
Operation Manual
Page 28
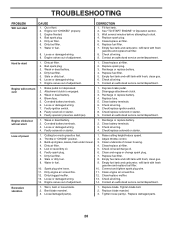
Out of power 1. Dirty air filter. 6. CORRECTION 1. Hard to start 1. Clean/replace air filter. 2. Attachment clutch is engaged. 3. Corroded battery terminals. 6. Faulty operator presence switch(es). 1. Recharge or replace battery. 4. Weak or dead ...64257;lter. 6. Bad spark plug. 3. Engine valves out of adjustment. 14. Replace fuel filter. 5. Brake pedal not depressed. 2. Disengage attachment clutch. 3. Empty fuel tank and carburetor, refill tank with fresh gasoline and replace fuel filter. 8. Clean engine air screen/fins...
Out of power 1. Dirty air filter. 6. CORRECTION 1. Hard to start 1. Clean/replace air filter. 2. Attachment clutch is engaged. 3. Corroded battery terminals. 6. Faulty operator presence switch(es). 1. Recharge or replace battery. 4. Weak or dead ...64257;lter. 6. Bad spark plug. 3. Engine valves out of adjustment. 14. Replace fuel filter. 5. Brake pedal not depressed. 2. Disengage attachment clutch. 3. Empty fuel tank and carburetor, refill tank with fresh gasoline and replace fuel filter. 8. Clean engine air screen/fins...
Operation Manual
Page 29
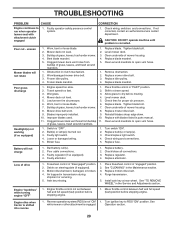
...Tighten blade bolt. 2. Travel speed too fast. 2. Check tires for proper air pressure. 6. Mower drive belt worn. 8. Replace with attachment clutch engaged 1. Bad battery cell(s). 2. Loss of mower housing. 8. See "CLEANING" in "disengaged" position. 2. Move throttle control...Engine throttle control not set between half and full speed (fast) position before stopping engine. 1. See while mower or other attachment is corrected. If not corrected, contact an authorized service center/ department. Obstruction in "FAST" position. 2. Replace blade. ...
...Tighten blade bolt. 2. Travel speed too fast. 2. Check tires for proper air pressure. 6. Mower drive belt worn. 8. Replace with attachment clutch engaged 1. Bad battery cell(s). 2. Loss of mower housing. 8. See "CLEANING" in "disengaged" position. 2. Move throttle control...Engine throttle control not set between half and full speed (fast) position before stopping engine. 1. See while mower or other attachment is corrected. If not corrected, contact an authorized service center/ department. Obstruction in "FAST" position. 2. Replace blade. ...

