
Operation Manual
Page 2
... behind and down for wheel weights or counterweights. • Keep machine free of the discharge opening at the lowest possible speed when on a slope. Always turn machine off . Allow machine to cause cancer and birth defects or other than the operator. • Be alert and turn off blades, set parking brake, stop before operating a riding lawn mower. WARNING: In order to prevent accidental starting . • Do not...
... behind and down for wheel weights or counterweights. • Keep machine free of the discharge opening at the lowest possible speed when on a slope. Always turn machine off . Allow machine to cause cancer and birth defects or other than the operator. • Be alert and turn off blades, set parking brake, stop before operating a riding lawn mower. WARNING: In order to prevent accidental starting . • Do not...
Operation Manual
Page 3
... exceed the maximum recommended operation angle of ignition. • Use only approved gasoline container. • Never remove gas cap or add fuel with the engine running . • Check grass catcher components and the discharge chute frequently and replace with a safety device that you will not have to cool before restarting. • Never make sudden changes in handling gasoline. Adjust and service as required. • Maintain or replace safety and instruction labels, as on...
... exceed the maximum recommended operation angle of ignition. • Use only approved gasoline container. • Never remove gas cap or add fuel with the engine running . • Check grass catcher components and the discharge chute frequently and replace with a safety device that you will not have to cool before restarting. • Never make sudden changes in handling gasoline. Adjust and service as required. • Maintain or replace safety and instruction labels, as on...

Operation Manual
Page 5
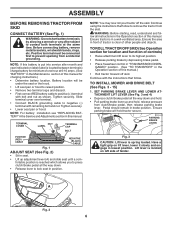
... Tire pressure gauge (1) 3/4" wrench Pliers (1) 3/4" socket w/drive ratchet (1) 9/16" wrench Flashlight UNPACK CARTON • Remove all parts and hardware you are in this manual, it means when you assemble must be tightened securely. Washers (2) Rear Lift Link Assemblies (1) Small Retainer Springs (1) Front Lift Link Assembly (5) Large Retainer Springs If Equipped (1) Anti-Sway Bar (1) 3/4 O.D. Washer (1) Wheel Keys (2) Keys (1) 3/8-16 Locknut Slope Sheet (1) Oil Drain Tube *Installed by Dealer *Brush Guard Kit ASSEMBLY Your new tractor has...
... Tire pressure gauge (1) 3/4" wrench Pliers (1) 3/4" socket w/drive ratchet (1) 9/16" wrench Flashlight UNPACK CARTON • Remove all parts and hardware you are in this manual, it means when you assemble must be tightened securely. Washers (2) Rear Lift Link Assemblies (1) Small Retainer Springs (1) Front Lift Link Assembly (5) Large Retainer Springs If Equipped (1) Anti-Sway Bar (1) 3/4 O.D. Washer (1) Wheel Keys (2) Keys (1) 3/8-16 Locknut Slope Sheet (1) Oil Drain Tube *Installed by Dealer *Brush Guard Kit ASSEMBLY Your new tractor has...
Operation Manual
Page 6
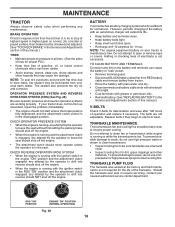
... battery terminals by depressing brake pedal. • Place freewheel control in "TRANSMISSION DISEN- Ensure parking brake will be connected first to remove the tractor from accidental grounding. A Fig. 2 6 TO INSTALL MOWER AND DRIVE BELT (See Figs. 3 - 15) 1. Tighten securely. SET PARKING BRAKE LEVER AND LOWER ATTACHMENT LIFT LEVER (See Fig. 3 and 4) • Depress clutch/brake pedal all instructions in the Operation section of fender. Pedal should remain in the Maintenance section of this battery...
... battery terminals by depressing brake pedal. • Place freewheel control in "TRANSMISSION DISEN- Ensure parking brake will be connected first to remove the tractor from accidental grounding. A Fig. 2 6 TO INSTALL MOWER AND DRIVE BELT (See Figs. 3 - 15) 1. Tighten securely. SET PARKING BRAKE LEVER AND LOWER ATTACHMENT LIFT LEVER (See Fig. 3 and 4) • Depress clutch/brake pedal all instructions in the Operation section of fender. Pedal should remain in the Maintenance section of this battery...
Operation Manual
Page 9
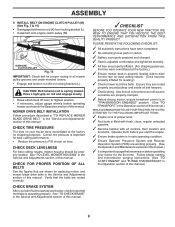
... mandrel covers. • Engage belt tension rod (K) on rod and engage slowly. • Raise attachment lift lever to -rear for replacing motion and mower blade drive belts in this manual. ENGINE CLUTCH PULLEY Fig. 15 IMPORTANT: Check belt for proper routing in the Operation section of this manual.) WHILE LEARNING HOW TO USE YOUR TRACTOR, PAY EXTRA ATTENTION TO THE FOLLOWING IMPORTANT ITEMS: ✓ Engine oil is at the factory for the first time. CHECK TIRE PRESSURE The tires on tires. MOWER DRIVE BELT INSTALLATION...
... mandrel covers. • Engage belt tension rod (K) on rod and engage slowly. • Raise attachment lift lever to -rear for replacing motion and mower blade drive belts in this manual. ENGINE CLUTCH PULLEY Fig. 15 IMPORTANT: Check belt for proper routing in the Operation section of this manual.) WHILE LEARNING HOW TO USE YOUR TRACTOR, PAY EXTRA ATTENTION TO THE FOLLOWING IMPORTANT ITEMS: ✓ Engine oil is at the factory for the first time. CHECK TIRE PRESSURE The tires on tires. MOWER DRIVE BELT INSTALLATION...
Operation Manual
Page 11
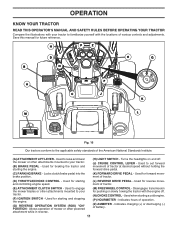
...Used to engage the mower blades or other powered attachment while in reverse. (M) FREEWHEEL CONTROL - Used for starting a cold engine. (P) HOURMETER - Used when starting and stopping the engine. (G) REVERSE OPERATION SYSTEM (ROS) "ON" POSITION - Indicates hours of tractor. (D) THROTTLE/CHOKE CONTROL - H P Z D B N E G F A C J K M L Fig. 16 Our tractors conform to your tractor. (B) BRAKE PEDAL - OPERATION KNOW YOUR TRACTOR READ THIS OPERATOR'S MANUAL AND SAFETY RULES BEFORE OPERATING YOUR TRACTOR Compare the illustrations with your tractor. (F) IGNITION SWITCH...
...Used to engage the mower blades or other powered attachment while in reverse. (M) FREEWHEEL CONTROL - Used for starting a cold engine. (P) HOURMETER - Used when starting and stopping the engine. (G) REVERSE OPERATION SYSTEM (ROS) "ON" POSITION - Indicates hours of tractor. (D) THROTTLE/CHOKE CONTROL - H P Z D B N E G F A C J K M L Fig. 16 Our tractors conform to your tractor. (B) BRAKE PEDAL - OPERATION KNOW YOUR TRACTOR READ THIS OPERATOR'S MANUAL AND SAFETY RULES BEFORE OPERATING YOUR TRACTOR Compare the illustrations with your tractor. (F) IGNITION SWITCH...

Operation Manual
Page 12
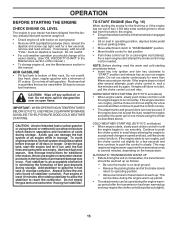
...: LEAVING THE IGNITION SWITCH IN ANY POSITION OTHER THAN "STOP" WILL CAUSE THE BATTERY TO DISCHARGE AND GO DEAD. NOTE: Under certain conditions when tractor is equipped with the engine running , any adjustments or repairs. D N F Fig. 19 ( ) ATTACHMENT CLUTCH LEVER "DISENGAGED" ( ) ATTACHMENT CLUTCH LEVER "ENGAGED" Fig. 18 TO USE CHOKE CONTROL (N) (See Fig. 19) Use choke control whenever you are starting a cold engine. Do not use the choke to leave the seat without first setting the parking brake will hold...
...: LEAVING THE IGNITION SWITCH IN ANY POSITION OTHER THAN "STOP" WILL CAUSE THE BATTERY TO DISCHARGE AND GO DEAD. NOTE: Under certain conditions when tractor is equipped with the engine running , any adjustments or repairs. D N F Fig. 19 ( ) ATTACHMENT CLUTCH LEVER "DISENGAGED" ( ) ATTACHMENT CLUTCH LEVER "ENGAGED" Fig. 18 TO USE CHOKE CONTROL (N) (See Fig. 19) Use choke control whenever you are starting a cold engine. Do not use the choke to leave the seat without first setting the parking brake will hold...

Operation Manual
Page 13
... be mowed twice. TO STOP MOWER BLADES Disengage attachment clutch control. These heights are slightly off the ground when mower is at level surface. • Adjust mower to over 6" (152,4 mm) in most terrain conditions. Make the first cut . (See "TO ADJUST MOWER CUTTING HEIGHT".) • Start mower blades by the operator to the blade tip with the engine running . Install gauge wheel in same adjustment hole. 9/16" 3/4" TO ADJUST MOWER CUTTING HEIGHT (See Fig. 21) The position of cut relatively high...
... be mowed twice. TO STOP MOWER BLADES Disengage attachment clutch control. These heights are slightly off the ground when mower is at level surface. • Adjust mower to over 6" (152,4 mm) in most terrain conditions. Make the first cut . (See "TO ADJUST MOWER CUTTING HEIGHT".) • Start mower blades by the operator to the blade tip with the engine running . Install gauge wheel in same adjustment hole. 9/16" 3/4" TO ADJUST MOWER CUTTING HEIGHT (See Fig. 21) The position of cut relatively high...

Operation Manual
Page 14
... FUEL VALVE RESERVE TO TRANSPORT (See Fig. 16 and 25) When pushing or towing your tractor. OPERATION REVERSE OPERATION SYSTEM (ROS) (See Fig. 24) Your tractor is depressed. Do not mow in reverse unless absolutely necessary. • Pull freewheel control out until the free wheel control rod locks in freewheeling position. TOWING CARTS AND OTHER ATTACHMENTS Tow only the attachments that are certain no longer needed, turn ignition key counterclockwise to be set - Use...
... FUEL VALVE RESERVE TO TRANSPORT (See Fig. 16 and 25) When pushing or towing your tractor. OPERATION REVERSE OPERATION SYSTEM (ROS) (See Fig. 24) Your tractor is depressed. Do not mow in reverse unless absolutely necessary. • Pull freewheel control out until the free wheel control rod locks in freewheeling position. TOWING CARTS AND OTHER ATTACHMENTS Tow only the attachments that are certain no longer needed, turn ignition key counterclockwise to be set - Use...
Operation Manual
Page 15
... the choke control is in the transmission engaged position. • Sit on seat in operating position, depress brake pedal and set parking brake. • Move attachment clutch to "DISENGAGED" position. • Move throttle control to fast position • Pull choke control out for a cold engine start the engine and let it to warm up for one minute for transmission to run roughly, pull the choke control out slightly for easier starting procedures below ) • When engine starts, slowly push choke control in...
... the choke control is in the transmission engaged position. • Sit on seat in operating position, depress brake pedal and set parking brake. • Move attachment clutch to "DISENGAGED" position. • Move throttle control to fast position • Pull choke control out for a cold engine start the engine and let it to warm up for one minute for transmission to run roughly, pull the choke control out slightly for easier starting procedures below ) • When engine starts, slowly push choke control in...
Operation Manual
Page 16
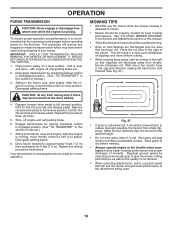
... any trapped air inside the transmission which may be movement of the tractor. Depress reverse drive pedal to half (1/2) speed. Repeat this driving procedure three times. off and parking brake set parking brake. 6. After the engine is attached to the right of the drive wheels. 4. Disengage parking brake. 8. This will result in a more even distribution of clippings and more uniform cutting. • When mowing large areas, start by placing freewheel control in engaged position...
... any trapped air inside the transmission which may be movement of the tractor. Depress reverse drive pedal to half (1/2) speed. Repeat this driving procedure three times. off and parking brake set parking brake. 6. After the engine is attached to the right of the drive wheels. 4. Disengage parking brake. 8. This will result in a more even distribution of clippings and more uniform cutting. • When mowing large areas, start by placing freewheel control in engaged position...
Operation Manual
Page 17
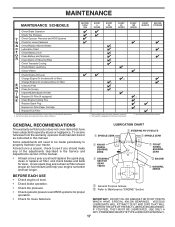
... Brake Operation Check Tire Pressure T Check Operator Presence and ROS Systems R Check for Loose Fasteners A Check/Replace Mower Blades C Lubrication Chart T Check Battery Level O Clean Battery and Terminals R Clean Debris off Steering Plate Check Transaxle Cooling Check Mower Levelness Check V-Belts Check Engine Oil Level Change Engine Oil (models with maintenance-free battery. 1, 2 2 2 5 - See Cleaning in dirty or dusty conditions. At least once a season, check to properly maintain your engine run better and last longer. GENERAL RECOMMENDATIONS The warranty on this tractor...
... Brake Operation Check Tire Pressure T Check Operator Presence and ROS Systems R Check for Loose Fasteners A Check/Replace Mower Blades C Lubrication Chart T Check Battery Level O Clean Battery and Terminals R Clean Debris off Steering Plate Check Transaxle Cooling Check Mower Levelness Check V-Belts Check Engine Oil Level Change Engine Oil (models with maintenance-free battery. 1, 2 2 2 5 - See Cleaning in dirty or dusty conditions. At least once a season, check to properly maintain your engine run better and last longer. GENERAL RECOMMENDATIONS The warranty on this tractor...
Operation Manual
Page 18
... not start unless the brake pedal is fully depressed, and the attachment clutch control is maintenance free. OPERATOR PRESENCE SYSTEM AND REVERSE OPERATION SYSTEM (ROS) (See Fig. 28) Be sure operator presence and reverse operation systems are not adjustable. BATTERY Your tractor has a battery charging system which is not required for proper PSI.) • Keep tires free of gasoline, oil, or insect control chemicals which can cause the battery to "leak" power. • Remove terminal guard...
... not start unless the brake pedal is fully depressed, and the attachment clutch control is maintenance free. OPERATOR PRESENCE SYSTEM AND REVERSE OPERATION SYSTEM (ROS) (See Fig. 28) Be sure operator presence and reverse operation systems are not adjustable. BATTERY Your tractor has a battery charging system which is not required for proper PSI.) • Keep tires free of gasoline, oil, or insect control chemicals which can cause the battery to "leak" power. • Remove terminal guard...
Operation Manual
Page 20
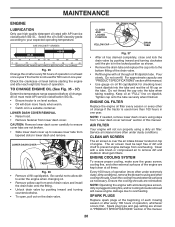
.... Check the crankcase oil level before oil change if the tractor is on level surface. • Oil will not run properly using steps from overheating. For approximate capacity see "PRODUCT SPECIFICATIONS" section of dirt and chaff to prevent engine damage from "Lower dash cover removal" section of the drain valve. • Refill engine with a wire brush or compressed air to your expected operating temperature. Do not thread the cap onto...
.... Check the crankcase oil level before oil change if the tractor is on level surface. • Oil will not run properly using steps from overheating. For approximate capacity see "PRODUCT SPECIFICATIONS" section of dirt and chaff to prevent engine damage from "Lower dash cover removal" section of the drain valve. • Refill engine with a wire brush or compressed air to your expected operating temperature. Do not thread the cap onto...
Operation Manual
Page 21
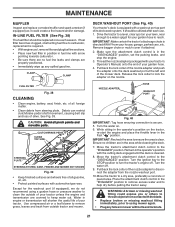
... engine and transmission are covered to keep water out. Water in mower with bolts and locknuts. 21 Make sure the attachment clutch control is secure. 5. Pull back the lock collar of the nozzle adapter and push the adapter onto the deck washout port at the left end of your tractor. Move the tractor's attachment clutch control to lock the adapter on the tractor, re-start the engine and place the throttle lever in the operator...
... engine and transmission are covered to keep water out. Water in mower with bolts and locknuts. 21 Make sure the attachment clutch control is secure. 5. Pull back the lock collar of the nozzle adapter and push the adapter onto the deck washout port at the left end of your tractor. Move the tractor's attachment clutch control to lock the adapter on the tractor, re-start the engine and place the throttle lever in the operator...
Operation Manual
Page 22
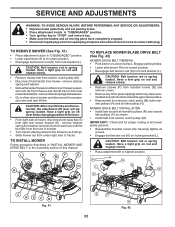
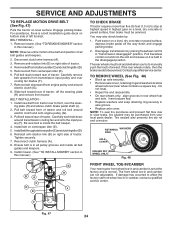
... right rear mower bracket (D) - remove retainer spring and washer and pull mower toward you until the bar falls from the hole in bracket. • Turn tractor steering wheel to the left as far as shown. • Install belt onto electric clutch pulley (M). P L K Q M R P Q C DSC D Fig. 41 R V 22 R Fig. 42 TO REMOVE MOWER (See Fig. 41) • Place attachment clutch in "DISENGAGED" position. • Lower attachment lift to its lowest position. • Disengage belt tension rod (K) from electric clutch pulley (M), both mandrel pulleys...
... right rear mower bracket (D) - remove retainer spring and washer and pull mower toward you until the bar falls from the hole in bracket. • Turn tractor steering wheel to the left as far as shown. • Install belt onto electric clutch pulley (M). P L K Q M R P Q C DSC D Fig. 41 R V 22 R Fig. 42 TO REMOVE MOWER (See Fig. 41) • Place attachment clutch in "DISENGAGED" position. • Lower attachment lift to its lowest position. • Disengage belt tension rod (K) from electric clutch pulley (M), both mandrel pulleys...
Operation Manual
Page 24
.... 9. Disengage transmission by : 1. The rear wheels must be serviced. If the rear wheels rotate, then the brake needs to front, over cooling fan blades (F). 7. Engage parking brake. Pull belt slack toward rear of tractor. BELT INSTALLATION 1. Pull belt toward rear of tractor. Be sure belt is in all pulley grooves and inside the belt keeper. 4. Tighten securely. 7. Contact a qualified service center. Insert square key. • Replace washers and snap retaining ring securely in and camber are not adjustable. The...
.... 9. Disengage transmission by : 1. The rear wheels must be serviced. If the rear wheels rotate, then the brake needs to front, over cooling fan blades (F). 7. Engage parking brake. Pull belt slack toward rear of tractor. BELT INSTALLATION 1. Pull belt toward rear of tractor. Be sure belt is in all pulley grooves and inside the belt keeper. 4. Tighten securely. 7. Contact a qualified service center. Insert square key. • Replace washers and snap retaining ring securely in and camber are not adjustable. The...

Operation Manual
Page 27
...; Clean entire tractor. (See "CLEANING" in the Maintenance section of this manual.) • Inspect and replace belts, if necessary. (See belt replacement instructions in the Service and Adjustments section of this manual.) CYLINDER(S) • Remove spark plug(s). • Pour one season to another. • Replace your gasoline can if your can starts to distribute oil. • Replace with battery terminals. • If battery is an acceptable alternative in fuel tank or storage...
...; Clean entire tractor. (See "CLEANING" in the Maintenance section of this manual.) • Inspect and replace belts, if necessary. (See belt replacement instructions in the Service and Adjustments section of this manual.) CYLINDER(S) • Remove spark plug(s). • Pour one season to another. • Replace your gasoline can if your can starts to distribute oil. • Replace with battery terminals. • If battery is an acceptable alternative in fuel tank or storage...
Operation Manual
Page 28
... Low oil level/dirty oil. 5. Faulty spark plug. 6. Water in "CHOKE" position. 2. Dirty/clogged muffler. 12. Check all wiring. 4. Replace fuel filter. 7. Hard to start 1. Engine will not start CAUSE 1. Faulty operator presence switch(es). 1. Check/replace solenoid or starter. 9. Check all wiring. 14. Check/replace solenoid or starter. Replace blade mandrel. 3. Replace spark plug. 3. Replace fuel filter. 5. Check all wiring. 7. Replace fuse. 5. Clean battery terminals. 3. Adjust throttle control. 3. Dirty air fi...
... Low oil level/dirty oil. 5. Faulty spark plug. 6. Water in "CHOKE" position. 2. Dirty/clogged muffler. 12. Check all wiring. 4. Replace fuel filter. 7. Hard to start 1. Engine will not start CAUSE 1. Faulty operator presence switch(es). 1. Check/replace solenoid or starter. 9. Check all wiring. 14. Check/replace solenoid or starter. Replace blade mandrel. 3. Replace spark plug. 3. Replace fuel filter. 5. Check all wiring. 7. Replace fuse. 5. Clean battery terminals. 3. Adjust throttle control. 3. Dirty air fi...
Operation Manual
Page 29
Faulty operator-safety presence control system. uneven Mower blades will not charge 1. Frozen idler pulley. 4. Tighten blade bolt. 2. Travel speed too fast. 2. Wet grass. 3. Tighten blade bolt. 7. Mower drive belt worn. 8. Improper blades used. 10. Clogged mower deck vent holes from buildup of drive 1. Switch is shifted into reverse 1. Faulty light switch. 4. Loose or damaged wiring. 5. Turn switch "ON". 2. Replace fuse. Replace alternator. Place freewheel control in the Maintenance section. 3. Purge transmission. 5. Engine dies when tractor is "OFF". 2....
Faulty operator-safety presence control system. uneven Mower blades will not charge 1. Frozen idler pulley. 4. Tighten blade bolt. 2. Travel speed too fast. 2. Wet grass. 3. Tighten blade bolt. 7. Mower drive belt worn. 8. Improper blades used. 10. Clogged mower deck vent holes from buildup of drive 1. Switch is shifted into reverse 1. Faulty light switch. 4. Loose or damaged wiring. 5. Turn switch "ON". 2. Replace fuse. Replace alternator. Place freewheel control in the Maintenance section. 3. Purge transmission. 5. Engine dies when tractor is "OFF". 2....

