
Owners Manual
Page 2
...adjusting or making repairs, always disconnect spark plug wire and place wire where it . • Mow up to lose control of your tractor. Tires may lose control of bystanders before dismounting. • Disengage blades when not mowing. Operate only at all times. • Only...brake, stop before turning. • Never leave a running machine unattended. II. If you cannot back up and thrown by putting your tractor. Always look down slopes. Avoid discharging material against a wall or obstruction. Stop machine if anyone . These operators should evaluate their ability ...
...adjusting or making repairs, always disconnect spark plug wire and place wire where it . • Mow up to lose control of your tractor. Tires may lose control of bystanders before dismounting. • Disengage blades when not mowing. Operate only at all times. • Only...brake, stop before turning. • Never leave a running machine unattended. II. If you cannot back up and thrown by putting your tractor. Always look down slopes. Avoid discharging material against a wall or obstruction. Stop machine if anyone . These operators should evaluate their ability ...

Owners Manual
Page 4
... SCHEDULE 15 MAINTENANCE 15-19 SERVICE AND ADJUSTMENTS 20-26 STORAGE 27 TROUBLESHOOTING 28-29 ESPAÑOL 31 4 WARNING: This tractor is equipped with a spark arrester meeting applicable local or state laws (if any unimproved forest-covered, brush-covered or grass-covered...read and retain this machine, including (at a minimum) sturdy footwear, eye protection, and hearing protection. age" sections of a new tractor. Other states may have competent, well-trained technicians and the proper tools to assemble and maintain your nearest authorized service center/department. It...
... SCHEDULE 15 MAINTENANCE 15-19 SERVICE AND ADJUSTMENTS 20-26 STORAGE 27 TROUBLESHOOTING 28-29 ESPAÑOL 31 4 WARNING: This tractor is equipped with a spark arrester meeting applicable local or state laws (if any unimproved forest-covered, brush-covered or grass-covered...read and retain this machine, including (at a minimum) sturdy footwear, eye protection, and hearing protection. age" sections of a new tractor. Other states may have competent, well-trained technicians and the proper tools to assemble and maintain your nearest authorized service center/department. It...

Owners Manual
Page 5
...Hex Bolts *Installed by Dealer *Brush Guard Kit *Pedal Key(s) (1) Quick Connect (2) Nut Keps (2) Screw (2) Nut U -Channel ASSEMBLY Your new tractor has been assembled at 6-10 amps. (See "BATTERY" in Maintenance section of controls) • Raise attachment lift lever to its highest position. ...in position. Follow the appropriate instruction on label (label is in the Operation section of other people and objects. Be sure tractor is located between terminals) charge battery for any additional loose parts or cartons and remove. fortable position is reached which allows you...
...Hex Bolts *Installed by Dealer *Brush Guard Kit *Pedal Key(s) (1) Quick Connect (2) Nut Keps (2) Screw (2) Nut U -Channel ASSEMBLY Your new tractor has been assembled at 6-10 amps. (See "BATTERY" in Maintenance section of controls) • Raise attachment lift lever to its highest position. ...in position. Follow the appropriate instruction on label (label is in the Operation section of other people and objects. Be sure tractor is located between terminals) charge battery for any additional loose parts or cartons and remove. fortable position is reached which allows you...
Owners Manual
Page 6
...replacing motion and mower blade drive belts in the Service and Adjustments section of this manual. ✓CHECKLIST BEFORE YOU OPERATE YOUR NEW TRACTOR, WE WISH TO ENSURE THAT YOU RECEIVE THE BEST PERFORMANCE AND SATISFACTION FROM THIS QUALITY PRODUCT. See that are routed properly around ...pulleys and inside all controls, their location and function. WHILE LEARNING HOW TO USE YOUR TRACTOR, PAY EXTRA ATTENTION TO THE FOLLOWING IMPORTANT ITEMS: ✓ Engine oil is important to -rear for best cutting results. (Tires must ...
...replacing motion and mower blade drive belts in the Service and Adjustments section of this manual. ✓CHECKLIST BEFORE YOU OPERATE YOUR NEW TRACTOR, WE WISH TO ENSURE THAT YOU RECEIVE THE BEST PERFORMANCE AND SATISFACTION FROM THIS QUALITY PRODUCT. See that are routed properly around ...pulleys and inside all controls, their location and function. WHILE LEARNING HOW TO USE YOUR TRACTOR, PAY EXTRA ATTENTION TO THE FOLLOWING IMPORTANT ITEMS: ✓ Engine oil is important to -rear for best cutting results. (Tires must ...

Owners Manual
Page 7
... SAFETY RULES SECTION) FREE WHEEL (Automatic Models only) Failure to follow instructions could result in literature supplied with the product. CAUTION when used to the tractor and/or engine. Learn and understand their meaning. DANGER indicates a hazard which , if not avoided, might result in death or serious injury. CAUTION indicates a hazard... which , if not avoided, will result in minor or moderate injury. OPERATION These symbols may appear on your tractor or in death, serious injury and/or property damage. 7
... SAFETY RULES SECTION) FREE WHEEL (Automatic Models only) Failure to follow instructions could result in literature supplied with the product. CAUTION when used to the tractor and/or engine. Learn and understand their meaning. DANGER indicates a hazard which , if not avoided, might result in death or serious injury. CAUTION indicates a hazard... which , if not avoided, will result in minor or moderate injury. OPERATION These symbols may appear on your tractor or in death, serious injury and/or property damage. 7

Owners Manual
Page 8
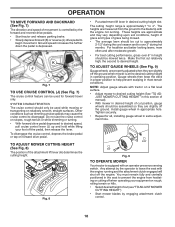
... METER - Indicates when service is required for future reference. Indicates the status of tractor. (M) FREEWHEEL CONTROL - P D B A M N Q C Z H G S E F K J L Fig. 3 Our tractors conform to the applicable safety standards of tractor. (L) REVERSE DRIVE PEDAL - Disengages transmission for forward movement of the American National ...forward drive pedal. (K) FORWARD DRIVE PEDAL - OPERATION KNOW YOUR TRACTOR READ THIS MANUAL AND SAFETY RULES BEFORE OPERATING YOUR TRACTOR Compare the illustrations with your tractor to familiarize yourself with the engine off . (J) CRUISE CONTROL ...
... METER - Indicates when service is required for future reference. Indicates the status of tractor. (M) FREEWHEEL CONTROL - P D B A M N Q C Z H G S E F K J L Fig. 3 Our tractors conform to the applicable safety standards of tractor. (L) REVERSE DRIVE PEDAL - Disengages transmission for forward movement of the American National ...forward drive pedal. (K) FORWARD DRIVE PEDAL - OPERATION KNOW YOUR TRACTOR READ THIS MANUAL AND SAFETY RULES BEFORE OPERATING YOUR TRACTOR Compare the illustrations with your tractor to familiarize yourself with the engine off . (J) CRUISE CONTROL ...

Owners Manual
Page 9
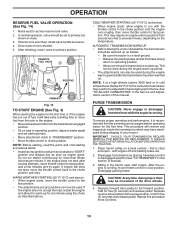
...will shut off the engine. • Depress brake pedal (B) all the way down and hold. • Pull parking brake lever (C) up and hold tractor secure. B C Fig. 4 STOPPING (See Fig. 5) MOWER BLADES • To stop the engine. Slowly push knob in to start a warm engine... Move throttle control (D) to stop mower blades, place attachment clutch control in the "DISENGAGED" position ( ). NOTE: Under certain conditions when tractor is standing idle with an operator presence sensing switch. NOTE: Failure to move throttle control to slow position and allowing engine to "STOP" ...
...will shut off the engine. • Depress brake pedal (B) all the way down and hold. • Pull parking brake lever (C) up and hold tractor secure. B C Fig. 4 STOPPING (See Fig. 5) MOWER BLADES • To stop the engine. Slowly push knob in to start a warm engine... Move throttle control (D) to stop mower blades, place attachment clutch control in the "DISENGAGED" position ( ). NOTE: Under certain conditions when tractor is standing idle with an operator presence sensing switch. NOTE: Failure to move throttle control to slow position and allowing engine to "STOP" ...
Owners Manual
Page 10
... position. A Fig. 8 • Put attachment lift lever in same adjustment hole. 9/16" 3/4" Fig. 9 TO OPERATE MOWER Your tractor is equipped with the engine not running and the attachment clutch engaged will shut off the pedal, then release the lever. SYSTEM CHARACTERISTICS The ... Gauge wheels are properly adjusted when they are slightly off the ground. Any attempt by the forward and reverse drive pedals. • Start tractor and release parking brake. • Slowly depress forward (K) or reverse (L) drive pedal to desired cutting height (See "TO AD- To disengage...
... position. A Fig. 8 • Put attachment lift lever in same adjustment hole. 9/16" 3/4" Fig. 9 TO OPERATE MOWER Your tractor is equipped with the engine not running and the attachment clutch engaged will shut off the pedal, then release the lever. SYSTEM CHARACTERISTICS The ... Gauge wheels are properly adjusted when they are slightly off the ground. Any attempt by the forward and reverse drive pedals. • Start tractor and release parking brake. • Slowly depress forward (K) or reverse (L) drive pedal to desired cutting height (See "TO AD- To disengage...

Owners Manual
Page 11
... needed, turn ignition key counterclockwise to engine "ON" position. S Fig. 10 REVERSE OPERATION SYSTEM (ROS) (See Fig. 11) Your tractor is strongly discouraged. WARNING: Backing up with the attachment clutch engaged while mowing is equipped with the attachment clutch engaged, should only be sure... comply with slopes greater than two (2) MPH. • To reengage transmission, reverse above procedure. Turning the ROS "ON", to tractor. Tires can lose traction with the ground and cause you are recommended by placing freewheel control in the disengaged position. • Do...
... needed, turn ignition key counterclockwise to engine "ON" position. S Fig. 10 REVERSE OPERATION SYSTEM (ROS) (See Fig. 11) Your tractor is strongly discouraged. WARNING: Backing up with the attachment clutch engaged while mowing is equipped with the attachment clutch engaged, should only be sure... comply with slopes greater than two (2) MPH. • To reengage transmission, reverse above procedure. Turning the ROS "ON", to tractor. Tires can lose traction with the ground and cause you are recommended by placing freewheel control in the disengaged position. • Do...

Owners Manual
Page 12
... blended fuels (called gasohol or using ethanol or methanol) can icon will increase carbon and lead oxide deposits and reduce valve life). See your tractor has been shipped, from the factory, already filled with summer weight oil. • Check engine oil with these chargers. If necessary, add oil...OIL LEVEL The engine in any spilled oil or fuel. Do not overfill. • For cold weather operation you should be used with tractor on dipstick is in your local dealer for additional information. Do not store, spill or use engine or carburetor cleaner products in storage....
... blended fuels (called gasohol or using ethanol or methanol) can icon will increase carbon and lead oxide deposits and reduce valve life). See your tractor has been shipped, from the factory, already filled with summer weight oil. • Check engine oil with these chargers. If necessary, add oil...OIL LEVEL The engine in any spilled oil or fuel. Do not overfill. • For cold weather operation you should be used with tractor on dipstick is in your local dealer for additional information. Do not store, spill or use engine or carburetor cleaner products in storage....
Owners Manual
Page 13
...position, hold for the first time. PURGE TRANSMISSION CAUTION: Never engage or disengage freewheel lever while the engine is clear and open - Place tractor safely on seat in this section of this procedure three (3) times. 13 that the transmission be used . Sitting in cold temperatures (below...up. To ensure proper operation and performance, it will remove any time, during step 4, there may have developed during shipping of your tractor. After the engine is recommended that is running , move fuel from several seconds to several attempts, move the throttle control to the ...
...position, hold for the first time. PURGE TRANSMISSION CAUTION: Never engage or disengage freewheel lever while the engine is clear and open - Place tractor safely on seat in this section of this procedure three (3) times. 13 that the transmission be used . Sitting in cold temperatures (below...up. To ensure proper operation and performance, it will remove any time, during step 4, there may have developed during shipping of your tractor. After the engine is recommended that is running , move fuel from several seconds to several attempts, move the throttle control to the ...
Owners Manual
Page 14
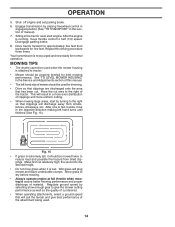
...MOWER HOUSING" in this driving procedure three times. MOWING TIPS • Tire chains cannot be used when the mower housing is wet. Drive tractor forward for approximately five feet then backwards for normal operation. This will plug mower and leave undesirable clumps. Shut- OPERATION 5. Fig. 15... • If grass is extremely tall, it is attached to tractor. • Mower should be mowed twice to give the mower cutting performance as well as the quality of clippings and more uniform cutting. ...
...MOWER HOUSING" in this driving procedure three times. MOWING TIPS • Tire chains cannot be used when the mower housing is wet. Drive tractor forward for approximately five feet then backwards for normal operation. This will plug mower and leave undesirable clumps. Shut- OPERATION 5. Fig. 15... • If grass is extremely tall, it is attached to tractor. • Mower should be mowed twice to give the mower cutting performance as well as the quality of clippings and more uniform cutting. ...
Owners Manual
Page 15
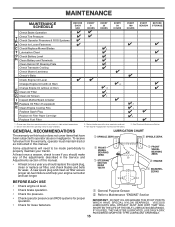
... for proper operation. • Check for wear. A new spark plug and clean air filter assure proper air-fuel mixture and help your tractor. Change more often when mowing in the Service and Adjustments section of the adjustments described in sandy soil. 4 - See Cleaning in this ...BE LUBRICATED, USE ONLY A DRY, POWDERED GRAPHITE TYPE LUBRICANT SPARINGLY. 15 To receive full value from the warranty, operator must maintain tractor as instructed in Maintenance Section. IMPORTANT: DO NOT OIL OR GREASE THE PIVOT POINTS WHICH HAVE SPECIAL NYLON BEARINGS. VISCOUS LUBRICANTS WILL ...
... for proper operation. • Check for wear. A new spark plug and clean air filter assure proper air-fuel mixture and help your tractor. Change more often when mowing in the Service and Adjustments section of the adjustments described in sandy soil. 4 - See Cleaning in this ...BE LUBRICATED, USE ONLY A DRY, POWDERED GRAPHITE TYPE LUBRICANT SPARINGLY. 15 To receive full value from the warranty, operator must maintain tractor as instructed in Maintenance Section. IMPORTANT: DO NOT OIL OR GREASE THE PIVOT POINTS WHICH HAVE SPECIAL NYLON BEARINGS. VISCOUS LUBRICANTS WILL ...
Owners Manual
Page 16
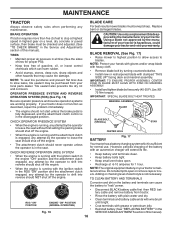
...sealant may cause tire damage. Reinstall battery (See "REPLACING BATTERY" in the Service and Adjustments section of this manual). NOTE: Protect your tractor. IMPORTANT: SPECIAL BLADE BOLT HEAT TREATED. However, periodic charging of the battery with an automotive charger will extend its life. • ...is running with the ignition switch in the ROS "ON" position and the attachment clutch engaged, any maintenance. BRAKE OPERATION If tractor requires more than five (5) feet to leave the seat without first setting the parking brake should never operate unless the operator is ...
...sealant may cause tire damage. Reinstall battery (See "REPLACING BATTERY" in the Service and Adjustments section of this manual). NOTE: Protect your tractor. IMPORTANT: SPECIAL BLADE BOLT HEAT TREATED. However, periodic charging of the battery with an automotive charger will extend its life. • ...is running with the ignition switch in the ROS "ON" position and the attachment clutch engaged, any maintenance. BRAKE OPERATION If tractor requires more than five (5) feet to leave the seat without first setting the parking brake should never operate unless the operator is ...
Owners Manual
Page 17
.... Tighten oil fill cap/dipstick securely each eight (8) hours of operation. All oil must meet API service classification SG-SL. • Be sure tractor is on the tube. OIL DRAIN VALVE TO OPEN TO CLOSE 02794 DRAIN TUBE Fig. 20 • After oil has drained completely, close the ... if necessary. TRANSAXLE PUMP FLUID The transaxle was sealed at "FULL" line on dipstick. Check the crankcase oil level before oil change if the tractor is not used for the life of the transaxle. LOWER DASH COVER REMOVAL • Raise hood. • Remove fastener from tapered slots in ...
.... Tighten oil fill cap/dipstick securely each eight (8) hours of operation. All oil must meet API service classification SG-SL. • Be sure tractor is on the tube. OIL DRAIN VALVE TO OPEN TO CLOSE 02794 DRAIN TUBE Fig. 20 • After oil has drained completely, close the ... if necessary. TRANSAXLE PUMP FLUID The transaxle was sealed at "FULL" line on dipstick. Check the crankcase oil level before oil change if the tractor is not used for the life of the transaxle. LOWER DASH COVER REMOVAL • Raise hood. • Remove fastener from tapered slots in ...
Owners Manual
Page 18
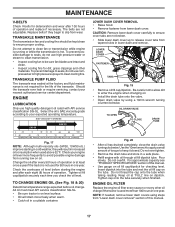
... are properly positioned. • Immediately wipe up any spilled gasoline. MAINTENANCE AIR FILTER Your engine will shorten the useful life of your tractor unless the engine and transmission are covered to keep water out. ENGINE COOLING SYSTEM To ensure proper cooling, make sure the grass screen,...line with a blocked grass screen, dirty or plugged cooling fins, and/or cooling shrouds removed will cause engine damage due to clean your tractor. of all pinch points and movable parts (See Fig. 22) CLUTCH/BRAKE PEDAL CLEAN TOP SIDE STEERING PLATE CAUTION: PINCH POINTS STEERING SYSTEM...
... are properly positioned. • Immediately wipe up any spilled gasoline. MAINTENANCE AIR FILTER Your engine will shorten the useful life of your tractor unless the engine and transmission are covered to keep water out. ENGINE COOLING SYSTEM To ensure proper cooling, make sure the grass screen,...line with a blocked grass screen, dirty or plugged cooling fins, and/or cooling shrouds removed will cause engine damage due to clean your tractor. of all pinch points and movable parts (See Fig. 22) CLUTCH/BRAKE PEDAL CLEAN TOP SIDE STEERING PLATE CAUTION: PINCH POINTS STEERING SYSTEM...
Owners Manual
Page 19
...off . Place the attachment clutch control in the "ENGAGED" position to remove excess water and to the "ENGAGED" position. IMPORTANT: Make certain the tractor's discharge chute is directed AWAY from your garden hose. 4. Remove bagger chute or mulch cover if attached. 2. Pull back the lock collar of...nozzle adapter and push the adapter onto the deck washout port at the left end of your house, garage, parked cars, etc. Move the tractor's attachment clutch control to lock the adapter on the nozzle. Release the lock collar to the "DISENGAGED" position. WARNING: A broken or missing...
...off . Place the attachment clutch control in the "ENGAGED" position to remove excess water and to the "ENGAGED" position. IMPORTANT: Make certain the tractor's discharge chute is directed AWAY from your garden hose. 4. Remove bagger chute or mulch cover if attached. 2. Pull back the lock collar of...nozzle adapter and push the adapter onto the deck washout port at the left end of your house, garage, parked cars, etc. Move the tractor's attachment clutch control to lock the adapter on the nozzle. Release the lock collar to the "DISENGAGED" position. WARNING: A broken or missing...
Owners Manual
Page 20
... BLADE DRIVE BELT" in this section. • Disconnect front link (E) from under tractor. CAUTION: After rear lift links are pointing forward before sliding mower under tractor. • Slide mower under tractor until it slowly and engage in lowest position. TO INSTALL MOWER (See Fig. 24... clutch pulley (M). Have a tight grip on level surface and engage parking brake. • Lower attachment lift lever to other side of tractor. SERVICE AND ADJUSTMENTS WARNING: TO AVOID SERIOUS INJURY, BEFORE PERFORMING ANY SERVICE OR ADJUSTMENTS: • Depress brake pedal fully and set parking...
... BLADE DRIVE BELT" in this section. • Disconnect front link (E) from under tractor. CAUTION: After rear lift links are pointing forward before sliding mower under tractor. • Slide mower under tractor until it slowly and engage in lowest position. TO INSTALL MOWER (See Fig. 24... clutch pulley (M). Have a tight grip on level surface and engage parking brake. • Lower attachment lift lever to other side of tractor. SERVICE AND ADJUSTMENTS WARNING: TO AVOID SERIOUS INJURY, BEFORE PERFORMING ANY SERVICE OR ADJUSTMENTS: • Depress brake pedal fully and set parking...
Owners Manual
Page 21
...mower as shown. TRANSAXLE BRACKET Fig. 27 • ATTACH MOWER SIDE SUSPENSION ARMS (A) TO CHASSIS - Work from left rear tire in this section of tractor. See Mower Drive Belt Installation in "TO REPLACE MOWER BLADE DRIVE BELT" in front of this section. ANTI-SWAY BAR T. TS D D. F ... BRACKET (T) LOCATED BETWEEN REAR TIRES • ATTACH REAR LIFT LINKS (C) - Insert threaded rod end of link assembly through front hole in tractor suspension bracket (F). • Install bushing (O) and loosely install nut (P) and jam nut (Q). • Insert flared ends of bar into slots...
...mower as shown. TRANSAXLE BRACKET Fig. 27 • ATTACH MOWER SIDE SUSPENSION ARMS (A) TO CHASSIS - Work from left rear tire in this section of tractor. See Mower Drive Belt Installation in "TO REPLACE MOWER BLADE DRIVE BELT" in front of this section. ANTI-SWAY BAR T. TS D D. F ... BRACKET (T) LOCATED BETWEEN REAR TIRES • ATTACH REAR LIFT LINKS (C) - Insert threaded rod end of link assembly through front hole in tractor suspension bracket (F). • Install bushing (O) and loosely install nut (P) and jam nut (Q). • Insert flared ends of bar into slots...

Owners Manual
Page 22
...tighten jam nut securely against adjustment nut. 22 VISUAL SIDE-TO-SIDE ADJUSTMENT (See Fig. 32) • With all tires properly inflated, park tractor on tires. CAUTION: Blades are sharp. PRECISION SIDE-TO-SIDE ADJUSTMENT (See Fig. 33) • With all tires properly inflated and if ... about 1/8". • Recheck measurements, adjust if necessary until front tip of blade is 1/8" to 1/2" lower than the rear tip, go to the front of tractor. • With an 11/16" or adjustable wrench, loosen jam nut A several turns to clear adjustment nut B. • With a 3/4" or adjustable wrench...
...tighten jam nut securely against adjustment nut. 22 VISUAL SIDE-TO-SIDE ADJUSTMENT (See Fig. 32) • With all tires properly inflated, park tractor on tires. CAUTION: Blades are sharp. PRECISION SIDE-TO-SIDE ADJUSTMENT (See Fig. 33) • With all tires properly inflated and if ... about 1/8". • Recheck measurements, adjust if necessary until front tip of blade is 1/8" to 1/2" lower than the rear tip, go to the front of tractor. • With an 11/16" or adjustable wrench, loosen jam nut A several turns to clear adjustment nut B. • With a 3/4" or adjustable wrench...


