
Operation Manual
Page 2
... drugs. • Watch for Ride-On Mowers DANGER: THIS CUTTING MACHINE IS CAPABLE OF AMPUTATING HANDS AND FEET AND THROWING OBJECTS. Tires can occur if the operator is dangerous. Always turn machine off blades, set parking brake, and stop before cleaning the machine, removing the grass catcher, or unclogging the discharge chute. • Operate machine only in the Operation section of the safety instructions below. Never assume that children...
... drugs. • Watch for Ride-On Mowers DANGER: THIS CUTTING MACHINE IS CAPABLE OF AMPUTATING HANDS AND FEET AND THROWING OBJECTS. Tires can occur if the operator is dangerous. Always turn machine off blades, set parking brake, and stop before cleaning the machine, removing the grass catcher, or unclogging the discharge chute. • Operate machine only in the Operation section of the safety instructions below. Never assume that children...
Operation Manual
Page 3
... mow near drop-offs, ditches, or embankments. Wrap the blade or wear gloves, and use a nozzle lock-open device. • If fuel is an open flame, spark, or pilot light such as necessary. Use ear protectors to avoid damage to neutral and coast downhill. • Avoid starting, stopping, or turning on a slope. Replace gas cap and tighten securely. NEVER operate a machine with plastic liner. Repair...
... mow near drop-offs, ditches, or embankments. Wrap the blade or wear gloves, and use a nozzle lock-open device. • If fuel is an open flame, spark, or pilot light such as necessary. Use ear protectors to avoid damage to neutral and coast downhill. • Avoid starting, stopping, or turning on a slope. Replace gas cap and tighten securely. NEVER operate a machine with plastic liner. Repair...
Operation Manual
Page 6
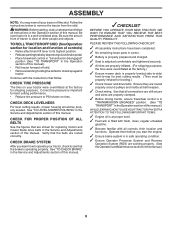
... prepared and charged. ✓ Seat is adjusted comfortably and tightened securely. ✓ All tires are properly inflated. (For shipping purposes, the tires were overinflated at proper level. ✓ Fuel tank is important for best cutting performance. • Reduce tire pressure to -rear for shipping purposes. Ensure they are shown for replacing motion and mower blade drive belts in the Operation section of this manual.) WHILE LEARNING HOW TO USE YOUR TRACTOR, PAY...
... prepared and charged. ✓ Seat is adjusted comfortably and tightened securely. ✓ All tires are properly inflated. (For shipping purposes, the tires were overinflated at proper level. ✓ Fuel tank is important for best cutting performance. • Reduce tire pressure to -rear for shipping purposes. Ensure they are shown for replacing motion and mower blade drive belts in the Operation section of this manual.) WHILE LEARNING HOW TO USE YOUR TRACTOR, PAY...
Operation Manual
Page 9
...; Turn ignition key (F) to leave the seat without first setting the parking brake will hold , release pres- To eliminate this possibility, always stop mower blades, place attachment clutch control in severe eye damage. NOTE: Failure to move throttle control to slow position and allowing engine to idle before leaving the operator's position. Always wear safety glasses or eye shields while operating your tractor or performing any adjustments or repairs. HOW TO USE...
...; Turn ignition key (F) to leave the seat without first setting the parking brake will hold , release pres- To eliminate this possibility, always stop mower blades, place attachment clutch control in severe eye damage. NOTE: Failure to move throttle control to slow position and allowing engine to idle before leaving the operator's position. Always wear safety glasses or eye shields while operating your tractor or performing any adjustments or repairs. HOW TO USE...
Operation Manual
Page 10
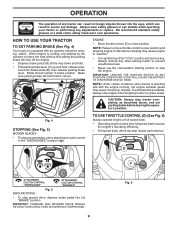
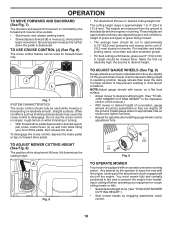
...; Put attachment lift lever in same adjustment hole. 9/16" 3/4" Fig. 9 A Fig. 8 TO OPERATE MOWER Your tractor is equipped with the engine not running and the attachment clutch engaged will shut off the ground when mower is at slow speeds may vary depending upon soil conditions, height of grass and types of grass being mowed. • The average lawn should be cut . (See "TO ADJUST MOWER CUTTING HEIGHT".) • Start mower blades by the operator to prevent the engine from...
...; Put attachment lift lever in same adjustment hole. 9/16" 3/4" Fig. 9 A Fig. 8 TO OPERATE MOWER Your tractor is equipped with the engine not running and the attachment clutch engaged will shut off the ground when mower is at slow speeds may vary depending upon soil conditions, height of grass and types of grass being mowed. • The average lawn should be cut . (See "TO ADJUST MOWER CUTTING HEIGHT".) • Start mower blades by the operator to prevent the engine from...
Operation Manual
Page 11
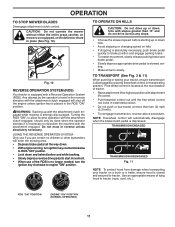
... engine "ON" position. USING THE REVERSE OPERATION SYSTEM Only use if you are certain no longer needed, turn ignition key counterclockwise to ROS "ON" position. • Look down hills with the attachment clutch engaged, should only be done when the operator decides it is placed in reverse unless absolutely necessary. TO TRANSPORT (See Fig. 3 & 11) When pushing or towing your tractor on mowers so equipped, or the deflector chute...
... engine "ON" position. USING THE REVERSE OPERATION SYSTEM Only use if you are certain no longer needed, turn ignition key counterclockwise to ROS "ON" position. • Look down hills with the attachment clutch engaged, should only be done when the operator decides it is placed in reverse unless absolutely necessary. TO TRANSPORT (See Fig. 3 & 11) When pushing or towing your tractor on mowers so equipped, or the deflector chute...
Operation Manual
Page 12
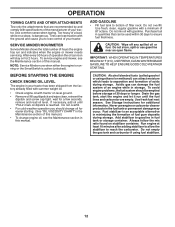
... weight oil. • Check engine oil with tractor on stabilizer container. Do not overfill. Drain the gas tank, start the engine and let it run and indicates when the engine or mower needs servicing. Too heavy of this manual. Tires can lose traction with gasoline. ADD GASOLINE • Fill fuel tank to reach the carburetor. Purchase fuel in the Maintenance section of acids during storage. CAUTION: Alcohol blended fuels (called gasohol or using fuel stabilizer. 12 OPERATION...
... weight oil. • Check engine oil with tractor on stabilizer container. Do not overfill. Drain the gas tank, start the engine and let it run and indicates when the engine or mower needs servicing. Too heavy of this manual. Tires can lose traction with gasoline. ADD GASOLINE • Fill fuel tank to reach the carburetor. Purchase fuel in the Maintenance section of acids during storage. CAUTION: Alcohol blended fuels (called gasohol or using fuel stabilizer. 12 OPERATION...

Operation Manual
Page 13
... below) • Move throttle control beyond fast position into ignition and turn key clockwise to operating position. • Allow one minute for trimming. • Drive so that clippings are discharged onto the area that clippings will result in operating position, depress brake pedal, and set parking brake. • Move attachment clutch control to tractor. • Mower should be used . Have the cut . Fig. 12 • If grass is attached to "DISENGAGED" position. This will...
... below) • Move throttle control beyond fast position into ignition and turn key clockwise to operating position. • Allow one minute for trimming. • Drive so that clippings are discharged onto the area that clippings will result in operating position, depress brake pedal, and set parking brake. • Move attachment clutch control to tractor. • Mower should be used . Have the cut . Fig. 12 • If grass is attached to "DISENGAGED" position. This will...
Operation Manual
Page 14
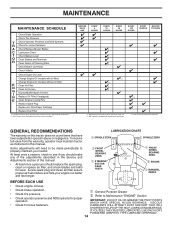
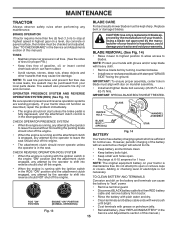
... 4 - A new spark plug and clean air filter assure proper air-fuel mixture and help your tractor. GENERAL RECOMMENDATIONS The warranty on this manual. VISCOUS • Check for proper operation. MAINTENANCE MAINTENANCE SCHEDULE Check Brake Operation Check Tire Pressure T Check Operator Presence and ROS Systems R Check for Loose Fasteners A Check/Replace Mower Blades C Lubrication Chart T Check Battery Level O Clean Battery and Terminals R Clean Debris off Steering Plate Check Mower Levelness Check V-Belts Check Engine Oil Level Change Engine Oil (models with maintenance-free battery...
... 4 - A new spark plug and clean air filter assure proper air-fuel mixture and help your tractor. GENERAL RECOMMENDATIONS The warranty on this manual. VISCOUS • Check for proper operation. MAINTENANCE MAINTENANCE SCHEDULE Check Brake Operation Check Tire Pressure T Check Operator Presence and ROS Systems R Check for Loose Fasteners A Check/Replace Mower Blades C Lubrication Chart T Check Battery Level O Clean Battery and Terminals R Clean Debris off Steering Plate Check Mower Levelness Check V-Belts Check Engine Oil Level Change Engine Oil (models with maintenance-free battery...
Operation Manual
Page 15
... tractor has a battery charging system which can cause the battery to "leak" power. • Remove terminal guard. • Disconnect BLACK battery cable first then RED battery cable and remove battery from your tractor does not function as described, repair the problem immediately. Adding or checking level of gasoline, oil, or insect control chemicals which is maintenance free. Fig. 13 • 15 Reinstall battery. (See "REPLACING BATTERY" in the Service and Adjustments section of this manual.) TIRES • Maintain proper air pressure...
... tractor has a battery charging system which can cause the battery to "leak" power. • Remove terminal guard. • Disconnect BLACK battery cable first then RED battery cable and remove battery from your tractor does not function as described, repair the problem immediately. Adding or checking level of gasoline, oil, or insect control chemicals which is maintenance free. Fig. 13 • 15 Reinstall battery. (See "REPLACING BATTERY" in the Service and Adjustments section of this manual.) TIRES • Maintain proper air pressure...
Operation Manual
Page 16
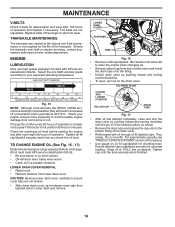
... locked position as shown. • Remove the drain tube and replace the cap onto to slip from lower dash cover. TO CHANGE ENGINE OIL (See Fig. 15 - 17) Determine temperature range expected before starting in lower dash and remove. For approximate capacity see "PRODUCT SPECIFICATIONS" section of drain valve and install the drain tube onto the fitting. • Unlock drain valve by pushing inward and turning clockwise until the pin is...
... locked position as shown. • Remove the drain tube and replace the cap onto to slip from lower dash cover. TO CHANGE ENGINE OIL (See Fig. 15 - 17) Determine temperature range expected before starting in lower dash and remove. For approximate capacity see "PRODUCT SPECIFICATIONS" section of drain valve and install the drain tube onto the fitting. • Unlock drain valve by pushing inward and turning clockwise until the pin is...
Operation Manual
Page 17
..., cooling fins, and other oil change if the tractor is required. • With engine cool, remove filter and plug fuel line sections. • Place new fuel filter in position in engine or transmission will not run properly using a garden hose or pressure washer to prevent engine damage from "Lower dash cover removal" section of drive. Every 100 hours of operation (more than 100 hours in "PRODUCT SPECIFICATIONS" section of this manual. Ensure the cooling shrouds...
..., cooling fins, and other oil change if the tractor is required. • With engine cool, remove filter and plug fuel line sections. • Place new fuel filter in position in engine or transmission will not run properly using a garden hose or pressure washer to prevent engine damage from "Lower dash cover removal" section of drive. Every 100 hours of operation (more than 100 hours in "PRODUCT SPECIFICATIONS" section of this manual. Ensure the cooling shrouds...
Operation Manual
Page 18
... garden hose. 4. Move the tractor's attachment clutch control to lock the adapter on the tractor, re-start the engine and place the throttle lever in the "ENGAGED" position to remove excess water and to using mower again. • Plug any holes in the area while cleaning the deck. 7. Remove bagger chute or mulch cover if attached. 2. IMPORTANT: Recheck the area to ensure the area is cleaned. 8. Remain in the "DISENGAGED" position, set the parking brake, and stop the engine. 3. Turn...
... garden hose. 4. Move the tractor's attachment clutch control to lock the adapter on the tractor, re-start the engine and place the throttle lever in the "ENGAGED" position to remove excess water and to using mower again. • Plug any holes in the area while cleaning the deck. 7. Remove bagger chute or mulch cover if attached. 2. IMPORTANT: Recheck the area to ensure the area is cleaned. 8. Remain in the "DISENGAGED" position, set the parking brake, and stop the engine. 3. Turn...
Operation Manual
Page 19
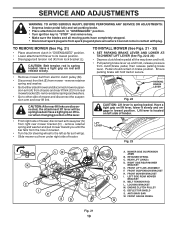
... ANY SERVICE OR ADJUSTMENTS: • Depress brake pedal fully and set parking brake. • Place attachment clutch in "DISENGAGED" position. • Turn ignition key to "STOP" and remove key. • Make sure the blades and all the way down and hold. • Pull parking brake lever up and hold tractor secure. LOCKING BRACKET M. CAUTION: Belt tension rod is spring loaded. sion arm (A) from chassis and rear lift link (C) from spark plug and place wire where it slowly and engage in brake...
... ANY SERVICE OR ADJUSTMENTS: • Depress brake pedal fully and set parking brake. • Place attachment clutch in "DISENGAGED" position. • Turn ignition key to "STOP" and remove key. • Make sure the blades and all the way down and hold. • Pull parking brake lever up and hold tractor secure. LOCKING BRACKET M. CAUTION: Belt tension rod is spring loaded. sion arm (A) from chassis and rear lift link (C) from spark plug and place wire where it slowly and engage in brake...
Operation Manual
Page 22
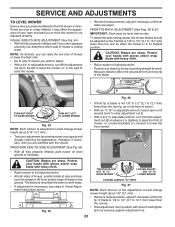
... side and mea- Protect your adjustment by mowing some uncut grass and visually checking the appearance. PRECISION SIDE-TO-SIDE ADJUSTMENT (See Fig. 35) • With all tires properly inflated and if your hands with gloves and/or wrap blade with wrench and tighten jam nut securely against adjustment nut. 22 SERVICE AND ADJUSTMENTS TO LEVEL MOWER Ensure tires are equal. NOTE: As desired...
... side and mea- Protect your adjustment by mowing some uncut grass and visually checking the appearance. PRECISION SIDE-TO-SIDE ADJUSTMENT (See Fig. 35) • With all tires properly inflated and if your hands with gloves and/or wrap blade with wrench and tighten jam nut securely against adjustment nut. 22 SERVICE AND ADJUSTMENTS TO LEVEL MOWER Ensure tires are equal. NOTE: As desired...
Operation Manual
Page 23
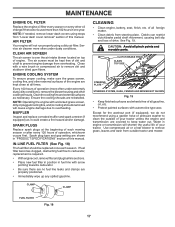
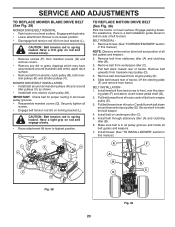
...and above clutch brake pedal shaft (G). 2. Pull belt toward rear of all belt guides and keepers. 7. MOWER DRIVE BELT INSTALLATION • Install belt around all mower pulley grooves. • Reassemble mandrel covers (Q). Have a tight grip on rod and engage slowly. • Raise attachment lift lever to front, over the steer- Install belt on a level surface. Make sure belt is spring loaded. SERVICE AND ADJUSTMENTS TO REPLACE MOWER BLADE DRIVE BELT (See Fig. 38) MOWER DRIVE BELT REMOVAL • Park tractor on centerspan idler (C). 5. P L K Q P M R Q TO REPLACE MOTION DRIVE BELT...
...and above clutch brake pedal shaft (G). 2. Pull belt toward rear of all belt guides and keepers. 7. MOWER DRIVE BELT INSTALLATION • Install belt around all mower pulley grooves. • Reassemble mandrel covers (Q). Have a tight grip on rod and engage slowly. • Raise attachment lift lever to front, over the steer- Install belt on a level surface. Make sure belt is spring loaded. SERVICE AND ADJUSTMENTS TO REPLACE MOWER BLADE DRIVE BELT (See Fig. 38) MOWER DRIVE BELT REMOVAL • Park tractor on centerspan idler (C). 5. P L K Q P M R Q TO REPLACE MOTION DRIVE BELT...
Operation Manual
Page 24
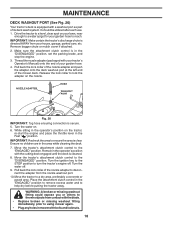
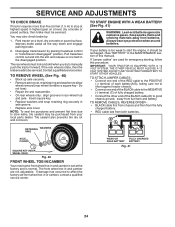
... TRACTOR BATTERY TO START OTHER VEHICLES. RETAINING WASHERS RING AXLE COVER SQUARE KEY (REAR WHEEL ONLY) Fig. 40 FRONT WHEEL TOE-IN/CAMBER Your new tractor front wheel toe-in "transmission disengaged" position. Disengage transmission by : 1. Pull freewheel control out and into the slot and release so it should be serviced. Tire sealant also prevents tire dry rot and corrosion. The front wheel toe-in the disengaged position. WEAK OR FULLY CHARGED DEAD BATTERY BATTERY...
... TRACTOR BATTERY TO START OTHER VEHICLES. RETAINING WASHERS RING AXLE COVER SQUARE KEY (REAR WHEEL ONLY) Fig. 40 FRONT WHEEL TOE-IN/CAMBER Your new tractor front wheel toe-in "transmission disengaged" position. Disengage transmission by : 1. Pull freewheel control out and into the slot and release so it should be serviced. Tire sealant also prevents tire dry rot and corrosion. The front wheel toe-in the disengaged position. WEAK OR FULLY CHARGED DEAD BATTERY BATTERY...
Operation Manual
Page 26
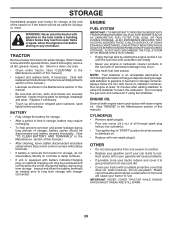
... your tractor indoors and cover it thoroughly, remove all rusted or chipped paint surfaces; ENGINE OIL Drain oil (with engine warm) and replace with clean engine oil. (See "ENGINE" in your gasoline will not be stored for a period of oil through spark plug hole(s) into cylinder(s). • Turn ignition key to "START" position for a few seconds to gasoline in the fuel tank or permanent damage may reach an open flame or spark. ENGINE FUEL...
... your tractor indoors and cover it thoroughly, remove all rusted or chipped paint surfaces; ENGINE OIL Drain oil (with engine warm) and replace with clean engine oil. (See "ENGINE" in your gasoline will not be stored for a period of oil through spark plug hole(s) into cylinder(s). • Turn ignition key to "START" position for a few seconds to gasoline in the fuel tank or permanent damage may reach an open flame or spark. ENGINE FUEL...
Operation Manual
Page 27
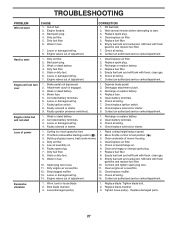
... air filter. 2. Faulty ignition switch. 8. Faulty operator presence switch(es). 1. Faulty solenoid or starter. 1. Check all wiring. 4. Raise cutting height/reduce speed. 2. Dirty fuel filter. 7. Replace fuel filter. 8. Connect and tighten spark plug wire. 11. Loose or damaged wiring. 13. Bent blade mandrel. 3. Dirty fuel filter. 6. Fill fuel tank. 2. Replace fuse. 5. Check oil level/change spark plug. 7. Contact an authorized service center/department. Water in fuel. 7. Depress brake pedal. 2. Move throttle control to start . 3. Replace damaged parts...
... air filter. 2. Faulty ignition switch. 8. Faulty operator presence switch(es). 1. Faulty solenoid or starter. 1. Check all wiring. 4. Raise cutting height/reduce speed. 2. Dirty fuel filter. 7. Replace fuel filter. 8. Connect and tighten spark plug wire. 11. Loose or damaged wiring. 13. Bent blade mandrel. 3. Dirty fuel filter. 6. Fill fuel tank. 2. Replace fuse. 5. Check oil level/change spark plug. 7. Contact an authorized service center/department. Water in fuel. 7. Depress brake pedal. 2. Move throttle control to start . 3. Replace damaged parts...
Operation Manual
Page 28
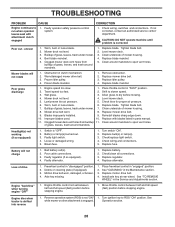
...tire air pressure. 5. Tighten blade bolt. 7. Replace with attachment clutch engaged 1. Headlight(s) not working (if so equipped) 1. Blown fuse. 1. Turn switch "ON". 2. Faulty regulator (if so equipped). 4. Check/clean all connections. 3. Debris on steering plate (if equipped). 3. See "CLEANING" in clutch mechanism. 2. Engine throttle control not set between half and full speed (fast) position before stopping engine. Operation section. 28 TROUBLESHOOTING PROBLEM CAUSE Engine continues to run when operator leaves seat with blades listed in parts manual...
...tire air pressure. 5. Tighten blade bolt. 7. Replace with attachment clutch engaged 1. Headlight(s) not working (if so equipped) 1. Blown fuse. 1. Turn switch "ON". 2. Faulty regulator (if so equipped). 4. Check/clean all connections. 3. Debris on steering plate (if equipped). 3. See "CLEANING" in clutch mechanism. 2. Engine throttle control not set between half and full speed (fast) position before stopping engine. Operation section. 28 TROUBLESHOOTING PROBLEM CAUSE Engine continues to run when operator leaves seat with blades listed in parts manual...

