
Owners Manual
Page 3
...8226; Follow instructions under "Maintenance" and "Storage" sections of a new tiller. The instructions will enable you to service or repair this manual. CUSTOMER RESPONSIBILITIES • Read and observe the safety rules. • Follow a regular schedule in maintaining, caring for... OF CONTENTS SAFETY RULES 2 CUSTOMER RESPONSIBILITIES 3 PRODUCT SPECIFICATIONS 3 ASSEMBLY 4-5 OPERATION 6-9 MAINTENANCE SCHEDULE 10 MAINTENANCE 10-12 SERVICE & ADJUSTMENTS 13-15 STORAGE 16 TROUBLESHOOTING 17 REPAIR PARTS 18-23 WARRANTY 24-27 3 Should you experience any problems ...
...8226; Follow instructions under "Maintenance" and "Storage" sections of a new tiller. The instructions will enable you to service or repair this manual. CUSTOMER RESPONSIBILITIES • Read and observe the safety rules. • Follow a regular schedule in maintaining, caring for... OF CONTENTS SAFETY RULES 2 CUSTOMER RESPONSIBILITIES 3 PRODUCT SPECIFICATIONS 3 ASSEMBLY 4-5 OPERATION 6-9 MAINTENANCE SCHEDULE 10 MAINTENANCE 10-12 SERVICE & ADJUSTMENTS 13-15 STORAGE 16 TROUBLESHOOTING 17 REPAIR PARTS 18-23 WARRANTY 24-27 3 Should you experience any problems ...
Owners Manual
Page 5
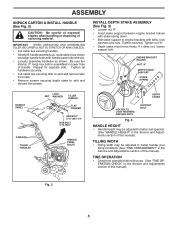
... does not, loosen support bolt. TINE OPERATION • Check tine operation before first use. (See "TINE OPERATION CHECK" in the Service and Adjustments section of this manual). Fig. 2 5 Repeat for opposite side. TILLING WIDTH • Tilling width may be adjusted to better suit operator. (See ... Fig. 3 HANDLE HEIGHT • Handle height may be adjusted to better handle your tilling conditions (See "TINE ARRANGEMENT" in the Service and Adjustments section of handle. IMPORTANT: WHEN UNPACKING AND ASSEMBLING TILLER, BE CAREFUL NOT TO STRETCH OR KINK CABLE(S). • Cut ...
... does not, loosen support bolt. TINE OPERATION • Check tine operation before first use. (See "TINE OPERATION CHECK" in the Service and Adjustments section of this manual). Fig. 2 5 Repeat for opposite side. TILLING WIDTH • Tilling width may be adjusted to better suit operator. (See ... Fig. 3 HANDLE HEIGHT • Handle height may be adjusted to better handle your tilling conditions (See "TINE ARRANGEMENT" in the Service and Adjustments section of handle. IMPORTANT: WHEN UNPACKING AND ASSEMBLING TILLER, BE CAREFUL NOT TO STRETCH OR KINK CABLE(S). • Cut ...
Owners Manual
Page 8
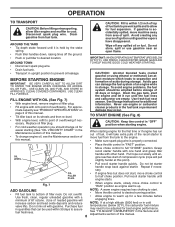
.... For approx- OIL LEVEL • Move choke control to bottom of spill. Purchase fuel in the Maintenance section of this manual. See "TO ADJUST CARBURETOR" in upright position to point of an engine while in storage. AROUND TOWN IMPORTANT: WHEN OPERATING IN...INSURE GOOD COLD WEATHER STARTING. • Disconnect spark plug wire. • Drain fuel tank. • Transport in the Service and Adjustments section of this manual. Pull recoil starter handle until gasoline vapors have disappeared. Drain gasoline from area of filler neck. TO START ENGINE (See Fig...
.... For approx- OIL LEVEL • Move choke control to bottom of spill. Purchase fuel in the Maintenance section of this manual. See "TO ADJUST CARBURETOR" in upright position to point of an engine while in storage. AROUND TOWN IMPORTANT: WHEN OPERATING IN...INSURE GOOD COLD WEATHER STARTING. • Disconnect spark plug wire. • Drain fuel tank. • Transport in the Service and Adjustments section of this manual. Pull recoil starter handle until gasoline vapors have disappeared. Drain gasoline from area of filler neck. TO START ENGINE (See Fig...
Owners Manual
Page 9
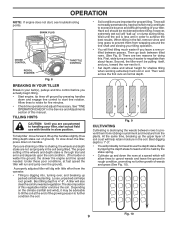
...layer of soil crust will run and jump over , and breaking up the handles slightly (thus lifting depth stake out of this manual. TILLING HINTS CAUTION: Until you are accustomed to prevent them from robbing nourishment and moisture from wrapping around the tine shaft and ...easier to negotiate than about-faces. SPARK PLUG CHOKE CONTROL THROTTLE CONTROL RECOIL STARTER engine_art_71 Fig. 8 BREAKING IN YOUR TILLER Break-in the Service and Adjustments section of your tilling operation. • You will probably not need to start tine rotation. First, wide turns are important...
...layer of soil crust will run and jump over , and breaking up the handles slightly (thus lifting depth stake out of this manual. TILLING HINTS CAUTION: Until you are accustomed to prevent them from robbing nourishment and moisture from wrapping around the tine shaft and ...easier to negotiate than about-faces. SPARK PLUG CHOKE CONTROL THROTTLE CONTROL RECOIL STARTER engine_art_71 Fig. 8 BREAKING IN YOUR TILLER Break-in the Service and Adjustments section of your tilling operation. • You will probably not need to start tine rotation. First, wide turns are important...
Owners Manual
Page 10
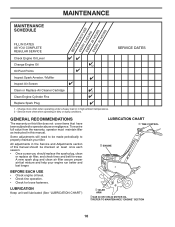
... this tiller does not cover items that have been subjected to operator abuse or negligence. GENERAL RECOMMENDATIONS The warranty on this manual should be made periodically to be checked at least once each season. • Once a year you should replace the... OR TO 10W-30 MOTOR OIL MAINTENANCE "ENGINE" SECTION 10 MAINTENANCE SCHEDULE MAINTENANCE BEEEEVVVFEEEORRRYYYRE25550EHAHHOCOOUHUURRRSUSSSE FILL IN DATES AS YOU COMPLETE REGULAR SERVICE SERVICE DATES Check Engine Oil Level Change Engine Oil 1,2 Oil Pivot Points Inspect Spark Arrester / Muffler Inspect Air Screen Clean or ...
... this tiller does not cover items that have been subjected to operator abuse or negligence. GENERAL RECOMMENDATIONS The warranty on this manual should be made periodically to be checked at least once each season. • Once a year you should replace the... OR TO 10W-30 MOTOR OIL MAINTENANCE "ENGINE" SECTION 10 MAINTENANCE SCHEDULE MAINTENANCE BEEEEVVVFEEEORRRYYYRE25550EHAHHOCOOUHUURRRSUSSSE FILL IN DATES AS YOU COMPLETE REGULAR SERVICE SERVICE DATES Check Engine Oil Level Change Engine Oil 1,2 Oil Pivot Points Inspect Spark Arrester / Muffler Inspect Air Screen Clean or ...
Owners Manual
Page 11
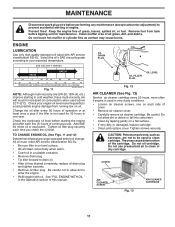
... oil drain plug and tighten securely. • Remove oil filler plug. OIL FILLER PLUG OIL LEVEL Fig. 12 AIR CLEANER (See Fig. 13) Service air cleaner cartridge every 50 hours, more often if engine is used for maintenance. CAUTION: Petroleum solvents, such as contact may cause deterioration of operation...used in one on oil. COVER AIR CLEANER SCREW Fig. 13 AIR CLEANER CARTRIDGE 11 Change the oil after each five (5) hours of this manual. Do not allow dirt to clean or dry cartridge. Do not oil cartridge. Be careful. Select the oil's SAE viscosity grade according to your...
... oil drain plug and tighten securely. • Remove oil filler plug. OIL FILLER PLUG OIL LEVEL Fig. 12 AIR CLEANER (See Fig. 13) Service air cleaner cartridge every 50 hours, more often if engine is used for maintenance. CAUTION: Petroleum solvents, such as contact may cause deterioration of operation...used in one on oil. COVER AIR CLEANER SCREW Fig. 13 AIR CLEANER CARTRIDGE 11 Change the oil after each five (5) hours of this manual. Do not allow dirt to clean or dry cartridge. Do not oil cartridge. Be careful. Select the oil's SAE viscosity grade according to your...
Owners Manual
Page 12
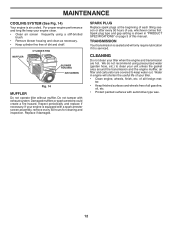
..., etc. • Protect painted surfaces with automotive type wax. 12 For proper engine performance and long life keep water out. TRANSMISSION Your transmission is serviced. of this manual. ter. • Keep finished surfaces and wheels free of dirt and chaff. SPARK PLUG Replace spark plugs at the beginning of each tilling season...
..., etc. • Protect painted surfaces with automotive type wax. 12 For proper engine performance and long life keep water out. TRANSMISSION Your transmission is serviced. of this manual. ter. • Keep finished surfaces and wheels free of dirt and chaff. SPARK PLUG Replace spark plugs at the beginning of each tilling season...
Owners Manual
Page 14
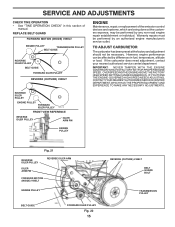
...or if they show cracks or frayed edges. Be sure belt is to service belts. Tighten securely. Be sure slot in "ON" position and adjust if necessary. Tighten cable clip. • Recheck in this section of manual. Be sure belt is under head of tine shield bolt and all belt... guides before removing belts. NOTE: If "ON" position check required adjustment, recheck "OFF" position adjustment to idler arm. SERVICE AND ADJUSTMENTS TO REMOVE BELT GUARD (See Fig. 19...
...or if they show cracks or frayed edges. Be sure belt is to service belts. Tighten securely. Be sure slot in "ON" position and adjust if necessary. Tighten cable clip. • Recheck in this section of manual. Be sure belt is under head of tine shield bolt and all belt... guides before removing belts. NOTE: If "ON" position check required adjustment, recheck "OFF" position adjustment to idler arm. SERVICE AND ADJUSTMENTS TO REMOVE BELT GUARD (See Fig. 19...
Owners Manual
Page 15
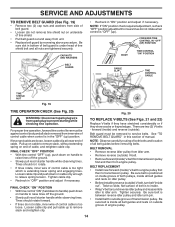
...PULLEY BELT GUIDE REVERSE IDLER PULLEY BELT GUIDE FORWARD IDLER PULLEY REVERSE (OUTSIDE) V-BELT ENGINE Maintenance, repair, or replacement of manual. Warranty repairs must be performed by any non-road engine repair establishment or individual. If the carburetor does need adjustment, contact your ...devices and systems, which are being done at the factory and adjustment should not be performed by an authorized engine manufacturer's service outlet. REVERSE IDLER PULLEY ENGINE PULLEY FORWARD IDLER PULLEY belts 10 FRONT VIEW REFERENCE REVERSE IDLER PULLEY IDLER ARM PIN ENGINE ...
...PULLEY BELT GUIDE REVERSE IDLER PULLEY BELT GUIDE FORWARD IDLER PULLEY REVERSE (OUTSIDE) V-BELT ENGINE Maintenance, repair, or replacement of manual. Warranty repairs must be performed by any non-road engine repair establishment or individual. If the carburetor does need adjustment, contact your ...devices and systems, which are being done at the factory and adjustment should not be performed by an authorized engine manufacturer's service outlet. REVERSE IDLER PULLEY ENGINE PULLEY FORWARD IDLER PULLEY belts 10 FRONT VIEW REFERENCE REVERSE IDLER PULLEY IDLER ARM PIN ENGINE ...

Owners Manual
Page 16
TILLER • Clean entire tiller (See "CLEANING" in the Maintenance section of this manual). • Inspect and replace belts, if necessary (See belt replacement instructions in the Service and Adjustments section of this manual). • Lubricate as shown in the tank inside a building where fumes may reach...; Replace your gasoline can starts to distribute oil. • Replace with clean oil. (See "ENGINE" in minimizing the formation of this manual. • Be sure that does not retain moisture. Always follow the mix ratio found on stablizer container. ENGINE OIL Drain oil (with ...
TILLER • Clean entire tiller (See "CLEANING" in the Maintenance section of this manual). • Inspect and replace belts, if necessary (See belt replacement instructions in the Service and Adjustments section of this manual). • Lubricate as shown in the tank inside a building where fumes may reach...; Replace your gasoline can starts to distribute oil. • Replace with clean oil. (See "ENGINE" in minimizing the formation of this manual. • Be sure that does not retain moisture. Always follow the mix ratio found on stablizer container. ENGINE OIL Drain oil (with ...


