
Owners Manual
Page 3
... 9 Safety Instructions 9 Personal Safety Equipment 11 Slope Operation 11 Safe Handling of Gasoline 13 General Maintenance 14 Transport 16 Controls 17 Control Locations 17 Steering Control Levers 18 Parking Brake 19 Throttle Control 19 Blade Switch 19 Ignition Switch 20 Choke Control 20 Fuses 20 Fuel Tank 21 Fuel Shut Off Valve 22 Cutting Height Adjuster 22 Seat Adjustment Lever 23 Hour Meter 23 Tracking Knob 23 Operation 24 Training 24 Steering 24 Before Starting 25 Starting the Engine 25 Weak Battery 28 Jumper Cables 28 Running 29 Operating On Hills 30 Mowing...
... 9 Safety Instructions 9 Personal Safety Equipment 11 Slope Operation 11 Safe Handling of Gasoline 13 General Maintenance 14 Transport 16 Controls 17 Control Locations 17 Steering Control Levers 18 Parking Brake 19 Throttle Control 19 Blade Switch 19 Ignition Switch 20 Choke Control 20 Fuses 20 Fuel Tank 21 Fuel Shut Off Valve 22 Cutting Height Adjuster 22 Seat Adjustment Lever 23 Hour Meter 23 Tracking Knob 23 Operation 24 Training 24 Steering 24 Before Starting 25 Starting the Engine 25 Weak Battery 28 Jumper Cables 28 Running 29 Operating On Hills 30 Mowing...

Owners Manual
Page 9
... before mowing 8011-513 Husqvarna-9 The machine is clear of bystanders before dismounting. • Disengage blades when not mowing. Shut off blades, set parking brake, stop before cleaning the machine, removing the grass catcher, or unclogging the discharge guard. • Operate machine only in the manual before starting the machine Clear the area of objects before and while backing. • Never direct discharged material toward the operator. SAFETY Safety Instructions These instructions are...
... before mowing 8011-513 Husqvarna-9 The machine is clear of bystanders before dismounting. • Disengage blades when not mowing. Shut off blades, set parking brake, stop before cleaning the machine, removing the grass catcher, or unclogging the discharge guard. • Operate machine only in the manual before starting the machine Clear the area of objects before and while backing. • Never direct discharged material toward the operator. SAFETY Safety Instructions These instructions are...

Owners Manual
Page 13
... ground away from the vehicle when filling. • Remove gas-powered equipment from a gasoline dispenser nozzle. • Keep the nozzle in contact with the engine running. Replace gas cap and tighten securely. • Do not start the engine near spilled fuel. • Never use and leave space for the mower deck's drive belt is complete. The engine must not be started until fueling is removed. Always place containers on the ground.
... ground away from the vehicle when filling. • Remove gas-powered equipment from a gasoline dispenser nozzle. • Keep the nozzle in contact with the engine running. Replace gas cap and tighten securely. • Do not start the engine near spilled fuel. • Never use and leave space for the mower deck's drive belt is complete. The engine must not be started until fueling is removed. Always place containers on the ground.

Owners Manual
Page 14
... properly tightened, torqued and that nuts and bolts, especially the fastening bolts for maintenance work. Wrap the blade or wear gloves, and use extra caution when servicing them. • Check brake operation frequently. If you run the engine too fast, you spill battery acid on your hands after handling the battery. 14-Husqvarna If you risk damaging the machine components. • Be very careful when handling battery acid. Never drive...
... properly tightened, torqued and that nuts and bolts, especially the fastening bolts for maintenance work. Wrap the blade or wear gloves, and use extra caution when servicing them. • Check brake operation frequently. If you run the engine too fast, you spill battery acid on your hands after handling the battery. 14-Husqvarna If you risk damaging the machine components. • Be very careful when handling battery acid. Never drive...

Owners Manual
Page 15
... on the battery. Adjust and service as necessary. • The mulch blades should only be used in storage. • Regularly clean deck and underside of sparking 8009-728 Husqvarna-15 Allow the machine to run over or into anything. SAFETY • Sparking can occur when working with the battery and the heavy cables of fire by removing grass, leaves, and other debris that the fuel filler cap is...
... on the battery. Adjust and service as necessary. • The mulch blades should only be used in storage. • Regularly clean deck and underside of sparking 8009-728 Husqvarna-15 Allow the machine to run over or into anything. SAFETY • Sparking can occur when working with the battery and the heavy cables of fire by removing grass, leaves, and other debris that the fuel filler cap is...

Owners Manual
Page 24
... seat, start engine (see "Moving by Hand" in Operation section), adjust engine speed to overly aggressive maneuvers. Push forward on turf. We suggest that direction. Until operator becomes comfortable with controls. This may damage turf due to idle, disengage parking brake, do not engage blades at this time, rotate control levers inward. Steering To move the mower under its own power. Training Zero turn to neutral when released. The right control lever controls the right wheel...
... seat, start engine (see "Moving by Hand" in Operation section), adjust engine speed to overly aggressive maneuvers. Push forward on turf. We suggest that direction. Until operator becomes comfortable with controls. This may damage turf due to idle, disengage parking brake, do not engage blades at this time, rotate control levers inward. Steering To move the mower under its own power. Training Zero turn to neutral when released. The right control lever controls the right wheel...

Owners Manual
Page 25
.... Pull the lifting lever backward to the locked position (transport) position. • Activate the parking brake by pressing the blade switch downwards. operation Before Starting • Read the sections Safety Instructions and Controls before starting (see Maintenance Schedule in the Maintenance section). • Check that there is sufficient fuel in the fuel tank. • Adjust the seat to the desired position. Starting the Engine • Sit on the seat. • Raise the mower deck by pushing...
.... Pull the lifting lever backward to the locked position (transport) position. • Activate the parking brake by pressing the blade switch downwards. operation Before Starting • Read the sections Safety Instructions and Controls before starting (see Maintenance Schedule in the Maintenance section). • Check that there is sufficient fuel in the fuel tank. • Adjust the seat to the desired position. Starting the Engine • Sit on the seat. • Raise the mower deck by pushing...

Owners Manual
Page 34
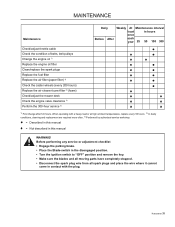
...; ♦ 34-Husqvarna For those points not described in this manual Maintenance Check the parking brake Check the engine's oil level (every refueling) Check the safety system Check for fuel and oil leakages Check/clean the engine's cooling air intake Check the mower deck Check for loose hardware (screws, nuts) Clean under the mower deck Start the engine and blades, listen for unusual sounds Check for damage Thoroughly clean around the engine Clean around belts, belt pulleys Check the tire pressures Check battery Sharpen/Replace mower blades Clean the engine's cooling air intake 2) Clean...
...; ♦ 34-Husqvarna For those points not described in this manual Maintenance Check the parking brake Check the engine's oil level (every refueling) Check the safety system Check for fuel and oil leakages Check/clean the engine's cooling air intake Check the mower deck Check for loose hardware (screws, nuts) Clean under the mower deck Start the engine and blades, listen for unusual sounds Check for damage Thoroughly clean around the engine Clean around belts, belt pulleys Check the tire pressures Check battery Sharpen/Replace mower blades Clean the engine's cooling air intake 2) Clean...
Owners Manual
Page 35
... often. 3) Performed by authorized service workshop. ● = Described in this manual ♦ = Not described in hours once each year 25 50 100 300 Check/adjust throttle cable Check the condition of belts, belt pulleys Change the engine oil 1) Replace the engine oil filter Clean/replace the spark plugs Replace the fuel filter Replace the air filter (paper filter) 2) Check the caster wheels (every 200 hours) Replace the air cleaner's pre-filter 2) (foam) Check/adjust the mower deck Check the engine valve clearance 3) Perform the 300-hour service 3) ● ● ●...
... often. 3) Performed by authorized service workshop. ● = Described in this manual ♦ = Not described in hours once each year 25 50 100 300 Check/adjust throttle cable Check the condition of belts, belt pulleys Change the engine oil 1) Replace the engine oil filter Clean/replace the spark plugs Replace the fuel filter Replace the air filter (paper filter) 2) Check the caster wheels (every 200 hours) Replace the air cleaner's pre-filter 2) (foam) Check/adjust the mower deck Check the engine valve clearance 3) Perform the 300-hour service 3) ● ● ●...

Owners Manual
Page 36
.... Adding or checking level of frame, remove the nuts that secure the battery hold-down. 5. Always use two wrenches for charging times WARNING! MAINTENANCE Battery Your mower is not necessary. Always wear eye protection when around batteries. Disconnect BLACK battery cable first, then the RED battery cable and remove the battery from accidental grounding. Clean terminals and battery cable ends with a maintenance free battery and does not need servicing. Replacing battery 1. Install new battery with hex bolt and hex...
.... Adding or checking level of frame, remove the nuts that secure the battery hold-down. 5. Always use two wrenches for charging times WARNING! MAINTENANCE Battery Your mower is not necessary. Always wear eye protection when around batteries. Disconnect BLACK battery cable first, then the RED battery cable and remove the battery from accidental grounding. Clean terminals and battery cable ends with a maintenance free battery and does not need servicing. Replacing battery 1. Install new battery with hex bolt and hex...
Owners Manual
Page 37
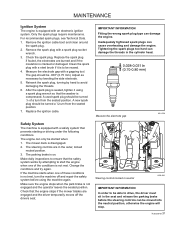
.... 6. Inadequately tightened spark plugs can only be turned 1/8 of a turn from the seated position. 7. The mower deck is on. The steering controls are burned and if the insulation is cracked or damaged. Remove the spark plug with a steel brush if it using the machine again. Check the spark plug. Change the conditions and try again. Husqvarna-37 Measure the electrode gap with an electronic ignition system. The parking brake is disengaged. 2. Replace the spark plug if fouled...
.... 6. Inadequately tightened spark plugs can only be turned 1/8 of a turn from the seated position. 7. The mower deck is on. The steering controls are burned and if the insulation is cracked or damaged. Remove the spark plug with a steel brush if it using the machine again. Check the spark plug. Change the conditions and try again. Husqvarna-37 Measure the electrode gap with an electronic ignition system. The parking brake is disengaged. 2. Replace the spark plug if fouled...

Owners Manual
Page 44
... cutting position. 3. Once belt is located on the idler arm and carefully route belt over the top of the cutter housing pulleys and remove belt. Replace belt shields on a level surface. Remove any twist. Push inward on the engine shaft. 2. Clutch pulley 2. Replace belts if they begin to make sure it matches the routing decal, and the belt does not have accumulated around the mandrel housings. 5. Apply parking brake. 2. Remove tension on the top of operation. Carefully slip belt...
... cutting position. 3. Once belt is located on the idler arm and carefully route belt over the top of the cutter housing pulleys and remove belt. Replace belt shields on a level surface. Remove any twist. Push inward on the engine shaft. 2. Clutch pulley 2. Replace belts if they begin to make sure it matches the routing decal, and the belt does not have accumulated around the mandrel housings. 5. Apply parking brake. 2. Remove tension on the top of operation. Carefully slip belt...

Owners Manual
Page 45
... idler pulley. 3. Idler spring 3. The belt should now be able to be removed from the engine pulley and pump pulleys. Engage the parking brake. Belt removal 1. Create slack in this section of the manual). 2. Wrap the belt around the pulley 2. Electric clutch 2. Clutch stop Pump belt removal 1 2 3 8054-002 Husqvarna-45 Remove the deck belt (see Deck Belt Installation in the belt by removing the spring on the pump idler arm. 3. Reattach the spring on a level surface. Route the belt around the inside of the manual). 1. MAINTENANCE Pump Belt Replacing pump belt Park...
... idler pulley. 3. Idler spring 3. The belt should now be able to be removed from the engine pulley and pump pulleys. Engage the parking brake. Belt removal 1. Create slack in this section of the manual). 2. Wrap the belt around the pulley 2. Electric clutch 2. Clutch stop Pump belt removal 1 2 3 8054-002 Husqvarna-45 Remove the deck belt (see Deck Belt Installation in the belt by removing the spring on the pump idler arm. 3. Reattach the spring on a level surface. Route the belt around the inside of the manual). 1. MAINTENANCE Pump Belt Replacing pump belt Park...

Owners Manual
Page 46
... that the blades are sharp. Replace with a heavy cloth when handling. Cutter housing Blade attachment 46-Husqvarna 8011-604-1 1 Protect your hands with gloves and/or wrap blades with a Husqvarna bolt if required. IMPORTANT INFORMATION Special blade bolt is important that result in a breakdown. MAINTENANCE Cutting Blades In order to 90 ft/lbs (122 Nm). Damaged blades should be replaced. Check the blades WARNING! Install and tighten blade bolt securely. 4. Do not use lower grade...
... that the blades are sharp. Replace with a heavy cloth when handling. Cutter housing Blade attachment 46-Husqvarna 8011-604-1 1 Protect your hands with gloves and/or wrap blades with a Husqvarna bolt if required. IMPORTANT INFORMATION Special blade bolt is important that result in a breakdown. MAINTENANCE Cutting Blades In order to 90 ft/lbs (122 Nm). Damaged blades should be replaced. Check the blades WARNING! Install and tighten blade bolt securely. 4. Do not use lower grade...

Owners Manual
Page 58
... the carburetor or fuel line. • Fouled spark plugs • Poor contact of the battery terminal cable connections • Charging lead is disconnected • Parking brake on • Bypass valve on pump open • Drive belt for the transmission slack or has come off • Air trapped in hydraulic system • Drive belt for the mower deck has come loose • Contact for the electromagnetic coupling has loosened • Blade switch...
... the carburetor or fuel line. • Fouled spark plugs • Poor contact of the battery terminal cable connections • Charging lead is disconnected • Parking brake on • Bypass valve on pump open • Drive belt for the transmission slack or has come off • Air trapped in hydraulic system • Drive belt for the mower deck has come loose • Contact for the electromagnetic coupling has loosened • Blade switch...
Owners Manual
Page 59
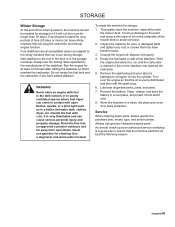
... underside of the mower deck to run until the carburetor is very flammable and can come in contact with care. Change the engine oil; Empty the fuel tanks or add a fuel stabilizer. Clean, charge, and store the battery in a cool place, but protect it from open flames, sparks, or a pilot light such as regards to stand for cleaning. Always use genuine Husqvarna spare parts. Use a degreaser and warm...
... underside of the mower deck to run until the carburetor is very flammable and can come in contact with care. Change the engine oil; Empty the fuel tanks or add a fuel stabilizer. Clean, charge, and store the battery in a cool place, but protect it from open flames, sparks, or a pilot light such as regards to stand for cleaning. Always use genuine Husqvarna spare parts. Use a degreaser and warm...
Owners Manual
Page 69
... regulations which become worn through 6, inclusive. Husqvarna-69 Additional limitations are covered by a third party which vary by warranty. SECTION 2 - Failure caused by continued use , including, but not limited to belts, blades, blade adapters, bulbs, clutches, clutch drums, filters (fuel line, fuel filters, air filters, oil filters), sprockets, guide bars, lubricants, rewind springs, spark plugs; (2) Natural discoloration of incidental or consequential damages, or limitations on the Online Product Registration link and fill out the...
... regulations which become worn through 6, inclusive. Husqvarna-69 Additional limitations are covered by a third party which vary by warranty. SECTION 2 - Failure caused by continued use , including, but not limited to belts, blades, blade adapters, bulbs, clutches, clutch drums, filters (fuel line, fuel filters, air filters, oil filters), sprockets, guide bars, lubricants, rewind springs, spark plugs; (2) Natural discoloration of incidental or consequential damages, or limitations on the Online Product Registration link and fill out the...
Owners Manual
Page 76
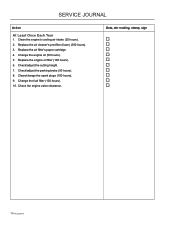
SERVICE JOURNAL Action At Least Once Each Year 1. Replace the air filter's paper cartridge. 4. Check/adjust the cutting height. 7. Change the fuel filter (100 hours). 10. Replace the air cleaner's pre-filter (foam) (300 hours). 3. Date, mtr reading, stamp, sign 76-Husqvarna Check the engine valve clearance. Clean the engine's cooling air intake (25 hours). 2. Clean/change the spark plugs (100 hours). 9. Replace the engine oil filter (100 hours). 6. Change the engine oil (50 hours). 5. Check/adjust the parking brake (50 hours). 8.
SERVICE JOURNAL Action At Least Once Each Year 1. Replace the air filter's paper cartridge. 4. Check/adjust the cutting height. 7. Change the fuel filter (100 hours). 10. Replace the air cleaner's pre-filter (foam) (300 hours). 3. Date, mtr reading, stamp, sign 76-Husqvarna Check the engine valve clearance. Clean the engine's cooling air intake (25 hours). 2. Clean/change the spark plugs (100 hours). 9. Replace the engine oil filter (100 hours). 6. Change the engine oil (50 hours). 5. Check/adjust the parking brake (50 hours). 8.
Parts Manual
Page 19
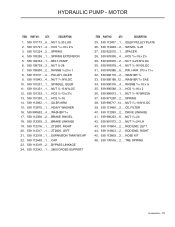
..... 539 990717 ��14 NUT 5/16-18 NYLOC 39.. 539 113466 2 OIL FILTER 40.. 539 112099 2 DRIVE LINKAGE 41.. 539 990223 6 NUT 5/16-24 42.. 539 991073 2 NUT 5/16-24 LH 43.. 539 110604 2 ROD END, LEFT 44.. 539 110603 2 ROD END, RIGHT 45.. 539 112669 2 HOSE KIT 46.. 539 130516 2 TAB, SPRING Husqvarna - 19 HYDRAULIC PUMP - QTY.
..... 539 990717 ��14 NUT 5/16-18 NYLOC 39.. 539 113466 2 OIL FILTER 40.. 539 112099 2 DRIVE LINKAGE 41.. 539 990223 6 NUT 5/16-24 42.. 539 991073 2 NUT 5/16-24 LH 43.. 539 110604 2 ROD END, LEFT 44.. 539 110603 2 ROD END, RIGHT 45.. 539 112669 2 HOSE KIT 46.. 539 130516 2 TAB, SPRING Husqvarna - 19 HYDRAULIC PUMP - QTY.

Parts Manual
Page 29
... 110733 1 DISCHARGE CHUTE 13.. 539 110735 1 SPRING, TORSION 14.. 539 110736 1 PIN-CLEVIS 5/16 DIA x 5.19 15.. 539 112079 3 BLADE 18" 16.. 539 112749 1 DECK W/DECALS 17.. 539 112169 2 IDLER BUSHING 18.. 539 112170 3 HOUSING 19.. 539 112171 3 PULLEY 20.. 539 132728 3 IDLER PULLEY, NYLON 21.. 539 101331 1 NUT ½-13 NYLOC 22.. 539 102243 1 WASHER .65, SUPPORT ITEM PART NO. QTY...
... 110733 1 DISCHARGE CHUTE 13.. 539 110735 1 SPRING, TORSION 14.. 539 110736 1 PIN-CLEVIS 5/16 DIA x 5.19 15.. 539 112079 3 BLADE 18" 16.. 539 112749 1 DECK W/DECALS 17.. 539 112169 2 IDLER BUSHING 18.. 539 112170 3 HOUSING 19.. 539 112171 3 PULLEY 20.. 539 132728 3 IDLER PULLEY, NYLON 21.. 539 101331 1 NUT ½-13 NYLOC 22.. 539 102243 1 WASHER .65, SUPPORT ITEM PART NO. QTY...


