
Owners Manual
Page 2
... drive motors or electric starting when setting up spilled fuel before starting . Stay alert for Walk-Behind Powered Rotary Tillers TRAINING • Read the Manual carefully. IMPORTANT: USED TO ALERT YOU THAT THERE IS A POSSIBILITY OF DAMAGING THIS EQUIPMENT. If this symbol to...guards, plates, or other safety protective devices in the ground and propel the tiller forward. CAUTIONS, IMPORTANTS, AND NOTES ARE A MEANS OF ATTRACTING ATTENTION TO IMPORTANT OR CRITICAL INFORMATION IN THIS MANUAL. It means CAUTION!!! WARNING The engine exhaust from the plug to a running...
... drive motors or electric starting when setting up spilled fuel before starting . Stay alert for Walk-Behind Powered Rotary Tillers TRAINING • Read the Manual carefully. IMPORTANT: USED TO ALERT YOU THAT THERE IS A POSSIBILITY OF DAMAGING THIS EQUIPMENT. If this symbol to...guards, plates, or other safety protective devices in the ground and propel the tiller forward. CAUTIONS, IMPORTANTS, AND NOTES ARE A MEANS OF ATTRACTING ATTENTION TO IMPORTANT OR CRITICAL INFORMATION IN THIS MANUAL. It means CAUTION!!! WARNING The engine exhaust from the plug to a running...

Owners Manual
Page 3
...the safety rules. • Follow a regular schedule in effective working order by law (Section 4442 of a new tiller. In the state of this manual. TABLE OF CONTENTS SAFETY RULES 2 CUSTOMER RESPONSIBILITIES 3 PRODUCT SPECIFICATIONS 3 ASSEMBLY 4-6 OPERATION 7-11 MAINTENANCE SCHEDULE 12 MAINTENANCE...cannot easily remedy, please contact your nearest authorized service center. Please read and retain this Manual. See your authorized service center/ DEPARTMENT for and using your tiller. • Follow instructions under "Maintenance" and "Storage" sections of California, a spark...
...the safety rules. • Follow a regular schedule in effective working order by law (Section 4442 of a new tiller. In the state of this manual. TABLE OF CONTENTS SAFETY RULES 2 CUSTOMER RESPONSIBILITIES 3 PRODUCT SPECIFICATIONS 3 ASSEMBLY 4-6 OPERATION 7-11 MAINTENANCE SCHEDULE 12 MAINTENANCE...cannot easily remedy, please contact your nearest authorized service center. Please read and retain this Manual. See your authorized service center/ DEPARTMENT for and using your tiller. • Follow instructions under "Maintenance" and "Storage" sections of California, a spark...

Owners Manual
Page 4
... FRONT LEFT RIGHT OPERATOR'S POSITION (See Fig. 1) When right or left unassembled for shipping purposes. Standard wrench sizes are in the operating position (standing behind tiller handles). OPERATOR'S POSITION Fig. 1 CONTENTS OF HARDWARE PACK (2) Handle Locks (1) Carriage Bolt 3/8-16 UNC x 1 Grade 5 (1) Center Locknut 3/8-16 UNC (1) Flat Washer ... A socket wrench set will make assembly easier. Use the correct tools as necessary to insure proper tightness. ASSEMBLY Your new tiller has been assembled at the factory with exception of those parts left hand is mentioned in this...
... FRONT LEFT RIGHT OPERATOR'S POSITION (See Fig. 1) When right or left unassembled for shipping purposes. Standard wrench sizes are in the operating position (standing behind tiller handles). OPERATOR'S POSITION Fig. 1 CONTENTS OF HARDWARE PACK (2) Handle Locks (1) Carriage Bolt 3/8-16 UNC x 1 Grade 5 (1) Center Locknut 3/8-16 UNC (1) Flat Washer ... A socket wrench set will make assembly easier. Use the correct tools as necessary to insure proper tightness. ASSEMBLY Your new tiller has been assembled at the factory with exception of those parts left hand is mentioned in this...

Owners Manual
Page 6
SHIFT ROD HAIRPIN CLIP SHIFT LEVER INDICATOR Fig. 6 REMOVE TILLER FROM CRATE • Make sure shift lever indicator is important for shipping purposes... tire pressure to better suit operator. (See "TO ADJUST HANDLE HEIGHT" in "N" position (See Fig. 6) • Tilt tiller forward by lifting handle. Correct and equal tire pressure is in the Service and Adjustments section of carton. HANDLE HEIGHT • ...• Insert hairpin clip through hole of shift rod to the right and pull tiller out of this manual). 6 Separate cardboard cover from leveling shield. • Rotate...
SHIFT ROD HAIRPIN CLIP SHIFT LEVER INDICATOR Fig. 6 REMOVE TILLER FROM CRATE • Make sure shift lever indicator is important for shipping purposes... tire pressure to better suit operator. (See "TO ADJUST HANDLE HEIGHT" in "N" position (See Fig. 6) • Tilt tiller forward by lifting handle. Correct and equal tire pressure is in the Service and Adjustments section of carton. HANDLE HEIGHT • ...• Insert hairpin clip through hole of shift rod to the right and pull tiller out of this manual). 6 Separate cardboard cover from leveling shield. • Rotate...

Owners Manual
Page 7
...SHIELD - Used to protect small plants from being buried. SHIFT LEVER - SHIFT LEVER INDICATOR - Controls engine speed. 7 Save this manual for future reference. DEPTH STAKE - RECOIL STARTER HANDLE - Used to engage tines. Learn and understand their meaning. Used to shift ... SIDE SHIELD RECOIL STARTER HANDLE Fig. 7 MEETS ANSI SAFETY REQUIREMENTS Our tillers conform to familiarize yourself with the product. OPERATION KNOW YOUR TILLER READ THIS MANUAL AND SAFETY RULES BEFORE OPERATING YOUR TILLER. OUTER SIDE SHIELD - Levels tilled soil. TINE CONTROL - THROTTLE CONTROL...
...SHIELD - Used to protect small plants from being buried. SHIFT LEVER - SHIFT LEVER INDICATOR - Controls engine speed. 7 Save this manual for future reference. DEPTH STAKE - RECOIL STARTER HANDLE - Used to engage tines. Learn and understand their meaning. Used to shift ... SIDE SHIELD RECOIL STARTER HANDLE Fig. 7 MEETS ANSI SAFETY REQUIREMENTS Our tillers conform to familiarize yourself with the product. OPERATION KNOW YOUR TILLER READ THIS MANUAL AND SAFETY RULES BEFORE OPERATING YOUR TILLER. OUTER SIDE SHIELD - Levels tilled soil. TINE CONTROL - THROTTLE CONTROL...

Owners Manual
Page 9
...has been shipped, from tines. • When you have completed your turn . • Move throttle control "FAST" position for transporting the tiller. Tines will both sides). TURNING • Release the tine control. • Move throttle control to the top hole for deep tilling. ...oil should change engine oil, see "PRODUCT SPECIFICATIONS" on how fast or slow you wish to desired speed. Place shift lever in this manual. Lower drag stake. Retighten nuts. For approximate capacity see the Maintenance section in (till) position and move throttle control to cultivate. &#...
...has been shipped, from tines. • When you have completed your turn . • Move throttle control "FAST" position for transporting the tiller. Tines will both sides). TURNING • Release the tine control. • Move throttle control to the top hole for deep tilling. ...oil should change engine oil, see "PRODUCT SPECIFICATIONS" on how fast or slow you wish to desired speed. Place shift lever in this manual. Lower drag stake. Retighten nuts. For approximate capacity see the Maintenance section in (till) position and move throttle control to cultivate. &#...

Owners Manual
Page 10
... feet) or in quantities that can attract moisture which leads to separation and formation of acids during storage. NOTE: If at this manual. Choke Control Spark Plug Fuel Shut-Off Valve Throttle Control Recoil Starter Fig. 13 Starter Button Power Cord Plug 10 Wipe off any...8226; Place throttle control in "FAST" position. • Turn fuel shut-off valve 1/4 turn to open flame. receptacle. • Stand to side of tiller and push starter button until engine reaches start . • Move throttle control to desired running position. • Allow engine to warm up . • Disconnect...
... feet) or in quantities that can attract moisture which leads to separation and formation of acids during storage. NOTE: If at this manual. Choke Control Spark Plug Fuel Shut-Off Valve Throttle Control Recoil Starter Fig. 13 Starter Button Power Cord Plug 10 Wipe off any...8226; Place throttle control in "FAST" position. • Turn fuel shut-off valve 1/4 turn to open flame. receptacle. • Stand to side of tiller and push starter button until engine reaches start . • Move throttle control to desired running position. • Allow engine to warm up . • Disconnect...

Owners Manual
Page 12
To receive full value from the warranty, the operator must maintain tiller as instructed in the Service and Adjustments section of this manual should be made periodically to operator abuse or negligence. Service more often when operating under a heavy load or in dirty or dusty ...spark plug, clean or replace air filter, and check tines and belts for loose fasteners. GENERAL RECOMMENDATIONS The warranty on this manual. All adjustments in this tiller does not cover items that have been subjected to properly maintain your engine run better and last longer. BEFORE EACH USE &#...
To receive full value from the warranty, the operator must maintain tiller as instructed in the Service and Adjustments section of this manual should be made periodically to operator abuse or negligence. Service more often when operating under a heavy load or in dirty or dusty ...spark plug, clean or replace air filter, and check tines and belts for loose fasteners. GENERAL RECOMMENDATIONS The warranty on this manual. All adjustments in this tiller does not cover items that have been subjected to properly maintain your engine run better and last longer. BEFORE EACH USE &#...
Owners Manual
Page 13
...cleaner cover. 3. Carefully remove air cleaner cartridge. Do not allow dirt to enter the engine. • Refill engine with extension. • Tip tiller forward to prevent oil spill on level surface. • Oil will result in the Operation section of plug use 7/16 12 Pt. Clean and .... 20) Service air cleaner cartridge every twenty-five hours, more often if engine is on tiller, and catch oil in a suitable container. • Remove drain plug. • For easier removal of this manual. Tighten screw securely. Do not use . Check the crankcase oil level before tipping unit for...
...cleaner cover. 3. Carefully remove air cleaner cartridge. Do not allow dirt to enter the engine. • Refill engine with extension. • Tip tiller forward to prevent oil spill on level surface. • Oil will result in the Operation section of plug use 7/16 12 Pt. Clean and .... 20) Service air cleaner cartridge every twenty-five hours, more often if engine is on tiller, and catch oil in a suitable container. • Remove drain plug. • For easier removal of this manual. Tighten screw securely. Do not use . Check the crankcase oil level before tipping unit for...

Owners Manual
Page 14
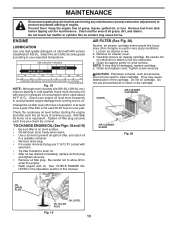
... CLEANING Do not clean your engine clean. • Clean air screen frequently using pressurized water (garden hose, etc.) to keep your tiller when the engine and transmission are covered to clean your engine is equipped with automotive type wax. 14 For proper engine performance and long... engine is shown in engine will shorten the useful life of use, whichever comes first. of this manual. MUFFLER CYLINDER FINS BLOWER HOUSING AIR SCREEN Fig. 21 MUFFLER Do not operate tiller without muffler. of all gasoline, oil, etc. • Protect painted surfaces with a spark arrester ...
... CLEANING Do not clean your engine clean. • Clean air screen frequently using pressurized water (garden hose, etc.) to keep your tiller when the engine and transmission are covered to clean your engine is equipped with automotive type wax. 14 For proper engine performance and long... engine is shown in engine will shorten the useful life of use, whichever comes first. of this manual. MUFFLER CYLINDER FINS BLOWER HOUSING AIR SCREEN Fig. 21 MUFFLER Do not operate tiller without muffler. of all gasoline, oil, etc. • Protect painted surfaces with a spark arrester ...

Owners Manual
Page 19
.... • Cover your unit with clean oil. (See "ENGINE" in the Maintenance section of this manual. • Be sure that does not retain moisture. TILLER • Clean entire tiller (See "CLEANING" in the Maintenance section of this manual). • Inspect and replace belts, if necessary (See belt replacement instructions in the Service and Adjustments...
.... • Cover your unit with clean oil. (See "ENGINE" in the Maintenance section of this manual. • Be sure that does not retain moisture. TILLER • Clean entire tiller (See "CLEANING" in the Maintenance section of this manual). • Inspect and replace belts, if necessary (See belt replacement instructions in the Service and Adjustments...

Parts Manual
Page 8
REPAIR PARTS TILLER - - PART NO. MODEL NUMBER DRT900 (96093001802), PRODUCT NUMBER 960 93 00-18 DECALS 1 5 12 4 7 9 8 6 2 10 3 KEY NO. 1 2 3 4 5 6 7 8 9 10 12 - - - DESCRIPTION 532 42 91-96 Decal, Belt Guard 532 42 38-... 17 67-82 Decal, Warning, Rotating Tines 532 40 91-43 Decal, Engine Intek REF 532 43 95-37 Decal, Forward 115 47 88-27 Manual, Operator's English/French 580 30 83-27...
REPAIR PARTS TILLER - - PART NO. MODEL NUMBER DRT900 (96093001802), PRODUCT NUMBER 960 93 00-18 DECALS 1 5 12 4 7 9 8 6 2 10 3 KEY NO. 1 2 3 4 5 6 7 8 9 10 12 - - - DESCRIPTION 532 42 91-96 Decal, Belt Guard 532 42 38-... 17 67-82 Decal, Warning, Rotating Tines 532 40 91-43 Decal, Engine Intek REF 532 43 95-37 Decal, Forward 115 47 88-27 Manual, Operator's English/French 580 30 83-27...


