Owners Manual
Page 2
...to point out important safety precautions. CAUTIONS, IMPORTANTS, AND NOTES ARE A MEANS OF ATTRACTING ATTENTION TO IMPORTANT OR CRITICAL INFORMATION IN THIS MANUAL. CAUTION: Always disconnect spark plug wire and place wire where it is highly flammable. • Use an approved fuel container. &#...: USED TO ALERT YOU THAT THERE IS A POSSIBILITY OF DAMAGING THIS EQUIPMENT. Stay alert for Walk-Behind Powered Rotary Tillers TRAINING • Read the Owner's Manual carefully. exhaust fumes are present, such as specified by the manufacturer of trouble. • Stop the engine (motor)...
...to point out important safety precautions. CAUTIONS, IMPORTANTS, AND NOTES ARE A MEANS OF ATTRACTING ATTENTION TO IMPORTANT OR CRITICAL INFORMATION IN THIS MANUAL. CAUTION: Always disconnect spark plug wire and place wire where it is highly flammable. • Use an approved fuel container. &#...: USED TO ALERT YOU THAT THERE IS A POSSIBILITY OF DAMAGING THIS EQUIPMENT. Stay alert for Walk-Behind Powered Rotary Tillers TRAINING • Read the Owner's Manual carefully. exhaust fumes are present, such as specified by the manufacturer of trouble. • Stop the engine (motor)...
Owners Manual
Page 3
... 3 ASSEMBLY 4-6 OPERATION 7-10 MAINTENANCE SCHEDULE 11 MAINTENANCE 11-13 SERVICE & ADJUSTMENTS 14-17 STORAGE 18 TROUBLESHOOTING 19 REPAIR PARTS-TILLER 20-26 WARRANTY 28-31 3 We have competent, well-trained technicians and the proper tools to give you the best possible ...rules. • Follow a regular schedule in maintaining, caring for and using your tiller. • Follow instructions under "Maintenance" and "Storage" sections of a new tiller. Please read and retain this manual. Always observe the "SAFETY RULES". The instructions will enable you cannot easily remedy...
... 3 ASSEMBLY 4-6 OPERATION 7-10 MAINTENANCE SCHEDULE 11 MAINTENANCE 11-13 SERVICE & ADJUSTMENTS 14-17 STORAGE 18 TROUBLESHOOTING 19 REPAIR PARTS-TILLER 20-26 WARRANTY 28-31 3 We have competent, well-trained technicians and the proper tools to give you the best possible ...rules. • Follow a regular schedule in maintaining, caring for and using your tiller. • Follow instructions under "Maintenance" and "Storage" sections of a new tiller. Please read and retain this manual. Always observe the "SAFETY RULES". The instructions will enable you cannot easily remedy...
Owners Manual
Page 4
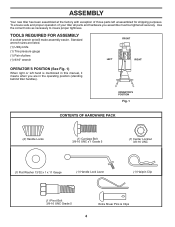
... socket wrench set will make assembly easier. Use the correct tools as necessary to insure proper tightness. Standard wrench sizes are in this manual, it means when you assemble must be tightened securely. OPERATOR'S POSITION Fig. 1 CONTENTS OF HARDWARE PACK (2) Handle Locks (1) Carriage Bolt... knife (1) Tire pressure gauge (1) Pair of those parts left hand is mentioned in the operating position (standing behind tiller handles). ASSEMBLY Your new tiller has been assembled at the factory with exception of pliers (1) 9/16" wrench FRONT LEFT RIGHT OPERATOR'S POSITION (See...
... socket wrench set will make assembly easier. Use the correct tools as necessary to insure proper tightness. Standard wrench sizes are in this manual, it means when you assemble must be tightened securely. OPERATOR'S POSITION Fig. 1 CONTENTS OF HARDWARE PACK (2) Handle Locks (1) Carriage Bolt... knife (1) Tire pressure gauge (1) Pair of those parts left hand is mentioned in the operating position (standing behind tiller handles). ASSEMBLY Your new tiller has been assembled at the factory with exception of pliers (1) 9/16" wrench FRONT LEFT RIGHT OPERATOR'S POSITION (See...
Owners Manual
Page 6
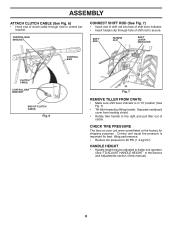
.... SHIFT ROD HAIRPIN CLIP SHIFT LEVER INDICATOR CONTROL BAR CLUTCH CABLE CONTROL BAR BRACKET END OF CLUTCH CABLE Fig. 6 Fig. 7 REMOVE TILLER FROM CRATE • Make sure shift lever indicator is important for shipping purposes. CHECK TIRE PRESSURE The tires on your unit were overinflated ... in the Service and Adjustments section of clutch cable through hole of carton. Separate cardboard cover from leveling shield. • Rotate tiller handle to the right and pull tiller out of shift rod to better suit operator. (See "TO ADJUST HANDLE HEIGHT" in "N" position (See Fig. 7) •...
.... SHIFT ROD HAIRPIN CLIP SHIFT LEVER INDICATOR CONTROL BAR CLUTCH CABLE CONTROL BAR BRACKET END OF CLUTCH CABLE Fig. 6 Fig. 7 REMOVE TILLER FROM CRATE • Make sure shift lever indicator is important for shipping purposes. CHECK TIRE PRESSURE The tires on your unit were overinflated ... in the Service and Adjustments section of clutch cable through hole of carton. Separate cardboard cover from leveling shield. • Rotate tiller handle to the right and pull tiller out of shift rod to better suit operator. (See "TO ADJUST HANDLE HEIGHT" in "N" position (See Fig. 7) •...
Owners Manual
Page 7
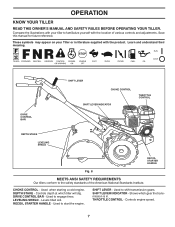
... familiarize yourself with the product. RECOIL STARTER HANDLE - SHIFT LEVER - These symbols may appear on your tiller to shift transmission gears. OPERATION KNOW YOUR TILLER READ THIS OWNER'S MANUAL AND SAFETY RULES BEFORE OPERATING YOUR TILLER. Save this manual for future reference. DRIVE CONTROL BAR SHIFT LEVER CHOKE CONTROL SHIFT LEVER INDICATOR THROTTLE CONTROL DEPTH...
... familiarize yourself with the product. RECOIL STARTER HANDLE - SHIFT LEVER - These symbols may appear on your tiller to shift transmission gears. OPERATION KNOW YOUR TILLER READ THIS OWNER'S MANUAL AND SAFETY RULES BEFORE OPERATING YOUR TILLER. Save this manual for future reference. DRIVE CONTROL BAR SHIFT LEVER CHOKE CONTROL SHIFT LEVER INDICATOR THROTTLE CONTROL DEPTH...
Owners Manual
Page 9
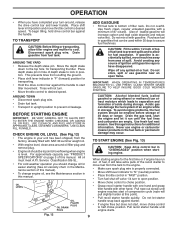
...ADDING OIL OR FUEL. Service Classification SG-SL. • For cold weather operation you have disappeared. See Storage Instructions for transporting the tiller. TO START ENGINE (See Fig. 13) CAUTION: Keep drive control bar in position. Do not let starter handle snap back against starter... increase carbon and lead oxide deposits and reduce valve life). For approximate capacity see the Maintenance section in the Maintenance section of this manual). • To change oil for easier starting engine for transporting. • Hold the drive control bar against the handle. All ...
...ADDING OIL OR FUEL. Service Classification SG-SL. • For cold weather operation you have disappeared. See Storage Instructions for transporting the tiller. TO START ENGINE (See Fig. 13) CAUTION: Keep drive control bar in position. Do not let starter handle snap back against starter... increase carbon and lead oxide deposits and reduce valve life). For approximate capacity see the Maintenance section in the Maintenance section of this manual). • To change oil for easier starting engine for transporting. • Hold the drive control bar against the handle. All ...
Owners Manual
Page 10
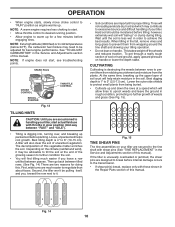
... CONTROL RECOIL STARTER engine_art_71 Fig. 13 THROTTLE CONTROL TILLING HINTS CAUTION: Until you leave a row untilled between passes. The decomposition of this manual). however, extremely wet soil will "ball-up . Fig. 15 TINE SHEAR PINS The tine assemblies on the climate (rainfall and wind),...control to desired running position. • Allow engine to warm up packed soil before internal damage occurs to negotiate than about-faces. A tiller will find tilling much easier to the transmission. • If shear pin(s) break, replace only with shear pins (See "TINE REPLACEMENT"...
... CONTROL RECOIL STARTER engine_art_71 Fig. 13 THROTTLE CONTROL TILLING HINTS CAUTION: Until you leave a row untilled between passes. The decomposition of this manual). however, extremely wet soil will "ball-up . Fig. 15 TINE SHEAR PINS The tine assemblies on the climate (rainfall and wind),...control to desired running position. • Allow engine to warm up packed soil before internal damage occurs to negotiate than about-faces. A tiller will find tilling much easier to the transmission. • If shear pin(s) break, replace only with shear pins (See "TINE REPLACEMENT"...
Owners Manual
Page 11
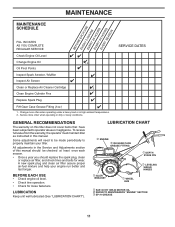
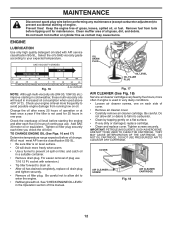
... lubricated (See "LUBRICATION CHART"). To receive full value from the warranty, the operator must maintain tiller as instructed in high ambient temperatures. 2 - GENERAL RECOMMENDATIONS The warranty on this manual should replace the spark plug, clean or replace air filter, and check tines and belts for loose...in dirty or dusty conditions. Service more often when operating under a heavy load or in this manual. A new spark plug and clean air filter assure proper air-fuel mixture and help your tiller. BEFORE EACH USE • Check engine oil level. • Check tine operation. •...
... lubricated (See "LUBRICATION CHART"). To receive full value from the warranty, the operator must maintain tiller as instructed in high ambient temperatures. 2 - GENERAL RECOMMENDATIONS The warranty on this manual should replace the spark plug, clean or replace air filter, and check tines and belts for loose...in dirty or dusty conditions. Service more often when operating under a heavy load or in this manual. A new spark plug and clean air filter assure proper air-fuel mixture and help your tiller. BEFORE EACH USE • Check engine oil level. • Check tine operation. •...
Owners Manual
Page 12
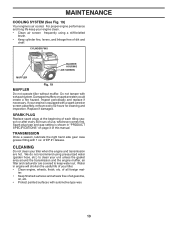
Clean muffler area of this manual. ENGINE LUBRICATION Use only high quality detergent oil rated with extension.) • Tip tiller forward to avoid possible engine damage from tank before tipping unit for 25 hours in cold weather, these multi-viscosity oils will drain more ..., replace oil drain plug and tighten securely. • Remove oil filler plug. Keep the engine free of operation or at least once a year if the tiller is used in a suitable container. • Remove drain plug. Tighten screws securely. OIL LEVEL OIL FILLER PLUG Fig. 17 AIR CLEANER (See Fig. 18)...
Clean muffler area of this manual. ENGINE LUBRICATION Use only high quality detergent oil rated with extension.) • Tip tiller forward to avoid possible engine damage from tank before tipping unit for 25 hours in cold weather, these multi-viscosity oils will drain more ..., replace oil drain plug and tighten securely. • Remove oil filler plug. Keep the engine free of operation or at least once a year if the tiller is used in a suitable container. • Remove drain plug. Tighten screws securely. OIL LEVEL OIL FILLER PLUG Fig. 17 AIR CLEANER (See Fig. 18)...
Owners Manual
Page 13
... filter and carburetor are hot. We do not recommend using a stiff-bristled brush. • Keep cylinder fins, levers, and linkage free of your tiller. • Clean engine, wheels, finish, etc. Do not tamper with automotive type wax. 13 Water in "PRODUCT SPECIFICATIONS" on page 3 of ...all foreign matter. • Keep finished surfaces and wheels free of this manual. Damaged mufflers or spark arresters could create a fire hazard. CLEANING Do not clean your engine is air cooled. of all gasoline, oil, etc...
... filter and carburetor are hot. We do not recommend using a stiff-bristled brush. • Keep cylinder fins, levers, and linkage free of your tiller. • Clean engine, wheels, finish, etc. Do not tamper with automotive type wax. 13 Water in "PRODUCT SPECIFICATIONS" on page 3 of ...all foreign matter. • Keep finished surfaces and wheels free of this manual. Damaged mufflers or spark arresters could create a fire hazard. CLEANING Do not clean your engine is air cooled. of all gasoline, oil, etc...
Owners Manual
Page 18
... from dust and dirt. • Cover your unit with gasoline in the Maintenance section of this manual. • Be sure that does not retain moisture. WARNING: Never store the tiller with a suitable protective cover that all rusted or chipped paint surfaces; Replace if necessary. •...Rust and/or dirt in the Maintenance section of this manual). • Lubricate as shown in your gasoline will cause your unit to reach the carburetor. TILLER • Clean entire tiller (See "CLEANING" in the Maintenance section of this manual). • Inspect and replace belts, if necessary (See...
... from dust and dirt. • Cover your unit with gasoline in the Maintenance section of this manual. • Be sure that does not retain moisture. WARNING: Never store the tiller with a suitable protective cover that all rusted or chipped paint surfaces; Replace if necessary. •...Rust and/or dirt in the Maintenance section of this manual). • Lubricate as shown in your gasoline will cause your unit to reach the carburetor. TILLER • Clean entire tiller (See "CLEANING" in the Maintenance section of this manual). • Inspect and replace belts, if necessary (See...
Owners Manual
Page 26
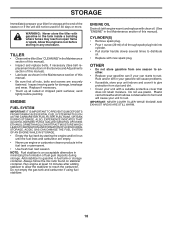
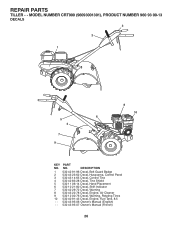
DESCRIPTION 532 42 91-96 Decal, Belt Guard Badge 532 43 23-62 Decal, Husqvarna, Control Panel 532 43 14-65 Decal, Control Tine 532 42 83-28 Decal, Tine Shield 532 11 06-14 Decal, Hand Placement 532 10 ..., Engine, Air Cleaner 532 12 00-76 Decal, Warning, Rotating Tines 532 40 91-43 Decal, Engine, Fuel Tank, 8.5 532 43 95-06 Owner's Manual (English) 532 43 95-07 Owner's Manual (French) 26 PART NO. MODEL NUMBER CRT900 (96093001301), PRODUCT NUMBER 960 93 00-13 DECALS 3 2 1 5 4 7 9 8 10 6 KEY NO. 1 2 3 4 5 6 7 8 9 10 - - - REPAIR PARTS...
DESCRIPTION 532 42 91-96 Decal, Belt Guard Badge 532 43 23-62 Decal, Husqvarna, Control Panel 532 43 14-65 Decal, Control Tine 532 42 83-28 Decal, Tine Shield 532 11 06-14 Decal, Hand Placement 532 10 ..., Engine, Air Cleaner 532 12 00-76 Decal, Warning, Rotating Tines 532 40 91-43 Decal, Engine, Fuel Tank, 8.5 532 43 95-06 Owner's Manual (English) 532 43 95-07 Owner's Manual (French) 26 PART NO. MODEL NUMBER CRT900 (96093001301), PRODUCT NUMBER 960 93 00-13 DECALS 3 2 1 5 4 7 9 8 10 6 KEY NO. 1 2 3 4 5 6 7 8 9 10 - - - REPAIR PARTS...

Parts List
Page 8
DESCRIPTION 532 42 91-96 Decal, Belt Guard Badge 532 43 23-62 Decal, Husqvarna, Control Panel 532 43 14-65 Decal, Control Tine 532 42 83-28 Decal, Tine Shield 532 11 06-14 Decal, Hand Placement 532 10 ..., Engine, Air Cleaner 532 12 00-76 Decal, Warning, Rotating Tines 532 40 91-43 Decal, Engine, Fuel Tank, 8.5 532 43 95-06 Owner's Manual (English) 532 43 95-07 Owner's Manual (French) 26 MODEL NUMBER CRT900 (96093001301), PRODUCT NUMBER 960 93 00-13 DECALS 3 2 1 5 4 7 9 8 10 6 KEY NO. 1 2 3 4 5 6 7 8 9 10 - - - PART NO. REPAIR PARTS...
DESCRIPTION 532 42 91-96 Decal, Belt Guard Badge 532 43 23-62 Decal, Husqvarna, Control Panel 532 43 14-65 Decal, Control Tine 532 42 83-28 Decal, Tine Shield 532 11 06-14 Decal, Hand Placement 532 10 ..., Engine, Air Cleaner 532 12 00-76 Decal, Warning, Rotating Tines 532 40 91-43 Decal, Engine, Fuel Tank, 8.5 532 43 95-06 Owner's Manual (English) 532 43 95-07 Owner's Manual (French) 26 MODEL NUMBER CRT900 (96093001301), PRODUCT NUMBER 960 93 00-13 DECALS 3 2 1 5 4 7 9 8 10 6 KEY NO. 1 2 3 4 5 6 7 8 9 10 - - - PART NO. REPAIR PARTS...


