

Owner Manual
Page 1
Operator's manual HUSQVARNA AUTOMOWER® 430XH/450XH Read the operator's manual carefully and make sure that you understand the instructions before you use the product. EN, English
Operator's manual HUSQVARNA AUTOMOWER® 430XH/450XH Read the operator's manual carefully and make sure that you understand the instructions before you use the product. EN, English

Owner Manual
Page 2
...'s Declaration of the product...........22 3.9 Automower® Connect app 23 3.10 To do the product settings 24 4 Operation 4.1 Main switch 34 4.2 To start the product 34 4.3 Operating mode - maintenance 37 5.2 Clean the product 37 5.3 Replace the blades 38 5.4 Battery 38 5.5 Winter service 39 6 Troubleshooting 6.1 Introduction - troubleshooting 40 6.2 Fault messages 40 6.3 Information messages 45 6.4 LED indicator lamp on the charging station 47 6.5 LED indicator lamp...
...'s Declaration of the product...........22 3.9 Automower® Connect app 23 3.10 To do the product settings 24 4 Operation 4.1 Main switch 34 4.2 To start the product 34 4.3 Operating mode - maintenance 37 5.2 Clean the product 37 5.3 Replace the blades 38 5.4 Battery 38 5.5 Winter service 39 6 Troubleshooting 6.1 Introduction - troubleshooting 40 6.2 Fault messages 40 6.3 Information messages 45 6.4 LED indicator lamp on the charging station 47 6.5 LED indicator lamp...

Owner Manual
Page 4
... 19. Low voltage cable 4 - Skid plate 18. Cable markers 23. Extra blades 28. Rear wheels 6. Headlights 8. product identification code) 10. Cutting system 13. Chassis box with electronics, battery and motors 14. Replaceable cover 9. Hatch to display and keypad 3. Main switch 15. LED for securing the charging station 25. Screws for operation check of the charging station and boundary wire 20. 1.3 Product overview Automower® 430XH 2 3 Automower® 450XH 6 1 5 4 9 10 11...
... 19. Low voltage cable 4 - Skid plate 18. Cable markers 23. Extra blades 28. Rear wheels 6. Headlights 8. product identification code) 10. Cutting system 13. Chassis box with electronics, battery and motors 14. Replaceable cover 9. Hatch to display and keypad 3. Main switch 15. LED for securing the charging station 25. Screws for operation check of the charging station and boundary wire 20. 1.3 Product overview Automower® 430XH 2 3 Automower® 450XH 6 1 5 4 9 10 11...

Owner Manual
Page 5
... from the machine when operating. WARNING: Read the user instructions before carrying out any inspections and/or maintenance. Do not use a high-pressure washer or even running water to electrostatic discharge (ESD). The security function lets the operator select between 3 security levels. 1 Is a part of the Installation kit which are placed. 1.5 Symbols on the rating plate. Loop wire for the loop wire 1 30. This product conforms...
... from the machine when operating. WARNING: Read the user instructions before carrying out any inspections and/or maintenance. Do not use a high-pressure washer or even running water to electrostatic discharge (ESD). The security function lets the operator select between 3 security levels. 1 Is a part of the Installation kit which are placed. 1.5 Symbols on the rating plate. Loop wire for the loop wire 1 30. This product conforms...

Owner Manual
Page 6
... timer function automatically adapts the cutting intervals to the Internet server. (Automower® Connect) The accessories function is used for settings made for the accessories. The installation function for manual settings for the products are set in the charging station but do not charge the battery. The battery indicator shows the charge level of the GPRS reception. (Automower® Connect) An X next to the bars indicates a problem with the SIM...
... timer function automatically adapts the cutting intervals to the Internet server. (Automower® Connect) The accessories function is used for settings made for the accessories. The installation function for manual settings for the products are set in the charging station but do not charge the battery. The battery indicator shows the charge level of the GPRS reception. (Automower® Connect) An X next to the bars indicates a problem with the SIM...
Owner Manual
Page 15
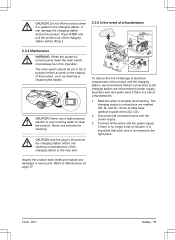
.... Never use a high-pressure washer or even running water to simplify reconnecting. The charging station's connections are disconnected (power supply, boundary wire and guide wire) if there is a risk of a thunderstorm 2.3.4 Maintenance WARNING: When the product is connected to the right place. Disconnect all connections to electrical components in the charging station. Inspect the product each wire is turned upside down the main switch must...
.... Never use a high-pressure washer or even running water to simplify reconnecting. The charging station's connections are disconnected (power supply, boundary wire and guide wire) if there is a risk of a thunderstorm 2.3.4 Maintenance WARNING: When the product is connected to the right place. Disconnect all connections to electrical components in the charging station. Inspect the product each wire is turned upside down the main switch must...
Owner Manual
Page 20
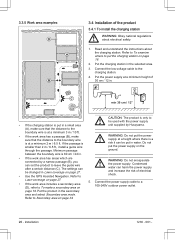
... be changed in . 3.3.5 Work area examples D A B 3.4 Installation of electrical shock. Read and understand the instructions about electrical safety. 1. Put the power supply at a minimum 2 m / 6.5 ft. The settings can harm the power supply and increase the risk of the product 3.4.1 To install the charging station WARNING: Obey national regulations about the charging station. Connect the power supply cable to leave the guide wire after a certain distance (C). Installation 1230...
... be changed in . 3.3.5 Work area examples D A B 3.4 Installation of electrical shock. Read and understand the instructions about electrical safety. 1. Put the power supply at a minimum 2 m / 6.5 ft. The settings can harm the power supply and increase the risk of the product 3.4.1 To install the charging station WARNING: Obey national regulations about the charging station. Connect the power supply cable to leave the guide wire after a certain distance (C). Installation 1230...
Owner Manual
Page 23
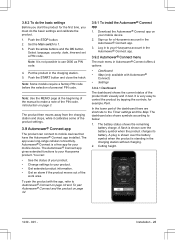
... up for example Park. It is standing in the charging station. 5. A flash is shown over the battery symbol when the product is very easy to control the product by tapping the controls, for a Husqvarna account in Automower® Connect offers 4 options: • Dashboard • Map (only available with the app, refer to use 0000 as PIN code. 4. A plug is not...
... up for example Park. It is standing in the charging station. 5. A flash is shown over the battery symbol when the product is very easy to control the product by tapping the controls, for a Husqvarna account in Automower® Connect offers 4 options: • Dashboard • Map (only available with the app, refer to use 0000 as PIN code. 4. A plug is not...

Owner Manual
Page 24
... timer settings Model Approximate operation capacity, m2/h / yd2/h Automower® 430XH 133 / 159 Automower® 450XH 208 / 248 Example: A lawn of the lawn with the approximate operation capacity. Push the STOP button. 2. Days / week 7 h / day 7.5 Timer settings 07:00 - 14:30 / 07:00 am - 2:30 pm 3.10.2.2 To set in the display of your lawn in m2 / yd2. 2. Calculate the dimension of the product. Use the...
... timer settings Model Approximate operation capacity, m2/h / yd2/h Automower® 430XH 133 / 159 Automower® 450XH 208 / 248 Example: A lawn of the lawn with the approximate operation capacity. Push the STOP button. 2. Days / week 7 h / day 7.5 Timer settings 07:00 - 14:30 / 07:00 am - 2:30 pm 3.10.2.2 To set in the display of your lawn in m2 / yd2. 2. Calculate the dimension of the product. Use the...
Owner Manual
Page 27
... to maintain a well-cut lawn in Lawn Coverage. Any grass twisted around the blade disc shaft, or blunt blades, can be adjusted to the menu on page 24. 2. Do steps 1-3 in the Lawn coverage menu. Use the arrow buttons and the OK button to remote parts of the yard. Push the OK button to set the cutting time. Installation - 27 Use the arrow buttons to...
... to maintain a well-cut lawn in Lawn Coverage. Any grass twisted around the blade disc shaft, or blunt blades, can be adjusted to the menu on page 24. 2. Do steps 1-3 in the Lawn coverage menu. Use the arrow buttons and the OK button to remote parts of the yard. Push the OK button to set the cutting time. Installation - 27 Use the arrow buttons to...
Owner Manual
Page 29
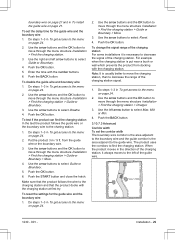
... charging station. Push the START button and close the hatch. Push the BACK button. 3.10.7.3 Advanced Corridor width To set the delay time for the guide wire and the boundary wire 1. boundary wire on page 21 and in To get access to the menu on page 24. 2. Do steps 1-3 in To install the guide wire on page 24. 2. from docking with the number...
... charging station. Push the START button and close the hatch. Push the BACK button. 3.10.7.3 Advanced Corridor width To set the delay time for the guide wire and the boundary wire 1. boundary wire on page 21 and in To get access to the menu on page 24. 2. Do steps 1-3 in To install the guide wire on page 24. 2. from docking with the number...
Owner Manual
Page 31
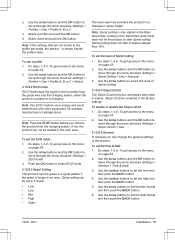
... page 24. 2. Installation - 31 Do steps 1-3 in grass height. Use the arrow buttons and the OK button to set the time & date 1. Spiral Cutting does not start Spiral cutting. Use the number buttons to move through the menu structure Settings > Profiles > Use > Profile A, B or C > Select. 3.10.8.2 ECO mode ECO mode stops the signal in the boundary loop, the guide wire and the charging station, when...
... page 24. 2. Installation - 31 Do steps 1-3 in grass height. Use the arrow buttons and the OK button to set the time & date 1. Spiral Cutting does not start Spiral cutting. Use the number buttons to move through the menu structure Settings > Profiles > Use > Profile A, B or C > Select. 3.10.8.2 ECO mode ECO mode stops the signal in the boundary loop, the guide wire and the charging station, when...

Owner Manual
Page 34
... operating mode where the product mows and charges automatically. 4.3.2 Override timer The timer settings can be temporarily overridden by selecting Override timer. Operation 1230 - 001 - WARNING: Do not use or before you start the product 1. 4 Operation 4.1 Main switch WARNING: Read the safety instructions carefully before any work area. 5. Never put your hands and feet away from the rotating blades. Refer to charge the battery...
... operating mode where the product mows and charges automatically. 4.3.2 Override timer The timer settings can be temporarily overridden by selecting Override timer. Operation 1230 - 001 - WARNING: Do not use or before you start the product 1. 4 Operation 4.1 Main switch WARNING: Read the safety instructions carefully before any work area. 5. Never put your hands and feet away from the rotating blades. Refer to charge the battery...

Owner Manual
Page 35
... the battery. WARNING: Always switch off the product 1. WARNING: Only charge the product using the main switch if it requires maintenance, or if the product must continue to operate when cutting is complete. • Use the right arrow button to pause operation. 4.4.3 Start with next timer The product stays in electric shock, overheating or leakage of the product. Park When selecting Park the following operation...
... the battery. WARNING: Always switch off the product 1. WARNING: Only charge the product using the main switch if it requires maintenance, or if the product must continue to operate when cutting is complete. • Use the right arrow button to pause operation. 4.4.3 Start with next timer The product stays in electric shock, overheating or leakage of the product. Park When selecting Park the following operation...
Owner Manual
Page 37
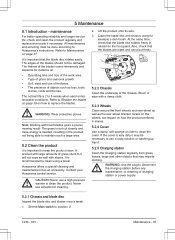
... mowing result. Set the Main switch to the foot guard. It is very dirty it will not cope as toys, tools, stones, roots and the like. Husqvarna offers a special cleaning and maintenance kit as the rear wheel bracket. Never use a high-pressure washer to keep the product clean. At the same time, check that the blades are intact and can impact on : • Operating time and size...
... mowing result. Set the Main switch to the foot guard. It is very dirty it will not cope as toys, tools, stones, roots and the like. Husqvarna offers a special cleaning and maintenance kit as the rear wheel bracket. Never use a high-pressure washer to keep the product clean. At the same time, check that the blades are intact and can impact on : • Operating time and size...

Owner Manual
Page 43
... trapped. Clean the wheels and around the drive wheel. Adjust the mower security settings in the charging station. Upside down The product is not correct. Next start the product again. do the timer settings on a flat, level sur- Free the product. Wheel drive prob- Refer to the Secondary area operating mode. The charging station is wrapped lem, right/left around the wheels. turned over. Needs manual charging The product is...
... trapped. Clean the wheels and around the drive wheel. Adjust the mower security settings in the charging station. Upside down The product is not correct. Next start the product again. do the timer settings on a flat, level sur- Free the product. Wheel drive prob- Refer to the Secondary area operating mode. The charging station is wrapped lem, right/left around the wheels. turned over. Needs manual charging The product is...

Owner Manual
Page 45
.... Replace the battery. Check if the indicator lamp in accordance with the instructions. Limited cutting height range The maximum and minimum position of information messages that no grass or other objects the cutting height adjustment is limited. ing up or down. Unexpected cutting height adj The cutting height adjustment is broken or not connec- without a request from mov- sentative. The guide wire is altered Carry out a cutting height calibration...
.... Replace the battery. Check if the indicator lamp in accordance with the instructions. Limited cutting height range The maximum and minimum position of information messages that no grass or other objects the cutting height adjustment is limited. ing up or down. Unexpected cutting height adj The cutting height adjustment is broken or not connec- without a request from mov- sentative. The guide wire is altered Carry out a cutting height calibration...

Owner Manual
Page 50
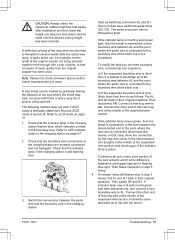
... the wire such as when gardening with a shovel. If not, screw off the blade disc and remove grass and foreign objects. Refer to Lawn coverage on page 31. The product turns This is enabled. The How often? Increase the intensity level in relation to the set cutting Increase the cutting height and then height. Long grass in the Weather timer. Check that the lawn has been mowed...
... the wire such as when gardening with a shovel. If not, screw off the blade disc and remove grass and foreign objects. Refer to Lawn coverage on page 31. The product turns This is enabled. The How often? Increase the intensity level in relation to the set cutting Increase the cutting height and then height. Long grass in the Weather timer. Check that the lawn has been mowed...
Owner Manual
Page 51
... the boundary wire between a solid green light and a flashing blue light. Some models have occurred until the desired cutting height has been reached. Connect the other end of this new loop wire at the middle of the loop wire can , for them. Troubleshooting - 51 If the indicator lamp now is green, then the break is somewhere in the charging station flashes...
... the boundary wire between a solid green light and a flashing blue light. Some models have occurred until the desired cutting height has been reached. Connect the other end of this new loop wire at the middle of the loop wire can , for them. Troubleshooting - 51 If the indicator lamp now is green, then the break is somewhere in the charging station flashes...

Owner Manual
Page 55
... Sound pressure noise level at the operator's ear, dB (A) 45 49 7 Mowing Cutting system Blade motor speed, rpm Power consumption during cutting, W +/- 20 % Cutting height, cm / " Cutting width, cm / " Narrowest possible passage, cm / " Maximum angle for work area, % Maximum angle for boundary wire, % Maximum length boundary wire, m / ft Maximum length guide loop, m / ft Working capacity, m2 / acre(s), +/- 20% IP-classification Robotic lawn mower Charging station Power supply Automower® 430XH Automower® 450XH 3 pivoted cutting blades...
... Sound pressure noise level at the operator's ear, dB (A) 45 49 7 Mowing Cutting system Blade motor speed, rpm Power consumption during cutting, W +/- 20 % Cutting height, cm / " Cutting width, cm / " Narrowest possible passage, cm / " Maximum angle for work area, % Maximum angle for boundary wire, % Maximum length boundary wire, m / ft Maximum length guide loop, m / ft Working capacity, m2 / acre(s), +/- 20% IP-classification Robotic lawn mower Charging station Power supply Automower® 430XH Automower® 450XH 3 pivoted cutting blades...

