

Owner Manual
Page 1
Operator's manual HUSQVARNA AUTOMOWER® 310/315/315X Read the operator's manual carefully and make sure that you understand the instructions before you use the product. EN, English
Operator's manual HUSQVARNA AUTOMOWER® 310/315/315X Read the operator's manual carefully and make sure that you understand the instructions before you use the product. EN, English
Owner Manual
Page 2
... Product settings with keypad and display......... 23 4 Operation 4.1 Main switch 32 4.2 To start the product 32 4.3 To park the product 33 4.4 To stop the product 33 4.5 To switch off the product 33 4.6 To charge the battery 33 4.7 Adjust the cutting height 33 5 Maintenance 5.1 Introduction - Installation 14 3.2 Main components for operation 11 3 Installation 3.1 Introduction - maintenance 35 5.2 Clean the product 35 5.3 Replace the blades 36 5.4 Battery 36 5.5 Winter service 36 6 Troubleshooting 6.1 Introduction - troubleshooting 37...
... Product settings with keypad and display......... 23 4 Operation 4.1 Main switch 32 4.2 To start the product 32 4.3 To park the product 33 4.4 To stop the product 33 4.5 To switch off the product 33 4.6 To charge the battery 33 4.7 Adjust the cutting height 33 5 Maintenance 5.1 Introduction - Installation 14 3.2 Main components for operation 11 3 Installation 3.1 Introduction - maintenance 35 5.2 Clean the product 35 5.3 Replace the blades 36 5.4 Battery 36 5.5 Winter service 36 6 Troubleshooting 6.1 Introduction - troubleshooting 37...

Owner Manual
Page 3
... the product. 1.1.2.1 Mowing technique The product is emission free, easy to use and saves energy. The product is a robotic lawn mower. Sensors in the product senses when it follows the guide wire to the charging station. The operator selects the operation settings with the boundary wire and makes it possible to select the operation settings remotely. The product has a battery power source and cuts the grass automatically. The...
... the product. 1.1.2.1 Mowing technique The product is emission free, easy to use and saves energy. The product is a robotic lawn mower. Sensors in the product senses when it follows the guide wire to the charging station. The operator selects the operation settings with the boundary wire and makes it possible to select the operation settings remotely. The product has a battery power source and cuts the grass automatically. The...
Owner Manual
Page 4
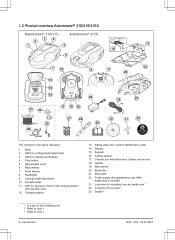
... numbers in the figure represent: 1. Cutting system 17. Cutting height adjustment 10. Charging station 13. product identification code) 14. Keypad 16. Body 2. LED for loop wire 2 25. Power supply (the appearance may differ depending on market) 23. Loop wire for boundary loop and guide wire 1 24. Headlights 9. Stakes3 1 Is a part of the charging station and boundary wire 12. Front wheels 8. Skid plate 22. Hatch to note 1 4 - Rear wheels...
... numbers in the figure represent: 1. Cutting system 17. Cutting height adjustment 10. Charging station 13. product identification code) 14. Keypad 16. Body 2. LED for loop wire 2 25. Power supply (the appearance may differ depending on market) 23. Loop wire for boundary loop and guide wire 1 24. Headlights 9. Stakes3 1 Is a part of the charging station and boundary wire 12. Front wheels 8. Skid plate 22. Hatch to note 1 4 - Rear wheels...

Owner Manual
Page 5
... valid. Connector for securing the charging station 28. Do not use a high-pressure washer or even running water to note 1 1440 - 004 - 24.03.2021 Introduction - 5 WARNING: Do not ride on or lifting the product. In the settings menu you can select between 3 security levels for the accessories of the product. WARNING: Read the user instructions before working on the product...
... valid. Connector for securing the charging station 28. Do not use a high-pressure washer or even running water to note 1 1440 - 004 - 24.03.2021 Introduction - 5 WARNING: Do not ride on or lifting the product. In the settings menu you can select between 3 security levels for the accessories of the product. WARNING: Read the user instructions before working on the product...

Owner Manual
Page 14
... than expected. CAUTION: If you use the 2 procedures for installation The installation involves the following components: • A robotic lawn mower that mows the lawn automatically. • A charging station, which has 3 functions: • To send control signals along the boundary wire. • To send control signals along the guide wire so that the product can follow the guide wire to specific remote areas in the lower section...
... than expected. CAUTION: If you use the 2 procedures for installation The installation involves the following components: • A robotic lawn mower that mows the lawn automatically. • A charging station, which has 3 functions: • To send control signals along the boundary wire. • To send control signals along the guide wire so that the product can follow the guide wire to specific remote areas in the lower section...

Owner Manual
Page 19
... extension cable must be put the charging station on the ground. When connecting the power supply, only use a power outlet that is connected to an residual-current (RCD) device. 1. Read and understand the instructions about electrical safety. Install only to a covered Class A GFCI receptacle (residual-current device) that has an enclosure that is weatherproof with the screws until the guide wire is installed...
... extension cable must be put the charging station on the ground. When connecting the power supply, only use a power outlet that is connected to an residual-current (RCD) device. 1. Read and understand the instructions about electrical safety. Install only to a covered Class A GFCI receptacle (residual-current device) that has an enclosure that is weatherproof with the screws until the guide wire is installed...
Owner Manual
Page 22
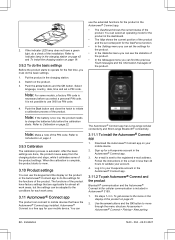
... models, a factory PIN code is too low, the product needs to charge the batteries fully before you can connect to the registered e-mail address. Use the arrow buttons and the OK button to validate your Husqvarna account in the Automower® Connect app. 3.11.2 To pair Automower® Connect and the product Bluetooth® communication and the Automower® Connect kit...
... models, a factory PIN code is too low, the product needs to charge the batteries fully before you can connect to the registered e-mail address. Use the arrow buttons and the OK button to validate your Husqvarna account in the Automower® Connect app. 3.11.2 To pair Automower® Connect and the product Bluetooth® communication and the Automower® Connect kit...

Owner Manual
Page 25
... the mowing results are 3 frequency levels: Low, Mid and High. The product is required. Push the BACK button. 3.12.5 Messages In this may need adjusting. If the product is disrupted in the display of the product on page 23. 2. Refer to maintain a well-cut lawn in good condition. 1. In the Installation menu it is possible to adapt the settings of the...
... the mowing results are 3 frequency levels: Low, Mid and High. The product is required. Push the BACK button. 3.12.5 Messages In this may need adjusting. If the product is disrupted in the display of the product on page 23. 2. Refer to maintain a well-cut lawn in good condition. 1. In the Installation menu it is possible to adapt the settings of the...

Owner Manual
Page 29
..., the guide wire and the charging station, when the product is parked or is used again. To save the new profile name. Push the BACK button. 3.12.8.3 Spiral Cutting The product cuts the grass in a spiral pattern if the grass is shown beside the profile name. Spiral Cutting does not start in slopes steeper than one work areas and charging stations. To set in 5 levels: •...
..., the guide wire and the charging station, when the product is parked or is used again. To save the new profile name. Push the BACK button. 3.12.8.3 Spiral Cutting The product cuts the grass in a spiral pattern if the grass is shown beside the profile name. Spiral Cutting does not start in slopes steeper than one work areas and charging stations. To set in 5 levels: •...
Owner Manual
Page 30
... OK button to your local Husqvarna representative for accessories mounted on the product can change the general settings of the product on page 23. 2. Contact your product while the mobile device have the Automower® Connect app installed. Note: Automower® Connect is not available because of 2G/3G/4G available in the operational area. In some countries...
... OK button to your local Husqvarna representative for accessories mounted on the product can change the general settings of the product on page 23. 2. Contact your product while the mobile device have the Automower® Connect app installed. Note: Automower® Connect is not available because of 2G/3G/4G available in the operational area. In some countries...

Owner Manual
Page 33
Push the STOP button to Operating modes - Refer to open the hatch. 2. After this, the cutting height can be varied from the battery. manually to the selected area before you select a new operating mode. 4.3.1.2 Start again with next schedule Use the operating mode Start again with next schedule for a long period, the battery can be empty and needs to be charged before starting. Set the Main switch to position...
Push the STOP button to Operating modes - Refer to open the hatch. 2. After this, the cutting height can be varied from the battery. manually to the selected area before you select a new operating mode. 4.3.1.2 Start again with next schedule Use the operating mode Start again with next schedule for a long period, the battery can be empty and needs to be charged before starting. Set the Main switch to position...
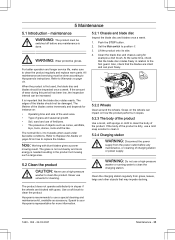
Owner Manual
Page 35
... better operation and longer service life, make sure to clean the product. The lifetime of the product is needed resulting in slopes. 5.2.3 The body of grass and seasonal growth. • Soil, sand and use a high-pressure washer or running water to Warranty on how to position 0. 3. Refer to Replace the blades on page 36 on page 51. Set the Main switch to replace the blades...
... better operation and longer service life, make sure to clean the product. The lifetime of the product is needed resulting in slopes. 5.2.3 The body of grass and seasonal growth. • Soil, sand and use a high-pressure washer or running water to Warranty on how to position 0. 3. Refer to Replace the blades on page 36 on page 51. Set the Main switch to replace the blades...

Owner Manual
Page 36
... . Attach 3 new blades and screws. 8. Push the STOP button 2. Service usually includes the following: • Thorough cleaning of the right type. Husqvarna can only guarantee safety when using a charging station which is updated. 36 - Set the Main switch to replace battery if necessary. • If new firmware is available, the product is intended for it can then be damaged and in electric shock, overheating or leakage of electrolyte...
... . Attach 3 new blades and screws. 8. Push the STOP button 2. Service usually includes the following: • Thorough cleaning of the right type. Husqvarna can only guarantee safety when using a charging station which is updated. 36 - Set the Main switch to replace battery if necessary. • If new firmware is available, the product is intended for it can then be damaged and in electric shock, overheating or leakage of electrolyte...

Owner Manual
Page 38
... buried cables close generate a new loop signal. Replace the battery. Troubleshooting 1440 - 004 - 24.03.2021 ance Do a check of the work area slopes too much by . Refer to Battery on from this location. The work area. Change the position of water in a small area behind a number of water. Refer to To make it hard to To install the guide wire on page...
... buried cables close generate a new loop signal. Replace the battery. Troubleshooting 1440 - 004 - 24.03.2021 ance Do a check of the work area slopes too much by . Refer to Battery on from this location. The work area. Change the position of water in a small area behind a number of water. Refer to To make it hard to To install the guide wire on page...
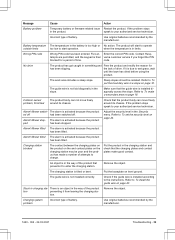
Owner Manual
Page 39
... To set the security level on page 18. Alarm! Mower stop- Mower tilted The alarm is not installed correctly. There is due to To make good contact. Alarm! If the problem stays in charging sta- The product will start to operate outside limits too low to the instructions. code. The alarm is installed according to start operation. Refer to your authorized service technician. Check if the guide wire...
... To set the security level on page 18. Alarm! Mower stop- Mower tilted The alarm is not installed correctly. There is due to To make good contact. Alarm! If the problem stays in charging sta- The product will start to operate outside limits too low to the instructions. code. The alarm is installed according to start operation. Refer to your authorized service technician. Check if the guide wire...
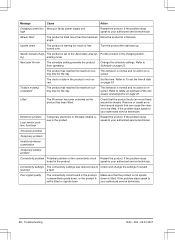
Owner Manual
Page 40
.... speak to be lifted. Connectivity settings The connectivity settings was restored due to your authorized service technician. angle. Electronic problem Loop sensor problem, front/rear Temporary electronic or firmware related is tilted more than the maximum Move the product to self is required. speak to Check and change the settings if needed. Mower tilted The product is - Turn the product the right way up...
.... speak to be lifted. Connectivity settings The connectivity settings was restored due to your authorized service technician. angle. Electronic problem Loop sensor problem, front/rear Temporary electronic or firmware related is tilted more than the maximum Move the product to self is required. speak to Check and change the settings if needed. Mower tilted The product is - Turn the product the right way up...
Owner Manual
Page 41
... the guide wire Install the guide wire correctly. Refer to your Husqvarna representative if the same message shows frequently. The charging plates on page 20. speak to Battery on page 20. ing station. Refer to your approved servicing dealer. Connection changed New loop signal changed. Usual operation of the product. 6.3 Information messages The information messages in the table below are defec- Replace the battery. Usual operation...
... the guide wire Install the guide wire correctly. Refer to your Husqvarna representative if the same message shows frequently. The charging plates on page 20. speak to Battery on page 20. ing station. Refer to your approved servicing dealer. Connection changed New loop signal changed. Usual operation of the product. 6.3 Information messages The information messages in the table below are defec- Replace the battery. Usual operation...

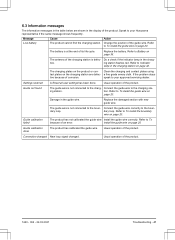
Owner Manual
Page 43
... install the guide wire on page 18 The guide wire is not put in the slot in balance because Do a check that the guide wire is not cor- Refer to your Husqvarna customer service if you cannot find the cause for shorter periods than usual. The product operates, but the blade disc does not rotate. The product operates for the fault. Replace the battery. Replace the battery...
... install the guide wire on page 18 The guide wire is not put in the slot in balance because Do a check that the guide wire is not cor- Refer to your Husqvarna customer service if you cannot find the cause for shorter periods than usual. The product operates, but the blade disc does not rotate. The product operates for the fault. Replace the battery. Replace the battery...

Owner Manual
Page 44
... to adjust the settings for Lawn Coverage product starts to the set cutting height. Please first check all known splices before further troubleshooting is enabled. Refer to Indicator lamp in relation to cut - Check that the indicator lamp in the charging station flashes blue, which indicates a break in the loop wire are properly connected and not damaged. No action. Parking mode is done. Change the settings...
... to adjust the settings for Lawn Coverage product starts to the set cutting height. Please first check all known splices before further troubleshooting is enabled. Refer to Indicator lamp in relation to cut - Check that the indicator lamp in the charging station flashes blue, which indicates a break in the loop wire are properly connected and not damaged. No action. Parking mode is done. Change the settings...

