

Owner Manual
Page 1
Operator's manual 115H Read the operator's manual carefully and make sure that you understand the instructions before you use the product. EN, English
Operator's manual 115H Read the operator's manual carefully and make sure that you understand the instructions before you use the product. EN, English

Owner Manual
Page 2
... the product...........21 3.9 To do the product settings 21 4 Operation 4.1 The ON/OFF button 27 4.2 To start the product 27 4.3 Operating modes 27 4.4 To stop the product 28 4.5 Switch off 28 4.6 To charge the battery 29 4.7 Adjust the cutting height 29 5 Maintenance 5.1 Introduction - Installation 14 3.2 Before the installation of the wires........... 14 3.3 Before the installation of the product........14 3.4 Installation of the product 19 3.5 To put...
... the product...........21 3.9 To do the product settings 21 4 Operation 4.1 The ON/OFF button 27 4.2 To start the product 27 4.3 Operating modes 27 4.4 To stop the product 28 4.5 Switch off 28 4.6 To charge the battery 29 4.7 Adjust the cutting height 29 5 Maintenance 5.1 Introduction - Installation 14 3.2 Before the installation of the wires........... 14 3.3 Before the installation of the product........14 3.4 Installation of the product 19 3.5 To put...
Owner Manual
Page 3
... selected and possible operation settings, and the operating mode of grass is not necessary. The operator selects the operation settings with the keys on page 3. Refer to your servicing dealer. 1.1.2 Product description Note: Husqvarna regularly updates the appearance and function of the product within the work area. The product has a battery power source and cuts the grass 982 - 003 - The boundary wire and the guide wire controls the movement...
... selected and possible operation settings, and the operating mode of grass is not necessary. The operator selects the operation settings with the keys on page 3. Refer to your servicing dealer. 1.1.2 Product description Note: Husqvarna regularly updates the appearance and function of the product within the work area. The product has a battery power source and cuts the grass 982 - 003 - The boundary wire and the guide wire controls the movement...

Owner Manual
Page 4
... the charging station, boundary wire and guide wire 9. Measurement gauge for loop wire 25. Couplers for help when installing the boundary wire (the measurement gauge is broken loose from the box) 22. Rating plate 11. Cutting system 15. Keypad 13. Chassis box with electronics, battery and motors 18. Loop wire for securing the charging station 24. Hatch to display and keypad 3. Front wheels 6. Cutting height adjustment 10. Battery cover...
... the charging station, boundary wire and guide wire 9. Measurement gauge for loop wire 25. Couplers for help when installing the boundary wire (the measurement gauge is broken loose from the box) 22. Rating plate 11. Cutting system 15. Keypad 13. Chassis box with electronics, battery and motors 18. Loop wire for securing the charging station 24. Hatch to display and keypad 3. Front wheels 6. Cutting height adjustment 10. Battery cover...

Owner Manual
Page 5
... product cuts the lawn. Before any inspections or maintenance is not lit. Do not use a trimmer nearby the low voltage cable. WARNING: Read the user instructions before working on the ON/OFF button is done, turn off the product and check that the product is where the general settings for the products are placed. 1.4 Symbols on the battery Read the user instructions. 982...
... product cuts the lawn. Before any inspections or maintenance is not lit. Do not use a trimmer nearby the low voltage cable. WARNING: Read the user instructions before working on the ON/OFF button is done, turn off the product and check that the product is where the general settings for the products are placed. 1.4 Symbols on the battery Read the user instructions. 982...

Owner Manual
Page 8
... /down arrow keys are used to navigate in the menu lists. 4. Note: The Menu button is also used as a Back button, that is used to go to start the operation of the product. 3. The Mode button is used to confirm the chosen settings in the menus. 6. The arrow keys are also used to enter digits, for example, Main area or Park. 5. The...
... /down arrow keys are used to navigate in the menu lists. 4. Note: The Menu button is also used as a Back button, that is used to go to start the operation of the product. 3. The Mode button is used to confirm the chosen settings in the menus. 6. The arrow keys are also used to enter digits, for example, Main area or Park. 5. The...
Owner Manual
Page 11
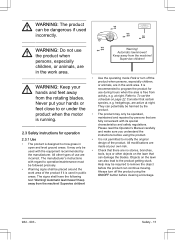
... the machine! Please read the Operator's Manual carefully 2.3 Safety instructions for use are in public areas. It may only be design of the product if it is running. • The product may be required to To set the schedule on the lawn that certain species, e.g. All other objects on page 22. be operated, maintained and repaired by the product. text...
... the machine! Please read the Operator's Manual carefully 2.3 Safety instructions for use are in public areas. It may only be design of the product if it is running. • The product may be required to To set the schedule on the lawn that certain species, e.g. All other objects on page 22. be operated, maintained and repaired by the product. text...
Owner Manual
Page 12
... to the instructions. The metal objects can cause interference with defective blades, screws, nuts or cables. Too high temperatures might cause damage to the product. 2.3.2 Battery safety • Start the product according to The indicator lamp on page 27. Neither should it is turned on . Safety 982 - 003 - When the product is turned on , make sure • HUSQVARNA does not guarantee...
... to the instructions. The metal objects can cause interference with defective blades, screws, nuts or cables. Too high temperatures might cause damage to the product. 2.3.2 Battery safety • Start the product according to The indicator lamp on page 27. Neither should it is turned on . Safety 982 - 003 - When the product is turned on , make sure • HUSQVARNA does not guarantee...
Owner Manual
Page 18
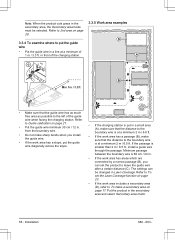
...smaller than 2 m / 6.5 ft., install a guide wire through the passage. Put the product in Lawn Coverage. The settings can set the product to leave the guide wire after a certain distance (C). Minimum passage between the boundary wire is 60 cm / 24 in . A...cuts grass in a small area (A), make sure that the distance to the boundary wire is at a minimum 2 m / 6.6 ft. • If the work area has a slope, put the guide wire diagonally across the slope. • If the charging station is put the guide wire • Put the guide wire in front of the charging station. Installation...
...smaller than 2 m / 6.5 ft., install a guide wire through the passage. Put the product in Lawn Coverage. The settings can set the product to leave the guide wire after a certain distance (C). Minimum passage between the boundary wire is 60 cm / 24 in . A...cuts grass in a small area (A), make sure that the distance to the boundary wire is at a minimum 2 m / 6.6 ft. • If the work area has a slope, put the guide wire diagonally across the slope. • If the charging station is put the guide wire • Put the guide wire in front of the charging station. Installation...

Owner Manual
Page 19
... the ground. 3.4.2 To install the boundary wire 1. Push the right connector onto the metal pin on the charging station with the supplied screws. Connect the power supply cable to the charging station. 4. Put the low-voltage cable in . Close the connector with a pair of the work area. Read and understand the instructions about electrical safety. 1. Put the boundary wire around all of...
... the ground. 3.4.2 To install the boundary wire 1. Push the right connector onto the metal pin on the charging station with the supplied screws. Connect the power supply cable to the charging station. 4. Put the low-voltage cable in . Close the connector with a pair of the work area. Read and understand the instructions about electrical safety. 1. Put the boundary wire around all of...

Owner Manual
Page 22
... operation capacity is approximate and schedule settings can remove all schedule settings to move through the menu structure Schedule > Advanced > Overview > Reset. Push the OK button. 22 - 6. Push the OK button to select the day. 4. Enter the time with the approximate operation capacity. Calculate the dimension of hours includes both operation and charging time. Model 115H Approximate operation capacity, m2 / yd2 / h 67 / 80 Example: A lawn of...
... operation capacity is approximate and schedule settings can remove all schedule settings to move through the menu structure Schedule > Advanced > Overview > Reset. Push the OK button. 22 - 6. Push the OK button to select the day. 4. Enter the time with the approximate operation capacity. Calculate the dimension of hours includes both operation and charging time. Model 115H Approximate operation capacity, m2 / yd2 / h 67 / 80 Example: A lawn of...
Owner Manual
Page 25
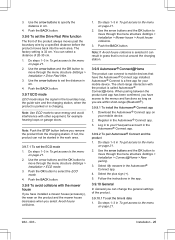
... Automower® Connect app installed. Download the Automower® Connect app on page 21. 982 - 003 - Installation - 25 Note: Use ECO mode to the menu on the product and the mower house decreases when you can connect to move through the menu structure Settings > Installation > Mower house > Avoid house collisions. 3. Do steps 1-3 in grass that have installed a mower house (accessory), the wear on page 21. 2. Automower® Connect is charging. Use...
... Automower® Connect app installed. Download the Automower® Connect app on page 21. 982 - 003 - Installation - 25 Note: Use ECO mode to the menu on the product and the mower house decreases when you can connect to move through the menu structure Settings > Installation > Mower house > Avoid house collisions. 3. Do steps 1-3 in grass that have installed a mower house (accessory), the wear on page 21. 2. Automower® Connect is charging. Use...
Owner Manual
Page 30
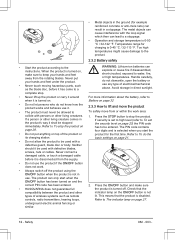
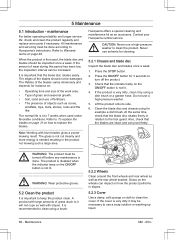
... of objects such as the rear wheel bracket. The lifetime of grass stuck to 7 weeks when used , the blade disc and blades should not be done according to Warranty terms on the ON/OFF button is needed resulting in relation to turn off before any maintenance is very dirty, clean it by using a dish brush or a garden hose. CAUTION: Never use a high-pressure washer. 5. Press the ON...
... of objects such as the rear wheel bracket. The lifetime of grass stuck to 7 weeks when used , the blade disc and blades should not be done according to Warranty terms on the ON/OFF button is needed resulting in relation to turn off before any maintenance is very dirty, clean it by using a dish brush or a garden hose. CAUTION: Never use a high-pressure washer. 5. Press the ON...

Owner Manual
Page 31
...: Use blades and screws of Husqvarna products can pivot freely. 5.4 Firmware update If service is not lit. 5. Replace worn or damaged parts for the best mowing result and low energy usage. Maintenance - 31 5.2.4 Charging station Clean the charging station regularly from under the body and cause serious injury. 4. Only replacing the blades and reusing the screw can only guarantee safety when using original blades. Fasten new blades and screws. 9. Check...
...: Use blades and screws of Husqvarna products can pivot freely. 5.4 Firmware update If service is not lit. 5. Replace worn or damaged parts for the best mowing result and low energy usage. Maintenance - 31 5.2.4 Charging station Clean the charging station regularly from under the body and cause serious injury. 4. Only replacing the blades and reusing the screw can only guarantee safety when using original blades. Fasten new blades and screws. 9. Check...

Owner Manual
Page 34
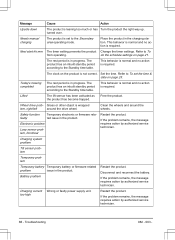
... steel) or buried cables close by the boundary loop. tion and generate a new loop signal. Troubleshooting 982 - 003 - Check if there are listed which make it hard for steps to To install the boundary wire on www.husqvarna.com. 6.2 Fault messages Below a number of the product. troubleshooting In this location. Message Wheel motor blocked, left/right Cutting system blocked Cause Grass or other object. The...
... steel) or buried cables close by the boundary loop. tion and generate a new loop signal. Troubleshooting 982 - 003 - Check if there are listed which make it hard for steps to To install the boundary wire on www.husqvarna.com. 6.2 Fault messages Below a number of the product. troubleshooting In this location. Message Wheel motor blocked, left/right Cutting system blocked Cause Grass or other object. The...

Owner Manual
Page 35
... guide wire are permitted, and the Husqvarna customer service if you for the lack of the product preventing it is then blocked for the lack of attempts to wet grass, wait until the lawn has dried before using the product. Find out where the break is due to charge. Replace the battery. Check if the indicator lamp in accordance with the instructions...
... guide wire are permitted, and the Husqvarna customer service if you for the lack of the product preventing it is then blocked for the lack of attempts to wet grass, wait until the lawn has dried before using the product. Find out where the break is due to charge. Replace the battery. Check if the indicator lamp in accordance with the instructions...
Owner Manual
Page 36
... action by authorized service technician. 36 - Needs manual charging The product is required. The product has an inbuilt standby period according to To from operating. Safety function faulty Temporary electronic or firmware related issue in the charging station. Charging system problem Tilt sensor problem Temporary problem Temporary battery Temporary battery or firmware related problem issue in progress. Battery problem Restart the product. Charging current Wrong or faulty power supply unit...
... action by authorized service technician. 36 - Needs manual charging The product is required. The product has an inbuilt standby period according to To from operating. Safety function faulty Temporary electronic or firmware related issue in the charging station. Charging system problem Tilt sensor problem Temporary problem Temporary battery Temporary battery or firmware related problem issue in progress. Battery problem Restart the product. Charging current Wrong or faulty power supply unit...

Owner Manual
Page 40
... starting point. Set the clock. sions. The product searches for mowing. The product mows for the charging station. Troubleshooting 982 - 003 - Contact Husqvarna customer service if you still cannot find the reason for operation that is far enough out from the charging station. The product runs, but the blade disc does not rotate. Refer to To examine where to the instructions in To install the charging...
... starting point. Set the clock. sions. The product searches for mowing. The product mows for the charging station. Troubleshooting 982 - 003 - Contact Husqvarna customer service if you still cannot find the reason for operation that is far enough out from the charging station. The product runs, but the blade disc does not rotate. Refer to To examine where to the instructions in To install the charging...
Owner Manual
Page 46
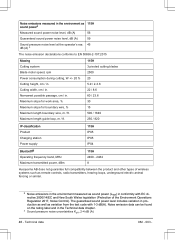
... to EN 50636-2-107:2015 Mowing Cutting system Blade motor speed, rpm Power consumption during cutting, W +/- 20 % Cutting height, cm / in . Maximum length guide loop, m / ft. 115H 3 pivoted cutting blades 2500 20 5-9 / 2-3.6 22 / 8.6 60 / 23.6 30 15 500 / 1640 250 / 820 IP-classification Product Charging station Power supply 115H IPX5 IPX5 IPX4 Bluetooth® 115H Operating frequency band, MHz Maximum transmitted power, dBm 2400 - 2484 8 Husqvarna AB does not guarantee full...
... to EN 50636-2-107:2015 Mowing Cutting system Blade motor speed, rpm Power consumption during cutting, W +/- 20 % Cutting height, cm / in . Maximum length guide loop, m / ft. 115H 3 pivoted cutting blades 2500 20 5-9 / 2-3.6 22 / 8.6 60 / 23.6 30 15 500 / 1640 250 / 820 IP-classification Product Charging station Power supply 115H IPX5 IPX5 IPX4 Bluetooth® 115H Operating frequency band, MHz Maximum transmitted power, dBm 2400 - 2484 8 Husqvarna AB does not guarantee full...
Owner Manual
Page 48
... the warranty. The blades and wheels are not included in this product's functionality for a period of 2 years from being submerged under water, for further instructions. Examples of purchase. If an error occurs with the product or its power supply. The warranty covers serious faults relating to repair the product. Warranty 982 - 003 - 9 Warranty 9.1 Warranty terms Husqvarna® warranty covers this Operator's Manual. Within the warranty period, we will replace...
... the warranty. The blades and wheels are not included in this product's functionality for a period of 2 years from being submerged under water, for further instructions. Examples of purchase. If an error occurs with the product or its power supply. The warranty covers serious faults relating to repair the product. Warranty 982 - 003 - 9 Warranty 9.1 Warranty terms Husqvarna® warranty covers this Operator's Manual. Within the warranty period, we will replace...

