Owners Manual
Page 3
Initial start 22 Aeration 22 Turning and maneuvering the lawn aerator .... 23 Operating on hills 23 Maintenance 24 Maintenance schedule 24 Replacing the air filter 25 Cleaning the sludge reservoir 26 Idle adjustment 26 Adjusting the throttle cable 27 Replacing the throttle cable 27 Ignition system 28 Replacing the engine 29 Replacing the clutch cable 29 Replacing and adjusting the drive belt 30 Cam lock for the handle 31 Wheels 32 Tines and tine shaft 34 Chain 36 Cleaning and washing 37 Two minute rule...
Initial start 22 Aeration 22 Turning and maneuvering the lawn aerator .... 23 Operating on hills 23 Maintenance 24 Maintenance schedule 24 Replacing the air filter 25 Cleaning the sludge reservoir 26 Idle adjustment 26 Adjusting the throttle cable 27 Replacing the throttle cable 27 Ignition system 28 Replacing the engine 29 Replacing the clutch cable 29 Replacing and adjusting the drive belt 30 Cam lock for the handle 31 Wheels 32 Tines and tine shaft 34 Chain 36 Cleaning and washing 37 Two minute rule...
Owners Manual
Page 4
... printed plate attached to check on the starter. You should have read the operator's manual carefully, particularly the safety instructions. Before the machine was delivered it underwent inspection and was adjusted by your new Husqvarna machine. When you need spare parts or support in service questions, guarantee issues, etc., please consult the following information: • The machine's type designation (MODEL). • The machine's serial number (S/N). The engine's serial number is...
... printed plate attached to check on the starter. You should have read the operator's manual carefully, particularly the safety instructions. Before the machine was delivered it underwent inspection and was adjusted by your new Husqvarna machine. When you need spare parts or support in service questions, guarantee issues, etc., please consult the following information: • The machine's type designation (MODEL). • The machine's serial number (S/N). The engine's serial number is...

Owners Manual
Page 12
... flames or sparks from electrical machines, electric engines, relays, switches, boilers or similar. • Store the machine in a locked space away from children and adults untrained in personal injury or fire. • Stop and inspect the equipment if you are strictly forbidden. Always check that leaking fuel or fumes can result in use safe lifting and moving parts have stopped...
... flames or sparks from electrical machines, electric engines, relays, switches, boilers or similar. • Store the machine in a locked space away from children and adults untrained in personal injury or fire. • Stop and inspect the equipment if you are strictly forbidden. Always check that leaking fuel or fumes can result in use safe lifting and moving parts have stopped...

Owners Manual
Page 14
... before making adjustments, performing maintenance or cleaning the machine. • Disconnect the spark plug cable before repair work tools. Please contact your guarantee. The machine must not be sure it in storage. 8011-027 Disconnect the spark plug cable before beginning repair work . • Do not disassemble the engine. Follow all maintenance instructions. • Do not change the setting of governors and avoid running . • Disengage the drive units...
... before making adjustments, performing maintenance or cleaning the machine. • Disconnect the spark plug cable before repair work tools. Please contact your guarantee. The machine must not be sure it in storage. 8011-027 Disconnect the spark plug cable before beginning repair work . • Do not disassemble the engine. Follow all maintenance instructions. • Do not change the setting of governors and avoid running . • Disengage the drive units...

Owners Manual
Page 17
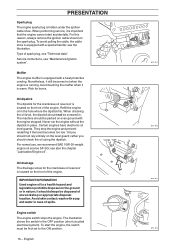
... magnapull type with a sludge reservoir. Fuel valve The fuel valve opens and closes the connection between the tank and the carburetor. When the engine starts, the lever can damage the starter. Forgetting the choke is no middle position. This also results in the carburetor. For cleaning instructions see the chapter "Maintenance/Cleaning the sludge reservoir". To replace the return spring or starter cord, contact an authorized service workshop. PRESENTATION Starter The starter is of the starter handle...
... magnapull type with a sludge reservoir. Fuel valve The fuel valve opens and closes the connection between the tank and the carburetor. When the engine starts, the lever can damage the starter. Forgetting the choke is no middle position. This also results in the carburetor. For cleaning instructions see the chapter "Maintenance/Cleaning the sludge reservoir". To replace the return spring or starter cord, contact an authorized service workshop. PRESENTATION Starter The starter is of the starter handle...
Owners Manual
Page 18
... should check the oil using the dipstick. The machine should not rely entirely on the front of the engine. For this reason, always remove the ignition cable shoe from the spark plug. Service instructions, see "Technical data". Risk for the crankcase oil reservoir is hidden under the ignition cable shoe. Refill the engine oil in the OFF position (short circuited electrical system). Certain engines have electronic oil level guards. For normal use, we...
... should check the oil using the dipstick. The machine should not rely entirely on the front of the engine. For this reason, always remove the ignition cable shoe from the spark plug. Service instructions, see "Technical data". Risk for the crankcase oil reservoir is hidden under the ignition cable shoe. Refill the engine oil in the OFF position (short circuited electrical system). Certain engines have electronic oil level guards. For normal use, we...

Owners Manual
Page 19
... fuel and fuel tank clean. Maximum allowable methanol 5% (volume). Change the fuel. If this does not help, contact an authorized service workshop. A V-belt pulley is located on level ground. The gear reduces the speed of the engine so that the output axle turns at the top of the gearbox until it flows out of the engine speed. 8011-224 WARNING! The gearbox can be damaged. When checking the level...
... fuel and fuel tank clean. Maximum allowable methanol 5% (volume). Change the fuel. If this does not help, contact an authorized service workshop. A V-belt pulley is located on level ground. The gear reduces the speed of the engine so that the output axle turns at the top of the gearbox until it flows out of the engine speed. 8011-224 WARNING! The gearbox can be damaged. When checking the level...

Owners Manual
Page 25
... using the machine on hills, you run the lawn aerator across a hill reduces rollover risk and maintains consistent aeration depth. • Move the weight over hard objects or surfaces (walkways, driveways, paved surfaces, etc.) with the handle while operating the lawn aerator. We recommend setting engine speed so that is easier to back or make sharp turns, you maintain complete control...
... using the machine on hills, you run the lawn aerator across a hill reduces rollover risk and maintains consistent aeration depth. • Move the weight over hard objects or surfaces (walkways, driveways, paved surfaces, etc.) with the handle while operating the lawn aerator. We recommend setting engine speed so that is easier to back or make sharp turns, you maintain complete control...
Owners Manual
Page 26
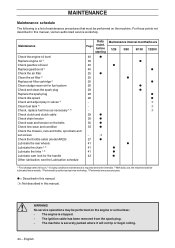
... lines as necessary 4, 5) Check clutch and clutch cable Check chain tension Check wear and tension on the belts Check tine wear and condition Check the chassis, nuts and bolts, sprockets and set screws Check the throttle cable (model AR25) Lubricate the rear wheels Lubricate the chain 2, 3) Lubricate the links 2, 3) Lubricate cam lock for fuel system Check and clean the spark plug Replace the spark plug Check idle speed Check and adjust play in this manual. Maintenance Check the engine oil level Replace engine oil 1) Check gearbox oil level Replace gearbox oil 1) Check the air filter Clean...
... lines as necessary 4, 5) Check clutch and clutch cable Check chain tension Check wear and tension on the belts Check tine wear and condition Check the chassis, nuts and bolts, sprockets and set screws Check the throttle cable (model AR25) Lubricate the rear wheels Lubricate the chain 2, 3) Lubricate the links 2, 3) Lubricate cam lock for fuel system Check and clean the spark plug Replace the spark plug Check idle speed Check and adjust play in this manual. Maintenance Check the engine oil level Replace engine oil 1) Check gearbox oil level Replace gearbox oil 1) Check the air filter Clean...

Owners Manual
Page 27
... not use compressed air over 2 bar/ 30 PSI to the air filter housing and tighten using the wing nut. 8011-028 8011-030 8011-031 8011-032 English - 25 Cleaning/replacement of the air filter is carried out as follows: • Mount the paper filter in the air filter housing and tighten using a mild detergent. Soak it dry with new engine oil. Refit the air filter as follows: 1. Do not oil the paper filter. 4. Remove...
... not use compressed air over 2 bar/ 30 PSI to the air filter housing and tighten using the wing nut. 8011-028 8011-030 8011-031 8011-032 English - 25 Cleaning/replacement of the air filter is carried out as follows: • Mount the paper filter in the air filter housing and tighten using a mild detergent. Soak it dry with new engine oil. Refit the air filter as follows: 1. Do not oil the paper filter. 4. Remove...

Owners Manual
Page 28
... its track and replace the sludge reservoir. Risk for leaks. Adjust the throttle to idle position or so that the engine idles at the lowest possible speed. 3. Increase the idle speed with the throttle and move it moderately to ON and check for carbon monoxide poisoning. MAINTENANCE Cleaning the sludge reservoir 1. Turn the fuel valve to avoid damaging the threads. 5. Turn the idle screw (1) so that the engine runs at 1250-1400...
... its track and replace the sludge reservoir. Risk for leaks. Adjust the throttle to idle position or so that the engine idles at the lowest possible speed. 3. Increase the idle speed with the throttle and move it moderately to ON and check for carbon monoxide poisoning. MAINTENANCE Cleaning the sludge reservoir 1. Turn the fuel valve to avoid damaging the threads. 5. Turn the idle screw (1) so that the engine runs at 1250-1400...
Owners Manual
Page 29
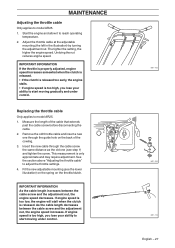
... screw. The tighter the setting, the higher the engine speed. If engine speed is too high, you lose your ability to start moving under control. MAINTENANCE Adjusting the throttle cable Only applies to model AR25. 1. If engine speed is too low, the engine will stall when the clutch is only approximate and may require adjustment. See the section above "Adjusting the throttle cable" to reach operating temperature. 2. This measurement is released. Remove the old throttle cable...
... screw. The tighter the setting, the higher the engine speed. If engine speed is too high, you lose your ability to start moving under control. MAINTENANCE Adjusting the throttle cable Only applies to model AR25. 1. If engine speed is too low, the engine will stall when the clutch is only approximate and may require adjustment. See the section above "Adjusting the throttle cable" to reach operating temperature. 2. This measurement is released. Remove the old throttle cable...

Owners Manual
Page 32
... parts for many hours of the pulleys by first pulling it over the smaller pulley and then over the larger pulley (see chapter "Maintenance/Replacing the clutch cable". 9. Make sure that the drive belt does not fasten in line with one another and with the handle collapsed on your Husqvarna lawn aerator, are in the upper belt guide when the tensioning pulley is slack. Turn off the engine and remove the drive guard cover. 2. Check...
... parts for many hours of the pulleys by first pulling it over the smaller pulley and then over the larger pulley (see chapter "Maintenance/Replacing the clutch cable". 9. Make sure that the drive belt does not fasten in line with one another and with the handle collapsed on your Husqvarna lawn aerator, are in the upper belt guide when the tensioning pulley is slack. Turn off the engine and remove the drive guard cover. 2. Check...
Owners Manual
Page 34
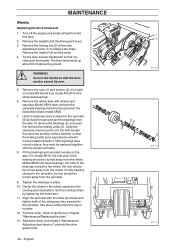
... tip over. 5. Undo 2 setscrews (hex screws) for the wheel axle bearings. 6. Set the locking collars by tightening the setscrews. 11. Remove the locking nut (2) on model AR 25) for the sprocket (5) and pull the sprocket and the bearings from the fuel tank. 2. the illustration shows model AR25. 7. Adjust the chain (see illustration). MAINTENANCE Wheels Replacing the drive wheel axle 1. Turn off the engine and empty all fuel from the axle. The front...
... tip over. 5. Undo 2 setscrews (hex screws) for the wheel axle bearings. 6. Set the locking collars by tightening the setscrews. 11. Remove the locking nut (2) on model AR 25) for the sprocket (5) and pull the sprocket and the bearings from the fuel tank. 2. the illustration shows model AR25. 7. Adjust the chain (see illustration). MAINTENANCE Wheels Replacing the drive wheel axle 1. Turn off the engine and empty all fuel from the axle. The front...
Owners Manual
Page 36
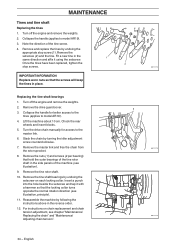
.... Remove the drive guard cover. 3. Slack the chain by undoing the setscrew on chain replacement and chain tension adjustment, see illustration, principle). 11. For instructions on each locking collar. Turn off the engine and remove the weights. 2. Chock the rear wheels and insert blocks. 5. Remove the tine shaft bearings by turning the idler adjustment screw counterclockwise. 7. Reassemble the machine by undoing the appropriate stop screws. 1 2 IMPORTANT INFORMATION Replace worn nuts so that the screws...
.... Remove the drive guard cover. 3. Slack the chain by undoing the setscrew on chain replacement and chain tension adjustment, see illustration, principle). 11. For instructions on each locking collar. Turn off the engine and remove the weights. 2. Chock the rear wheels and insert blocks. 5. Remove the tine shaft bearings by turning the idler adjustment screw counterclockwise. 7. Reassemble the machine by undoing the appropriate stop screws. 1 2 IMPORTANT INFORMATION Replace worn nuts so that the screws...

Owners Manual
Page 41
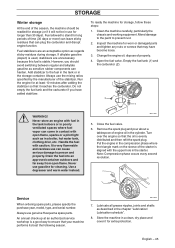
... drained directly after stopping the machine. wash with soap and water in position and screw the dipstick back into place. Should this happen, attempt to cool somewhat. Tighten it is important to slip after lubrication. Allow the engine to clean them with grease use Husqvarna's Universal Grease no. 5310038-01 or Husqvarna's Lubrication Grease UL 21 no. 5310060-74. Fill the new oil using...
... drained directly after stopping the machine. wash with soap and water in position and screw the dipstick back into place. Should this happen, attempt to cool somewhat. Tighten it is important to slip after lubrication. Allow the engine to clean them with grease use Husqvarna's Universal Grease no. 5310038-01 or Husqvarna's Lubrication Grease UL 21 no. 5310060-74. Fill the new oil using...

Owners Manual
Page 45
... level ground when inspecting and filling oil. 5. See the chapter "Lubrication/ Engine oil". Use eye protection. Fill the engine (1) with the manufacturerrecommended oil. First lift the rear wheel control (4) and then fold the collapsible handle (3) into working position. Place the weights (7) in reduction gear". Lock using the cam lock (6). 4. The machine must be parked on each side of the box. 3. Initial start-up Applies to model AR19. 1. ASSEMBLY INSTRUCTIONS Assembly - Remove...
... level ground when inspecting and filling oil. 5. See the chapter "Lubrication/ Engine oil". Use eye protection. Fill the engine (1) with the manufacturerrecommended oil. First lift the rear wheel control (4) and then fold the collapsible handle (3) into working position. Place the weights (7) in reduction gear". Lock using the cam lock (6). 4. The machine must be parked on each side of the box. 3. Initial start-up Applies to model AR19. 1. ASSEMBLY INSTRUCTIONS Assembly - Remove...
Owners Manual
Page 47
... oil is evenly distributed and then refit the spark plug. It is very flammable and careless use can cause serious damage to prevent rust. 2. Use a degreaser and warm water instead. 8011-048 5. Turn over the engine so that your machine performs its best the following season. 8011-049 7. Service When ordering spare parts, please specify the purchase year, model, type, and serial number...
... oil is evenly distributed and then refit the spark plug. It is very flammable and careless use can cause serious damage to prevent rust. 2. Use a degreaser and warm water instead. 8011-048 5. Turn over the engine so that your machine performs its best the following season. 8011-049 7. Service When ordering spare parts, please specify the purchase year, model, type, and serial number...
Owners Manual
Page 49
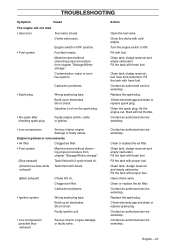
...Tank filled with 2-cycle mixed oil. (Voluminous blue-white Tank filled with diesel. Clean or replace the air filter. Clean or replace the air filter. Check electrode gap and clean or replace spark plug. TROUBLESHOOTING Symptom Cause The engine will not start • User error Fuel valve closed. Fuel tank empty. Clean tank, sludge reservoir, fuel lines and carburetor. Clean the spark plug. exhaust) (Black exhaust) Choke left on the spark plug. • No spark after checking spark plug Faulty engine switch, cable or ignition. Clogged air filter. Fill the tank with fuel...
...Tank filled with 2-cycle mixed oil. (Voluminous blue-white Tank filled with diesel. Clean or replace the air filter. Clean or replace the air filter. Check electrode gap and clean or replace spark plug. TROUBLESHOOTING Symptom Cause The engine will not start • User error Fuel valve closed. Fuel tank empty. Clean tank, sludge reservoir, fuel lines and carburetor. Clean the spark plug. exhaust) (Black exhaust) Choke left on the spark plug. • No spark after checking spark plug Faulty engine switch, cable or ignition. Clogged air filter. Fill the tank with fuel...
Owners Manual
Page 51
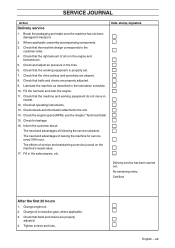
... adjust air pressure in reduction gear, where applicable. 3. Check that belts and chains are properly adjusted. 9. Check that the machine and working equipment is in the engine and transmission. 5. Change engine oil. 2. Check that the working equipment do not move in transport. 2. Check decals and information attached to the customer order. 4. Certified: After the first 20 hours 1. Where applicable, assembly accompanying components. 3. Check that the drive pulleys and sprockets are properly adjusted. 4. Check...
... adjust air pressure in reduction gear, where applicable. 3. Check that belts and chains are properly adjusted. 9. Check that the machine and working equipment is in the engine and transmission. 5. Change engine oil. 2. Check that the working equipment do not move in transport. 2. Check decals and information attached to the customer order. 4. Certified: After the first 20 hours 1. Where applicable, assembly accompanying components. 3. Check that the drive pulleys and sprockets are properly adjusted. 4. Check...


