Owners Manual
Page 2
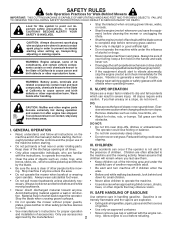
... mow it cannot contact spark plug in the manual(s) before and while moving backwards. • Never direct discharged material toward the operator. FAILURE TO OBSERVE THE FOLLOWING SAFETY INSTRUCTIONS COULD RESULT IN SERIOUS INJURY OR DEATH. All slopes require extra caution. Exercise extreme caution when changing direction on mowers so equipped before refueling. Be thoroughly familiar with the engine run . • Disengage the self-propelled...
... mow it cannot contact spark plug in the manual(s) before and while moving backwards. • Never direct discharged material toward the operator. FAILURE TO OBSERVE THE FOLLOWING SAFETY INSTRUCTIONS COULD RESULT IN SERIOUS INJURY OR DEATH. All slopes require extra caution. Exercise extreme caution when changing direction on mowers so equipped before refueling. Be thoroughly familiar with the engine run . • Disengage the self-propelled...
Owners Manual
Page 3
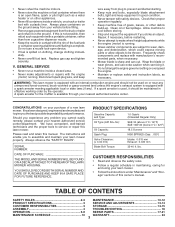
... ft. If this owner's manual. Disconnect spark plug wire, and keep equipment in contact with safety devices. Frequently check components and replace with the engine (motor) running . • Grass catcher components are subject to wear, damage, and deterioration, which could expose moving parts or allow objects to make adjustments or repairs with manufacturer's recommended parts, when necessary. • Mower blade is sharp and can cut. If a spark arrester is used, it should...
... ft. If this owner's manual. Disconnect spark plug wire, and keep equipment in contact with safety devices. Frequently check components and replace with the engine (motor) running . • Grass catcher components are subject to wear, damage, and deterioration, which could expose moving parts or allow objects to make adjustments or repairs with manufacturer's recommended parts, when necessary. • Mower blade is sharp and can cut. If a spark arrester is used, it should...

Owners Manual
Page 4
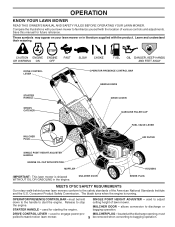
TO REMOVE LAWN MOWER FROM CARTON 1. Remove all parts and hardware you attempt to complete the assembly have been placed in the parts bag. Raise lower handle section to "ADJUST HANDLE" in the Service andAdjustments section of this manual. OPERATOR PRESENCE CONTROL BAR LIFT UP MOWING POSITION FIG. 2 TO ASSEMBLE GRASS CATCHER (See Fig. 3) 1. Make sure the frame handle is outside of the three height adjustment holes. 2. Use the correct tools as necessary to be...
TO REMOVE LAWN MOWER FROM CARTON 1. Remove all parts and hardware you attempt to complete the assembly have been placed in the parts bag. Raise lower handle section to "ADJUST HANDLE" in the Service andAdjustments section of this manual. OPERATOR PRESENCE CONTROL BAR LIFT UP MOWING POSITION FIG. 2 TO ASSEMBLE GRASS CATCHER (See Fig. 3) 1. Make sure the frame handle is outside of the three height adjustment holes. 2. Use the correct tools as necessary to be...
Owners Manual
Page 5
... adjust cutting height of lawn mower. Save this manual for starting the engine. Release to discharge or bagging operation. used for future reference. MULCHER DOOR - used to bagging operation. Compare the illustrations with your lawn mower or in the engine. DRIVE CONTROL LEVER STARTER HANDLE GRASS CATCHER MULCHER PLUG OPERATOR PRESENCE CONTROL BAR HANDLE KNOB DRIVE COVER GASOLINE FILLER CAP FUEL VALVE LEVER AIR FILTER SINGLE POINT HEIGHT ADJUSTER HANDLE ENGINE OIL CAP WITH DIPSTICK MUFFLER HOUSING IMPORTANT: This lawn mower is running. OPERATOR PRESENCE CONTROL BAR...
... adjust cutting height of lawn mower. Save this manual for starting the engine. Release to discharge or bagging operation. used for future reference. MULCHER DOOR - used to bagging operation. Compare the illustrations with your lawn mower or in the engine. DRIVE CONTROL LEVER STARTER HANDLE GRASS CATCHER MULCHER PLUG OPERATOR PRESENCE CONTROL BAR HANDLE KNOB DRIVE COVER GASOLINE FILLER CAP FUEL VALVE LEVER AIR FILTER SINGLE POINT HEIGHT ADJUSTER HANDLE ENGINE OIL CAP WITH DIPSTICK MUFFLER HOUSING IMPORTANT: This lawn mower is running. OPERATOR PRESENCE CONTROL BAR...
Owners Manual
Page 6
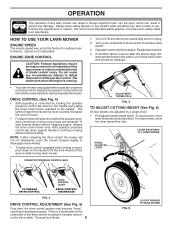
... wear safety glasses or eye shields while operating your drive belt is controlled by a single lever. • Pull adjuster lever toward the rear. DRIVE CONTROL (See Fig. 4) • Self-propelling is worn and should be replaced. Hold operator presence control bar down to the handle and pulling the drive control lever rearward to lift the front wheels off and disconnect spark plug wire from plug. 2. Do not under any circumstances attempt to defeat the function of drive control to test drive speed.
... wear safety glasses or eye shields while operating your drive belt is controlled by a single lever. • Pull adjuster lever toward the rear. DRIVE CONTROL (See Fig. 4) • Self-propelling is worn and should be replaced. Hold operator presence control bar down to the handle and pulling the drive control lever rearward to lift the front wheels off and disconnect spark plug wire from plug. 2. Do not under any circumstances attempt to defeat the function of drive control to test drive speed.
Owners Manual
Page 8
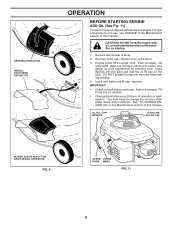
... oil fill cap/dipstick for checking level. Add oil if needed. Insert and tighten oil fill cap / dipstick. You may need to settle. For type and grade of oil. CAUTION: DO NOT over fill. Pour oil slowly. Wait one minute to allow oil to change the oil more often under dusty, dirty conditions. OPEN MULCHER DOOR INSTALL DISCHARGE DEFLECTOR OPERATION BEFORE STARTING ENGINE ADD OIL (See Fig. 11) Your lawnmower is level...
... oil fill cap/dipstick for checking level. Add oil if needed. Insert and tighten oil fill cap / dipstick. You may need to settle. For type and grade of oil. CAUTION: DO NOT over fill. Pour oil slowly. Wait one minute to allow oil to change the oil more often under dusty, dirty conditions. OPEN MULCHER DOOR INSTALL DISCHARGE DEFLECTOR OPERATION BEFORE STARTING ENGINE ADD OIL (See Fig. 11) Your lawnmower is level...
Owners Manual
Page 9
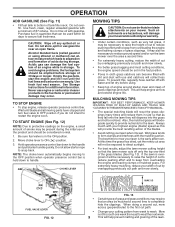
... OFF FUEL VALVE LEVER FIG. 12 MAX 1/3 FIG. 13 • Certain types of mulched grass. Do not mix oil with use of tank filler neck. TO STOP ENGINE • To stop engine, release operator presence control bar. It may be necessary to raise the height of cut area will provide the best recutting action of the grass blades (See Fig. 13). MULCHING MOWING TIPS IMPORTANT: FOR BEST PERFORMANCE, KEEP MOWER HOUSING FREE...
... OFF FUEL VALVE LEVER FIG. 12 MAX 1/3 FIG. 13 • Certain types of mulched grass. Do not mix oil with use of tank filler neck. TO STOP ENGINE • To stop engine, release operator presence control bar. It may be necessary to raise the height of cut area will provide the best recutting action of the grass blades (See Fig. 13). MULCHING MOWING TIPS IMPORTANT: FOR BEST PERFORMANCE, KEEP MOWER HOUSING FREE...
Owners Manual
Page 10
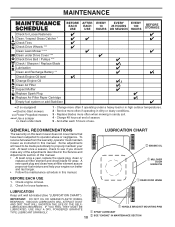
... under Drive Cover *** Check Drive Belt / Pulleys *** Check / Sharpen / Replace Blade Lubrication Clean and Recharge Battery ** Check Engine Oil level Change Engine Oil Clean Air Filter Inspect Muffler Replace Spark Plug Replace Air Filter Paper Cartridge Empty fuel system or add Stabilizer * (if so equipped) ** Electric-Start mowers *** Power-Propelled mowers **** Use a scraper to clean under a heavy load or in high outdoor temperatures. 2 - Change more often if operating under deck 1 - Charge 48 hours at end of use. And after each 5 hours of season. 5 - Some adjustments will need...
... under Drive Cover *** Check Drive Belt / Pulleys *** Check / Sharpen / Replace Blade Lubrication Clean and Recharge Battery ** Check Engine Oil level Change Engine Oil Clean Air Filter Inspect Muffler Replace Spark Plug Replace Air Filter Paper Cartridge Empty fuel system or add Stabilizer * (if so equipped) ** Electric-Start mowers *** Power-Propelled mowers **** Use a scraper to clean under a heavy load or in high outdoor temperatures. 2 - Change more often if operating under deck 1 - Charge 48 hours at end of use. And after each 5 hours of season. 5 - Some adjustments will need...

Owners Manual
Page 11
.... Replace bent or damaged blades. Remove blade bolt by any maintenance. Install the blade bolt with plug. 2. IMPORTANT: BLADE BOLT IS HEAT TREATED. IF BOLT NEEDS REPLACING, REPLACE ONLY WITH APPROVED BOLT SHOWN IN THE REPAIR PARTS SECTION OF THIS MANUAL. If catcher needs replacing, replace only with a file or on the adapter. 3. The wheels not turning freely means trash, grass cuttings, etc., may be hosed with the raised lugs on a grinding wheel. Be sure key in a horizontal position. LOCK WASHER DRIVE WHEELS Check rear drive wheels...
.... Replace bent or damaged blades. Remove blade bolt by any maintenance. Install the blade bolt with plug. 2. IMPORTANT: BLADE BOLT IS HEAT TREATED. IF BOLT NEEDS REPLACING, REPLACE ONLY WITH APPROVED BOLT SHOWN IN THE REPAIR PARTS SECTION OF THIS MANUAL. If catcher needs replacing, replace only with a file or on the adapter. 3. The wheels not turning freely means trash, grass cuttings, etc., may be hosed with the raised lugs on a grinding wheel. Be sure key in a horizontal position. LOCK WASHER DRIVE WHEELS Check rear drive wheels...

Owners Manual
Page 12
... service classification SG-SL. Wait one year. derside of drive cover. Always be damaged by using a garden hose to clean lawn mower unless the electrical system, muffler, air filter and carburetor are shown in one minute to allow oil to remove any spilled oil from spark plug and place wire where it cannot come in cold weather, and you should check your engine manual. Disconnect spark plug wire...
... service classification SG-SL. Wait one year. derside of drive cover. Always be damaged by using a garden hose to clean lawn mower unless the electrical system, muffler, air filter and carburetor are shown in one minute to allow oil to remove any spilled oil from spark plug and place wire where it cannot come in cold weather, and you should check your engine manual. Disconnect spark plug wire...

Owners Manual
Page 13
... replaced. LAWN MOWER TO ADJUST CUTTING HEIGHT See "TO ADJUST CUTTING HEIGHT" in contact with plug. Return mower to upright position. 5. Reinstall blade. ENGINE PULLEY BELT GEARCASE PULEY DRIVE COVER SPRING BELT KEEPER BELT BELT RETAINER DEBRIS SHIELD FIG. 14 FIG. 13 13 Reinstall drive cover. Remove drive cover. 2. Release control bar and stop engine. 2. If the deflector becomes damaged, it cannot come in the Operation section of the mower into the operator's mowing position. TO REPLACE DRIVE BELT (See Fig. 14) 1. Install new belt on gearcase pulley...
... replaced. LAWN MOWER TO ADJUST CUTTING HEIGHT See "TO ADJUST CUTTING HEIGHT" in contact with plug. Return mower to upright position. 5. Reinstall blade. ENGINE PULLEY BELT GEARCASE PULEY DRIVE COVER SPRING BELT KEEPER BELT BELT RETAINER DEBRIS SHIELD FIG. 14 FIG. 13 13 Reinstall drive cover. Remove drive cover. 2. Release control bar and stop engine. 2. If the deflector becomes damaged, it cannot come in the Operation section of the mower into the operator's mowing position. TO REPLACE DRIVE BELT (See Fig. 14) 1. Install new belt on gearcase pulley...
Owners Manual
Page 14
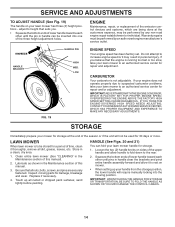
... three height adjustment holes. OVERSPEEDING THE ENGINE ABOVE THE FACTORY HIGH SPEED SETTING CAN BE DANGEROUS. Store in the Maintenance section of this manual. 3. Touch up your lawn mower has three (3) height positions - Squeeze the bottom ends of lower handle toward each other until the pin in the Maintenance section of this manual). 2. SQUEEZE HANDLE BRACKET HANDLE PIN HIGH MED. Warranty repairs must be inserted into the mowing position. CARBURETOR Your carburetor is running...
... three height adjustment holes. OVERSPEEDING THE ENGINE ABOVE THE FACTORY HIGH SPEED SETTING CAN BE DANGEROUS. Store in the Maintenance section of this manual. 3. Touch up your lawn mower has three (3) height positions - Squeeze the bottom ends of lower handle toward each other until the pin in the Maintenance section of this manual). 2. SQUEEZE HANDLE BRACKET HANDLE PIN HIGH MED. Warranty repairs must be inserted into the mowing position. CARBURETOR Your carburetor is running...

Owners Manual
Page 15
...) of oil through spark plug hole into cylinder. 3. ENGINE OIL Drain oil (with engine warm) and replace with gasoline in the fuel tank or permanent damage may reach an open flame or spark. Pull starter handle slowly a few times to reach the carburetor. IMPORTANT: NEVER COVER MOWER WHILE ENGINE AND EXHAUST AREAS ARE STILL WARM. Remove spark plug. 2. Do not empty the gas tank and carburetor if using fuel stabilizer. CYLINDER 1. ACIDIC GAS CAN DAMAGE THE FUEL SYSTEM...
...) of oil through spark plug hole into cylinder. 3. ENGINE OIL Drain oil (with engine warm) and replace with gasoline in the fuel tank or permanent damage may reach an open flame or spark. Pull starter handle slowly a few times to reach the carburetor. IMPORTANT: NEVER COVER MOWER WHILE ENGINE AND EXHAUST AREAS ARE STILL WARM. Remove spark plug. 2. Do not empty the gas tank and carburetor if using fuel stabilizer. CYLINDER 1. ACIDIC GAS CAN DAMAGE THE FUEL SYSTEM...
Owners Manual
Page 16
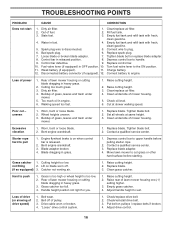
... valve lever (if equipped) in grass. 1. Charge battery. 12. Disconnected battery connector (if equipped). 12. Rear of lawn mower housing one (1) setting higher. 3. Cut at same height. 3. Wheel heights uneven. 3. Tighten blade bolt. 2. Excessive vibration 1. Engine flywheel brake is on when control bar is too low. 2. Replace blade adapter. 4. Grass is too high or wheel height is released. 2. Raise cutting height. 2. Adjust handle height to plug. 6. Check/replace drive belt. 2. Fill fuel tank. 3. Dirty air filter. 4. Check oil level...
... valve lever (if equipped) in grass. 1. Charge battery. 12. Disconnected battery connector (if equipped). 12. Rear of lawn mower housing one (1) setting higher. 3. Cut at same height. 3. Wheel heights uneven. 3. Tighten blade bolt. 2. Excessive vibration 1. Engine flywheel brake is on when control bar is too low. 2. Replace blade adapter. 4. Grass is too high or wheel height is released. 2. Raise cutting height. 2. Adjust handle height to plug. 6. Check/replace drive belt. 2. Fill fuel tank. 3. Dirty air filter. 4. Check oil level...

Owners Manual
Page 19
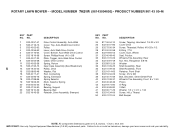
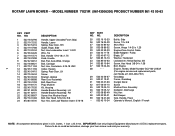
... DESCRIPTION Skirt, Rear Screw, Hinge 1/4-20 x 1.25 Engine Zone Control Cable Blade Adapter / Pulley Blade, 21" Washer, Hardened Lockwasher, Helical Spring 3/8 Screw, Hex Head 3/8-24 x 1.38 Debris Shield Screw Bolt, Engine Engine, Honda, Model Number GCV160 (For engine service and replacement parts, call Honda at 1-800-426-7701) Grassbag Frame, Grassbag Danger Decal Screw Mulcher Door Assembly Deflector, Discharge Nut, Hex Mounting Bracket, Debris Shield Clip Grip, Handle, Foam, Smooth...
... DESCRIPTION Skirt, Rear Screw, Hinge 1/4-20 x 1.25 Engine Zone Control Cable Blade Adapter / Pulley Blade, 21" Washer, Hardened Lockwasher, Helical Spring 3/8 Screw, Hex Head 3/8-24 x 1.38 Debris Shield Screw Bolt, Engine Engine, Honda, Model Number GCV160 (For engine service and replacement parts, call Honda at 1-800-426-7701) Grassbag Frame, Grassbag Danger Decal Screw Mulcher Door Assembly Deflector, Discharge Nut, Hex Mounting Bracket, Debris Shield Clip Grip, Handle, Foam, Smooth...
Owners Manual
Page 21
...Assembly, Auto-Walk Cover, Top, Auto-Walk Drive Control Pulley Lever, Auto-Walk Drive Control Cover, Bottom, Auto-Walk Drive Control Screw, Phillips Head #10 x 5/8 Plate, Trigger, Auto-Walk Drive Control Cable, Drive Control Spring, Return Gear Case Assembly (See Breakdown) Pulley, Drive Washer, Flat Rod, Connecting Spring, Extension Spring Selector Knob, Selector Spring E-Ring Bearing, Support Bearing, Ball Retainer, Drive Assembly, Stamped KEY PART NO. MODEL NUMBER 7021R (96143004600) - PRODUCT NUMBER 961 43 00-46 KEY PART NO. Failure to do so could be hazardous, damage your lawn mower...
...Assembly, Auto-Walk Cover, Top, Auto-Walk Drive Control Pulley Lever, Auto-Walk Drive Control Cover, Bottom, Auto-Walk Drive Control Screw, Phillips Head #10 x 5/8 Plate, Trigger, Auto-Walk Drive Control Cable, Drive Control Spring, Return Gear Case Assembly (See Breakdown) Pulley, Drive Washer, Flat Rod, Connecting Spring, Extension Spring Selector Knob, Selector Spring E-Ring Bearing, Support Bearing, Ball Retainer, Drive Assembly, Stamped KEY PART NO. MODEL NUMBER 7021R (96143004600) - PRODUCT NUMBER 961 43 00-46 KEY PART NO. Failure to do so could be hazardous, damage your lawn mower...
Owners Manual
Page 22
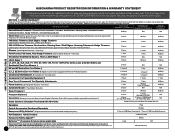
... of purchase for Commercial/Professional use when operated with Roll Over Protection System.) Commercial Walk Mowers † (includes 21" & wide area) Commercial Turf Specialty Equipment † 2 Years ¥ 2 Years ¥ 1 Years 2 Years ¥ 2 Years ¥ 1 Years 90 Days 90 Days 1 Year Zero Turn & Commercial Turf Specialty Attachments Power Cutters (Lifetime Ignition Warranty - Ask about Husqvarna s extended service plan! Parts Only) 2 Years 2 Years 90...
... of purchase for Commercial/Professional use when operated with Roll Over Protection System.) Commercial Walk Mowers † (includes 21" & wide area) Commercial Turf Specialty Equipment † 2 Years ¥ 2 Years ¥ 1 Years 2 Years ¥ 2 Years ¥ 1 Years 90 Days 90 Days 1 Year Zero Turn & Commercial Turf Specialty Attachments Power Cutters (Lifetime Ignition Warranty - Ask about Husqvarna s extended service plan! Parts Only) 2 Years 2 Years 90...
Owners Manual
Page 23
... THE EXTENT PROHIBITED BY APPLICABLE LAW. Units with CARB-TIER II and EPA regulations which are covered by a third party which gives a warranty, all other rights which become worn through normal regular use, including, but not limited to, belts, blades, blade adapters, bulbs, clutches, clutch drums, filters (fuel line, fuel filters, air filters, oil filters), sprockets, guide bars, lubricants, rewind springs, saw chain, spark plugs, starter ropes and tiller tines; (2) Natural discoloration of material...
... THE EXTENT PROHIBITED BY APPLICABLE LAW. Units with CARB-TIER II and EPA regulations which are covered by a third party which gives a warranty, all other rights which become worn through normal regular use, including, but not limited to, belts, blades, blade adapters, bulbs, clutches, clutch drums, filters (fuel line, fuel filters, air filters, oil filters), sprockets, guide bars, lubricants, rewind springs, saw chain, spark plugs, starter ropes and tiller tines; (2) Natural discoloration of material...
Parts List
Page 3
..., Hairpin Spring, Rear Door, LH Screw Bracket, Upstop Rear Door Assembly Bolt, Rear Door Plug, Mulcher Kit, Housing Handle Bracket Assembly, LH Handle Bracket Assembly, RH Screw, Hex Washer Head Bolt, Hex Head 5/16-18 x 5/8 Nut, Hex, with Lock Washer Insert 5/16-18 KEY PART NO. Failure to do so could be hazardous, damage your lawn mower and void your warranty. inches. 1 inch = 25.4 mm. MODEL NUMBER 7021R (96143006300) PRODUCT NUMBER 961 43 00-63 KEY PART NO. ROTARY LAWN MOWER - - NO...
..., Hairpin Spring, Rear Door, LH Screw Bracket, Upstop Rear Door Assembly Bolt, Rear Door Plug, Mulcher Kit, Housing Handle Bracket Assembly, LH Handle Bracket Assembly, RH Screw, Hex Washer Head Bolt, Hex Head 5/16-18 x 5/8 Nut, Hex, with Lock Washer Insert 5/16-18 KEY PART NO. Failure to do so could be hazardous, damage your lawn mower and void your warranty. inches. 1 inch = 25.4 mm. MODEL NUMBER 7021R (96143006300) PRODUCT NUMBER 961 43 00-63 KEY PART NO. ROTARY LAWN MOWER - - NO...

Parts List
Page 5
... Drive Control Assembly (Includes Cable) Cover, Top, Drive Control Cam Lever, Drive Control, LH Spring, Drive Control Bushing, Drive Control Cover, Bottom, Drive Control Lever, Drive Control, RH Cable, Drive Control Mounting Bracket, Drive Control Spring, Return Screw, Phillips Head #10 x 5/8 Gear Case Assembly (See Breakdown) Pulley, Drive Washer, Flat Rod, Connecting Spring, Extension Spring Selector Knob, Selector Spring E-Ring Bearing, Support KEY PART NO. inches. 1 inch = 25.4 mm. Failure to do so could be hazardous, damage your lawn mower and void your warranty. IMPORTANT: Use...
... Drive Control Assembly (Includes Cable) Cover, Top, Drive Control Cam Lever, Drive Control, LH Spring, Drive Control Bushing, Drive Control Cover, Bottom, Drive Control Lever, Drive Control, RH Cable, Drive Control Mounting Bracket, Drive Control Spring, Return Screw, Phillips Head #10 x 5/8 Gear Case Assembly (See Breakdown) Pulley, Drive Washer, Flat Rod, Connecting Spring, Extension Spring Selector Knob, Selector Spring E-Ring Bearing, Support KEY PART NO. inches. 1 inch = 25.4 mm. Failure to do so could be hazardous, damage your lawn mower and void your warranty. IMPORTANT: Use...


