
Owners Manual
Page 34
... the vibration damping elements are no fuel leaks from the engine, tank or fuel lines. Check that must be carried out by an autorized service workshop. Check and clean the spark arrestor screen on the harness is not damaged and works. X Clean the air filter. X Check that the transport guard... for wear. X Check that the bevel gear is filled three-quarters full with the special grease. Replace if necessary by an authorized service workshop. Do this manual. MAINTENANCE Maintenance schedule The following is a list of the machine.
... the vibration damping elements are no fuel leaks from the engine, tank or fuel lines. Check that must be carried out by an autorized service workshop. Check and clean the spark arrestor screen on the harness is not damaged and works. X Clean the air filter. X Check that the transport guard... for wear. X Check that the bevel gear is filled three-quarters full with the special grease. Replace if necessary by an authorized service workshop. Do this manual. MAINTENANCE Maintenance schedule The following is a list of the machine.
Workshop Manual
Page 3
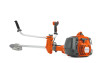
Contents Workshop Manual Husqvarna 555, 560XP, 560XPG, 562XP and 562XPG Contents Index 4 Introduction and safety instructions 6 Technical data 10 Service tools 12 Service data 14 Safety equipment 16 Repair instructions 24 Carburettor 34 Troubleshooting 56 Husqvarna AB has a policy of continuous product development and therefore reserves the right to modify the design and appearance of products without prior notice. English - 3
Contents Workshop Manual Husqvarna 555, 560XP, 560XPG, 562XP and 562XPG Contents Index 4 Introduction and safety instructions 6 Technical data 10 Service tools 12 Service data 14 Safety equipment 16 Repair instructions 24 Carburettor 34 Troubleshooting 56 Husqvarna AB has a policy of continuous product development and therefore reserves the right to modify the design and appearance of products without prior notice. English - 3
Workshop Manual
Page 4
... or worn starter cord 26 Replacing a broken return spring 27 Starter assembly 27 Stop control 20 Dismantling the stop function 21 Symbols Symbols in the Workshop Manual 9 Symbols on the saw 9 T Tank unit 42 Assembly 43 Dismantling 42 Tank valve 42 Technical Data 10 Threads 54 Repairing damaged threads 54 Throttle control...
... or worn starter cord 26 Replacing a broken return spring 27 Starter assembly 27 Stop control 20 Dismantling the stop function 21 Symbols Symbols in the Workshop Manual 9 Symbols on the saw 9 T Tank unit 42 Assembly 43 Dismantling 42 Tank valve 42 Technical Data 10 Threads 54 Repairing damaged threads 54 Throttle control...

Workshop Manual
Page 6
Introduction and safety instructions 2 Introduction and safety regulations Contents 2.1 General ...7 2.2 Safety ...7 2.3 Target group ...7 2.4 Modifications...7 2.5 Tools ...7 2.6 Structure ...7 2.7 Numbering ...7 2.8 General instructions ...8 2.9 Special instructions ...8 2.10 Symbols on the saw ...9 2.11 Symbols in the Workshop Manual 9 6 - English
Introduction and safety instructions 2 Introduction and safety regulations Contents 2.1 General ...7 2.2 Safety ...7 2.3 Target group ...7 2.4 Modifications...7 2.5 Tools ...7 2.6 Structure ...7 2.7 Numbering ...7 2.8 General instructions ...8 2.9 Special instructions ...8 2.10 Symbols on the saw ...9 2.11 Symbols in the Workshop Manual 9 6 - English

Workshop Manual
Page 7
... chain saw in time this Workshop Manual and on the saw . Look up the page for use Husqvarna's original: • Spare parts • Service tools • Accessories 2.6 Structure This Workshop Manual can be dismantled and assembled: 1. The Manual is to components inside the ... heading. 2. All service tools are numbered 1, 2 etc. Introduction and safety instructions 2 Introduction and safety instructions 2.1 General This Workshop Manual describes in question. 2. Look up the "Repair instructions" chapter which deals with safety must be applied as soon as follows when...
... chain saw in time this Workshop Manual and on the saw . Look up the page for use Husqvarna's original: • Spare parts • Service tools • Accessories 2.6 Structure This Workshop Manual can be dismantled and assembled: 1. The Manual is to components inside the ... heading. 2. All service tools are numbered 1, 2 etc. Introduction and safety instructions 2 Introduction and safety instructions 2.1 General This Workshop Manual describes in question. 2. Look up the "Repair instructions" chapter which deals with safety must be applied as soon as follows when...
Workshop Manual
Page 8
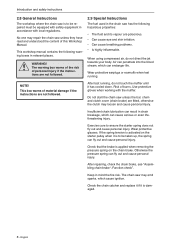
This workshop manual contains the following hazardous properties: • The fluid and its vapour are poisonous. • Can... saw unless the bar, chain and clutch cover (chain brake) are not followed. This box warns of this Workshop Manual. Check that the brake is applied when removing the pressure spring on the starter pulley when it is to be... equipped with safety equipment in relevant places. Introduction and safety instructions 2.8 General Instructions The workshop where the chain saw is to be repaired must be taken up, the spring can penetrate into the blood ...
This workshop manual contains the following hazardous properties: • The fluid and its vapour are poisonous. • Can... saw unless the bar, chain and clutch cover (chain brake) are not followed. This box warns of this Workshop Manual. Check that the brake is applied when removing the pressure spring on the starter pulley when it is to be... equipped with safety equipment in relevant places. Introduction and safety instructions 2.8 General Instructions The workshop where the chain saw is to be repaired must be taken up, the spring can penetrate into the blood ...

Workshop Manual
Page 9
Chain brake Decompression valve Fuel pump Adjusting the oil pump English - 9 2.10 Symbols on the chain saw. Refuelling Stop button Chain oil fill. Choke Lever Introduction and safety instructions 2.11 Symbols in the Workshop Manual This symbol warns of personal injury when the instructions are embedded on the saw The symbols below are not followed.
Chain brake Decompression valve Fuel pump Adjusting the oil pump English - 9 2.10 Symbols on the chain saw. Refuelling Stop button Chain oil fill. Choke Lever Introduction and safety instructions 2.11 Symbols in the Workshop Manual This symbol warns of personal injury when the instructions are embedded on the saw The symbols below are not followed.

