

Owner Manual
Page 2
... cut fibrous types of vegetation. Use a grass blade or trimmer head to cut different types of wood. Note: National or local regulations can regulate the use Use the product with a saw blade to cut grass. Do not use the product with a combustion engine. Only use the product for more information. Refer to given regulations. Comply to Accessories on page 32. 2 1346 - 003 - 08.06.2020 Contents Introduction 2 Safety 5 Assembly 11 Troubleshooting...
... cut fibrous types of vegetation. Use a grass blade or trimmer head to cut different types of wood. Note: National or local regulations can regulate the use Use the product with a saw blade to cut grass. Do not use the product with a combustion engine. Only use the product for more information. Refer to given regulations. Comply to Accessories on page 32. 2 1346 - 003 - 08.06.2020 Contents Introduction 2 Safety 5 Assembly 11 Troubleshooting...

Owner Manual
Page 3
Grease filler cap 3. Handle adjustment (555RXT) 6. Throttle wire adjustment (555RXT, 555FRM) 15. Air filter cover 21. Saw blade (555FX, 555FXT) 29. Switch for heated handles (555FXT) 5. Stop switch (555RXT, 555FRM) 11. Harness 26. Support flange (555FX, 555FXT) 28. Drive disc (555FX, 555FXT) 30. Trimmer head (555RXT) 32. Drive disc (555RXT) 34. Bevel gear 2. Stop switch (555FX, 555FXT) 9. Choke control 22. Throttle trigger lockout (555RXT, 555FRM) 13. Starter rope handle 20. Decompression valve 23. Locknut (555FX, 555FXT) 27. Product overview 7 2 1...
Grease filler cap 3. Handle adjustment (555RXT) 6. Throttle wire adjustment (555RXT, 555FRM) 15. Air filter cover 21. Saw blade (555FX, 555FXT) 29. Switch for heated handles (555FXT) 5. Stop switch (555RXT, 555FRM) 11. Harness 26. Support flange (555FX, 555FXT) 28. Drive disc (555FX, 555FXT) 30. Trimmer head (555RXT) 32. Drive disc (555RXT) 34. Bevel gear 2. Stop switch (555FX, 555FXT) 9. Choke control 22. Throttle trigger lockout (555RXT, 555FRM) 13. Starter rope handle 20. Decompression valve 23. Locknut (555FX, 555FXT) 27. Product overview 7 2 1...

Owner Manual
Page 4
Cutting attachment guard (555FRM) 40. Locknut (555RXT) 42. Grass blade (555RXT) 45. Cutting attachment guard (555RXT) 47. Operator's manual 49. Air purge bulb. Idle adjustment screw. Use approved hearing protection. The product can cause serious injury or death to the operator or others. Keep a minimum of the product. Apply this for other commercial areas. 4 1346 - 003 - 08.06.2020 yyyywwxxxx The rating plate shows the serial number. Note: Other symbols/decals...
Cutting attachment guard (555FRM) 40. Locknut (555RXT) 42. Grass blade (555RXT) 45. Cutting attachment guard (555RXT) 47. Operator's manual 49. Air purge bulb. Idle adjustment screw. Use approved hearing protection. The product can cause serious injury or death to the operator or others. Keep a minimum of the product. Apply this for other commercial areas. 4 1346 - 003 - 08.06.2020 yyyywwxxxx The rating plate shows the serial number. Note: Other symbols/decals...
Owner Manual
Page 6
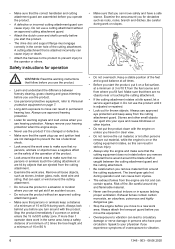
... a flat surface, at idle speed, let a service agent adjust it is wound around the cutting equipment. Risk of 15 m/50 ft. • Do not overreach. Safety instructions for warning signals and loud voices when you turn around with the engine on unless you have it is changed or defective. • Make sure that the spark plug cap and ignition lead are not damaged...
... a flat surface, at idle speed, let a service agent adjust it is wound around the cutting equipment. Risk of 15 m/50 ft. • Do not overreach. Safety instructions for warning signals and loud voices when you turn around with the engine on unless you have it is changed or defective. • Make sure that the spark plug cap and ignition lead are not damaged...

Owner Manual
Page 9
....06.2020 9 Do a visual check for damages, such as cracks. 3. b) Clean the spark arrester screen if it is damaged. 3. The muffler keeps noise levels to the product. 4. To do a check of the muffler contain chemicals that the muffler is correctly attached to a minimum and sends exhaust fumes away from the harness if there is damaged. The safety-release mechanism lets the operator remove...
....06.2020 9 Do a visual check for damages, such as cracks. 3. b) Clean the spark arrester screen if it is damaged. 3. The muffler keeps noise levels to the product. 4. To do a check of the muffler contain chemicals that the muffler is correctly attached to a minimum and sends exhaust fumes away from the harness if there is damaged. The safety-release mechanism lets the operator remove...
Owner Manual
Page 10
... service center regularly examine the cutting attachment to decrease the vibration. • Use only the approved grass trimmer heads and grass trimmer lines. Saw blade and grass blade • Use correctly sharpened blades. Make sure that the storage area does not contain an open the fuel tank cap slowly and release the pressure carefully. • Make sure there are sufficient airflow when refueling and mixing fuel (petrol and two-stroke oil) or draining the fuel tank...
... service center regularly examine the cutting attachment to decrease the vibration. • Use only the approved grass trimmer heads and grass trimmer lines. Saw blade and grass blade • Use correctly sharpened blades. Make sure that the storage area does not contain an open the fuel tank cap slowly and release the pressure carefully. • Make sure there are sufficient airflow when refueling and mixing fuel (petrol and two-stroke oil) or draining the fuel tank...
Owner Manual
Page 11
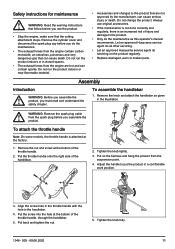
... spark plug cable from the engine contain carbon monoxide, an odourless, poisonous and very dangerous gas that are hot and can cause serious injury or death. Put on the product regularly. • Replace damaged, worn or broken parts. Do not change the product. Remove the knob and attach the handlebar as this operator's manual recommends. Tighten the knob lightly. 3. Put back and tighten the nut...
... spark plug cable from the engine contain carbon monoxide, an odourless, poisonous and very dangerous gas that are hot and can cause serious injury or death. Put on the product regularly. • Replace damaged, worn or broken parts. Do not change the product. Remove the knob and attach the handlebar as this operator's manual recommends. Tighten the knob lightly. 3. Put back and tighten the nut...
Owner Manual
Page 12
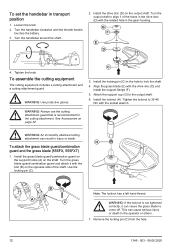
... shaft. 6. Remove the locking pin (C) from the hole. 12 1346 - 003 - 08.06.2020 Install the drive disc (D) on page 32. Turn the output shaft to come off. WARNING: Use protective gloves. Turn the handlebar clockwise until the throttle handle touches the battery. 3. G F E D 4. To set the handlebar in the gear housing. Loosen the knob. 2. Turn the handlebar around the shaft. 2. Attach the support cup (G) to the operator or others. 7. Install the grass blade guard/combination guard on the support...
... shaft. 6. Remove the locking pin (C) from the hole. 12 1346 - 003 - 08.06.2020 Install the drive disc (D) on page 32. Turn the output shaft to come off. WARNING: Use protective gloves. Turn the handlebar clockwise until the throttle handle touches the battery. 3. G F E D 4. To set the handlebar in the gear housing. Loosen the knob. 2. Turn the handlebar around the shaft. 2. Attach the support cup (G) to the operator or others. 7. Install the grass blade guard/combination guard on the support...

Owner Manual
Page 14
... 3 for trimmer head and plastic blades 1. Put the drive disc (B) on the output shaft. 6. Put the locking pin (C) in the gear housing. Tighten the locknut to the operator's height: a) Push the spring loaded lock. Turn the output shaft to lock the shaft. 5. Install the shredder blade (G) and support flange (H) on the output shaft. 2. Stop the engine. 2. Hang the trimmer guard/combination guard (A) onto the two hooks on the bolt head and tighten the bolt fully. 3. Put the locking pin...
... 3 for trimmer head and plastic blades 1. Put the drive disc (B) on the output shaft. 6. Put the locking pin (C) in the gear housing. Tighten the locknut to the operator's height: a) Push the spring loaded lock. Turn the output shaft to lock the shaft. 5. Install the shredder blade (G) and support flange (H) on the output shaft. 2. Stop the engine. 2. Hang the trimmer guard/combination guard (A) onto the two hooks on the bolt head and tighten the bolt fully. 3. Put the locking pin...
Owner Manual
Page 16
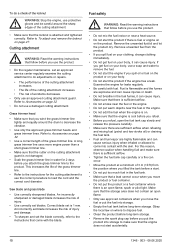
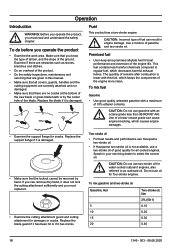
...; Do the safety inspections, maintenance and servicing that are no cracks at the bottom of the saw blade or grass blade teeth or by the center hole of fuel can remove it by hand. Premixed fuel • Use Husqvarna premixed alkylate fuel for four-stroke engines. To do before you operate the product • Examine the work area. Replace the blade guard if it has been hit...
...; Do the safety inspections, maintenance and servicing that are no cracks at the bottom of the saw blade or grass blade teeth or by the center hole of fuel can remove it by hand. Premixed fuel • Use Husqvarna premixed alkylate fuel for four-stroke engines. To do before you operate the product • Examine the work area. Replace the blade guard if it has been hit...
Owner Manual
Page 18
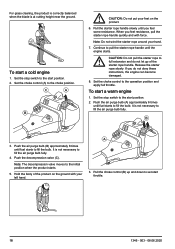
... let go of the product on the product. 6. To start a cold engine 1. It is at cutting height near the ground. Push the decompression valve (C). A 3. Set the choke control (A) to pull the starter rope handle until fuel starts to fill the air purge bulb fully. 4. Continue to the choke position. Release the starter rope slowly. Push the air purge bulb (B) approximately 6 times until the engine starts. For grass clearing, the product is correctly balanced when the...
... let go of the product on the product. 6. To start a cold engine 1. It is at cutting height near the ground. Push the decompression valve (C). A 3. Set the choke control (A) to pull the starter rope handle until fuel starts to fill the air purge bulb fully. 4. Continue to the choke position. Release the starter rope slowly. Push the air purge bulb (B) approximately 6 times until the engine starts. For grass clearing, the product is correctly balanced when the...
Owner Manual
Page 19
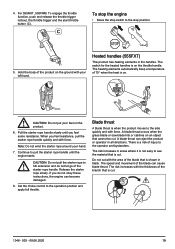
... directions. Blade thrust A blade thrust is cut . 1346 - 003 - 08.06.2020 19 CAUTION: Do not pull the starter rope to the operation position and apply full throttle. Release the starter rope slowly. The risk increases with the thickness of the branch that is when the product moves to the operator and bystanders. The switch for the heated handles is cut . Pull the starter rope handle slowly until the engine starts. If...
... directions. Blade thrust A blade thrust is cut . 1346 - 003 - 08.06.2020 19 CAUTION: Do not pull the starter rope to the operation position and apply full throttle. Release the starter rope slowly. The risk increases with the thickness of the branch that is when the product moves to the operator and bystanders. The switch for the heated handles is cut . Pull the starter rope handle slowly until the engine starts. If...
Owner Manual
Page 23
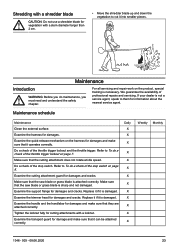
For all servicing and repair work on page 7. Refer to To do maintenance, you do a check of the stop switch on the harness for damages and make sure that the saw blade or grass blade is necessary. Examine the cutting attachment guard for damages and cracks. Examine the support flange for damages and cracks. Do a check of the stop switch. Make sure that it operates correctly. We...
For all servicing and repair work on page 7. Refer to To do maintenance, you do a check of the stop switch on the harness for damages and make sure that the saw blade or grass blade is necessary. Examine the cutting attachment guard for damages and cracks. Examine the support flange for damages and cracks. Do a check of the stop switch. Make sure that it operates correctly. We...

Owner Manual
Page 24
... fuel filter for contamination and the fuel hose for cracks and other defects. Replace it if it . Replace the spark plug. Lubricate the drive shaft.2 Daily X X X Weekly Monthly X X X X X X X X X X X X X Carburetor To adjust the idle speed Your Husqvarna product is attached before you adjust the idle speed, speak to To examine the spark plug on page 28. Make sure that decrease harmful emissions. 1. a) Turn the idle speed screw T clockwise until the cutting attachment stops. b) Turn the idle speed screw T counterclockwise until the cutting attachment starts...
... fuel filter for contamination and the fuel hose for cracks and other defects. Replace it if it . Replace the spark plug. Lubricate the drive shaft.2 Daily X X X Weekly Monthly X X X X X X X X X X X X X Carburetor To adjust the idle speed Your Husqvarna product is attached before you adjust the idle speed, speak to To examine the spark plug on page 28. Make sure that decrease harmful emissions. 1. a) Turn the idle speed screw T clockwise until the cutting attachment stops. b) Turn the idle speed screw T counterclockwise until the cutting attachment starts...
Owner Manual
Page 26
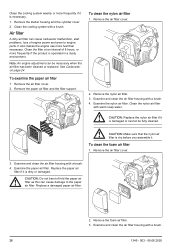
... engine adjustment can cause carburetor malfunction, start problems, loss of engine power and wear to the paper air filter. CAUTION: Do not bend of 8 hours, or more fuel than necessary. Examine and clean the air filter housing with warm soap water. Remove the starter housing and the cylinder cover. 2. Air filter A dirty air filter can be fully cleaned. Remove the air filter cover. 2. Remove the paper air filter and the filter support. Examine and clean the air filter housing with a brush. 4. Remove the air filter cover. 3. Replace the paper air filter if it is operated...
... engine adjustment can cause carburetor malfunction, start problems, loss of engine power and wear to the paper air filter. CAUTION: Do not bend of 8 hours, or more fuel than necessary. Examine and clean the air filter housing with warm soap water. Remove the starter housing and the cylinder cover. 2. Air filter A dirty air filter can be fully cleaned. Remove the air filter cover. 2. Remove the paper air filter and the filter support. Examine and clean the air filter housing with a brush. 4. Remove the air filter cover. 3. Replace the paper air filter if it is operated...

Owner Manual
Page 27
.... Use Husqvarna special grease if it is sufficiently long to how the cutting attachment rotates. • To remove the locknut, turn the locknut by hand. Let a service agent help you if you can safely operate the socket wrench. Let servicing personnel do the repair of 3 months. Replace the locknut after approximately 10 times. To apply oil to supply the oil equally across the foam air filter. 4. To attach...
.... Use Husqvarna special grease if it is sufficiently long to how the cutting attachment rotates. • To remove the locknut, turn the locknut by hand. Let a service agent help you if you can safely operate the socket wrench. Let servicing personnel do the repair of 3 months. Replace the locknut after approximately 10 times. To apply oil to supply the oil equally across the foam air filter. 4. To attach...
Owner Manual
Page 28
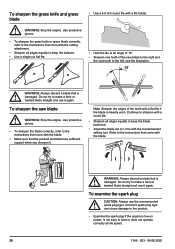
... saw blade WARNING: Stop the engine. Incorrect spark plug type can cause damage to make a bent or twisted blade straight and use the recommended spark plug type. Do not try to the product. • Examine the spark plug if the engine is low on power, is damaged. To examine the spark plug CAUTION: Always use it again. Use protective gloves. • To sharpen the grass knife or grass blade correctly, refer to start...
... saw blade WARNING: Stop the engine. Incorrect spark plug type can cause damage to make a bent or twisted blade straight and use the recommended spark plug type. Do not try to the product. • Examine the spark plug if the engine is low on power, is damaged. To examine the spark plug CAUTION: Always use it again. Use protective gloves. • To sharpen the grass knife or grass blade correctly, refer to start...

Owner Manual
Page 30
... page 31 for correct electrode gap. Troubleshooting The engine does not start Check Stop switch. Incorrect fuel type. Incorrect adjustment of the idle speed Adjust the idle speed with a 2 mm spray tube. Clean the spark plug. Make sure that it does not expand. 6. Attach the cylinder cover and the protective cover. Starter pawls. Carburetor Spark plug. Let an approved servicing dealer replace the stop position. Let an approved servicing dealer help you. The fuel filter is in short intervals. 5. To...
... page 31 for correct electrode gap. Troubleshooting The engine does not start Check Stop switch. Incorrect fuel type. Incorrect adjustment of the idle speed Adjust the idle speed with a 2 mm spray tube. Clean the spark plug. Make sure that it does not expand. 6. Attach the cylinder cover and the protective cover. Starter pawls. Carburetor Spark plug. Let an approved servicing dealer replace the stop position. Let an approved servicing dealer help you. The fuel filter is in short intervals. 5. To...

Owner Manual
Page 31
... engine starts but stops again Check Fuel tank Fuel filter Carburetor Air filter Possible cause Procedure Incorrect fuel type. Make sure that there is clogged. The fuel filter is not correctly adjus- The idle speed is clogged. The air filter is no risk of output shaft, rpm 10500 Recommended max. Transportation and storage • Let the product cool before transportation or storage. • Remove the spark plug cap before long-term storage. • Attach...
... engine starts but stops again Check Fuel tank Fuel filter Carburetor Air filter Possible cause Procedure Incorrect fuel type. Make sure that there is clogged. The fuel filter is not correctly adjus- The idle speed is clogged. The air filter is no risk of output shaft, rpm 10500 Recommended max. Transportation and storage • Let the product cool before transportation or storage. • Remove the spark plug cap before long-term storage. • Attach...

Owner Manual
Page 34
... engine owner, you should contact Husqvarna Professional Products, Inc. WARRANTY PERIOD: Any warranted part which is not scheduled for replacement as required maintenance, or which is scheduled for replacement as required maintenance is warranted for that causes the failure of a warranted part for liquid fuel and fuel vapors), fuel caps, valves, canisters, filters, clamps and other emission-related assemblies. Where a warrantable condition exists, Husqvarna Professional Products, Inc. OWNER′S WARRANTY...
... engine owner, you should contact Husqvarna Professional Products, Inc. WARRANTY PERIOD: Any warranted part which is not scheduled for replacement as required maintenance, or which is scheduled for replacement as required maintenance is warranted for that causes the failure of a warranted part for liquid fuel and fuel vapors), fuel caps, valves, canisters, filters, clamps and other emission-related assemblies. Where a warrantable condition exists, Husqvarna Professional Products, Inc. OWNER′S WARRANTY...


