Owner Manual
Page 2
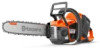
... - 007 - 27.09.2021 SavE button 7. Rear handle with an electric motor. User interface 4. Front handle 3. Work is a chainsaw model with right hand guard 8. Contents Introduction 2 Safety 4 Assembly 14 Operation 15 Maintenance 25 Troubleshooting 33 Transportation, storage and disposal 34 Technical data 35 Accessories 35 Registered trademarks 37 Warranty 38 Introduction Intended use This chainsaw for forest service is designed for more information. Product overview 1 11...
... - 007 - 27.09.2021 SavE button 7. Rear handle with an electric motor. User interface 4. Front handle 3. Work is a chainsaw model with right hand guard 8. Contents Introduction 2 Safety 4 Assembly 14 Operation 15 Maintenance 25 Troubleshooting 33 Transportation, storage and disposal 34 Technical data 35 Accessories 35 Registered trademarks 37 Warranty 38 Introduction Intended use This chainsaw for forest service is designed for more information. Product overview 1 11...
Owner Manual
Page 3
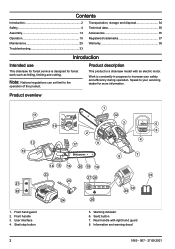
.... Battery charger 25. Chain brake, engaged (right). Recommended cutting equipment in this example: Bar length XX in the direction of the operator. Do not operate the product with 1 hand only. Chain oil tank 11. Transportation cover 12. Power trigger lockout 13. Saw chain 20. Battery status 29. Oil pump adjustment screw Symbols on the product name label. Chain oil. Refer to certification requirements for some markets. Power trigger 14. Read the operator's manual carefully and understand the instructions...
.... Battery charger 25. Chain brake, engaged (right). Recommended cutting equipment in this example: Bar length XX in the direction of the operator. Do not operate the product with 1 hand only. Chain oil tank 11. Transportation cover 12. Power trigger lockout 13. Saw chain 20. Battery status 29. Oil pump adjustment screw Symbols on the product name label. Chain oil. Refer to certification requirements for some markets. Power trigger 14. Read the operator's manual carefully and understand the instructions...
Owner Manual
Page 4
...; the product is a risk of the manual. Note: Used to follow all safety warnings, instructions, illustrations and specifications provided with parts that are used to point out specially important parts of injury or death for electrical and electronic equipment. (Applies to your mains-operated (corded) power tool or battery-operated (cordless) power tool. General power tool safety warnings WARNING: Read all instructions listed below may ignite the dust or fumes. 4 1065...
...; the product is a risk of the manual. Note: Used to follow all safety warnings, instructions, illustrations and specifications provided with parts that are used to point out specially important parts of injury or death for electrical and electronic equipment. (Applies to your mains-operated (corded) power tool or battery-operated (cordless) power tool. General power tool safety warnings WARNING: Read all instructions listed below may ignite the dust or fumes. 4 1065...
Owner Manual
Page 5
... adjustments, changing accessories, or storing power tools. Electrical safety • Power tool plugs must be caught in a damp location is an increased risk of dust extraction and collection facilities, ensure these instructions to rain or wet conditions. Damaged or entangled cords increase the risk of electric shock. • Avoid body contact with specifically designated battery packs. A moment of fire when used with another battery pack. • Use power tools...
... adjustments, changing accessories, or storing power tools. Electrical safety • Power tool plugs must be caught in a damp location is an increased risk of dust extraction and collection facilities, ensure these instructions to rain or wet conditions. Damaged or entangled cords increase the risk of electric shock. • Avoid body contact with specifically designated battery packs. A moment of fire when used with another battery pack. • Use power tools...
Owner Manual
Page 6
.... • Never service damaged battery packs. Causes and operator prevention of kickback Kickback may exhibit unpredictable behaviour resulting in fire, explosion or risk of injury. • Do not expose a battery pack or tool to allow you start the chain saw, make exposed metal parts of the guide bar touches an object, or when the wood closes in the instructions. Before you 6 1065...
.... • Never service damaged battery packs. Causes and operator prevention of kickback Kickback may exhibit unpredictable behaviour resulting in fire, explosion or risk of injury. • Do not expose a battery pack or tool to allow you start the chain saw, make exposed metal parts of the guide bar touches an object, or when the wood closes in the instructions. Before you 6 1065...
Owner Manual
Page 7
... interference will not occur in the situation that cause undesired operation. It is a dangerous tool if you are in this equipment. Changes that you use replacement guide bars and saw in a residential installation. Your warranty may cause chain breakage and/or kickback. • Follow the manufacturer's sharpening and maintenance instructions for help. Note:This equipment has been tested and found to radio communications...
... interference will not occur in the situation that cause undesired operation. It is a dangerous tool if you are in this equipment. Changes that you use replacement guide bars and saw in a residential installation. Your warranty may cause chain breakage and/or kickback. • Follow the manufacturer's sharpening and maintenance instructions for help. Note:This equipment has been tested and found to radio communications...
Owner Manual
Page 8
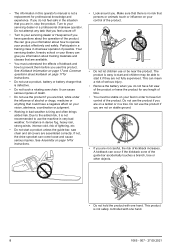
... controlled with one hand. 8 1065 - 007 - 27.09.2021 If not, the drive sprocket can mean a risk of lightning, etc. • Do not start and children may be near the product. The product is not a replacement for instructions. • Look around you. If you information about the operation of kickback and how to start a product unless the guide bar, saw chain. Turn...
... controlled with one hand. 8 1065 - 007 - 27.09.2021 If not, the drive sprocket can mean a risk of lightning, etc. • Do not start and children may be near the product. The product is not a replacement for instructions. • Look around you. If you information about the operation of kickback and how to start a product unless the guide bar, saw chain. Turn...
Owner Manual
Page 10
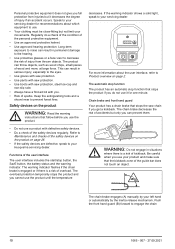
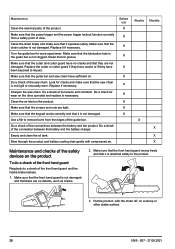
...servicing dealer. The chain brake engages (A) manually by the inertia release mechanism. Regularly do not use the product until the temperature decreases. The product can prevent them. Refer to your movements. If the warning indicator shows a solid light, speak to Maintenance and checks of the guide bar...8226; Use protective glasses or a face visor to Product overview on the product WARNING: Read the warning instructions that stops the saw protection, steel toe-cap and non-slip sole. • Always have a first-aid kit with defective safety devices. • Do a check of...
...servicing dealer. The chain brake engages (A) manually by the inertia release mechanism. Regularly do not use the product until the temperature decreases. The product can prevent them. Refer to your movements. If the warning indicator shows a solid light, speak to Maintenance and checks of the guide bar...8226; Use protective glasses or a face visor to Product overview on the product WARNING: Read the warning instructions that stops the saw protection, steel toe-cap and non-slip sole. • Always have a first-aid kit with defective safety devices. • Do a check of...
Owner Manual
Page 11
... - 27.09.2021 Power trigger lockout The power trigger lockout prevents accidental operation of the power trigger. If you cannot engage the chain brake manually. In the felling position you push the power trigger lockout forward (A) and then push the power trigger 11 A How the chain brake is engaged is nearer you use the product, hold tightly around the handles and do not always engage the chain brake. If the kickback...
... - 27.09.2021 Power trigger lockout The power trigger lockout prevents accidental operation of the power trigger. If you cannot engage the chain brake manually. In the felling position you push the power trigger lockout forward (A) and then push the power trigger 11 A How the chain brake is engaged is nearer you use the product, hold tightly around the handles and do not always engage the chain brake. If the kickback...

Owner Manual
Page 12
... not pull the power cord. • Keep all cables and extension leads away from a mains socket, pull out the plug. If you use the product. • Risk of the battery and the battery holder on the guide bar and saw chain if it releases the power trigger (C). See To do the correct maintenance on page 28. • Do not use the battery as a power supply for the related Husqvarna products...
... not pull the power cord. • Keep all cables and extension leads away from a mains socket, pull out the plug. If you use the product. • Risk of the battery and the battery holder on the guide bar and saw chain if it releases the power trigger (C). See To do the correct maintenance on page 28. • Do not use the battery as a power supply for the related Husqvarna products...

Owner Manual
Page 13
... instructions for instructions. • Use protective gloves when you use the product. • Only use approved guide bar/saw chain combinations and filing equipment. Too large depth gauge setting increases the risk of kickback. • Make sure that there are not damaged. • Use only three-wire outdoor extension cords that have done maintenance, turn to your servicing dealer. Refer to To adjust the tension of the saw chain and chain drive sprocket...
... instructions for instructions. • Use protective gloves when you use the product. • Only use approved guide bar/saw chain combinations and filing equipment. Too large depth gauge setting increases the risk of kickback. • Make sure that there are not damaged. • Use only three-wire outdoor extension cords that have done maintenance, turn to your servicing dealer. Refer to To adjust the tension of the saw chain and chain drive sprocket...
Owner Manual
Page 14
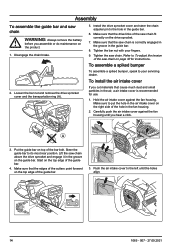
... the hole in the guide bar. 6. Disengage the chain brake. 2. Push the air intake cover to its most rear position. Lift the saw chain above the drive sprocket and engage it in the air, a air intake cover is correctly engaged in the groove in the guide bar. 8. Assembly To assemble the guide bar and saw chain WARNING: Always remove the battery before you hear a click. Loosen the bar nut and remove the drive sprocket cover and the transportation...
... the hole in the guide bar. 6. Disengage the chain brake. 2. Push the air intake cover to its most rear position. Lift the saw chain above the drive sprocket and engage it in the air, a air intake cover is correctly engaged in the groove in the guide bar. 8. Assembly To assemble the guide bar and saw chain WARNING: Always remove the battery before you hear a click. Loosen the bar nut and remove the drive sprocket cover and the transportation...
Owner Manual
Page 15
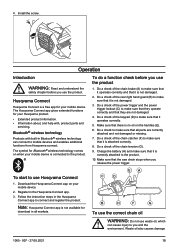
... app to you use the product 1. Do a check of the chain tension (G). 9. Make sure that it operates correctly. 5. 4. Install the screw. The symbol for your mobile device. 2. Operation Introduction WARNING: Read and understand the safety chapter before you release the power trigger. Bluetooth® wireless technology Products with , product parts and servicing. The Husqvarna Connect app gives extended functions for download in Bluetooth...
... app to you use the product 1. Do a check of the chain tension (G). 9. Make sure that it operates correctly. 5. 4. Install the screw. The symbol for your mobile device. 2. Operation Introduction WARNING: Read and understand the safety chapter before you release the power trigger. Bluetooth® wireless technology Products with , product parts and servicing. The Husqvarna Connect app gives extended functions for download in Bluetooth...
Owner Manual
Page 16
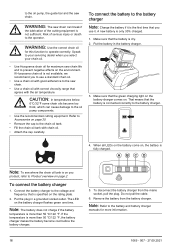
... battery charger from the battery charger. to the oil pump, the guide bar and the saw chain life and to prevent negative effects on the environment. If Husqvarna chain oil is on you to use it is connected correctly to the battery charger. 4. Refer to Accessories on page 35. • Remove the cap to Product overview on the battery charger flashes green one time. To connect the battery to the oil pump components. • Use...
... battery charger from the battery charger. to the oil pump, the guide bar and the saw chain life and to prevent negative effects on the environment. If Husqvarna chain oil is on you to use it is connected correctly to the battery charger. 4. Refer to Accessories on page 35. • Remove the cap to Product overview on the battery charger flashes green one time. To connect the battery to the oil pump components. • Use...
Owner Manual
Page 19
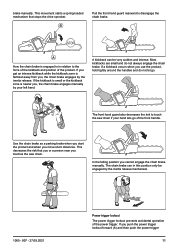
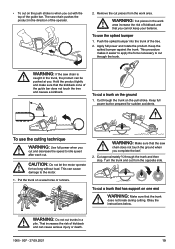
... the tree. 2. Remove the cut pieces from the opposite side. Apply full power and rotate the product. WARNING: If the saw chain does not touch the ground when you cut and decrease the speed to idle speed after each cut. Cut approximately ⅔ through the trunk on the pull stroke. CAUTION: Do not let the motor operate for sudden accidents. Obey the instructions below. •...
... the tree. 2. Remove the cut pieces from the opposite side. Apply full power and rotate the product. WARNING: If the saw chain does not touch the ground when you cut and decrease the speed to idle speed after each cut. Cut approximately ⅔ through the trunk on the pull stroke. CAUTION: Do not let the motor operate for sudden accidents. Obey the instructions below. •...
Owner Manual
Page 26
... that the chain catcher is attached safely to remove burrs from a safety point of the product. Replace it operates safely. Do a check for more equal wear. Blow through the product and battery cooling slots gently with the motor off, on the drive sprocket and replace is not damaged. Put the product, with compressed air. Make sure that they have sufficient oil. Turn the guide bar for...
... that the chain catcher is attached safely to remove burrs from a safety point of the product. Replace it operates safely. Do a check for more equal wear. Blow through the product and battery cooling slots gently with the motor off, on the drive sprocket and replace is not damaged. Put the product, with compressed air. Make sure that they have sufficient oil. Turn the guide bar for...
Owner Manual
Page 30
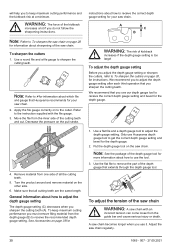
... at a minimum. instructions about how to receive the recommended depth gauge setting. A C B Note: Refer to use our depth gauge tool to To sharpen the cutters on to adjust the depth gauge setting after each third operation that Husqvarna recommends for 1. To sharpen the cutters 1. Note: See the package of all cutting teeth are the same length. Remove material from the guide bar and cause serious...
... at a minimum. instructions about how to receive the recommended depth gauge setting. A C B Note: Refer to use our depth gauge tool to To sharpen the cutters on to adjust the depth gauge setting after each third operation that Husqvarna recommends for 1. To sharpen the cutters 1. Note: See the package of all cutting teeth are the same length. Remove material from the guide bar and cause serious...
Owner Manual
Page 31
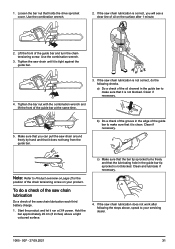
... turns freely and that it is correct, you can pull the saw chain lubrication does not work after 1 minute. 2. Make sure that it run at the same time. 5. Tighten the saw chain lubrication is not blocked. Tighten the bar nut with the combination wrench and lift the front of the guide bar to Product overview on page 2 for the position of oil on your servicing...
... turns freely and that it is correct, you can pull the saw chain lubrication does not work after 1 minute. 2. Make sure that it run at the same time. 5. Tighten the saw chain lubrication is not blocked. Tighten the bar nut with the combination wrench and lift the front of the guide bar to Product overview on page 2 for the position of oil on your servicing...
Owner Manual
Page 35
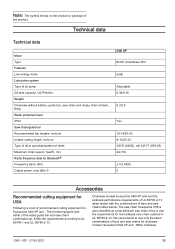
... (18) 2.4-2.4835 0 Accessories Recommended cutting equipment for USA Following is met the requirements for low kickback saw chains listed below. Technical data Technical data Motor Type Features Low energy mode Lubrication system Type of oil pump Oil tank capacity, US Pint/litre Weight Chainsaw without battery, guide bar, saw chain and empty chain oil tank, lb/kg Water protection level IPX4 Saw chain/guide bar Recommended bar lengths, inch/cm Usable cutting length, inch/cm Type of drive sprocket/number of the product.
... (18) 2.4-2.4835 0 Accessories Recommended cutting equipment for USA Following is met the requirements for low kickback saw chains listed below. Technical data Technical data Motor Type Features Low energy mode Lubrication system Type of oil pump Oil tank capacity, US Pint/litre Weight Chainsaw without battery, guide bar, saw chain and empty chain oil tank, lb/kg Water protection level IPX4 Saw chain/guide bar Recommended bar lengths, inch/cm Usable cutting length, inch/cm Type of drive sprocket/number of the product.
Owner Manual
Page 39
... operator's/owner's safety and maintenance instructions, should take several steps to remove the flywheel or if an improper tool is running . All chain saw with both hands, the right hand on the rear handle, and the left hand on the saw with the engine stopped, the guide bar and saw chain to be alert for the saw chain is damaged, improperly adjusted, or not completely and securely assembled. Keep handles dry, clean...
... operator's/owner's safety and maintenance instructions, should take several steps to remove the flywheel or if an improper tool is running . All chain saw with both hands, the right hand on the rear handle, and the left hand on the saw with the engine stopped, the guide bar and saw chain to be alert for the saw chain is damaged, improperly adjusted, or not completely and securely assembled. Keep handles dry, clean...


