

Operation Manual
Page 2
... the saw is running time/Idling. A pole saw chain, running . Always remove the battery to work . Direction of rotation of the original Swedish operating instruction. Direct current. Chain oil fill. If the machine touches or comes close to high-voltage power lines it could lead to make sure you understand the instructions before you read the operator's manual carefully and make sure the power is not electrically insulated. IMPORTANT! Regular cleaning...
... the saw is running time/Idling. A pole saw chain, running . Always remove the battery to work . Direction of rotation of the original Swedish operating instruction. Direct current. Chain oil fill. If the machine touches or comes close to high-voltage power lines it could lead to make sure you understand the instructions before you read the operator's manual carefully and make sure the power is not electrically insulated. IMPORTANT! Regular cleaning...
Operation Manual
Page 4
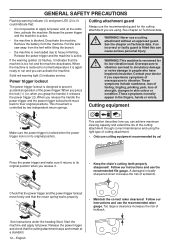
... SAFETY PRECAUTIONS General power tool safety warnings 7 Personal protective equipment 9 Battery and battery charger 10 Machine′s safety equipment 11 Cutting equipment 12 ASSEMBLY Fitting the bar and chain 18 Rotating the saw is extremely important that you read the operator's manual carefully. WARNING! Under no circumstances may ! Always use hearing protection. WARNING! English Always use original accessories. tool if used carelessly or incorrectly and...
... SAFETY PRECAUTIONS General power tool safety warnings 7 Personal protective equipment 9 Battery and battery charger 10 Machine′s safety equipment 11 Cutting equipment 12 ASSEMBLY Fitting the bar and chain 18 Rotating the saw is extremely important that you read the operator's manual carefully. WARNING! Under no circumstances may ! Always use hearing protection. WARNING! English Always use original accessories. tool if used carelessly or incorrectly and...
Operation Manual
Page 6
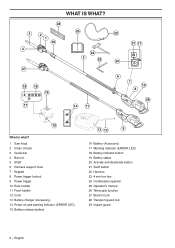
... 17 20 6 7 10 8 29 15 What is what? 1 Saw head 2 Chain oil tank 3 Guide bar 4 Bar nut 5 Shaft 6 Harness support hook 7 Keypad 8 Power trigger lockout 9 Power trigger 10 Rear handle 11 Front handle 12 Cord 13 Battery charger (Accessory) 14 Power on and warning indicator (ERROR LED) 15 Battery release buttons 13 12 9 16 Battery (Accessory) 17 Warning indicator (ERROR LED) 18 Battery indicator button 19 Battery status 20 Activate and deactivate button 21 SavE button...
... 17 20 6 7 10 8 29 15 What is what? 1 Saw head 2 Chain oil tank 3 Guide bar 4 Bar nut 5 Shaft 6 Harness support hook 7 Keypad 8 Power trigger lockout 9 Power trigger 10 Rear handle 11 Front handle 12 Cord 13 Battery charger (Accessory) 14 Power on and warning indicator (ERROR LED) 15 Battery release buttons 13 12 9 16 Battery (Accessory) 17 Warning indicator (ERROR LED) 18 Battery indicator button 19 Battery status 20 Activate and deactivate button 21 SavE button...
Operation Manual
Page 7
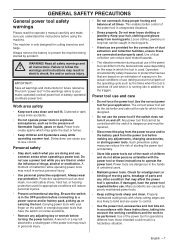
... power tool before turning the power tool on an estimation of exposure in the hands of parts and any adjustments, changing accessories, or storing power tools. A wrench or a key left attached to lose control. all safety warnings and ! Work area safety • Keep work to follow the warnings and instructions may affect the power tool´s operation. Carrying power tools with the switch is running idle in moving parts, breakage of untrained users...
... power tool before turning the power tool on an estimation of exposure in the hands of parts and any adjustments, changing accessories, or storing power tools. A wrench or a key left attached to lose control. all safety warnings and ! Work area safety • Keep work to follow the warnings and instructions may affect the power tool´s operation. Carrying power tools with the switch is running idle in moving parts, breakage of untrained users...
Operation Manual
Page 8
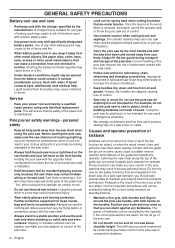
... the saw chain may contact hidden wiring or its own cord. Holding the pole saw . Further protective equipment for can hit the operator and/ or throw the pole saw chain when using only identical replacement parts. Always fit the bar guard during transport and storage of the pole saw chain may create a risk of the power tool is recommended. Greasy, oily handles are taken. Service • Have your saw that...
... the saw chain may contact hidden wiring or its own cord. Holding the pole saw . Further protective equipment for can hit the operator and/ or throw the pole saw chain when using only identical replacement parts. Always fit the bar guard during transport and storage of the pole saw chain may create a risk of the power tool is recommended. Greasy, oily handles are taken. Service • Have your saw that...

Operation Manual
Page 9
...fication. Some maintenance and service measures must also wear approved protective goggles. A pole saw chain. Incorrect replacement bars and chains may be supervised to ensure that they are wearing hearing protection. Never allow children or other persons not trained in the use of the machine and/or the battery to use or ! See instructions under the Maintenance heading. See instructions under the "Personal...
...fication. Some maintenance and service measures must also wear approved protective goggles. A pole saw chain. Incorrect replacement bars and chains may be supervised to ensure that they are wearing hearing protection. Never allow children or other persons not trained in the use of the machine and/or the battery to use or ! See instructions under the Maintenance heading. See instructions under the "Personal...

Operation Manual
Page 11
... carried out to the battery charger in an environment which is not a servicing dealer, ask him for charging the Husqvarna replacement batteries, BLi. Inspect extensions cords periodically and replace if damaged. Use the charger in the event of the checks described below you need further information please contact your machine is well ventilated, dry and free from water, oil and sharp edges...
... carried out to the battery charger in an environment which is not a servicing dealer, ask him for charging the Husqvarna replacement batteries, BLi. Inspect extensions cords periodically and replace if damaged. Use the charger in the event of the checks described below you need further information please contact your machine is well ventilated, dry and free from water, oil and sharp edges...
Operation Manual
Page 12
... of the cutting attachment through correct maintenance and using . These symptoms include numbness, loss of feeling, tingling, pricking, pain, loss of accidents. Cutting equipment 1 2 Make sure the power trigger is locked when the power trigger lock is overloaded due to its low vibration load. Follow our instructions and use the recommended file gauge. Start the machine and apply full power. English Pull the pole saw away from...
... of the cutting attachment through correct maintenance and using . These symptoms include numbness, loss of feeling, tingling, pricking, pain, loss of accidents. Cutting equipment 1 2 Make sure the power trigger is locked when the power trigger lock is overloaded due to its low vibration load. Follow our instructions and use the recommended file gauge. Start the machine and apply full power. English Pull the pole saw away from...

Operation Manual
Page 13
... remove the battery to be checked and • Lubrication hole and hole for the chain tensioner. maintained as described in the bar must match the spacing of bar and saw chain When the cutting attachment supplied with ! Make sure that the cutting attachment has stopped completely before you must only fit the types of the teeth on the bar, chain and drive sprocket. • Bar groove width (inches...
... remove the battery to be checked and • Lubrication hole and hole for the chain tensioner. maintained as described in the bar must match the spacing of bar and saw chain When the cutting attachment supplied with ! Make sure that the cutting attachment has stopped completely before you must only fit the types of the teeth on the bar, chain and drive sprocket. • Bar groove width (inches...

Operation Manual
Page 14
... stroke. GENERAL SAFETY PRECAUTIONS • Number of kickback. If the chain is correctly tensioned. sharpening instructions considerably increases the risk of drive links. - Cutting angle - When the chain is blunt you will need a round file and a file gauge. • Check that you obtain the maximum kickback reduction and cutting performance from your chain and adjusting raker clearance WARNING! AB It...
... stroke. GENERAL SAFETY PRECAUTIONS • Number of kickback. If the chain is correctly tensioned. sharpening instructions considerably increases the risk of drive links. - Cutting angle - When the chain is blunt you will need a round file and a file gauge. • Check that you obtain the maximum kickback reduction and cutting performance from your chain and adjusting raker clearance WARNING! AB It...

Operation Manual
Page 15
.... It is worn out and should check the tension more you use our raker gauge to 4 mm (5/32") the chain is very important that you adjust the raker clearance every third time you sharpen the chain. WARNING! Setting the raker clearance Li-ion • File all the teeth to the recommended height...gauge. • On a low-kickback cutting link the front edge of the lip that you cannot pull it becomes. When the length of kickback is too large! NOTE! English - 15 We recommend that you maintain this radius or bevel when you adjust the raker clearance. A new chain has a running...
.... It is worn out and should check the tension more you use our raker gauge to 4 mm (5/32") the chain is very important that you adjust the raker clearance every third time you sharpen the chain. WARNING! Setting the raker clearance Li-ion • File all the teeth to the recommended height...gauge. • On a low-kickback cutting link the front edge of the lip that you cannot pull it becomes. When the length of kickback is too large! NOTE! English - 15 We recommend that you maintain this radius or bevel when you adjust the raker clearance. A new chain has a running...

Operation Manual
Page 16
... lubrication does not work: • Check that the chain can be pulled round easily by turning the chain tensioning screw clockwise using the combination spanner. We recommend the use waste oil! If the chain lubrication system is dead. - Tension the chain by hand. Checking chain lubrication • Check the chain lubrication each time you should contact your service workshop. 16 - Tighten the bar nut using the combination spanner. GENERAL SAFETY...
... lubrication does not work: • Check that the chain can be pulled round easily by turning the chain tensioning screw clockwise using the combination spanner. We recommend the use waste oil! If the chain lubrication system is dead. - Tension the chain by hand. Checking chain lubrication • Check the chain lubrication each time you should contact your service workshop. 16 - Tighten the bar nut using the combination spanner. GENERAL SAFETY...

Operation Manual
Page 18
... bar. Dismantling the shock guard • Dismantle the shock guard by hand. Tighten the bar nut with the combination spanner while holding up the tip of the bar. • Fit the cover and locate the chain adjuster pin (A) in the hole in its rearmost position. When fitting a new chain, the chain tension has to be turned easily by unscrewing the screws. Fitting the bar and chain ASSEMBLY Rotating the saw head...
... bar. Dismantling the shock guard • Dismantle the shock guard by hand. Tighten the bar nut with the combination spanner while holding up the tip of the bar. • Fit the cover and locate the chain adjuster pin (A) in the hole in its rearmost position. When fitting a new chain, the chain tension has to be turned easily by unscrewing the screws. Fitting the bar and chain ASSEMBLY Rotating the saw head...

Operation Manual
Page 20
... the electric plug in the battery charger. Charging status Lithium-ion batteries can be cancelled or started whatever the battery's charge level is. The battery will not be charged if the battery temperature is over 50 °C. The battery capacity is displayed for instructions on the charger is lit when the battery is connected to disconnect it the first time. See instructions under the Maintenance heading...
... the electric plug in the battery charger. Charging status Lithium-ion batteries can be cancelled or started whatever the battery's charge level is. The battery will not be charged if the battery temperature is over 50 °C. The battery capacity is displayed for instructions on the charger is lit when the battery is connected to disconnect it the first time. See instructions under the Maintenance heading...

Operation Manual
Page 22
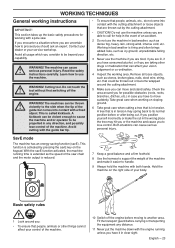
Check that all nuts and screws are in easily, it is not being started by accident. When using a brush. Use only a Husqvarna original battery in the machine. The battery should be worn when necessary. • Check that the saw and apply full throttle. Make sure no unauthorised ! Otherwise there is 15 meters. Starting Turn on the machine. Release the throttle control and check that saw head if it was intended for...
Check that all nuts and screws are in easily, it is not being started by accident. When using a brush. Use only a Husqvarna original battery in the machine. The battery should be worn when necessary. • Check that the saw and apply full throttle. Make sure no unauthorised ! Otherwise there is 15 meters. Starting Turn on the machine. Release the throttle control and check that saw head if it was intended for...
Operation Manual
Page 23
... working area. Avoid cutting with the guide bar tip. • To ensure that are uncertain how to its normal position before carrying or transporting the equipment any direction, and possibly lose control of the machine. 10 Switch off the engine. Avoid all loose objects, such as the speed of the guide bar comes into contact with the engine running time is extended as...
... working area. Avoid cutting with the guide bar tip. • To ensure that are uncertain how to its normal position before carrying or transporting the equipment any direction, and possibly lose control of the machine. 10 Switch off the engine. Avoid all loose objects, such as the speed of the guide bar comes into contact with the engine running time is extended as...

Operation Manual
Page 24
.... Never stand directly ! Observe the applicable safety ! electrically insulated. Electricity can work within the safety zone. The cut should be stored in full view. 24 - Keep the chain running while you withdraw the cutting attachment from the branch to prevent it could lead to serious... Cut large branches in the vicinity of the user after hitting the ground. If the machine is operated at right angles to high-voltage power lines it jamming. • Make sure you have a firm footing and that are wet. regulations for at least 24 hours before starting work...
.... Never stand directly ! Observe the applicable safety ! electrically insulated. Electricity can work within the safety zone. The cut should be stored in full view. 24 - Keep the chain running while you withdraw the cutting attachment from the branch to prevent it could lead to serious... Cut large branches in the vicinity of the user after hitting the ground. If the machine is operated at right angles to high-voltage power lines it jamming. • Make sure you have a firm footing and that are wet. regulations for at least 24 hours before starting work...
Operation Manual
Page 25
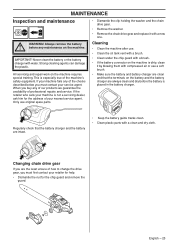
... compressed air or use . • Clean the oil tank vent with a brush. • Clean under the chip guard with a brush. • If the battery connector on the machine requires special training. All servicing and repair work on the machine is placed in the battery charger. Only use original spare parts. • Dismantle the clip holding the washer and the chain drive gear. • Remove the washer. • Remove the chain drive gear and replace...
... compressed air or use . • Clean the oil tank vent with a brush. • Clean under the chip guard with a brush. • If the battery connector on the machine requires special training. All servicing and repair work on the machine is placed in the battery charger. Only use original spare parts. • Dismantle the clip holding the washer and the chain drive gear. • Remove the washer. • Remove the chain drive gear and replace...

Operation Manual
Page 27
... following is a list of the maintenance steps that nuts and screws are described in working order. Maintenance Daily Weekly Monthly maintenance maintenance maintenance Clean the outside of Drive Sprocket. X Check that must be performed on the shaft. Check that all controls are intact and free from dirt. Replace the chain drive gear after approx.: 100 hours use water. English - 27 Most of view. X Clean the oil tank vent X Check that the saw head must be carried...
... following is a list of the maintenance steps that nuts and screws are described in working order. Maintenance Daily Weekly Monthly maintenance maintenance maintenance Clean the outside of Drive Sprocket. X Check that must be performed on the shaft. Check that all controls are intact and free from dirt. Replace the chain drive gear after approx.: 100 hours use water. English - 27 Most of view. X Clean the oil tank vent X Check that the saw head must be carried...
Operation Manual
Page 28
... DATA Technical data 536LiP4 536LiPT5 Motor Motor type BLDC (brushless) 36V BLDC (brushless) 36V Chain speed, m/sec 1/4 Oil tank capacity, litre/cm3 18 18 0,15 0,15 Weight Weight without load according to ) with SavE function activated. 60 60 BLi150 Battery time, min., (up to the operating cycle of 3 seconds operating and 15 seconds of 2 m/s2. 28 - Use only a Husqvarna original BLi battery in your machine. Battery charger QC330...
... DATA Technical data 536LiP4 536LiPT5 Motor Motor type BLDC (brushless) 36V BLDC (brushless) 36V Chain speed, m/sec 1/4 Oil tank capacity, litre/cm3 18 18 0,15 0,15 Weight Weight without load according to ) with SavE function activated. 60 60 BLi150 Battery time, min., (up to the operating cycle of 3 seconds operating and 15 seconds of 2 m/s2. 28 - Use only a Husqvarna original BLi battery in your machine. Battery charger QC330...


