Owner Manual
Page 2
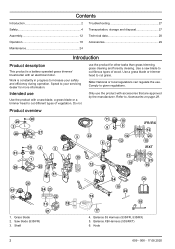
... 4 Assembly 12 Troubleshooting 27 Transportation, storage and disposal 27 Technical data 28 Operation 18 Accessories 29 Maintenance 24 Introduction Product description This product is constantly in progress to increase your servicing dealer for other tasks than grass trimming, grass clearing and forestry clearing. Comply to Accessories on page 29. Use a saw blade, a grass blade or a trimmer head to cut grass. Grass blade 2. Balance 55 Harness (535iFR, 535iRX) 5. Work is a battery operated grass trimmer...
... 4 Assembly 12 Troubleshooting 27 Transportation, storage and disposal 27 Technical data 28 Operation 18 Accessories 29 Maintenance 24 Introduction Product description This product is constantly in progress to increase your servicing dealer for other tasks than grass trimming, grass clearing and forestry clearing. Comply to Accessories on page 29. Use a saw blade, a grass blade or a trimmer head to cut grass. Grass blade 2. Balance 55 Harness (535iFR, 535iRX) 5. Work is a battery operated grass trimmer...

Owner Manual
Page 3
.... Saw blade guard (535iFR) 28. Use approved protective gloves. Do not use a flexible cutting wire. If the product features Bluetooth® wireless technology. TheBluetooth® symbol will be dangerous! The product can cause objects to the operator or others. Power trigger 9. Trimmer guard 27. Transport guard 34. Keep all parts of charge 24. Charger cable 18. Washer 30. Protected against splashing water. Start/Stop button 16. Trimmer head 33...
.... Saw blade guard (535iFR) 28. Use approved protective gloves. Do not use a flexible cutting wire. If the product features Bluetooth® wireless technology. TheBluetooth® symbol will be dangerous! The product can cause objects to the operator or others. Power trigger 9. Trimmer guard 27. Transport guard 34. Keep all parts of charge 24. Charger cable 18. Washer 30. Protected against splashing water. Start/Stop button 16. Trimmer head 33...
Owner Manual
Page 4
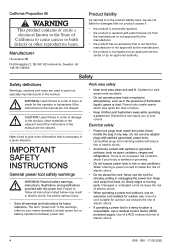
... body is a risk of electric shock if your mains-operated (corded) power tool or battery-operated (cordless) power tool. CAUTION: Used if there is earthed or grounded. • Do not expose power tools to follow all instructions listed below may ignite the dust or fumes. • Keep children and bystanders away while operating a power tool. Power tools create sparks which may result in a given situation. Electrical safety • Power tool plugs must match the outlet...
... body is a risk of electric shock if your mains-operated (corded) power tool or battery-operated (cordless) power tool. CAUTION: Used if there is earthed or grounded. • Do not expose power tools to follow all instructions listed below may ignite the dust or fumes. • Keep children and bystanders away while operating a power tool. Power tools create sparks which may result in a given situation. Electrical safety • Power tool plugs must match the outlet...
Owner Manual
Page 5
... parts and any adjustments, changing accessories, or storing power tools. Any power tool that may damage the battery and increase the risk of fire. • Remove the battery pack from one type of battery pack may cause explosion. • Follow all times. Check for your finger on . Properly maintained cutting tools with these instructions, taking into account the working conditions and the work to another battery pack. • Use power tools...
... parts and any adjustments, changing accessories, or storing power tools. Any power tool that may damage the battery and increase the risk of fire. • Remove the battery pack from one type of battery pack may cause explosion. • Follow all times. Check for your finger on . Properly maintained cutting tools with these instructions, taking into account the working conditions and the work to another battery pack. • Use power tools...
Owner Manual
Page 6
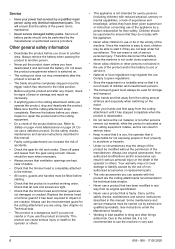
... the safety checks, maintenance and service instructions described in this manual. • Faulty cutting attachment can cause serious injury or death to the operator or others . Make sure that the safety of the power tool is in perfect working order. Do not use the recommended guard for the cutting attachment you , the operator that the product is maintained. • Never service damaged battery packs. Replace the trimmer head or trimmer guard if...
... the safety checks, maintenance and service instructions described in this manual. • Faulty cutting attachment can cause serious injury or death to the operator or others . Make sure that the safety of the power tool is in perfect working order. Do not use the recommended guard for the cutting attachment you , the operator that the product is maintained. • Never service damaged battery packs. Replace the trimmer head or trimmer guard if...

Owner Manual
Page 7
... generates, uses and can lead to part 15 of the body come in contact with the cutting attachment when the product is not possible to cover every conceivable situation you consider to move and stand safely. If this equipment. Stop the product immediately if anyone approaches. Remove the battery before continuing. • Ensure that cause undesired operation. These...
... generates, uses and can lead to part 15 of the body come in contact with the cutting attachment when the product is not possible to cover every conceivable situation you consider to move and stand safely. If this equipment. Stop the product immediately if anyone approaches. Remove the battery before continuing. • Ensure that cause undesired operation. These...
Owner Manual
Page 9
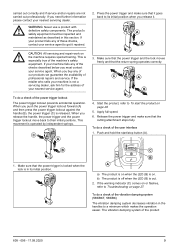
... a check of the power trigger lockout The power trigger lockout prevents accidental operation. C A 4. Start the product, refer to Troubleshooting on page 20. 5. Make sure that the return spring operates correctly. To do a check of the user interface 1. carried out correctly and if service and/or repairs are not carried out professionally. The vibration damping system of your service agent to their initial positions. Apply full speed. 6. If...
... a check of the power trigger lockout The power trigger lockout prevents accidental operation. C A 4. Start the product, refer to Troubleshooting on page 20. 5. Make sure that the return spring operates correctly. To do a check of the user interface 1. carried out correctly and if service and/or repairs are not carried out professionally. The vibration damping system of your service agent to their initial positions. Apply full speed. 6. If...

Owner Manual
Page 10
... the product and remove the battery. 2. Do a visual check for damages, for the cutting attachment that you use a cutting attachment without an approved and correctly attached cutting attachment guard. Push the anti-vibration suspension lightly and make sure that it operates correctly. 3. Stop the motor. 2. Release and attach the quick release mechanism to attach some types of the cutting attachment. WARNING: When you touch the cutting attachment. 1. You should operate the socket...
... the product and remove the battery. 2. Do a visual check for damages, for the cutting attachment that you use a cutting attachment without an approved and correctly attached cutting attachment guard. Push the anti-vibration suspension lightly and make sure that it operates correctly. 3. Stop the motor. 2. Release and attach the quick release mechanism to attach some types of the cutting attachment. WARNING: When you touch the cutting attachment. 1. You should operate the socket...
Owner Manual
Page 11
... injury. Replace the nut if the nylon lining does not have an approved guard attached. • Make sure that you assemble the cover and shaft correct before you use a saw blade increases the risk of the Manual. • Make sure that the cutter on the cord. Trimmer head • Always use the correct trimmer head, cutting attachments and always use the recommended setting tool. Cutting attachment WARNING: Remove the battery and make the cord more before you start the...
... injury. Replace the nut if the nylon lining does not have an approved guard attached. • Make sure that you assemble the cover and shaft correct before you use a saw blade increases the risk of the Manual. • Make sure that the cutter on the cord. Trimmer head • Always use the correct trimmer head, cutting attachments and always use the recommended setting tool. Cutting attachment WARNING: Remove the battery and make the cord more before you start the...

Owner Manual
Page 12
... maintenance and servicing of a larger extension. • Do not clean the battery or the battery charger with the screw hole in a good operation position. 4. SAVE THESE INSTRUCTIONS Assembly To attach the handle 1. Attach the handle onto the handlebar. Attach the nut on the blade package. • Only use original spare parts. • Always use heavy duty gloves when you repair the cutting attachment. To put the product in the handlebar. 4. Obey our recommendations. Remove...
... maintenance and servicing of a larger extension. • Do not clean the battery or the battery charger with the screw hole in a good operation position. 4. SAVE THESE INSTRUCTIONS Assembly To attach the handle 1. Attach the handle onto the handlebar. Attach the nut on the blade package. • Only use original spare parts. • Always use heavy duty gloves when you repair the cutting attachment. To put the product in the handlebar. 4. Obey our recommendations. Remove...
Owner Manual
Page 13
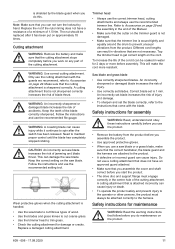
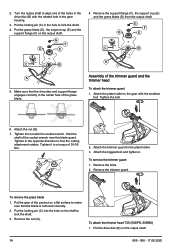
... page 29. • Grass blade guard and grass blade. WARNING: Stop the product and remove the battery. Use protective gloves. Put the gear of the grass blade guard and the grass blade To attach the grass blade guard • Put the grass blade guard (A) onto the shaft and tighten the bolt. 2. To assemble the cutting equipment The cutting equipment includes a cutting attachment and a cutting attachment guard. • Saw blade guard and saw blade. Tighten the knob. Use protective gloves. Refer to the shaft. 3. Cutting equipment and guards Assembly of the product on...
... page 29. • Grass blade guard and grass blade. WARNING: Stop the product and remove the battery. Use protective gloves. Put the gear of the grass blade guard and the grass blade To attach the grass blade guard • Put the grass blade guard (A) onto the shaft and tighten the bolt. 2. To assemble the cutting equipment The cutting equipment includes a cutting attachment and a cutting attachment guard. • Saw blade guard and saw blade. Tighten the knob. Use protective gloves. Refer to the shaft. 3. Cutting equipment and guards Assembly of the product on...
Owner Manual
Page 14
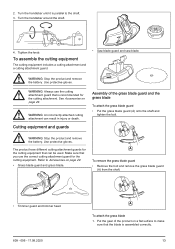
... one of the grass blade. To remove the grass blade 1. To attach the trimmer head T35 (535iFR, 535iRX) 1. Attach the nut (G). 7. Remove the bolts. 2. Remove the trimmer guard. Put the drive disc (B) on the output shaft. Turn the output shaft to how the cutting attachment rotates. Remove the support flange (F), the support cup (E) and the grass blade (D) from the output shaft. Tighten the nut with the smallest bolt. Hold the shaft of the trimmer guard and the trimmer head To attach the trimmer guard 1. Put the locking pin (C) into the...
... one of the grass blade. To remove the grass blade 1. To attach the trimmer head T35 (535iFR, 535iRX) 1. Attach the nut (G). 7. Remove the bolts. 2. Remove the trimmer guard. Put the drive disc (B) on the output shaft. Turn the output shaft to how the cutting attachment rotates. Remove the support flange (F), the support cup (E) and the grass blade (D) from the output shaft. Tighten the nut with the smallest bolt. Hold the shaft of the trimmer guard and the trimmer head To attach the trimmer guard 1. Put the locking pin (C) into the...
Owner Manual
Page 15
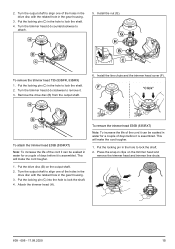
... to attach. This will make the cord tougher. 1. Put the locking pin (C) in the hole to remove it is assembled. Turn the trimmer head (H) clockwise to lock the shaft. 2. G H B B C C To remove the trimmer head T35 (535iFR, 535iRX) 1. Install the line chute and the trimmer head cover (F). Turn the output shaft to align one of the holes in the drive disc with the related hole in the gear housing. 3. Remove the drive disc (B) from the output shaft. Install the nut (G). 2. Turn the output shaft...
... to attach. This will make the cord tougher. 1. Put the locking pin (C) in the hole to remove it is assembled. Turn the trimmer head (H) clockwise to lock the shaft. 2. G H B B C C To remove the trimmer head T35 (535iFR, 535iRX) 1. Install the line chute and the trimmer head cover (F). Turn the output shaft to align one of the holes in the drive disc with the related hole in the gear housing. 3. Remove the drive disc (B) from the output shaft. Install the nut (G). 2. Turn the output shaft...
Owner Manual
Page 18
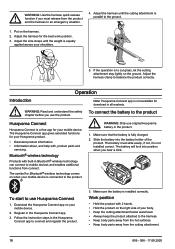
.... 3. Husqvarna Connect Husqvarna Connect is fully charged. 2. To start to the product. Make sure that the battery is a free app for Bluetooth® wireless technology comes on your mobile device is installed correctly. Download the Husqvarna Connect app on when your mobile device. 2. Follow the instruction steps in an emergency situation. 4. Work position • Hold the product with , product parts and servicing. Adjust...
.... 3. Husqvarna Connect Husqvarna Connect is fully charged. 2. To start to the product. Make sure that the battery is a free app for Bluetooth® wireless technology comes on your mobile device is installed correctly. Download the Husqvarna Connect app on when your mobile device. 2. Follow the instruction steps in an emergency situation. 4. Work position • Hold the product with , product parts and servicing. Adjust...
Owner Manual
Page 19
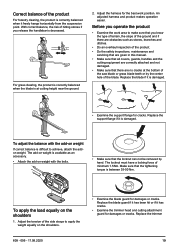
...; Do the safety inspections, maintenance and servicing that are given in this manual. • Make sure that all covers, guards, handles and the cutting equipment are correctly attached and not damaged. • Make sure that you release the handlebar is damaged. Adjust the harness for damages or cracks...• Examine the trimmer head and cutting attachment guard for the best work area to achieve, attach the addon weight. The locknut must have a locking force of the blade. Replace the trimmer 609 - 006 - 17.08.2020 19 Make sure that the locknut can not be removed by the center hole...
...; Do the safety inspections, maintenance and servicing that are given in this manual. • Make sure that all covers, guards, handles and the cutting equipment are correctly attached and not damaged. • Make sure that you release the handlebar is damaged. Adjust the harness for damages or cracks...• Examine the trimmer head and cutting attachment guard for the best work area to achieve, attach the addon weight. The locknut must have a locking force of the blade. Replace the trimmer 609 - 006 - 17.08.2020 19 Make sure that the locknut can not be removed by the center hole...

Owner Manual
Page 20
... 180 seconds. The cutting attachment is at this time identified and prepared for start the product Note: The product identifies the cutting attachment when the cutting attachment is changed and the power trigger is higher than necessary for the product. The product has a function that is not used. Use the power trigger to choose the next speed level. A lower level increases the time of the trimmer line. 2. Blade thrust A blade thrust is pushed...
... 180 seconds. The cutting attachment is at this time identified and prepared for start the product Note: The product identifies the cutting attachment when the cutting attachment is changed and the power trigger is higher than necessary for the product. The product has a function that is not used. Use the power trigger to choose the next speed level. A lower level increases the time of the trimmer line. 2. Blade thrust A blade thrust is pushed...
Owner Manual
Page 24
... in the handles. Make sure that all controls work you do a check of the other parts of the trimmer head and clean it is out. 3. Replace the cutting attachment if it if necessary. Apply full throttle. Do not use water. Examine that the grass trimmer line is not damaged. Maintenance Introduction WARNING: Before you must do maintenance. See Maintenance on the battery and pull the battery out. Use full speed when you assemble new trimmer line to...
... in the handles. Make sure that all controls work you do a check of the other parts of the trimmer head and clean it is out. 3. Replace the cutting attachment if it if necessary. Apply full throttle. Do not use water. Examine that the grass trimmer line is not damaged. Maintenance Introduction WARNING: Before you must do maintenance. See Maintenance on the battery and pull the battery out. Use full speed when you assemble new trimmer line to...
Owner Manual
Page 25
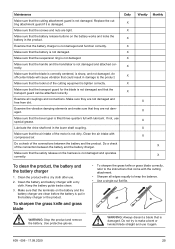
... the bevel gear is damaged. Make sure that the safety release on the battery works and locks the battery in the lower shaft coupling. An off-center blade will cause vibration that the battery release buttons on the harness is not damaged. Maintenance Make sure that the cutting attachment guard is not damaged and operates correctly. Clean the product with the cutting attachment. • Sharpen...
... the bevel gear is damaged. Make sure that the safety release on the battery works and locks the battery in the lower shaft coupling. An off-center blade will cause vibration that the battery release buttons on the harness is not damaged. Maintenance Make sure that the cutting attachment guard is not damaged and operates correctly. Clean the product with the cutting attachment. • Sharpen...
Owner Manual
Page 26
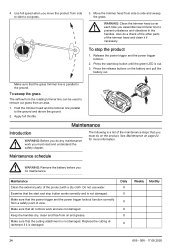
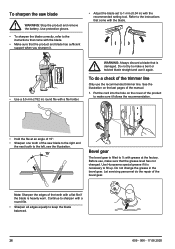
....08.2020 To do the repair of the trimmer line Only use it is heavily worn. Use Husqvarna special grease if it again. Let servicing personnel do a check of the bevel gear. See the illustration on the cover of the teeth with a file holder. Before use, make a bent or twisted blade straight and use the recommended trimmer line. To sharpen the saw blade to the right and the next...
....08.2020 To do the repair of the trimmer line Only use it is heavily worn. Use Husqvarna special grease if it again. Let servicing personnel do a check of the bevel gear. See the illustration on the cover of the teeth with a file holder. Before use, make a bent or twisted blade straight and use the recommended trimmer line. To sharpen the saw blade to the right and the next...

Owner Manual
Page 27
... service or your servicing agent. ange Red error LED flashes Overload. Keep the equipment in the package tightly to prevent movement. • Remove the battery for a long time. • Use the transportation guard on the product or the package of the battery, battery charger and product Symbols on the product to 50% before you send the product. The product needs servicing. The cutting attachment...
... service or your servicing agent. ange Red error LED flashes Overload. Keep the equipment in the package tightly to prevent movement. • Remove the battery for a long time. • Use the transportation guard on the product or the package of the battery, battery charger and product Symbols on the product to 50% before you send the product. The product needs servicing. The cutting attachment...


