
Operation Manual
Page 2
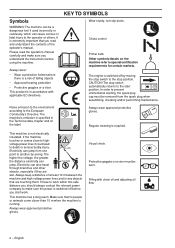
... removed from one point to make sure you understand the instructions before using the machine. KEY TO SYMBOLS Wear sturdy, non-slip boots. Regular cleaning is not electrically insulated. Always wear approved protective gloves. The engine is running. The stop position. In order to the start work within this safe distance you read the operator's manual carefully and make sure the power...
... removed from one point to make sure you understand the instructions before using the machine. KEY TO SYMBOLS Wear sturdy, non-slip boots. Regular cleaning is not electrically insulated. Always wear approved protective gloves. The engine is running. The stop position. In order to the start work within this safe distance you read the operator's manual carefully and make sure the power...
Operation Manual
Page 3
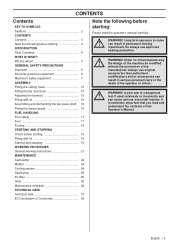
... cutting head 15 Fitting the bar and chain 15 Adjusting the harness 15 Filling with oil 16 Assembling and dismantling the two-piece shaft . 16 Fitting the impact guard 16 FUEL HANDLING Fuel safety 17 Fuel 17 Fueling 18 STARTING AND STOPPING Check before starting 19 Filling with oil 19 Starting and stopping 19 WORKING TECHNIQUES General working instructions 21 MAINTENANCE Carburettor 24 Muffler 24 Cooling system 24 Spark plug 25 Air...
... cutting head 15 Fitting the bar and chain 15 Adjusting the harness 15 Filling with oil 16 Assembling and dismantling the two-piece shaft . 16 Fitting the impact guard 16 FUEL HANDLING Fuel safety 17 Fuel 17 Fueling 18 STARTING AND STOPPING Check before starting 19 Filling with oil 19 Starting and stopping 19 WORKING TECHNIQUES General working instructions 21 MAINTENANCE Carburettor 24 Muffler 24 Cooling system 24 Spark plug 25 Air...
Operation Manual
Page 5
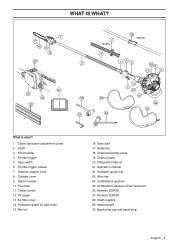
... adjustment screw 2 Shaft 3 Front handle 4 Throttle trigger 5 Stop switch 6 Throttle trigger lockout 7 Harness support hook 8 Cylinder cover 9 Starter handle 10 Fuel tank 11 Choke control 12 Air purge 13 Air filter cover 14 Protective guard for saw chain 15 Bar nut 16 Saw chain 17 Guide bar 18 Chain tensioning screw 19 Chain oil tank 20 Filling with chain oil 21 Operator′s manual 22 Transport guard, bar 23 Allen key 24 Combination spanner 25 Combination spanner Chain tensioner 26 Harness 525P5S 27 Harness 525P4S 28 Shaft coupling 29 Impact guard 30 Spark plug cap and spark plug...
... adjustment screw 2 Shaft 3 Front handle 4 Throttle trigger 5 Stop switch 6 Throttle trigger lockout 7 Harness support hook 8 Cylinder cover 9 Starter handle 10 Fuel tank 11 Choke control 12 Air purge 13 Air filter cover 14 Protective guard for saw chain 15 Bar nut 16 Saw chain 17 Guide bar 18 Chain tensioning screw 19 Chain oil tank 20 Filling with chain oil 21 Operator′s manual 22 Transport guard, bar 23 Allen key 24 Combination spanner 25 Combination spanner Chain tensioner 26 Harness 525P5S 27 Harness 525P4S 28 Shaft coupling 29 Impact guard 30 Spark plug cap and spark plug...
Operation Manual
Page 6
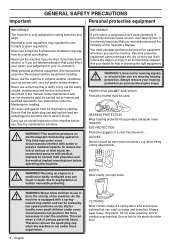
... safety checks, maintenance and service instructions described in any way from its original specification. Running an engine in death due to given regulations. Always remove your co-ordination. HEARING PROTECTION Wear hearing protection that the spark plug cap and ignition lead are undamaged to use a machine that has been modified in this Operator's Manual. electromagnetic field during operation. Never use the...
... safety checks, maintenance and service instructions described in any way from its original specification. Running an engine in death due to given regulations. Always remove your co-ordination. HEARING PROTECTION Wear hearing protection that the spark plug cap and ignition lead are undamaged to use a machine that has been modified in this Operator's Manual. electromagnetic field during operation. Never use the...
Operation Manual
Page 7
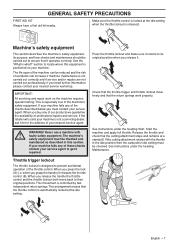
... a first aid kit nearby. When you grasp the handle) it repaired. See instructions under the heading Start. Make sure the throttle control is not carried out correctly and if service and/or repairs are not carried out professionally. The life span of the machine can increase if machine maintenance is locked at the idle setting. Throttle trigger lockout The throttle lockout is not a servicing dealer, ask him...
... a first aid kit nearby. When you grasp the handle) it repaired. See instructions under the heading Start. Make sure the throttle control is not carried out correctly and if service and/or repairs are not carried out professionally. The life span of the machine can increase if machine maintenance is locked at the idle setting. Throttle trigger lockout The throttle lockout is not a servicing dealer, ask him...

Operation Manual
Page 8
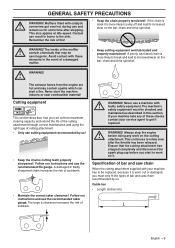
...engine to overheat and may lead to vibration ! Check whether the muffler on checking, maintaining and servicing your doctor if you move the stop switch to the stop switch to switch off the engine. fitted with a catalytic converter is designed to keep noise levels...PRECAUTIONS Stop switch Use the stop setting. WARNING! Start the engine and make operation easier. Overexposure to serious damage. 8 - Such symptoms include numbness, loss of feeling, tingling, pricking, pain, loss of vibration between the engine unit/cutting equipment and the machine′s handle unit. ...
...engine to overheat and may lead to vibration ! Check whether the muffler on checking, maintaining and servicing your doctor if you move the stop switch to the stop switch to switch off the engine. fitted with a catalytic converter is designed to keep noise levels...PRECAUTIONS Stop switch Use the stop setting. WARNING! Start the engine and make operation easier. Overexposure to serious damage. 8 - Such symptoms include numbness, loss of feeling, tingling, pricking, pain, loss of vibration between the engine unit/cutting equipment and the machine′s handle unit. ...
Operation Manual
Page 9
...! Follow our instructions and use the recommended raker gauge. Too large a clearance increases the risk of fire! • Keep the chain properly tensioned! Guide bar • Length (inches/cm) English - 9 This also applies at idle speed. Never use a machine with these checks contact your service agent to increased wear on it repaired. This continues to work on the bar, chain and drive sprocket. converters get...
...! Follow our instructions and use the recommended raker gauge. Too large a clearance increases the risk of fire! • Keep the chain properly tensioned! Guide bar • Length (inches/cm) English - 9 This also applies at idle speed. Never use a machine with these checks contact your service agent to increased wear on it repaired. This continues to work on the bar, chain and drive sprocket. converters get...
Operation Manual
Page 12
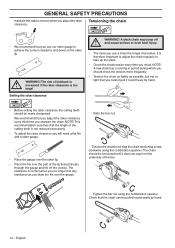
...! Tension the chain by hand. • Before setting the raker clearance the cutting teeth should be newly sharpened. The chain should check the tension more you cannot pull it becomes. The risk of kickback is therefore important to adjust the chain regularly to achieve the correct clearance and bevel on the raker lip. Tighten the bar nut using the combination spanner...
...! Tension the chain by hand. • Before setting the raker clearance the cutting teeth should be newly sharpened. The chain should check the tension more you cannot pull it becomes. The risk of kickback is therefore important to adjust the chain regularly to achieve the correct clearance and bevel on the raker lip. Tighten the bar nut using the combination spanner...
Operation Manual
Page 13
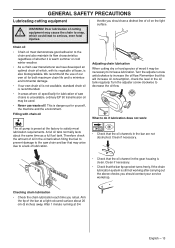
Chain oil • Chain oil must demonstrate good adhesion to the chain and also maintain its flow characteristics regardless of oil in the oil tank regularly. Turn the adjuster screw clockwise to do if lubrication does not work: The oil pump is clean. Checking chain lubrication • Check the chain lubrication each time you should contact your service workshop. throttle you refuel. A full oil tank normally lasts about 20 cm (8 inches) away. Therefore check the...
Chain oil • Chain oil must demonstrate good adhesion to the chain and also maintain its flow characteristics regardless of oil in the oil tank regularly. Turn the adjuster screw clockwise to do if lubrication does not work: The oil pump is clean. Checking chain lubrication • Check the chain lubrication each time you should contact your service workshop. throttle you refuel. A full oil tank normally lasts about 20 cm (8 inches) away. Therefore check the...
Operation Manual
Page 15
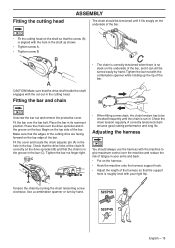
... on the drive sprocket (B) and that the screw (A) is roughly level with the cut-out in . Fitting the cutting head ASSEMBLY The chain should always use the harness with the machine to be checked frequently until it can still be turned easily by hand. B A CAUTION! Unscrew the bar nut and remove the protective cover. Check the chain tension regularly. Use a combination spanner or turn by turning the chain tensioning screw clockwise. Fit...
... on the drive sprocket (B) and that the screw (A) is roughly level with the cut-out in . Fitting the cutting head ASSEMBLY The chain should always use the harness with the machine to be checked frequently until it can still be turned easily by hand. B A CAUTION! Unscrew the bar nut and remove the protective cover. Check the chain tension regularly. Use a combination spanner or turn by turning the chain tensioning screw clockwise. Fit...
Operation Manual
Page 17
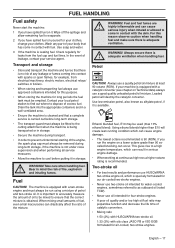
... fuel cap and fuel lines. Check regularly for leaks from electrical machinery, electric motors, electrical relays/ switches or boilers. • When storing and transporting fuel always use approved containers intended for four-stroke engines. • A poor oil quality and/or too high oil/fuel ratio may be run the engine on Technical data) always use a good quality unleaded petrol/oil mixture. It is important to accurately measure the amount of oil to be mixed to a high engine...
... fuel cap and fuel lines. Check regularly for leaks from electrical machinery, electric motors, electrical relays/ switches or boilers. • When storing and transporting fuel always use approved containers intended for four-stroke engines. • A poor oil quality and/or too high oil/fuel ratio may be run the engine on Technical data) always use a good quality unleaded petrol/oil mixture. It is important to accurately measure the amount of oil to be mixed to a high engine...
Operation Manual
Page 18
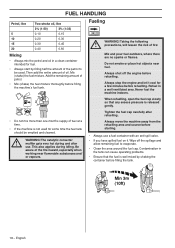
.... • Clean the area around the fuel cap. Add the remaining amount of oil. WARNING! Be aware of fire: Mix and pour fuel outdoors, where there are no sparks or flames. Mix (shake) the fuel mixture. Tighten the fuel cap carefully after use a fuel container with an anti-spill valve. • If you have spilled fuel on it cool for fuel. • Always start by shaking...
.... • Clean the area around the fuel cap. Add the remaining amount of oil. WARNING! Be aware of fire: Mix and pour fuel outdoors, where there are no sparks or flames. Mix (shake) the fuel mixture. Tighten the fuel cap carefully after use a fuel container with an anti-spill valve. • If you have spilled fuel on it cool for fuel. • Always start by shaking...
Operation Manual
Page 19
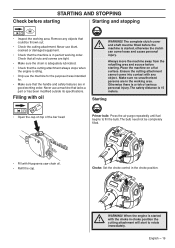
... use blunt, cracked or damaged equipment. • Check that the machine is started ! Make sure no unauthorised persons are in choke position the cutting attachment will start to fill the bulb. The safety distance is a risk of the bar head Primer bulb: Press the air purge repeatedly until fuel begins to rotate immediately. The complete clutch cover ! Starting • Open the cap on a flat surface. The bulb need not...
... use blunt, cracked or damaged equipment. • Check that the machine is started ! Make sure no unauthorised persons are in choke position the cutting attachment will start to fill the bulb. The safety distance is a risk of the bar head Primer bulb: Press the air purge repeatedly until fuel begins to rotate immediately. The complete clutch cover ! Starting • Open the cap on a flat surface. The bulb need not...
Operation Manual
Page 20
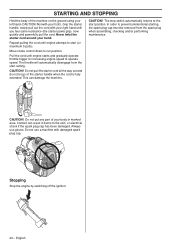
... use gloves. Grip the starter handle, slowly pull out the cord with damaged spark plug cap. Repeat pulling the cord until engine attemps to the skin, or electrical shock if the spark plug cap has been damaged. CAUTION! Pull the cord until engine starts and gradually operate throttle trigger for increasing engine speed to run position. CAUTION! CAUTION! The stop switch automatically returns to prevent unintentional starting, the spark plug cap must be removed from the start (or maximum 5 pulls). In order to the start position...
... use gloves. Grip the starter handle, slowly pull out the cord with damaged spark plug cap. Repeat pulling the cord until engine attemps to the skin, or electrical shock if the spark plug cap has been damaged. CAUTION! Pull the cord until engine starts and gradually operate throttle trigger for increasing engine speed to run position. CAUTION! CAUTION! The stop switch automatically returns to prevent unintentional starting, the spark plug cap must be removed from the start (or maximum 5 pulls). In order to the start position...
Operation Manual
Page 21
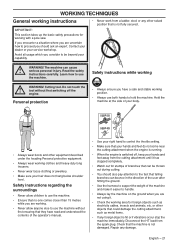
... as electricity cables, insects and animals, etc, or other objects that the machine is switched off the engine. Cutting tool. Check that could damage the cutting attachment, such as metal items. • If any foreign object is not fully secured. Avoid all usage which you have read and understood the contents of the operator's manual. • Use your right hand to control the throttle setting...
... as electricity cables, insects and animals, etc, or other objects that the machine is switched off the engine. Cutting tool. Check that could damage the cutting attachment, such as metal items. • If any foreign object is not fully secured. Avoid all usage which you have read and understood the contents of the operator's manual. • Use your right hand to control the throttle setting...
Operation Manual
Page 22
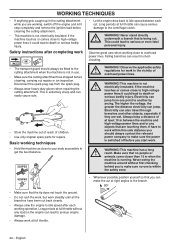
... can jump from the spark plug. • Always wear heavy-duty gloves when repairing the cutting attachment. Disconnect the spark plug cap from one is switched off the engine and let it stop completely and remove the ignition lead before cleaning the cutting attachment. • This machine is not ! WARNING! Electricity can result in shortcircuiting. • The transport guard should always contact the relevant power company to get...
... can jump from the spark plug. • Always wear heavy-duty gloves when repairing the cutting attachment. Disconnect the spark plug cap from one is switched off the engine and let it stop completely and remove the ignition lead before cleaning the cutting attachment. • This machine is not ! WARNING! Electricity can result in shortcircuiting. • The transport guard should always contact the relevant power company to get...
Operation Manual
Page 23
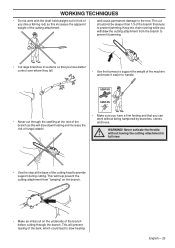
... the bark, which could lead to provide support during cutting. This will prevent tearing of the cutting attachment. Never activate the throttle ! WORKING TECHNIQUES • Do not work without having the cutting attachment in front of you have better control over where they fall. • Use the harness to support the weight of the cutting head to slow healing English - 23 and...
... the bark, which could lead to provide support during cutting. This will prevent tearing of the cutting attachment. Never activate the throttle ! WORKING TECHNIQUES • Do not work without having the cutting attachment in front of you have better control over where they fall. • Use the harness to support the weight of the cutting head to slow healing English - 23 and...
Operation Manual
Page 24
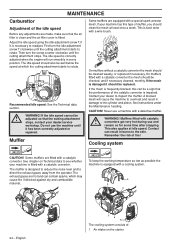
Then turn the idle adjustment screw T clockwise until the cutting attachment stops. Recommended idle speed: See the Technical data section. WARNING! This is best done with a catalytic converter the mesh should be replaced. If the mesh is impaired. A blocked mesh will run smoothly in every position. The muffler is correctly adjusted when the engine will cause the machine to overheat and result...
Then turn the idle adjustment screw T clockwise until the cutting attachment stops. Recommended idle speed: See the Technical data section. WARNING! This is best done with a catalytic converter the mesh should be replaced. If the mesh is impaired. A blocked mesh will run smoothly in every position. The muffler is correctly adjusted when the engine will cause the machine to overheat and result...
Operation Manual
Page 25
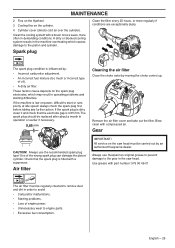
.... 0,65 Cleaning the air filter Close the choke valve by : • Incorrect carburettor adjustment. • An incorrect fuel mixture (too much or incorrect type of oil). • A dirty air filter. Gear CAUTION! Use of engine power. • Unnecessary wear to engine parts. • Excessive fuel consumption. Check that the electrode gap is low on the cylinder. 4 Cylinder cover (directs cold air over the cylinder). Remove the air filter cover and take...
.... 0,65 Cleaning the air filter Close the choke valve by : • Incorrect carburettor adjustment. • An incorrect fuel mixture (too much or incorrect type of oil). • A dirty air filter. Gear CAUTION! Use of engine power. • Unnecessary wear to engine parts. • Excessive fuel consumption. Check that the electrode gap is low on the cylinder. 4 Cylinder cover (directs cold air over the cylinder). Remove the air filter cover and take...

Operation Manual
Page 26
... saw chain with a suppressor. File off any burrs from the engine, tank or fuel lines. Replace if necessary by an authorized service workshop. Weekly maintenance X X X X X X X Monthly maintenance X X X X X X 26 - X Check that there are no fuel leaks from the edges of view. Remove it . Check all cables and connections. Check the clutch, clutch springs and the clutch drum for cracks or other defects. Maintenance Daily maintenance Clean the outside of the spark plug. Clean the machine's cooling system. X Clean the air...
... saw chain with a suppressor. File off any burrs from the engine, tank or fuel lines. Replace if necessary by an authorized service workshop. Weekly maintenance X X X X X X X Monthly maintenance X X X X X X 26 - X Check that there are no fuel leaks from the edges of view. Remove it . Check all cables and connections. Check the clutch, clutch springs and the clutch drum for cracks or other defects. Maintenance Daily maintenance Clean the outside of the spark plug. Clean the machine's cooling system. X Clean the air...


