
Parts Manual
Page 5
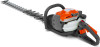
CYLINDER COVER Ref Part No Description 1 590 04 99-01 CYLINDER COVER 2 504 08 80-01 SCREW ITXSCM 3 597 02 06-01 HEAT PROTECTOR 522 HDR60 S, 522 HDR75 S Remark QTY KIT 1 23 1
CYLINDER COVER Ref Part No Description 1 590 04 99-01 CYLINDER COVER 2 504 08 80-01 SCREW ITXSCM 3 597 02 06-01 HEAT PROTECTOR 522 HDR60 S, 522 HDR75 S Remark QTY KIT 1 23 1

Parts Manual
Page 17
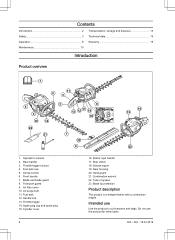
CRANKCASE Ref Part No Description 1 597 02 36-01 CRANKCASE ASSY 2 525 63 73-01 SEALING RING 3 525 82 50-01 SCREW ITXSCM 4 525 72 84-01 BALL BEARING 5 597 02 10-01 GASKET KIT 522 HDR60 S, 522 HDR75 S Remark QTY KIT 1 21 31 21 1
CRANKCASE Ref Part No Description 1 597 02 36-01 CRANKCASE ASSY 2 525 63 73-01 SEALING RING 3 525 82 50-01 SCREW ITXSCM 4 525 72 84-01 BALL BEARING 5 597 02 10-01 GASKET KIT 522 HDR60 S, 522 HDR75 S Remark QTY KIT 1 21 31 21 1

Parts Manual
Page 19
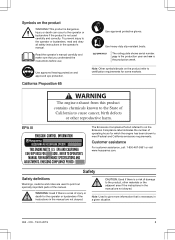
CRANKSHAFT Ref Part No Description 1 577 67 00-02 CRANKSHAFT KIT 2 525 63 73-01 SEALING RING 3 525 72 84-01 BALL BEARING 4 597 29 22-01 BEARING KIT 522 HDR60 S, 522 HDR75 S Remark QTY KIT 1 21 21 11
CRANKSHAFT Ref Part No Description 1 577 67 00-02 CRANKSHAFT KIT 2 525 63 73-01 SEALING RING 3 525 72 84-01 BALL BEARING 4 597 29 22-01 BEARING KIT 522 HDR60 S, 522 HDR75 S Remark QTY KIT 1 21 21 11

Parts Manual
Page 21
... Part No Description 1 537 41 90-01 SWITCH 2 574 48 88-06 SHORT CIRCUIT CABLE 3 597 02 40-01 REAR HANDLE 4 580 27 68-01 THROTTLE LOCKOUT 5 590 05 76-01 THROTTLE CONTROL 6 590 68 66-01 SPRING 7 590 05 77-01 LOCKING BUTTON 8 504 08 98-02 RECOIL SPRING 9 575 23 20-02 O-RING 10 573 92 58-01 SCREW... ITXSCFT 11 575 57 21-02 THROTTLE CABLE ASSY 12 525 75 51-01 SCREW ITXSCFM 13 590 64 77-01 SPRING 14 597 02 41-01 FRONT HANDLE ASSY 15 521 51 81-01 SCREW 16 591 15 69-01 PROTECTION 522 HDR60 S, 522 HDR75 S Remark QTY KIT 13 13 1 13 13...
... Part No Description 1 537 41 90-01 SWITCH 2 574 48 88-06 SHORT CIRCUIT CABLE 3 597 02 40-01 REAR HANDLE 4 580 27 68-01 THROTTLE LOCKOUT 5 590 05 76-01 THROTTLE CONTROL 6 590 68 66-01 SPRING 7 590 05 77-01 LOCKING BUTTON 8 504 08 98-02 RECOIL SPRING 9 575 23 20-02 O-RING 10 573 92 58-01 SCREW... ITXSCFT 11 575 57 21-02 THROTTLE CABLE ASSY 12 525 75 51-01 SCREW ITXSCFM 13 590 64 77-01 SPRING 14 597 02 41-01 FRONT HANDLE ASSY 15 521 51 81-01 SCREW 16 591 15 69-01 PROTECTION 522 HDR60 S, 522 HDR75 S Remark QTY KIT 13 13 1 13 13...

Parts Manual
Page 25
CUTTING EQUIPMENT Ref Part No Description 1 598 77 60-01 PROTECTOR BAR 2 592 75 13-01 NUT 2 592 75 13-01 NUT 3 592 84 87-01 BAR PLATE 4 590 32 71-01 GUIDE BAR 4 590 32 71-02 GUIDE BAR 5 590 32 75-01 WEAR PLATE 5 590 32 76-01 WEAR PLATE 6 597 02 19-01 BLADE KIT 6 597 02 21-01 BLADE KIT 7 592...
CUTTING EQUIPMENT Ref Part No Description 1 598 77 60-01 PROTECTOR BAR 2 592 75 13-01 NUT 2 592 75 13-01 NUT 3 592 84 87-01 BAR PLATE 4 590 32 71-01 GUIDE BAR 4 590 32 71-02 GUIDE BAR 5 590 32 75-01 WEAR PLATE 5 590 32 76-01 WEAR PLATE 6 597 02 19-01 BLADE KIT 6 597 02 21-01 BLADE KIT 7 592...
Owner Manual
Page 2
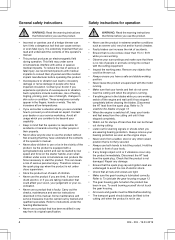
...12 19 18 7 23 8 16 15 20 1. Front handle 7. Transport guard 9. Air purge bulb 11. Handle lock 13. Grease nipple 19. Operator's manual 2. Fuel tank 12. Throttle trigger lockout 4. Fuel tank cap 5. Choke control 6. Air filter cover 10. Spark plug cap and spark plug 15. Blade tip protection Product description The product is a hedge trimmer with a combustion engine. Starter rope handle 17. Hand guard 21. Tube of grease 23. Cylinder cover 2 16. Throttle trigger 14. Stop switch 18. Rear handle 3. Intended use the product for other tasks. 904 - 003...
...12 19 18 7 23 8 16 15 20 1. Front handle 7. Transport guard 9. Air purge bulb 11. Handle lock 13. Grease nipple 19. Operator's manual 2. Fuel tank 12. Throttle trigger lockout 4. Fuel tank cap 5. Choke control 6. Air filter cover 10. Spark plug cap and spark plug 15. Blade tip protection Product description The product is a hedge trimmer with a combustion engine. Starter rope handle 17. Hand guard 21. Tube of grease 23. Cylinder cover 2 16. Throttle trigger 14. Stop switch 18. Rear handle 3. Intended use the product for other tasks. 904 - 003...
Owner Manual
Page 3
...www.husqvarna.com. This product is the production week. Read the operator's manual carefully and make sure that is a risk of damage to meet Federal and California emissions requirements. yyyywwxxxx The rating plate shows serial number....parts of operating hours for the operator or bystanders if the instructions in a given situation. 904 - 003 - 19.03.2019 3 California Proposition 65 Use approved protective gloves. Safety Safety definitions Warnings, cautions and notes are not obeyed. Symbols on the Emission Compliance label indicates the number of the manual. Use...
...www.husqvarna.com. This product is the production week. Read the operator's manual carefully and make sure that is a risk of damage to meet Federal and California emissions requirements. yyyywwxxxx The rating plate shows serial number....parts of operating hours for the operator or bystanders if the instructions in a given situation. 904 - 003 - 19.03.2019 3 California Proposition 65 Use approved protective gloves. Safety Safety definitions Warnings, cautions and notes are not obeyed. Symbols on the Emission Compliance label indicates the number of the manual. Use...
Owner Manual
Page 4
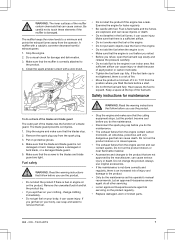
... not touch the gear housing. • All covers and guards must be started by trained and qualified specialists. This field may under some circumstances interfere with the motor running . • If anything jams in the blades while you are working, switch off , keep your service workshop. Therefore remove the spark plug cap when the product is not under the heading Maintenance. • Never use a product that has...
... not touch the gear housing. • All covers and guards must be started by trained and qualified specialists. This field may under some circumstances interfere with the motor running . • If anything jams in the blades while you are working, switch off , keep your service workshop. Therefore remove the spark plug cap when the product is not under the heading Maintenance. • Never use a product that has...
Owner Manual
Page 5
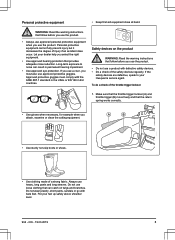
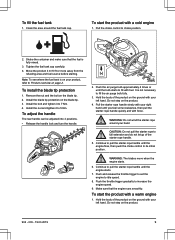
.... • Use clothing made of the throttle trigger lockout 1. Put your Husqvarna service agent. Let your dealer help you select the right equipment. • Use approved hearing protection that the return spring works correctly. • Use gloves when necessary, for example when you use a product with bare feet. Long-term exposure to your hair up safely above shoulder level. 904...
.... • Use clothing made of the throttle trigger lockout 1. Put your Husqvarna service agent. Let your dealer help you select the right equipment. • Use approved hearing protection that the return spring works correctly. • Use gloves when necessary, for example when you use a product with bare feet. Long-term exposure to your hair up safely above shoulder level. 904...
Owner Manual
Page 6
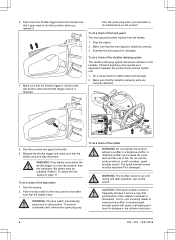
... the throttle trigger is released. WARNING: The stop switch automatically goes back to examine the muffler. Turn to your servicing dealer to start , remove the spark plug cap To do a check of fire. Push down the throttle trigger lockout and make sure that the vibration damping units are correctly attached. 4. from the blades. 1. Make sure that the blades stop switch to its initial position when you assemble or do maintenance on...
... the throttle trigger is released. WARNING: The stop switch automatically goes back to examine the muffler. Turn to your servicing dealer to start , remove the spark plug cap To do a check of fire. Push down the throttle trigger lockout and make sure that the vibration damping units are correctly attached. 4. from the blades. 1. Make sure that the blades stop switch to its initial position when you assemble or do maintenance on...
Owner Manual
Page 7
... replace a damaged or bent blade, or a damaged blade guard. 5. If you filled the tank before you do the maintenance as this operator's manual recommends. WARNING: Read the warning instructions that follow before a start the product if the engine has a leak. Let the product become cool before you do the maintenance. • Disconnect the spark plug cap before you refuel, open the fuel tank cap slowly and release the pressure...
... replace a damaged or bent blade, or a damaged blade guard. 5. If you filled the tank before you do the maintenance as this operator's manual recommends. WARNING: Read the warning instructions that follow before a start the product if the engine has a leak. Let the product become cool before you do the maintenance. • Disconnect the spark plug cap before you refuel, open the fuel tank cap slowly and release the pressure...
Owner Manual
Page 8
... use Husqvarna two-stroke oil. • If Husqvarna two-stroke oil is lower with a maximum of a higher octane grade for air-cooled engines. Do not use gasoline of 10% ethanol contents. Add the remaining quantity of oil. 3. Speak to your servicing dealer to regular fuel, which causes engine damages. • We recommend that you get the correct mixture. Shake the fuel mixture. 4. CAUTION: Do not mix fuel...
... use Husqvarna two-stroke oil. • If Husqvarna two-stroke oil is lower with a maximum of a higher octane grade for air-cooled engines. Do not use gasoline of 10% ethanol contents. Add the remaining quantity of oil. 3. Speak to your servicing dealer to regular fuel, which causes engine damages. • We recommend that you get the correct mixture. Shake the fuel mixture. 4. CAUTION: Do not mix fuel...
Owner Manual
Page 9
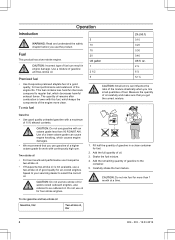
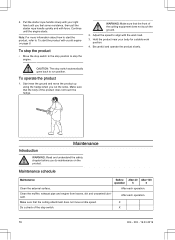
... the throttle trigger gradually to 7 Nm. 4. Remove the nut and the bolt on the blade tip. 3. Push and release the throttle trigger to set the engine to choke position. 2. Pull the choke control to idle speed. 8. Push the air purge bulb approximately 6 times or until the engine fires, then push the choke control to Product overview on the ground with your right hand until the engine starts. 7. Continue to pull the starter rope handle until the bulb starts to pull the starter rope handle until...
... the throttle trigger gradually to 7 Nm. 4. Remove the nut and the bolt on the blade tip. 3. Push and release the throttle trigger to set the engine to choke position. 2. Pull the choke control to idle speed. 8. Push the air purge bulb approximately 6 times or until the engine fires, then push the choke control to Product overview on the ground with your right hand until the engine starts. 7. Continue to pull the starter rope handle until the bulb starts to pull the starter rope handle until...
Owner Manual
Page 10
... start the product with a cold engine on the product. CAUTION: The stop switch. After each operation. 2. Pull the starter rope handle slowly with your body for a stable work load. 3. Be careful and operate the product slowly. Maintenance schedule Maintenance Before After 40 After 100 operation h h Clean the external surface. Clean the muffler, exhaust pipe and engine from leaves, dirt and unwanted lubricant. Make sure that the cutting attachment...
... start the product with a cold engine on the product. CAUTION: The stop switch. After each operation. 2. Pull the starter rope handle slowly with your body for a stable work load. 3. Be careful and operate the product slowly. Maintenance schedule Maintenance Before After 40 After 100 operation h h Clean the external surface. Clean the muffler, exhaust pipe and engine from leaves, dirt and unwanted lubricant. Make sure that the cutting attachment...
Owner Manual
Page 11
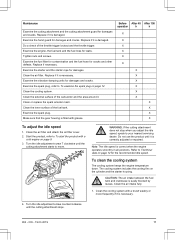
... grease. Examine the vibration damping units for damages. WARNING: If the cutting attachment does not stop when you adjust the idle speed, speak to To examine the spark plug on the cylinder and the starter housing. Do not use the product until it is correctly adjusted or repaired. Clean the cooling system. Before After 40 After 100 operation h h X X X X X X X X X X X X X X X X To adjust the idle speed 1. Clean the air intake fully. 1. Clean or replace the spark...
... grease. Examine the vibration damping units for damages. WARNING: If the cutting attachment does not stop when you adjust the idle speed, speak to To examine the spark plug on the cylinder and the starter housing. Do not use the product until it is correctly adjusted or repaired. Clean the cooling system. Before After 40 After 100 operation h h X X X X X X X X X X X X X X X X To adjust the idle speed 1. Clean the air intake fully. 1. Clean or replace the spark...

Owner Manual
Page 12
... foam filter (B). Note: An air filter that the foam filter (B) is used for a long time can cause skin irritation. 1. 2. Make sure that is dry. 6. Clean the foam filter (B) with warm soap water. Refer to To apply oil to start or does not operate correctly at idle speed. • To decrease the risk of engine power, wear to the air filter CAUTION: Always use Husqvarna special air-filter oil. Remove the air filter cover (A). Put the air filter in...
... foam filter (B). Note: An air filter that the foam filter (B) is used for a long time can cause skin irritation. 1. 2. Make sure that is dry. 6. Clean the foam filter (B) with warm soap water. Refer to To apply oil to start or does not operate correctly at idle speed. • To decrease the risk of engine power, wear to the air filter CAUTION: Always use Husqvarna special air-filter oil. Remove the air filter cover (A). Put the air filter in...
Owner Manual
Page 13
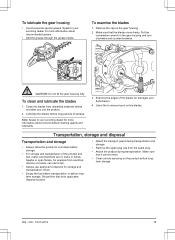
... 13 To examine the blades 1. Remove the cap on the blades. To clean and lubricate the blades 1. Discard the fuel at an applicable disposal location. • Attach the transport guard during transportation and storage. • Remove the spark plug cap from electrical devices or boilers, can start a fire. • Always use the product. 2. CAUTION: Do not fill the gear housing fully. To lubricate the gear housing • Use Husqvarna special grease. Use a file to cool down...
... 13 To examine the blades 1. Remove the cap on the blades. To clean and lubricate the blades 1. Discard the fuel at an applicable disposal location. • Attach the transport guard during transportation and storage. • Remove the spark plug cap from electrical devices or boilers, can start a fire. • Always use the product. 2. CAUTION: Do not fill the gear housing fully. To lubricate the gear housing • Use Husqvarna special grease. Use a file to cool down...
Owner Manual
Page 14
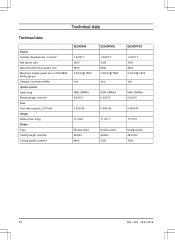
Technical data Technical data Engine Cylinder displacement, cu.in/cm3 Idle speed, rpm Recommended max speed, rpm Maximum engine power acc. to ISO 8893, kW/hp @ rpm Catalytic converter muffler Ignition system Spark plug Electrode gap, inch/mm Fuel Fuel tank capacity, US Pint/l Weight Without fuel, lb/kg Blades Type Cutting length, inch/mm Cutting speed, cuts/min 522HD60S 1.32/21.7 3000 9200 0.6/0.8 @ 7800 Yes NGK CMR6A 0.02/0.5 0.95/0.45 11.0/5.0 Double sided 24...
Technical data Technical data Engine Cylinder displacement, cu.in/cm3 Idle speed, rpm Recommended max speed, rpm Maximum engine power acc. to ISO 8893, kW/hp @ rpm Catalytic converter muffler Ignition system Spark plug Electrode gap, inch/mm Fuel Fuel tank capacity, US Pint/l Weight Without fuel, lb/kg Blades Type Cutting length, inch/mm Cutting speed, cuts/min 522HD60S 1.32/21.7 3000 9200 0.6/0.8 @ 7800 Yes NGK CMR6A 0.02/0.5 0.95/0.45 11.0/5.0 Double sided 24...
Owner Manual
Page 15
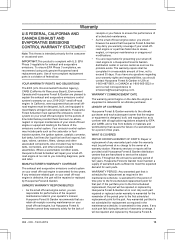
... performance of time, not to explain the exhaust and evaporative emissions control system's warranty on your small off -road engine owner, you are franchised to you should however be completed in a reasonable amount of the required maintenance listed in the maintenance schedule, is warranted for liquid fuel and fuel vapors), fuel caps, valves, canisters, filters, clamps and other emission-related assemblies. Use of non-compliant replacement parts is...
... performance of time, not to explain the exhaust and evaporative emissions control system's warranty on your small off -road engine owner, you are franchised to you should however be completed in a reasonable amount of the required maintenance listed in the maintenance schedule, is warranted for liquid fuel and fuel vapors), fuel caps, valves, canisters, filters, clamps and other emission-related assemblies. Use of non-compliant replacement parts is...
Owner Manual
Page 16
... warranty coverage. DIAGNOSIS: The owner must be used in the performance of a non-exempted add-on or modified parts will be liable to the effect of "repair or replace as defined in the warranty statement provided to maintenance schedule. 4. Intake pipe, airfilter holder and carburetor bolts. 3. Fuel tank, fuel line (for disallowing a warranty claim. Spark Plug, covered up to the consumer. Husqvarna Forest & Garden will be updated annually in the operator's manual...
... warranty coverage. DIAGNOSIS: The owner must be used in the performance of a non-exempted add-on or modified parts will be liable to the effect of "repair or replace as defined in the warranty statement provided to maintenance schedule. 4. Intake pipe, airfilter holder and carburetor bolts. 3. Fuel tank, fuel line (for disallowing a warranty claim. Spark Plug, covered up to the consumer. Husqvarna Forest & Garden will be updated annually in the operator's manual...


