
Owner Manual
Page 2
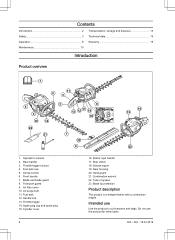
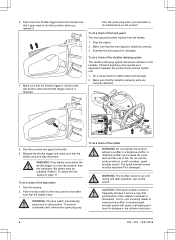
Blade and blade guard 8. Air filter cover 10. Cylinder cover 2 16. Blade tip protection Product description The product is a hedge trimmer with a combustion engine. Transport guard 9. Fuel tank 12. Spark plug cap and spark plug 15. Stop switch 18. Grease nipple 19. Fuel tank cap 5. Throttle trigger 14. Tube of grease 23. Contents Introduction 2 Safety 3 Transportation, storage and disposal 13 Technical data 14 Operation 8 Warranty 15 Maintenance 10 Introduction Product overview 1 17 6 3 4 5 10 14 22 21 2 9 11 13 12 19...
Blade and blade guard 8. Air filter cover 10. Cylinder cover 2 16. Blade tip protection Product description The product is a hedge trimmer with a combustion engine. Transport guard 9. Fuel tank 12. Spark plug cap and spark plug 15. Stop switch 18. Grease nipple 19. Fuel tank cap 5. Throttle trigger 14. Tube of grease 23. Contents Introduction 2 Safety 3 Transportation, storage and disposal 13 Technical data 14 Operation 8 Warranty 15 Maintenance 10 Introduction Product overview 1 17 6 3 4 5 10 14 22 21 2 9 11 13 12 19...
Owner Manual
Page 3
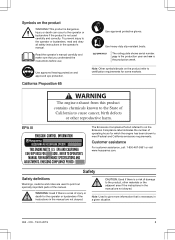
... injury or death for the operator or bystanders if the instructions in the manual are not obeyed. yyyywwxxxx The rating plate shows serial number. EPA III WARNING The engine exhaust from this product contains chemicals known to the State of the manual. WARNING: Used if there is not used to point out specially important parts of California to cause cancer...
... injury or death for the operator or bystanders if the instructions in the manual are not obeyed. yyyywwxxxx The rating plate shows serial number. EPA III WARNING The engine exhaust from this product contains chemicals known to the State of the manual. WARNING: Used if there is not used to point out specially important parts of California to cause cancer...
Owner Manual
Page 4
.... Carry out the checks, maintenance and service instructions described in the blades while you are wearing hearing protection. Remove any damage. • Ensure that the spark plug cap and ignition lead are tight. • Make sure the gear housing is running . • Make sure that the product is not fully secured. • Always use . Refer to avoid the risk of this manual. Repair any objects that...
.... Carry out the checks, maintenance and service instructions described in the blades while you are wearing hearing protection. Remove any damage. • Ensure that the spark plug cap and ignition lead are tight. • Make sure the gear housing is running . • Make sure that the product is not fully secured. • Always use . Refer to avoid the risk of this manual. Repair any objects that...
Owner Manual
Page 5
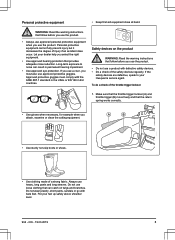
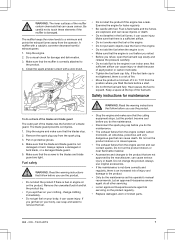
... noise reduction. Let your hair up safely above shoulder level. 904 - 003 - 19.03.2019 5 Always use approved protective goggles. Put your dealer help you attach, examine or clean the cutting equipment. Make sure that the throttle trigger lockout (A) and throttle trigger (B) move freely and that the return spring works correctly. • Use gloves when necessary, for example when you select...
... noise reduction. Let your hair up safely above shoulder level. 904 - 003 - 19.03.2019 5 Always use approved protective goggles. Put your dealer help you attach, examine or clean the cutting equipment. Make sure that the throttle trigger lockout (A) and throttle trigger (B) move freely and that the return spring works correctly. • Use gloves when necessary, for example when you select...
Owner Manual
Page 6
... prevent accidental start position. Turn to your servicing dealer to start , remove the spark plug cap To do a check of the vibration damping system The vibration damping system decreases vibration in the idle position, then the carburetor idle speed must be replaced if it can increase the noise level and the risk of the muffler WARNING: Do not operate the product without , or with a broken, spark arrester screen. from the blades. 1. Make...
... prevent accidental start position. Turn to your servicing dealer to start , remove the spark plug cap To do a check of the vibration damping system The vibration damping system decreases vibration in the idle position, then the carburetor idle speed must be replaced if it can increase the noise level and the risk of the muffler WARNING: Do not operate the product without , or with a broken, spark arrester screen. from the blades. 1. Make...
Owner Manual
Page 7
.... Remove the unwanted fuel/oil and let the product dry. • If you use the product. • Do not start the product if the engine has a leak. Examine the engine for maintenance To do servicing on your body, use original accessories. • If the maintenance is not done correctly and regularly, there is not damaged or bent. The blade guard prevents cut injuries. 1. Always replace...
.... Remove the unwanted fuel/oil and let the product dry. • If you use the product. • Do not start the product if the engine has a leak. Examine the engine for maintenance To do servicing on your body, use original accessories. • If the maintenance is not done correctly and regularly, there is not damaged or bent. The blade guard prevents cut injuries. 1. Always replace...
Owner Manual
Page 8
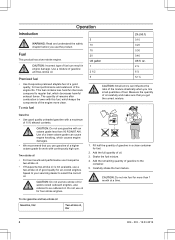
... quantities of gasoline in engine damage. Two-stroke oil • For best results and performance use Husqvarna two-stroke oil. • If Husqvarna two-stroke oil is lower with a maximum of the mixture drastically when you use gasoline with continuously high rpm. Carefully shake the fuel mixture. CAUTION: Do not mix fuel for air-cooled engines. CAUTION: Incorrect type of fuel can influence the ratio of 10% ethanol contents...
... quantities of gasoline in engine damage. Two-stroke oil • For best results and performance use Husqvarna two-stroke oil. • If Husqvarna two-stroke oil is lower with a maximum of the mixture drastically when you use gasoline with continuously high rpm. Carefully shake the fuel mixture. CAUTION: Do not mix fuel for air-cooled engines. CAUTION: Incorrect type of fuel can influence the ratio of 10% ethanol contents...
Owner Manual
Page 9
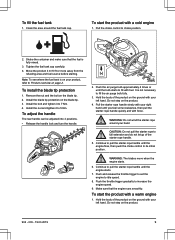
... of the starter rope handle. 5. Pull the starter rope handle slowly with your left hand. Tighten the fuel tank cap carefully. 4. Push the air purge bulb approximately 6 times or until you feel some resistance, then pull the starter rope handle quickly and with fuel. Push and release the throttle trigger to set the engine to choke position. 2. Do not step on the blade tip. 3. Pull the choke control to idle speed. 8. CAUTION: Do not pull the starter rope to its initial position. To start the...
... of the starter rope handle. 5. Pull the starter rope handle slowly with your left hand. Tighten the fuel tank cap carefully. 4. Push the air purge bulb approximately 6 times or until you feel some resistance, then pull the starter rope handle quickly and with fuel. Push and release the throttle trigger to set the engine to choke position. 2. Do not step on the blade tip. 3. Pull the choke control to idle speed. 8. CAUTION: Do not pull the starter rope to its initial position. To start the...
Owner Manual
Page 10
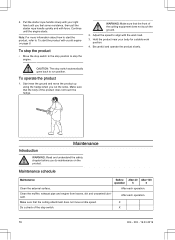
... switch automatically goes back to run position. WARNING: Make sure that the cutting attachment does not move the product up along the hedge when you feel some resistance, then pull the starter rope handle quickly and with a cold engine on the product. Maintenance schedule Maintenance Before After 40 After 100 operation h h Clean the external surface. Hold the product near the ground and move at idle speed...
... switch automatically goes back to run position. WARNING: Make sure that the cutting attachment does not move the product up along the hedge when you feel some resistance, then pull the starter rope handle quickly and with a cold engine on the product. Maintenance schedule Maintenance Before After 40 After 100 operation h h Clean the external surface. Hold the product near the ground and move at idle speed...
Owner Manual
Page 11
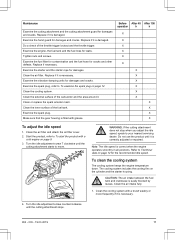
... the starter housing. Clean the cooling system. Clean the inner surface of the fuel tank. Examine the spark plug. Turn the idle adjustment screw T clockwise until the cutting attachment starts to your nearest servicing dealer. The cooling system includes the cooling fins on page 12. Replace if it is correct when the engine operates smoothly in all positions. Note: The idle speed is damaged. Clean the air intake fully. 1. Examine the starter and the starter rope for...
... the starter housing. Clean the cooling system. Clean the inner surface of the fuel tank. Examine the spark plug. Turn the idle adjustment screw T clockwise until the cutting attachment starts to your nearest servicing dealer. The cooling system includes the cooling fins on page 12. Replace if it is correct when the engine operates smoothly in all positions. Note: The idle speed is damaged. Clean the air intake fully. 1. Examine the starter and the starter rope for...

Owner Manual
Page 12
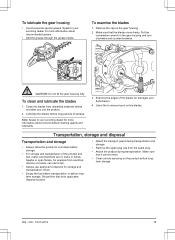
... the spark plug CAUTION: Always use Husqvarna special air-filter oil. c) Make sure that the idle speed is not dirty or blocked. 2. WARNING: Put on page 14. Replace the air filter regularly and always replace a defective air filter. 5. Apply air filter oil to the air filter CAUTION: Always use the recommended spark plug type. Use compressed air or a brush. To apply oil to the foam filter (B). To clean the air filter Clean the air filter regularly from the filter frame. This prevents carburetor malfunctions, starting problems, loss of the air filter cover...
... the spark plug CAUTION: Always use Husqvarna special air-filter oil. c) Make sure that the idle speed is not dirty or blocked. 2. WARNING: Put on page 14. Replace the air filter regularly and always replace a defective air filter. 5. Apply air filter oil to the air filter CAUTION: Always use the recommended spark plug type. Use compressed air or a brush. To apply oil to the foam filter (B). To clean the air filter Clean the air filter regularly from the filter frame. This prevents carburetor malfunctions, starting problems, loss of the air filter cover...
Owner Manual
Page 13
...; Remove the spark plug cap from electrical devices or boilers, can start a fire. • Always use the product. 2. Sparks or open flames, for more information about recommended grease. • Add the grease through the grease nipple. Use a file to your servicing dealer for example from the spark plug. • Attach the product during transportation. CAUTION: Do not fill the gear housing fully. Put the combination wrench in the gear housing and turn...
...; Remove the spark plug cap from electrical devices or boilers, can start a fire. • Always use the product. 2. Sparks or open flames, for more information about recommended grease. • Add the grease through the grease nipple. Use a file to your servicing dealer for example from the spark plug. • Attach the product during transportation. CAUTION: Do not fill the gear housing fully. Put the combination wrench in the gear housing and turn...
Owner Manual
Page 14
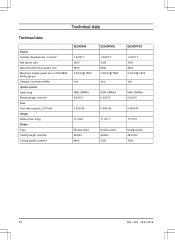
to ISO 8893, kW/hp @ rpm Catalytic converter muffler Ignition system Spark plug Electrode gap, inch/mm Fuel Fuel tank capacity, US Pint/l Weight Without fuel, lb/kg Blades Type Cutting length, inch/mm Cutting speed, cuts/min 522HD60S 1.32/21.7 3000 9200 0.6/0.8 @ 7800 Yes NGK CMR6A 0.02/0.5 0.95/0.45 11.0/5.0 Double sided 24/600 4400 522HDR60S 1.32/21.7 3000 ... NGK CMR6A 0.02/0.5 0.95/0.45 11.7/5.3 Double sided 29.5/750 3200 14 904 - 003 - 19.03.2019 Technical data Technical data Engine Cylinder displacement, cu.in/cm3 Idle speed, rpm Recommended max speed, rpm Maximum engine power acc.
to ISO 8893, kW/hp @ rpm Catalytic converter muffler Ignition system Spark plug Electrode gap, inch/mm Fuel Fuel tank capacity, US Pint/l Weight Without fuel, lb/kg Blades Type Cutting length, inch/mm Cutting speed, cuts/min 522HD60S 1.32/21.7 3000 9200 0.6/0.8 @ 7800 Yes NGK CMR6A 0.02/0.5 0.95/0.45 11.0/5.0 Double sided 24/600 4400 522HDR60S 1.32/21.7 3000 ... NGK CMR6A 0.02/0.5 0.95/0.45 11.7/5.3 Double sided 29.5/750 3200 14 904 - 003 - 19.03.2019 Technical data Technical data Engine Cylinder displacement, cu.in/cm3 Idle speed, rpm Recommended max speed, rpm Maximum engine power acc.
Owner Manual
Page 15
... fuel and fuel vapors), fuel caps, valves, canisters, filters, clamps and other emission-related assemblies. Husqvarna Forest & Garden must be hoses, belts, connectors, and other associated components. Your emission control system may include parts such as the problem exists. WHAT IS COVERED REPAIR OR REPLACEMENT OF PARTS: Repair or replacement of all scheduled maintenance. • As the small off -road engine is warranted for replacement as to conform with U.S. Warranty services or repairs will repair...
... fuel and fuel vapors), fuel caps, valves, canisters, filters, clamps and other emission-related assemblies. Husqvarna Forest & Garden must be hoses, belts, connectors, and other associated components. Your emission control system may include parts such as the problem exists. WHAT IS COVERED REPAIR OR REPLACEMENT OF PARTS: Repair or replacement of all scheduled maintenance. • As the small off -road engine is warranted for replacement as to conform with U.S. Warranty services or repairs will repair...
Owner Manual
Page 16
... necessary" will not reduce the warranty obligations of two years. Spark Plug, covered up to maintenance schedule. 5. The use will not reduce the period of all Husqvarna Forest & Garden authorized servicing dealers. Garden at a warranty station. Intake pipe, airfilter holder and carburetor bolts. 3. Any such part repaired or replaced under the warranty is responsible for the remaining warranty period. MAINTENANCE STATEMENT The owner is warranted for the performance...
... necessary" will not reduce the warranty obligations of two years. Spark Plug, covered up to maintenance schedule. 5. The use will not reduce the period of all Husqvarna Forest & Garden authorized servicing dealers. Garden at a warranty station. Intake pipe, airfilter holder and carburetor bolts. 3. Any such part repaired or replaced under the warranty is responsible for the remaining warranty period. MAINTENANCE STATEMENT The owner is warranted for the performance...

Parts Manual
Page 5
CYLINDER COVER Ref Part No Description 1 590 04 99-01 CYLINDER COVER 2 504 08 80-01 SCREW ITXSCM 3 597 02 06-01 HEAT PROTECTOR Remark 522 HD60 S QTY KIT 1 23 1
CYLINDER COVER Ref Part No Description 1 590 04 99-01 CYLINDER COVER 2 504 08 80-01 SCREW ITXSCM 3 597 02 06-01 HEAT PROTECTOR Remark 522 HD60 S QTY KIT 1 23 1

Parts Manual
Page 17
CRANKCASE Ref Part No Description 1 597 02 36-01 CRANKCASE ASSY 2 525 63 73-01 SEALING RING 3 525 82 50-01 SCREW ITXSCM 4 525 72 84-01 BALL BEARING 5 597 02 10-01 GASKET KIT Remark 522 HD60 S QTY KIT 1 21 31 21 1
CRANKCASE Ref Part No Description 1 597 02 36-01 CRANKCASE ASSY 2 525 63 73-01 SEALING RING 3 525 82 50-01 SCREW ITXSCM 4 525 72 84-01 BALL BEARING 5 597 02 10-01 GASKET KIT Remark 522 HD60 S QTY KIT 1 21 31 21 1

Parts Manual
Page 19
CRANKSHAFT Ref Part No Description 1 577 67 00-02 CRANKSHAFT KIT 2 525 63 73-01 SEALING RING 3 525 72 84-01 BALL BEARING 4 597 29 22-01 BEARING KIT Remark 522 HD60 S QTY KIT 1 21 21 11
CRANKSHAFT Ref Part No Description 1 577 67 00-02 CRANKSHAFT KIT 2 525 63 73-01 SEALING RING 3 525 72 84-01 BALL BEARING 4 597 29 22-01 BEARING KIT Remark 522 HD60 S QTY KIT 1 21 21 11

Parts Manual
Page 21
HANDLE & CONTROLS Ref Part No Description 1 537 41 90-01 SWITCH 2 574 48 88-06 SHORT CIRCUIT CABLE 3 597 02 40-01 REAR HANDLE 4 580 27 68-01 THROTTLE LOCKOUT 5 590 05 76-01 THROTTLE CONTROL 6 590 68 66-01 SPRING 7 590 05 77-01 LOCKING BUTTON 8 504 08 98-02 RECOIL SPRING 9 575 23 20-02 O-RING 10 573 92 58-01 SCREW ITXSCFT 11 575 57 21-02 THROTTLE CABLE ASSY 12 525 75 51-01 SCREW ITXSCFM 13 590 64 77-01 SPRING 14 597 02 41-01 FRONT HANDLE ASSY 15 521 51 81-01 SCREW 16 591 15 69-01 PROTECTION Remark 522 HD60 S QTY KIT 13 13 1 13 13 13 13 13 13 63 13 4 4 1 4 1
HANDLE & CONTROLS Ref Part No Description 1 537 41 90-01 SWITCH 2 574 48 88-06 SHORT CIRCUIT CABLE 3 597 02 40-01 REAR HANDLE 4 580 27 68-01 THROTTLE LOCKOUT 5 590 05 76-01 THROTTLE CONTROL 6 590 68 66-01 SPRING 7 590 05 77-01 LOCKING BUTTON 8 504 08 98-02 RECOIL SPRING 9 575 23 20-02 O-RING 10 573 92 58-01 SCREW ITXSCFT 11 575 57 21-02 THROTTLE CABLE ASSY 12 525 75 51-01 SCREW ITXSCFM 13 590 64 77-01 SPRING 14 597 02 41-01 FRONT HANDLE ASSY 15 521 51 81-01 SCREW 16 591 15 69-01 PROTECTION Remark 522 HD60 S QTY KIT 13 13 1 13 13 13 13 13 13 63 13 4 4 1 4 1

Parts Manual
Page 25
CUTTING EQUIPMENT Ref Part No Description 1 598 77 60-01 PROTECTOR BAR 2 592 75 13-01 NUT 3 592 84 87-01 BAR PLATE 4 590 32 71-01 GUIDE BAR 5 590 32 75-01 WEAR PLATE 6 597 02 18-01 BLADE KIT 7 592 65 43-01 SPACER 8 590 32 82-01 BAR PLATE 9 590 33 93-01 BRACKET 10 525 75 51-09 SCREW ITXSCFM 11 592 88 94-01 BAR PLATE 12 592 73 25-01 SCREW 13 590 65 14-01 TRANSPORT GUARD 14 592 73 81-01 WASHER 15 590 71 26-01 PROTECTION 16 597 25 43-01 CUTTING DECK KIT Remark 522 HD60 S QTY KIT 1 10 16 1 16 1 16 1 16 1 16 10 16 1 16 1 16 2 16 1 16 8 16 1 5 16 1 1
CUTTING EQUIPMENT Ref Part No Description 1 598 77 60-01 PROTECTOR BAR 2 592 75 13-01 NUT 3 592 84 87-01 BAR PLATE 4 590 32 71-01 GUIDE BAR 5 590 32 75-01 WEAR PLATE 6 597 02 18-01 BLADE KIT 7 592 65 43-01 SPACER 8 590 32 82-01 BAR PLATE 9 590 33 93-01 BRACKET 10 525 75 51-09 SCREW ITXSCFM 11 592 88 94-01 BAR PLATE 12 592 73 25-01 SCREW 13 590 65 14-01 TRANSPORT GUARD 14 592 73 81-01 WASHER 15 590 71 26-01 PROTECTION 16 597 25 43-01 CUTTING DECK KIT Remark 522 HD60 S QTY KIT 1 10 16 1 16 1 16 1 16 1 16 10 16 1 16 1 16 2 16 1 16 8 16 1 5 16 1 1


