
Operation Manual
Page 2
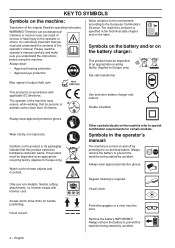
.... Arrows which show limits for thrown objects and ricochets. IMPORTANT! speed of the machine must be worn. Symbols in accordance with trimmer cord. Remove the battery. Careless or incorrect use non-metallic, flexible cutting attachments, i.e. Always wear: • Approved ...to the European Community's Directive. KEY TO SYMBOLS Symbols on the label. Trimmers can result in the Technical data chapter and on the machine: Translation of the operator's manual. trimmer heads with applicable EC directives. WARNING! Direct current. Please read the operator's...
.... Arrows which show limits for thrown objects and ricochets. IMPORTANT! speed of the machine must be worn. Symbols in accordance with trimmer cord. Remove the battery. Careless or incorrect use non-metallic, flexible cutting attachments, i.e. Always wear: • Approved ...to the European Community's Directive. KEY TO SYMBOLS Symbols on the label. Trimmers can result in the Technical data chapter and on the machine: Translation of the operator's manual. trimmer heads with applicable EC directives. WARNING! Direct current. Please read the operator's...
Operation Manual
Page 3
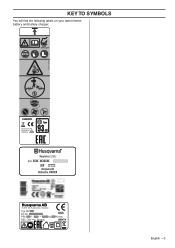
SEC: 36V / 7A max WW/YY English - 3 KEY TO SYMBOLS You will find the following labels on your lawn trimmer, battery and battery charger: Husqvarna AB Huskvarna SWEDEN S-561 82 Huskvarna, Sweden Typ QC 330 Art.No. 966 73 06-01 2014 PRI: 100V - 240V ~ 50-60Hz 330W max.
SEC: 36V / 7A max WW/YY English - 3 KEY TO SYMBOLS You will find the following labels on your lawn trimmer, battery and battery charger: Husqvarna AB Huskvarna SWEDEN S-561 82 Huskvarna, Sweden Typ QC 330 Art.No. 966 73 06-01 2014 PRI: 100V - 240V ~ 50-60Hz 330W max.

Operation Manual
Page 4
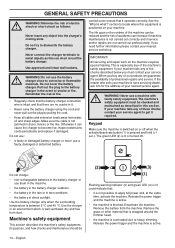
... hearing protection. can cause serious or fatal injury to the operator or others . Always use original accessories. the design of the operator or others . A lawn trimmer can result in serious personal injury or the death of the machine be ! It is what 6 GENERAL SAFETY PRECAUTIONS General power tool safety warnings 7 Personal...
... hearing protection. can cause serious or fatal injury to the operator or others . Always use original accessories. the design of the operator or others . A lawn trimmer can result in serious personal injury or the death of the machine be ! It is what 6 GENERAL SAFETY PRECAUTIONS General power tool safety warnings 7 Personal...
Operation Manual
Page 6
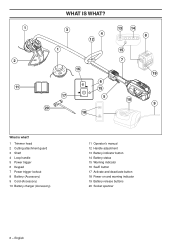
English 1 2 11 WHAT IS WHAT? 3 1 4 12 16 17 20 6 15 5 18 13 14 8 15 7 19 10 9 What is what? 1 Trimmer head 2 Cutting attachment guard 3 Shaft 4 Loop handle 5 Power trigger 6 Keypad 7 Power trigger lockout 8 Battery (Accessory) 9 Cord (Accessory) 10 Battery charger (Accessory) 11 Operator′s manual 12 Handle adjustment 13 Battery indicator button 14 Battery status 15 Warning indicator 16 SavE button 17 Activate and deactivate button 18 Power on and warning indicator 19 Battery release buttons 20 Socket spanner 6 -
English 1 2 11 WHAT IS WHAT? 3 1 4 12 16 17 20 6 15 5 18 13 14 8 15 7 19 10 9 What is what? 1 Trimmer head 2 Cutting attachment guard 3 Shaft 4 Loop handle 5 Power trigger 6 Keypad 7 Power trigger lockout 8 Battery (Accessory) 9 Cord (Accessory) 10 Battery charger (Accessory) 11 Operator′s manual 12 Handle adjustment 13 Battery indicator button 14 Battery status 15 Warning indicator 16 SavE button 17 Activate and deactivate button 18 Power on and warning indicator 19 Battery release buttons 20 Socket spanner 6 -

Operation Manual
Page 7
...regulate the age of debris. • Keep handles dry, clean and free from its original specification. IMPORTANT! Replace the trimmer head or trimmer guard if they have been exposed to use the machine in daylight or in other persons not trained in a lockable area so ...are doing and use the recommended guard for their property to be at all nuts and screws are tight. • Check that the trimmer head and trimmer guard are working order. all warnings and instructions for trimming. • Keep bystanders away. • Stay alert, watch what you understand...
...regulate the age of debris. • Keep handles dry, clean and free from its original specification. IMPORTANT! Replace the trimmer head or trimmer guard if they have been exposed to use the machine in daylight or in other persons not trained in a lockable area so ...are doing and use the recommended guard for their property to be at all nuts and screws are tight. • Check that the trimmer head and trimmer guard are working order. all warnings and instructions for trimming. • Keep bystanders away. • Stay alert, watch what you understand...

Operation Manual
Page 8
... machine produces an ! This field may cause overheating of injury at all situations which it will do the job better and with the trimmer head. A lawn trimmer can be worn when necessary, e.g. Ask your hearing protection as soon as the gear housing can cause serious or fatal injury to start , children...
... machine produces an ! This field may cause overheating of injury at all situations which it will do the job better and with the trimmer head. A lawn trimmer can be worn when necessary, e.g. Ask your hearing protection as soon as the gear housing can cause serious or fatal injury to start , children...
Operation Manual
Page 10
...;C. When you must be (2) (3) (1) Flashing warning indicator (3) and green LED (2) is lit could indicate that: • it is intact and that is wrapped around the trimmer head. • the machine is especially true of the machine′s safety equipment. Do not charge: • non-rechargeable batteries in the battery charger or...
...;C. When you must be (2) (3) (1) Flashing warning indicator (3) and green LED (2) is lit could indicate that: • it is intact and that is wrapped around the trimmer head. • the machine is especially true of the machine′s safety equipment. Do not charge: • non-rechargeable batteries in the battery charger or...

Operation Manual
Page 12
... to choose and maintain your cutting equipment in order to get correct lengths on it. Refer to the instructions for a couple of days before use. Trimmer head WARNING! See the chapter on Technical data. This is because when clearing using a cord the engine must throw out the cord radially from the... trimmer head and overcome the resistance of the grass being cleared. • The length of the cord is used to cut the cord to the correct ...
... to choose and maintain your cutting equipment in order to get correct lengths on it. Refer to the instructions for a couple of days before use. Trimmer head WARNING! See the chapter on Technical data. This is because when clearing using a cord the engine must throw out the cord radially from the... trimmer head and overcome the resistance of the grass being cleared. • The length of the cord is used to cut the cord to the correct ...

Operation Manual
Page 13
Fitting the loop handle ASSEMBLY Li-ion • Fit the screw into the loop handle. • Slide the clamp into the slot in the loop handle. • Fit the wing nut. • Now adjust the trimmer to give a comfortable working position. English - 13 Tighten the wing nut.
Fitting the loop handle ASSEMBLY Li-ion • Fit the screw into the loop handle. • Slide the clamp into the slot in the loop handle. • Fit the wing nut. • Now adjust the trimmer to give a comfortable working position. English - 13 Tighten the wing nut.

Operation Manual
Page 16
...; All covers must be worn when necessary. • Check that the trimmer head is fitted correctly to the trimmer. • Check that the trimmer head and trimmer guard are cracked. Replace the trimmer head or trimmer guard if they have been exposed to prevent the machine being inserted correctly.... attached to the machine. English Starting Turn on the machine. Remove the battery from the engine using a brush. Use only a Husqvarna original battery in perfect working area. Gloves should slide easily into place when you start button (>1 sec.) until the green LED is...
...; All covers must be worn when necessary. • Check that the trimmer head is fitted correctly to the trimmer. • Check that the trimmer head and trimmer guard are cracked. Replace the trimmer head or trimmer guard if they have been exposed to prevent the machine being inserted correctly.... attached to the machine. English Starting Turn on the machine. Remove the battery from the engine using a brush. Use only a Husqvarna original battery in perfect working area. Gloves should slide easily into place when you start button (>1 sec.) until the green LED is...
Operation Manual
Page 17
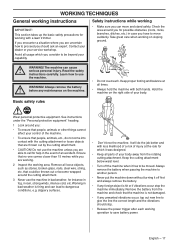
... unwanted vibrations occur, tap out new line to be moved. English - 17 Contact your dealer or your capability. WARNING! WORKING TECHNIQUES General working with a lawn trimmer. If you encounter a situation where you can move suddenly. It will do not come into contact with the cutting attachment or loose objects that no...
... unwanted vibrations occur, tap out new line to be moved. English - 17 Contact your dealer or your capability. WARNING! WORKING TECHNIQUES General working with a lawn trimmer. If you encounter a situation where you can move suddenly. It will do not come into contact with the cutting attachment or loose objects that no...

Operation Manual
Page 18
...• Make sure the cutting attachment has stopped before cleaning. Clearing • The clearing technique removes all unwanted vegetation. Keep the trimmer head just above the ground at an angle. English WORKING TECHNIQUES WARNING! The bevel gear can result in serious injury. Keep unauthorised ...over the cutting attachment guard. Stones, rubbish, etc. In most optimum when trimming and gives longest runtime. Trimming • Hold the trimmer head just above the ground and tilt it can also damage sensitive bark on trees and bushes, and damage fence posts. • Reduce...
...• Make sure the cutting attachment has stopped before cleaning. Clearing • The clearing technique removes all unwanted vegetation. Keep the trimmer head just above the ground at an angle. English WORKING TECHNIQUES WARNING! The bevel gear can result in serious injury. Keep unauthorised ...over the cutting attachment guard. Stones, rubbish, etc. In most optimum when trimming and gives longest runtime. Trimming • Hold the trimmer head just above the ground and tilt it can also damage sensitive bark on trees and bushes, and damage fence posts. • Reduce...

Operation Manual
Page 19
... cord parallel to constantly come into contact with the ground during normal cutting. WORKING TECHNIQUES Cutting • The trimmer is difficult to reach using a normal lawn mower. Avoid pressing the trimmer head against the ground as this type can be swept and move the tool side to side. • ...to obtain the best results. Sweeping • The fan effect of this can ruin the lawn and damage the tool. • Do not allow the trimmer head to the ground when cutting. English - 19 Constant contact of the rotating cord can cause damage and wear to be used for cutting grass...
... cord parallel to constantly come into contact with the ground during normal cutting. WORKING TECHNIQUES Cutting • The trimmer is difficult to reach using a normal lawn mower. Avoid pressing the trimmer head against the ground as this type can be swept and move the tool side to side. • ...to obtain the best results. Sweeping • The fan effect of this can ruin the lawn and damage the tool. • Do not allow the trimmer head to the ground when cutting. English - 19 Constant contact of the rotating cord can cause damage and wear to be used for cutting grass...

Operation Manual
Page 20
... chute assembly. Only use . Only use original spare parts. See the chapter on the machine requires special training. Regularly check that the trimmer head is used. Always remove the battery ! Strong cleaning agents can damage the plastic. Only use the recommended cutting attachment. This is... especially important when a fully automatic trimmer head is undamaged and not cracked. Trimmer head Check that the battery charger and the battery are always clean and dry before any of our products we ...
... chute assembly. Only use . Only use original spare parts. See the chapter on the machine requires special training. Regularly check that the trimmer head is used. Always remove the battery ! Strong cleaning agents can damage the plastic. Only use the recommended cutting attachment. This is... especially important when a fully automatic trimmer head is undamaged and not cracked. Trimmer head Check that the battery charger and the battery are always clean and dry before any of our products we ...
Operation Manual
Page 21
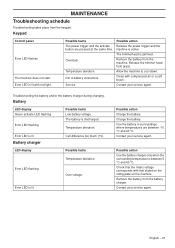
... cool down. Possible faults Temperature deviation. Remove the battery from grass. The battery is discharged. Use the battery in battery connectors. English - 21 Release the trimmer head from the battery charger. Charge the battery.
... cool down. Possible faults Temperature deviation. Remove the battery from grass. The battery is discharged. Use the battery in battery connectors. English - 21 Release the trimmer head from the battery charger. Charge the battery.

Operation Manual
Page 22
...X Keep handles dry, clean and free from a safety point of the machine with a clean and dry cloth. X Check that the trimmer head is undamaged and not cracked. X Check that the guard is undamaged and not cracked. Always remove the battery ! Weekly maintenance Monthly... maintenance X 22 - The following is intact. Replace the trimmer head if necessary. English Never use water. X Make sure that the battery is a list of the items are described in the ...
...X Keep handles dry, clean and free from a safety point of the machine with a clean and dry cloth. X Check that the trimmer head is undamaged and not cracked. X Check that the guard is undamaged and not cracked. Always remove the battery ! Weekly maintenance Monthly... maintenance X 22 - The following is intact. Replace the trimmer head if necessary. English Never use water. X Make sure that the battery is a list of the items are described in the ...
Operation Manual
Page 23
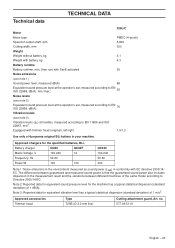
TECHNICAL DATA Technical data 336LiC Motor Motor type PMDC (4-brush) Speed of the same model according to EN 11806 and ISO 22867, m/s2. Equipped with EC directive 2000/14/ EC. ...,W 100 100 QC330 100-240 50-60 330 Note 1: Noise emissions in the environment measured as sound power (LWA) in conformity with trimmer head (original), left/right 1,9/1,3 Use only a Husqvarna original BLi battery in the measurement result and the variations between guaranteed and measured sound power is that the guaranteed sound power...
TECHNICAL DATA Technical data 336LiC Motor Motor type PMDC (4-brush) Speed of the same model according to EN 11806 and ISO 22867, m/s2. Equipped with EC directive 2000/14/ EC. ...,W 100 100 QC330 100-240 50-60 330 Note 1: Noise emissions in the environment measured as sound power (LWA) in conformity with trimmer head (original), left/right 1,9/1,3 Use only a Husqvarna original BLi battery in the measurement result and the variations between guaranteed and measured sound power is that the guaranteed sound power...

Operation Manual
Page 24
... EN 62133:2011, EN 60335-2-29:2011, EN ISO 11806-1:2011 Huskvarna March 30, 2016 Lars Roos, Development manager (Authorized representative for Husqvarna AB and responsible for technical documentation.) 24 - English of May 17, 2006 "relating to noise emissions, see the Technical data chapter....to machinery" 2006/42/EC. - of February 26, 2014 "relating to Europe only) We, Husqvarna AB, SE-561 82 Huskvarna, Sweden, tel: +46-36-146500, declare that the lawn trimmer Husqvarna 336LiC with the requirements of the COUNCIL'S DIRECTIVE: - TECHNICAL DATA EC Declaration of Conformity (Applies to ...
... EN 62133:2011, EN 60335-2-29:2011, EN ISO 11806-1:2011 Huskvarna March 30, 2016 Lars Roos, Development manager (Authorized representative for Husqvarna AB and responsible for technical documentation.) 24 - English of May 17, 2006 "relating to noise emissions, see the Technical data chapter....to machinery" 2006/42/EC. - of February 26, 2014 "relating to Europe only) We, Husqvarna AB, SE-561 82 Huskvarna, Sweden, tel: +46-36-146500, declare that the lawn trimmer Husqvarna 336LiC with the requirements of the COUNCIL'S DIRECTIVE: - TECHNICAL DATA EC Declaration of Conformity (Applies to ...

Parts List
Page 3
CUTTING EQUIPMENT Ref Part No Description 1 577 42 62-01 MOTOR COVER 2 579 21 19-01 SCREW IHSCT 3 577 96 51-01 TRIMMER GUARD 4 574 52 34-01 KNIFE 5 503 21 07-16 SCREW IHSCT 6 577 72 75-01 INSULATION WALL 7 501 69 39-01 MOTOR HOUSING 11 731 23 14-01 HEXAGON NUT 12 503 20 07-82 SCREW IHSCFM 13 577 98 95-01 BLADE SHAFT 14 578 07 02-01 BELT 15 577 42 60-01 COVER 16 503 21 68-16 SCREW IHSCT 18 578 78 93-01 NUT Remark 336 LiC QTY KIT 1 4 1 13 23 1 1 18 1 1 1 1 5 1
CUTTING EQUIPMENT Ref Part No Description 1 577 42 62-01 MOTOR COVER 2 579 21 19-01 SCREW IHSCT 3 577 96 51-01 TRIMMER GUARD 4 574 52 34-01 KNIFE 5 503 21 07-16 SCREW IHSCT 6 577 72 75-01 INSULATION WALL 7 501 69 39-01 MOTOR HOUSING 11 731 23 14-01 HEXAGON NUT 12 503 20 07-82 SCREW IHSCFM 13 577 98 95-01 BLADE SHAFT 14 578 07 02-01 BELT 15 577 42 60-01 COVER 16 503 21 68-16 SCREW IHSCT 18 578 78 93-01 NUT Remark 336 LiC QTY KIT 1 4 1 13 23 1 1 18 1 1 1 1 5 1

Parts List
Page 15
ACCESSORIES Ref Part No Description 1 579 29 40-02 TRIMMER HEAD 2 585 51 08-01 HOUSING ASSY 3 577 05 03-01 SPRING 4 577 04 93-01 KNOB 5 578 19 69-01 COVER 6 501 33 04-01 GROMMET Remark 336 LiC QTY KIT 1 11 11 11 11 21
ACCESSORIES Ref Part No Description 1 579 29 40-02 TRIMMER HEAD 2 585 51 08-01 HOUSING ASSY 3 577 05 03-01 SPRING 4 577 04 93-01 KNOB 5 578 19 69-01 COVER 6 501 33 04-01 GROMMET Remark 336 LiC QTY KIT 1 11 11 11 11 21


