
Operation Manual
Page 2
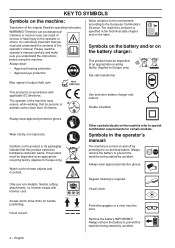
... to Europe only) Watch out for handle positioning. speed of the original Swedish operating instruction. Symbols on the product or its packaging indicate that you read the operator's manual carefully and make sure you understand the instructions before using the machine. Always remove the battery to the operator or others. Double insulation Always wear approved protective gloves. trimmer heads with applicable EC directives. KEY...
... to Europe only) Watch out for handle positioning. speed of the original Swedish operating instruction. Symbols on the product or its packaging indicate that you read the operator's manual carefully and make sure you understand the instructions before using the machine. Always remove the battery to the operator or others. Double insulation Always wear approved protective gloves. trimmer heads with applicable EC directives. KEY...

Operation Manual
Page 4
... General power tool safety warnings 7 Personal protective equipment 8 Battery and battery charger 9 Machine′s safety equipment 10 Cutting equipment 12 ASSEMBLY Fitting the loop handle 13 BATTERY HANDLING Battery 14 Battery charger 14 Transport and storage 15 Disposal of the battery, battery charger and machine 15 STARTING AND STOPPING Check before starting 16 Connect battery to the machine 16 Starting and stopping 16 WORKING TECHNIQUES General working instructions 17 MAINTENANCE...
... General power tool safety warnings 7 Personal protective equipment 8 Battery and battery charger 9 Machine′s safety equipment 10 Cutting equipment 12 ASSEMBLY Fitting the loop handle 13 BATTERY HANDLING Battery 14 Battery charger 14 Transport and storage 15 Disposal of the battery, battery charger and machine 15 STARTING AND STOPPING Check before starting 16 Connect battery to the machine 16 Starting and stopping 16 WORKING TECHNIQUES General working instructions 17 MAINTENANCE...

Operation Manual
Page 5
...of this area Husqvarna is within these areas. If you will be necessary. We are convinced that it is working today. By following its content (usage, service, maintenance, etc), the life span and the second-hand value of forest and garden products, with repairs and service whenever this ..., the first motor driven lawn mowers appeared, followed by chain saws in 1959, and it will appreciate with your product and that you sell this may be your choice to buy a Husqvarna product! The business concept is not one of our product for a long time. The purchase of one...
...of this area Husqvarna is within these areas. If you will be necessary. We are convinced that it is working today. By following its content (usage, service, maintenance, etc), the life span and the second-hand value of forest and garden products, with repairs and service whenever this ..., the first motor driven lawn mowers appeared, followed by chain saws in 1959, and it will appreciate with your product and that you sell this may be your choice to buy a Husqvarna product! The business concept is not one of our product for a long time. The purchase of one...
Operation Manual
Page 6
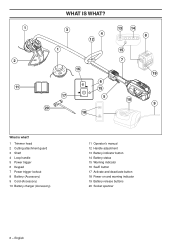
English 1 2 11 WHAT IS WHAT? 3 1 4 12 16 17 20 6 15 5 18 13 14 8 15 7 19 10 9 What is what? 1 Trimmer head 2 Cutting attachment guard 3 Shaft 4 Loop handle 5 Power trigger 6 Keypad 7 Power trigger lockout 8 Battery (Accessory) 9 Cord (Accessory) 10 Battery charger (Accessory) 11 Operator′s manual 12 Handle adjustment 13 Battery indicator button 14 Battery status 15 Warning indicator 16 SavE button 17 Activate and deactivate button 18 Power on and warning indicator 19 Battery release buttons 20 Socket spanner 6 -
English 1 2 11 WHAT IS WHAT? 3 1 4 12 16 17 20 6 15 5 18 13 14 8 15 7 19 10 9 What is what? 1 Trimmer head 2 Cutting attachment guard 3 Shaft 4 Loop handle 5 Power trigger 6 Keypad 7 Power trigger lockout 8 Battery (Accessory) 9 Cord (Accessory) 10 Battery charger (Accessory) 11 Operator′s manual 12 Handle adjustment 13 Battery indicator button 14 Battery status 15 Warning indicator 16 SavE button 17 Activate and deactivate button 18 Power on and warning indicator 19 Battery release buttons 20 Socket spanner 6 -

Operation Manual
Page 7
...) with this manual. Clean off the machine when it is in fluence of the machine before using a brush. Check that all times and especially when switching on the motor. • Dress properly. Replace the trimmer head or trimmer guard if they do not play with the appliance. • Never allow children or other well-lit conditions. Personal safety • The cutting tool does not...
...) with this manual. Clean off the machine when it is in fluence of the machine before using a brush. Check that all times and especially when switching on the motor. • Dress properly. Replace the trimmer head or trimmer guard if they do not play with the appliance. • Never allow children or other well-lit conditions. Personal safety • The cutting tool does not...

Operation Manual
Page 8
... comply with medical implants to use the machine. Listen out for instance in fog, in rain, damp or in the vicinity of this machine. Always remove your capability. electromagnetic field during operation. A lawn trimmer can face. WARNING! WARNING! GLOVES Gloves should consult an expert before operating this operator's manual. when fitting cutting attachments. 8 - English Extremely hot weather may...
... comply with medical implants to use the machine. Listen out for instance in fog, in rain, damp or in the vicinity of this machine. Always remove your capability. electromagnetic field during operation. A lawn trimmer can face. WARNING! WARNING! GLOVES Gloves should consult an expert before operating this operator's manual. when fitting cutting attachments. 8 - English Extremely hot weather may...
Operation Manual
Page 9
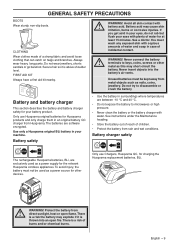
..., coins, screws or other devices. WARNING! There is above shoulder level. FIRST AID KIT Always have a first aid kit nearby. WARNING! terminals to microwaves or high pressure. • Never clean the battery or the battery charger with ! Battery safety • Use the battery in your machine. battery acid. CLOTHING Wear clothes made of children. • Protect the battery from ! See instructions under the Maintenance heading. •...
..., coins, screws or other devices. WARNING! There is above shoulder level. FIRST AID KIT Always have a first aid kit nearby. WARNING! terminals to microwaves or high pressure. • Never clean the battery or the battery charger with ! Battery safety • Use the battery in your machine. battery acid. CLOTHING Wear clothes made of children. • Protect the battery from ! See instructions under the Maintenance heading. •...
Operation Manual
Page 10
... risk of fire. • Regularly check that the battery charger connection wire is intact and that : • it is not possible to get it operates correctly. carried out to ensure that is wrapped around the trimmer head. • the machine is not carried out correctly and if service and/or repairs are no cracks in an environment...
... risk of fire. • Regularly check that the battery charger connection wire is intact and that : • it is not possible to get it operates correctly. carried out to ensure that is wrapped around the trimmer head. • the machine is not carried out correctly and if service and/or repairs are no cracks in an environment...

Operation Manual
Page 11
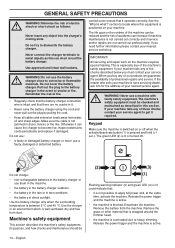
... the power trigger. Power trigger lockout The power trigger lockout is intended to prevent loose objects from accidental contact with the cutting attachment. 1 2 Make sure the power trigger is locked when the power trigger lock is renowned for the cutting attachment you release it. Cutting attachment guard Li-ion This guard is designed to prevent accidental operation of strength, changes in its original position. See the chapter on Technical data. See instructions under the heading Start...
... the power trigger. Power trigger lockout The power trigger lockout is intended to prevent loose objects from accidental contact with the cutting attachment. 1 2 Make sure the power trigger is locked when the power trigger lock is renowned for the cutting attachment you release it. Cutting attachment guard Li-ion This guard is designed to prevent accidental operation of strength, changes in its original position. See the chapter on Technical data. See instructions under the heading Start...

Operation Manual
Page 12
... the trimmer head to follow this instruction may cause personal injury. Always ensure the trimmer line is used to cut the cord to load the line and the correct line diameter. A longer cord requires greater engine power than a shorter cord of the cutting equipment. Only use . trimmer line. It continues to suit a particular motor size. Check that the cutting equipment has stopped completely and remove the battery before you start any work on any part of...
... the trimmer head to follow this instruction may cause personal injury. Always ensure the trimmer line is used to cut the cord to load the line and the correct line diameter. A longer cord requires greater engine power than a shorter cord of the cutting equipment. Only use . trimmer line. It continues to suit a particular motor size. Check that the cutting equipment has stopped completely and remove the battery before you start any work on any part of...

Operation Manual
Page 13
Tighten the wing nut. Fitting the loop handle ASSEMBLY Li-ion • Fit the screw into the loop handle. • Slide the clamp into the slot in the loop handle. • Fit the wing nut. • Now adjust the trimmer to give a comfortable working position. English - 13
Tighten the wing nut. Fitting the loop handle ASSEMBLY Li-ion • Fit the screw into the loop handle. • Slide the clamp into the slot in the loop handle. • Fit the wing nut. • Now adjust the trimmer to give a comfortable working position. English - 13

Operation Manual
Page 14
... battery capacity is displayed for instructions on the battery is lit. Regularly check that the cable is pressed. LED 1, LED 2, LED 3 are lit the battery is only 30% charged when delivered. • Put the battery in any problems with the battery. The battery is 50%-75% lit. LED 1 is lit when an error has occurred. Replace cable if it the first time. Put the electric plug...
... battery capacity is displayed for instructions on the battery is lit. Regularly check that the cable is pressed. LED 1, LED 2, LED 3 are lit the battery is only 30% charged when delivered. • Put the battery in any problems with the battery. The battery is 50%-75% lit. LED 1 is lit when an error has occurred. Replace cable if it the first time. Put the electric plug...

Operation Manual
Page 16
...; Never use the machine without a guard nor with a defective guard. • All covers must be worn when necessary. • Check that the trimmer head is completely attached to the machine. Make sure no unauthorised ! Starting Turn on the machine. Remove the battery from the engine using a brush. Check that all nuts and screws are tight. • Check that the machine is not being started by releasing the power trigger or the power trigger lockout...
...; Never use the machine without a guard nor with a defective guard. • All covers must be worn when necessary. • Check that the trimmer head is completely attached to the machine. Make sure no unauthorised ! Starting Turn on the machine. Remove the battery from the engine using a brush. Check that all nuts and screws are tight. • Check that the machine is not being started by releasing the power trigger or the power trigger lockout...
Operation Manual
Page 17
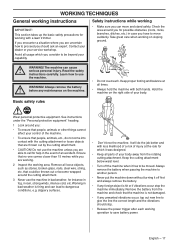
.... Keep the cutting attachment below waist level. • Turn off the machine when it off first and always remove the battery. • If any unwanted vibrations occur, tap out new line to use the machine unless you can move suddenly. Remove the battery from the rotating cutting attachment. Contact your dealer or your body away from the machine and check that no-one...
.... Keep the cutting attachment below waist level. • Turn off the machine when it off first and always remove the battery. • If any unwanted vibrations occur, tap out new line to use the machine unless you can move suddenly. Remove the battery from the rotating cutting attachment. Contact your dealer or your body away from the machine and check that no-one...

Operation Manual
Page 18
... battery before removing materials that are wound around the trimmer head as this can result in serious injury. Watch out for a while afterwards.You could get caught between the guard and cutting attachment. The green LED will light to indicate that the cord lasts longer and to 10-12 cm and reducing the engine speed. Always remove the battery before cleaning, carrying out repairs...
... battery before removing materials that are wound around the trimmer head as this can result in serious injury. Watch out for a while afterwards.You could get caught between the guard and cutting attachment. The green LED will light to indicate that the cord lasts longer and to 10-12 cm and reducing the engine speed. Always remove the battery before cleaning, carrying out repairs...

Operation Manual
Page 20
... nearest service agent. Keep the battery guide tracks clean. Always remove the battery ! Strong cleaning agents can damage the plastic. Only use . Clean plastic parts with water. WARNING! Cleaning Clean the machine after use the recommended trimmer heads and trimmer lines. IMPORTANT! Never clean the battery or the battery charger with a clean and dry cloth. • Replace the trimmer head. • Install the drive disc and the trimmer head. • Fit the nut and the line chute assembly. • Fit the trimmer head. 20 - Trimmer head Check...
... nearest service agent. Keep the battery guide tracks clean. Always remove the battery ! Strong cleaning agents can damage the plastic. Only use . Clean plastic parts with water. WARNING! Cleaning Clean the machine after use the recommended trimmer heads and trimmer lines. IMPORTANT! Never clean the battery or the battery charger with a clean and dry cloth. • Replace the trimmer head. • Install the drive disc and the trimmer head. • Fit the nut and the line chute assembly. • Fit the trimmer head. 20 - Trimmer head Check...
Operation Manual
Page 21
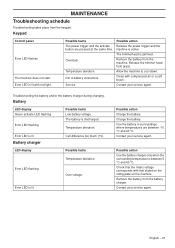
.... Use the battery in battery connectors. Contact your service agent. The trimmerhead is lit Battery charger LED display Cell difference too much (1V). Clean with that stated on the rating plate on the machine. Error LED is jammed. Check that the mains voltage corresponds with compressed air or a soft brush. Possible faults Possible action The power trigger and the activate Release the power trigger...
.... Use the battery in battery connectors. Contact your service agent. The trimmerhead is lit Battery charger LED display Cell difference too much (1V). Clean with that stated on the rating plate on the machine. Error LED is jammed. Check that the mains voltage corresponds with compressed air or a soft brush. Possible faults Possible action The power trigger and the activate Release the power trigger...

Operation Manual
Page 22
... power trigger lock and the power trigger function works correctly from oil and grease. X Check that nuts and screws are tight. X Check the connections between the battery and the machine and also check the connection between battery and the battery charger. Always remove the battery ! X Check that the battery is intact. English Maintenance Daily maintenance Clean the outside of view. Never use water. Maintenance schedule MAINTENANCE Li-ion WARNING! before any maintenance on the machine. Replace the trimmer head...
... power trigger lock and the power trigger function works correctly from oil and grease. X Check that nuts and screws are tight. X Check the connections between the battery and the machine and also check the connection between battery and the battery charger. Always remove the battery ! X Check that the battery is intact. English Maintenance Daily maintenance Clean the outside of view. Never use water. Maintenance schedule MAINTENANCE Li-ion WARNING! before any maintenance on the machine. Replace the trimmer head...
Operation Manual
Page 23
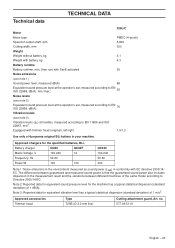
... dispersion in your machine. Approved accessories Trimmer head Type T25B (Ø 2.0 mm line) Cutting attachment guard, Art. TECHNICAL DATA Technical data 336LiC Motor Motor type PMDC (4-brush) Speed of the same model according to EN 11806 and ISO 22867, m/s2. Approved chargers for the machine has a typical statistical dispersion (standard deviation) of 1 m/s2. Note 3: Reported data for equivalent vibration level has a typical statistical dispersion (standard...
... dispersion in your machine. Approved accessories Trimmer head Type T25B (Ø 2.0 mm line) Cutting attachment guard, Art. TECHNICAL DATA Technical data 336LiC Motor Motor type PMDC (4-brush) Speed of the same model according to EN 11806 and ISO 22867, m/s2. Approved chargers for the machine has a typical statistical dispersion (standard deviation) of 1 m/s2. Note 3: Reported data for equivalent vibration level has a typical statistical dispersion (standard...

Parts List
Page 3
CUTTING EQUIPMENT Ref Part No Description 1 577 42 62-01 MOTOR COVER 2 579 21 19-01 SCREW IHSCT 3 577 96 51-01 TRIMMER GUARD 4 574 52 34-01 KNIFE 5 503 21 07-16 SCREW IHSCT 6 577 72 75-01 INSULATION WALL 7 501 69 39-01 MOTOR HOUSING 11 731 23 14-01 HEXAGON NUT 12 503 20 07-82 SCREW IHSCFM 13 577 98 95-01 BLADE SHAFT 14 578 07 02-01 BELT 15 577 42 60-01 COVER 16 503 21 68-16 SCREW IHSCT 18 578 78 93-01 NUT Remark 336 LiC QTY KIT 1 4 1 13 23 1 1 18 1 1 1 1 5 1
CUTTING EQUIPMENT Ref Part No Description 1 577 42 62-01 MOTOR COVER 2 579 21 19-01 SCREW IHSCT 3 577 96 51-01 TRIMMER GUARD 4 574 52 34-01 KNIFE 5 503 21 07-16 SCREW IHSCT 6 577 72 75-01 INSULATION WALL 7 501 69 39-01 MOTOR HOUSING 11 731 23 14-01 HEXAGON NUT 12 503 20 07-82 SCREW IHSCFM 13 577 98 95-01 BLADE SHAFT 14 578 07 02-01 BELT 15 577 42 60-01 COVER 16 503 21 68-16 SCREW IHSCT 18 578 78 93-01 NUT Remark 336 LiC QTY KIT 1 4 1 13 23 1 1 18 1 1 1 1 5 1


