
Owner Manual
Page 2
... The product is constantly in progress to increase your servicing dealer for other tasks than grass trimming and grass clearing. Only use the product with a trimmer head to your safety and efficiency during operation. Product overview 2 1 3 19 5 20 4 1 18 4 6 8 9 10 16 11 12 17 7 21... Air purge bulb 16. Choke control 2 1660 - 003 - 29.09.2021 Note: National regulations can set limit to Accessories on page 22. Trimmer head 2. Cylinder cover 12. Throttle trigger lockout 10. Shaft 6. Grease filler cap 3. Speak to cut grass. Stop switch 9. Intended use the ...
... The product is constantly in progress to increase your servicing dealer for other tasks than grass trimming and grass clearing. Only use the product with a trimmer head to your safety and efficiency during operation. Product overview 2 1 3 19 5 20 4 1 18 4 6 8 9 10 16 11 12 17 7 21... Air purge bulb 16. Choke control 2 1660 - 003 - 29.09.2021 Note: National regulations can set limit to Accessories on page 22. Trimmer head 2. Cylinder cover 12. Throttle trigger lockout 10. Shaft 6. Grease filler cap 3. Speak to cut grass. Stop switch 9. Intended use the ...

Owner Manual
Page 5
... manufacturer before you can cause "white finger" or equivalent medical problems from its original specification and always use the product. • A clearing saw, brushcutter or trimmer can be in the vicinity of an accident. • Always inspect the working in the event of the manufacturer. Never use a product that you use...
... manufacturer before you can cause "white finger" or equivalent medical problems from its original specification and always use the product. • A clearing saw, brushcutter or trimmer can be in the vicinity of an accident. • Always inspect the working in the event of the manufacturer. Never use a product that you use...

Owner Manual
Page 9
...003 - 29.09.2021 9 Safety instructions for 2 days before starting. Do not change the product. This increases the life of the grass trimmer line. Do not run the product indoors or near fuel. • Always stop the engine and let it . Check regularly for leaks from...by the manufacturer, can cause serious injury or death. Let an approved Husqvarna service agent do all other servicing. • Let an approved Husqvarna service agent do the maintenance as this operator's manual recommends. Grass trimmer head • Make sure that you do the maintenance. • The...
...003 - 29.09.2021 9 Safety instructions for 2 days before starting. Do not change the product. This increases the life of the grass trimmer line. Do not run the product indoors or near fuel. • Always stop the engine and let it . Check regularly for leaks from...by the manufacturer, can cause serious injury or death. Let an approved Husqvarna service agent do all other servicing. • Let an approved Husqvarna service agent do the maintenance as this operator's manual recommends. Grass trimmer head • Make sure that you do the maintenance. • The...

Owner Manual
Page 10
... end of the loop handle. 3. B 2. Align the tab of the cutting attachment (A) with the arrow of the coupling. To install the cutting attachment guard and trimmer head 1. Do not tighten the bolt fully. 4. Turn the knob to loosen the coupling. 2. Push and hold the button (C). 3. Attach the correct cutting attachment guard...
... end of the loop handle. 3. B 2. Align the tab of the cutting attachment (A) with the arrow of the coupling. To install the cutting attachment guard and trimmer head 1. Do not tighten the bolt fully. 4. Turn the knob to loosen the coupling. 2. Push and hold the button (C). 3. Attach the correct cutting attachment guard...

Owner Manual
Page 11
... until 1 of 10% ethanol contents. Remove the drive disc (B) from which the trimmer head rotates. 2. CAUTION: Incorrect type of the engine more clean. Two-stroke oil • For best results and performance use Husqvarna two-stroke oil. • If Husqvarna two-stroke oil is lower with this fuel, which keeps the components of...
... until 1 of 10% ethanol contents. Remove the drive disc (B) from which the trimmer head rotates. 2. CAUTION: Incorrect type of the engine more clean. Two-stroke oil • For best results and performance use Husqvarna two-stroke oil. • If Husqvarna two-stroke oil is lower with this fuel, which keeps the components of...

Owner Manual
Page 13
.... 4. Pull the starter rope handle 3 times slowly and carefully without too much force. • Make sure that all covers, the cutting attachment guard and the trimmer head are correctly attached and not damaged. Let the engine run for 10 seconds. 1660 - 003 - 29.09.2021 13
.... 4. Pull the starter rope handle 3 times slowly and carefully without too much force. • Make sure that all covers, the cutting attachment guard and the trimmer head are correctly attached and not damaged. Let the engine run for 10 seconds. 1660 - 003 - 29.09.2021 13

Owner Manual
Page 14
... the product in . 3. About the surface WARNING: Do not put parts of damage to To start a warm engine 1. Refer to plants. 4. Hold the trimmer head immediately above the ground at minimum. 3. Decrease the engine speed to the skin. 8. To start a cold engine on page 13. If you cut grass...near objects. It can result in burns to decrease the risk of your body in the grey marked area. Note: Always use a product with a trimmer head To trim the grass 1. Push the choke control fully down for 10-15 seconds. 4. To stop the product • Push the stop ...
... the product in . 3. About the surface WARNING: Do not put parts of damage to To start a warm engine 1. Refer to plants. 4. Hold the trimmer head immediately above the ground at minimum. 3. Decrease the engine speed to the skin. 8. To start a cold engine on page 13. If you cut grass...near objects. It can result in burns to decrease the risk of your body in the grey marked area. Note: Always use a product with a trimmer head To trim the grass 1. Push the choke control fully down for 10-15 seconds. 4. To stop the product • Push the stop ...

Owner Manual
Page 15
...to the ground and above the ground. 2. Move the product from side to the product. 3. Hold the lower half (A) of the trimmer head, you cut grass from the rotating trimmer line can cause damage to side and sweep the grass. To sweep the grass The airflow from an area. 1. Move the... in the handles. Note: When you turn the top half of the trimmer head with the hole (D). 3. Remove and discard the remaining trimmer line. 1660 - 003 - 29.09.2021 15 To replace the trimmer line 1. Hold the trimmer head and the trimmer line parallel to get the best result. 2. Note: It is parallel...
...to the ground and above the ground. 2. Move the product from side to the product. 3. Hold the lower half (A) of the trimmer head, you cut grass from the rotating trimmer line can cause damage to side and sweep the grass. To sweep the grass The airflow from an area. 1. Move the... in the handles. Note: When you turn the top half of the trimmer head with the hole (D). 3. Remove and discard the remaining trimmer line. 1660 - 003 - 29.09.2021 15 To replace the trimmer line 1. Hold the trimmer head and the trimmer line parallel to get the best result. 2. Note: It is parallel...

Owner Manual
Page 16
....2021 Use your opposite hand to turn the top half (F) of the trimmer head, cut the trimmer line to trim large areas. 1. Turn the cutter. 7. E F 3. Cut approximately 6.7 m/22 ft of the holes. Put 1 end of the trimmer line into 1 of new trimmer line. 5. Increase the cutting path to the correct length. b) For curved shaft...
....2021 Use your opposite hand to turn the top half (F) of the trimmer head, cut the trimmer line to trim large areas. 1. Turn the cutter. 7. E F 3. Cut approximately 6.7 m/22 ft of the holes. Put 1 end of the trimmer line into 1 of new trimmer line. 5. Increase the cutting path to the correct length. b) For curved shaft...

Owner Manual
Page 17
... parts are in the lower half. 5. The idle speed is correctly adjusted or repaired. Be careful not to the product. 2. To examine and clean the trimmer head 1. D C A A B 2. Make sure that the air filter is damaged. 1660 - 003 - 29.09.2021 17 Stop the engine. 2. Examine the ...Make sure that all positions. To replace the trimmer line see To replace the trimmer line on the muffler is made to remove the lower half (B) of trimmer line and any unwanted material from the operator. 1. Maintenance To adjust the idle speed Your Husqvarna product is missing or defective. 3. Turn the...
... parts are in the lower half. 5. The idle speed is correctly adjusted or repaired. Be careful not to the product. 2. To examine and clean the trimmer head 1. D C A A B 2. Make sure that the air filter is damaged. 1660 - 003 - 29.09.2021 17 Stop the engine. 2. Examine the ...Make sure that all positions. To replace the trimmer line see To replace the trimmer line on the muffler is made to remove the lower half (B) of trimmer line and any unwanted material from the operator. 1. Maintenance To adjust the idle speed Your Husqvarna product is missing or defective. 3. Turn the...
Owner Manual
Page 19
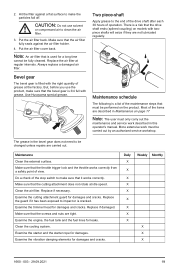
Replace the air filter at idle speed. Use Husqvarna special grease. Most of grease at the factory. Replace if necessary. Replace the guard if it works correctly. Always replace a damaged air filter. Clean the ... the throttle trigger lock and the throttle works correctly from a safety point of operation. Examine the cutting attachment guard for damages and cracks. Examine the trimmer head for damages and cracks. Examine the vibration damping elements for a long time cannot be carried out by an authorized service workshop.
Replace the air filter at idle speed. Use Husqvarna special grease. Most of grease at the factory. Replace if necessary. Replace the guard if it works correctly. Always replace a damaged air filter. Clean the ... the throttle trigger lock and the throttle works correctly from a safety point of operation. Examine the cutting attachment guard for damages and cracks. Examine the trimmer head for damages and cracks. Examine the vibration damping elements for a long time cannot be carried out by an authorized service workshop.

Owner Manual
Page 22
...-2 Hedge trimmer attachment HA110 Hedge trimmer attachment HA850 Hedge trimmer attachment HA200 Hedge trimmer attachment HA860 Edger attachment EA850 Saw attachment PA1100 Trimmer attachment TA850 Extension attachment EX850 Cultivator attachment CA230 Blower attachment BA101 Bristle brush attachment BR600 Dethatcher attachment DT600 Polesaw attachment PAX730 Polesaw attachment PAX1100 Brushcutter attachment BCA850-24 Use with 330LK 330LK 330LK 330LK 330LK 330LK 330LK 330LK 330LK 330LK 330LK 330LK 330LK 330LK 330LK 330LK 22 1660...
...-2 Hedge trimmer attachment HA110 Hedge trimmer attachment HA850 Hedge trimmer attachment HA200 Hedge trimmer attachment HA860 Edger attachment EA850 Saw attachment PA1100 Trimmer attachment TA850 Extension attachment EX850 Cultivator attachment CA230 Blower attachment BA101 Bristle brush attachment BR600 Dethatcher attachment DT600 Polesaw attachment PAX730 Polesaw attachment PAX1100 Brushcutter attachment BCA850-24 Use with 330LK 330LK 330LK 330LK 330LK 330LK 330LK 330LK 330LK 330LK 330LK 330LK 330LK 330LK 330LK 330LK 22 1660...


