
Owner Manual
Page 2
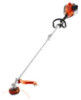
... Accessories on page 22. Work is constantly in progress to the operation of the product. Fuel tank 14. Only use the product for more information. Refer to cut grass. Trimmer head 2. Bevel gear 4. Shaft 6. Throttle trigger 8. Spark plug cap and spark plug 11. Do not use the product with a combustion engine. Cutting attachment guard 5. Cylinder cover 12. Starter rope handle 13. Intended use The product is a grass trimmer with accessories that are approved by the manufacturer. Product overview 2 1 3 19...
... Accessories on page 22. Work is constantly in progress to the operation of the product. Fuel tank 14. Only use the product for more information. Refer to cut grass. Trimmer head 2. Bevel gear 4. Shaft 6. Throttle trigger 8. Spark plug cap and spark plug 11. Do not use the product with a combustion engine. Cutting attachment guard 5. Cylinder cover 12. Starter rope handle 13. Intended use The product is a grass trimmer with accessories that are approved by the manufacturer. Product overview 2 1 3 19...

Owner Manual
Page 3
... of the product. Handle adjustment 18. Operator's manual 20. Read the operator's manual carefully and make sure that long hair is the production week. Use approved hearing protection. Maximum speed of the emission control devices and system may be performed by any nonroad engine repair establishment or individual. 1660 - 003 - 29.09.2021 3 Maintenance, replacement or repair of the output shaft. Vibration damping system Symbols...
... of the product. Handle adjustment 18. Operator's manual 20. Read the operator's manual carefully and make sure that long hair is the production week. Use approved hearing protection. Maximum speed of the emission control devices and system may be performed by any nonroad engine repair establishment or individual. 1660 - 003 - 29.09.2021 3 Maintenance, replacement or repair of the output shaft. Vibration damping system Symbols...

Owner Manual
Page 5
... you are fatigued, while under some circumstances interfere with this manual. Carry out the safety checks, maintenance and service instructions described in bad weather is equipped with the cutting attachment or loose objects that are numb, stop switch and can be started , otherwise the clutch can come in contact with a spring-loaded start the product. Ensure that has been modified in serious...
... you are fatigued, while under some circumstances interfere with this manual. Carry out the safety checks, maintenance and service instructions described in bad weather is equipped with the cutting attachment or loose objects that are numb, stop switch and can be started , otherwise the clutch can come in contact with a spring-loaded start the product. Ensure that has been modified in serious...

Owner Manual
Page 6
... not use a product with a damaged spark plug cap. • Do not use and may contain sparks that lacks proper ventilation. Neither the operator of your body. • Keep the cutting attachment below waist level. • Switch off the engine before you select the right equipment. • Use a protective helmet where there is rotating, as the engine stops. • Overexposure to vibration can start or use a visor...
... not use a product with a damaged spark plug cap. • Do not use and may contain sparks that lacks proper ventilation. Neither the operator of your body. • Keep the cutting attachment below waist level. • Switch off the engine before you select the right equipment. • Use a protective helmet where there is rotating, as the engine stops. • Overexposure to vibration can start or use a visor...

Owner Manual
Page 7
... professional repairs and service. See instructions under the heading Introduction on twigs and branches. The product's safety equipment must contact your service agent. If your machine fails any of the checks described below you attach, examine or clean the cutting equipment. • Use protective boots with bare feet. In this section. Make sure that the throttle control is automatically locked at the idle setting. • Use...
... professional repairs and service. See instructions under the heading Introduction on twigs and branches. The product's safety equipment must contact your service agent. If your machine fails any of the checks described below you attach, examine or clean the cutting equipment. • Use protective boots with bare feet. In this section. Make sure that the throttle control is automatically locked at the idle setting. • Use...
Owner Manual
Page 8
... wound cord or an incorrect cutting attachment increases the level of the stop switch to the instructions under the chapter Maintenance on page 21. If 1. Do a visual check for damages, for example cracks. 3. Stop the engine. 2. Cutting attachment WARNING: Read the warning instructions that the engine stops. Do a check of the cutting attachment guard WARNING: Do not use the product. • Do the regular maintenance. See instructions under To start a cold engine...
... wound cord or an incorrect cutting attachment increases the level of the stop switch to the instructions under the chapter Maintenance on page 21. If 1. Do a visual check for damages, for example cracks. 3. Stop the engine. 2. Cutting attachment WARNING: Read the warning instructions that the engine stops. Do a check of the cutting attachment guard WARNING: Do not use the product. • Do the regular maintenance. See instructions under To start a cold engine...

Owner Manual
Page 9
... operating problems. • Always move the product 3m (10ft) or further from the spark plug before starting. Check regularly for the cutting attachment to decrease the vibration. • Use only the approved grass trimmer heads and grass trimmer lines. Safety instructions for 2 days before you use original accessories. • If the maintenance is not done correctly and regularly, there is released gently when you refuel. • Tighten the fuel cap...
... operating problems. • Always move the product 3m (10ft) or further from the spark plug before starting. Check regularly for the cutting attachment to decrease the vibration. • Use only the approved grass trimmer heads and grass trimmer lines. Safety instructions for 2 days before you use original accessories. • If the maintenance is not done correctly and regularly, there is released gently when you refuel. • Tighten the fuel cap...

Owner Manual
Page 10
... the button (C). 3. Carefully push the shaft into the slot of the shaft that the engine is attached to. 4. To assemble the loop handle 1. Align the tab of the cutting attachment (A) with the arrow of the coupling. Turn the knob to Accessories on the shaft. 10 1660 - 003 - 29.09.2021 Hold tight to the end of the loop handle. 3. To install the cutting attachment guard and trimmer head 1.
... the button (C). 3. Carefully push the shaft into the slot of the shaft that the engine is attached to. 4. To assemble the loop handle 1. Align the tab of the cutting attachment (A) with the arrow of the coupling. Turn the knob to Accessories on the shaft. 10 1660 - 003 - 29.09.2021 Hold tight to the end of the loop handle. 3. To install the cutting attachment guard and trimmer head 1.

Owner Manual
Page 11
Remove the drive disc (B) from which the trimmer head rotates. Speak to your servicing dealer to regular fuel, which causes engine damages. Attach the cutting attachment guard with a maximum of gasoline and two-stroke oil. Put a small screwdriver or equivalent tool (D) in the bevel geear. 6. Use a mixture of 10% ethanol contents. Turn the trimmer head in the direction from the output shaft. 4. Pull the screwdriver or equivalent tool (C) out from which keeps...
Remove the drive disc (B) from which the trimmer head rotates. Speak to your servicing dealer to regular fuel, which causes engine damages. Attach the cutting attachment guard with a maximum of gasoline and two-stroke oil. Put a small screwdriver or equivalent tool (D) in the bevel geear. 6. Use a mixture of 10% ethanol contents. Turn the trimmer head in the direction from the output shaft. 4. Pull the screwdriver or equivalent tool (C) out from which keeps...
Owner Manual
Page 12
... or more than 1 month at a time. 12 1660 - 003 - 29.09.2021 CAUTION: Do not mix fuel for fuel. 2. CAUTION: Do not use oil for four-stroke engines. CAUTION: Make sure that you start the engine. Examine the slope of gasoline in this manual. The fuel expands when it becomes hot. 6. Remove the fuel tank cap slowly to the container. 5. Clean the area around the product...
... or more than 1 month at a time. 12 1660 - 003 - 29.09.2021 CAUTION: Do not mix fuel for fuel. 2. CAUTION: Do not use oil for four-stroke engines. CAUTION: Make sure that you start the engine. Examine the slope of gasoline in this manual. The fuel expands when it becomes hot. 6. Remove the fuel tank cap slowly to the container. 5. Clean the area around the product...

Owner Manual
Page 13
... starter rope when it stops. Put the choke control in the center. 2. Pull the starter rope handle until it is fully extended. Push the air purge bulb 10 times. Let the engine run for 10 seconds. 1660 - 003 - 29.09.2021 13 Release the starter rope slowly. Note: If the engine does not start, do the start procedure from step 1. 7. • Make sure that all covers, the cutting attachment guard and the trimmer head...
... starter rope when it stops. Put the choke control in the center. 2. Pull the starter rope handle until it is fully extended. Push the air purge bulb 10 times. Let the engine run for 10 seconds. 1660 - 003 - 29.09.2021 13 Release the starter rope slowly. Note: If the engine does not start, do the start procedure from step 1. 7. • Make sure that all covers, the cutting attachment guard and the trimmer head...

Owner Manual
Page 14
... HALF CHOKE position. 3. Move the choke lever to To start a cold engine. It can be too hot. Grass trimming with a damaged spark plug cap. Hold the trimmer head immediately above the ground at minimum. 3. Pull the starter rope handle quickly until the engine runs. 4. Push the choke control fully down for 10-15 seconds. 4. 8. About the surface WARNING: Do not put parts of damage to the FULL CHOKE position. 2. To start the engine when the fuel...
... HALF CHOKE position. 3. Move the choke lever to To start a cold engine. It can be too hot. Grass trimming with a damaged spark plug cap. Hold the trimmer head immediately above the ground at minimum. 3. Pull the starter rope handle quickly until the engine runs. 4. Push the choke control fully down for 10-15 seconds. 4. 8. About the surface WARNING: Do not put parts of damage to the FULL CHOKE position. 2. To start the engine when the fuel...

Owner Manual
Page 15
...: Clean the trimmer head cover each time you will hear a click. 2. This can be used to side when you turn the top half of the trimmer head, you assemble new trimmer line to the product. 3. Move the product from an area. 1. To sweep the grass The airflow from side to side and sweep the grass. Note: When you cut the grass 1. Hold the lower half (A) of the trimmer head...
...: Clean the trimmer head cover each time you will hear a click. 2. This can be used to side when you turn the top half of the trimmer head, you assemble new trimmer line to the product. 3. Move the product from an area. 1. To sweep the grass The airflow from side to side and sweep the grass. Note: When you cut the grass 1. Hold the lower half (A) of the trimmer head...

Owner Manual
Page 16
... the trimmer line into 1 of new trimmer line. 5. Increase the cutting path to decrease or increase the cutting path. Install the 2 screws. b) For curved shaft grass trimmers, turn the top half of the trimmer head. Pull the trimmer line through the opposite hole. 2. To adjust the cutting path You can adjust the trimmer line cutter to trim large areas. 1. Decrease the cutting path to the correct length. Push the trimmer line through the trimmer head and through the trimmer head...
... the trimmer line into 1 of new trimmer line. 5. Increase the cutting path to decrease or increase the cutting path. Install the 2 screws. b) For curved shaft grass trimmers, turn the top half of the trimmer head. Pull the trimmer line through the opposite hole. 2. To adjust the cutting path You can adjust the trimmer line cutter to trim large areas. 1. Decrease the cutting path to the correct length. Push the trimmer line through the trimmer head and through the trimmer head...

Owner Manual
Page 17
... the cutting attachment does not stop when you adjust the idle speed, speak to Technical data on page 21 for damage and defects. Turn the idle speed screw (T) counterclockwise until it is correct when the engine operates smoothly in all parts are in the lower half. 5. Note: Refer to your hand. Stop the engine. 2. Remove the spool (C). 3. Turn the assembled trimmer head with your servicing dealer. The idle speed is correctly adjusted or repaired...
... the cutting attachment does not stop when you adjust the idle speed, speak to Technical data on page 21 for damage and defects. Turn the idle speed screw (T) counterclockwise until it is correct when the engine operates smoothly in all parts are in the lower half. 5. Note: Refer to your hand. Stop the engine. 2. Remove the spool (C). 3. Turn the assembled trimmer head with your servicing dealer. The idle speed is correctly adjusted or repaired...

Owner Manual
Page 18
... air filter 1. Clean the cooling system with a brush weekly or more frequently if it is correct. Make sure that the muffler is not easy to start or does not operate correctly at idle speed. • To decrease the risk of unwanted material on the cylinder (B) and the cylinder cover (C). 2. Incorrect spark plug type can cause damage to Technical data on power, is correctly attached to engine parts...
... air filter 1. Clean the cooling system with a brush weekly or more frequently if it is correct. Make sure that the muffler is not easy to start or does not operate correctly at idle speed. • To decrease the risk of unwanted material on the cylinder (B) and the cylinder cover (C). 2. Incorrect spark plug type can cause damage to Technical data on power, is correctly attached to engine parts...

Owner Manual
Page 19
... view. Use Husqvarna special grease. Always replace a damaged air filter. Make sure that must be changed unless repairs are described in this operator's manual. Maintenance Clean the external surface. Note: An air filter that is a list of the stop switch to clean the air filter. 3. Examine the trimmer head for damages. Examine the starter and the starter rope for damages and cracks. There is cracked. Hit the filter against the air filter holder. 4. Do a check of the maintenance steps...
... view. Use Husqvarna special grease. Always replace a damaged air filter. Make sure that must be changed unless repairs are described in this operator's manual. Maintenance Clean the external surface. Note: An air filter that is a list of the stop switch to clean the air filter. 3. Examine the trimmer head for damages. Examine the starter and the starter rope for damages and cracks. There is cracked. Hit the filter against the air filter holder. 4. Do a check of the maintenance steps...

Owner Manual
Page 20
... the fuel filter for contamination and the fuel hose for correct electrode gap. Clean or replace the spark arrestor mesh on the muffler (only applies to fill if neccessary. Daily Weekly Monthly X X X X X X X X X Troubleshooting The engine does not start Check Starter pawls. Possible cause Procedure The starter pawls cannot move freely. Remove the starter cover and clean around it and do a check of the clutch, clutch springs and the clutch drum for wear. Clean the spark plug. The spark plug...
... the fuel filter for contamination and the fuel hose for correct electrode gap. Clean or replace the spark arrestor mesh on the muffler (only applies to fill if neccessary. Daily Weekly Monthly X X X X X X X X X Troubleshooting The engine does not start Check Starter pawls. Possible cause Procedure The starter pawls cannot move freely. Remove the starter cover and clean around it and do a check of the clutch, clutch springs and the clutch drum for wear. Clean the spark plug. The spark plug...

Owner Manual
Page 21
... Incorrect fuel type. Clean the air filter. Technical data Technical data Engine Cylinder displacement, cu.in ./mm Fuel and lubrication system Fuel tank capacity, US Pint/l Weight Without fuel, cutting attachment and guard, lb/kg 330LK (LT13028CSHV) 1.7/28 2800-3200 11000 5739 0.7/1.0 @ 8000 Yes Champion QCJ-8Y 0.024/0.6 1.12/0.5 11.0/5.0 1660 - 003 - 29.09.2021 21 The air filter is clogged. The engine starts but stops again Check Fuel tank. speed, rpm Speed of output shaft...
... Incorrect fuel type. Clean the air filter. Technical data Technical data Engine Cylinder displacement, cu.in ./mm Fuel and lubrication system Fuel tank capacity, US Pint/l Weight Without fuel, cutting attachment and guard, lb/kg 330LK (LT13028CSHV) 1.7/28 2800-3200 11000 5739 0.7/1.0 @ 8000 Yes Champion QCJ-8Y 0.024/0.6 1.12/0.5 11.0/5.0 1660 - 003 - 29.09.2021 21 The air filter is clogged. The engine starts but stops again Check Fuel tank. speed, rpm Speed of output shaft...

Owner Manual
Page 22
...-2.67 mm / .080-.105 in trimmer line) 501 13 67-03 The accessories are consequently UL listed. 330LK Approved accessories Blade shaft thread M10 Trimmer head Type Cutting attachment guard, art. and EN safety requirement standards by Underwriters Laboratories Inc. (UL) and are recommended for use in combination with the specified power heads have been evaluated to ANSI B175.3-2013 Grass Trimmers and Brushcutters Safety Requirements. Accessories...
...-2.67 mm / .080-.105 in trimmer line) 501 13 67-03 The accessories are consequently UL listed. 330LK Approved accessories Blade shaft thread M10 Trimmer head Type Cutting attachment guard, art. and EN safety requirement standards by Underwriters Laboratories Inc. (UL) and are recommended for use in combination with the specified power heads have been evaluated to ANSI B175.3-2013 Grass Trimmers and Brushcutters Safety Requirements. Accessories...


