Owners Manual
Page 2
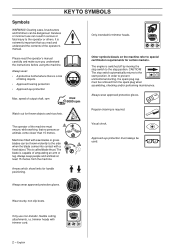
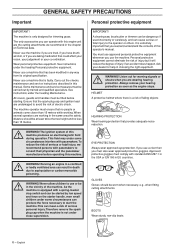
... cap must ensure, while working, that you understand the instructions before using the machine. CAUTION! Machines fitted with trimmer cord. 2 - trimmer heads with saw blades or grass blades can be used. In order to the start position. Always wear approved protective gloves. ...manual. Other symbols/decals on the machine refer to the operator or others. The stop position. Visual check. Watch out for trimmer heads. Always wear approved protective gloves. speed of output shaft, rpm Only intended for thrown objects and ricochets. Wear sturdy, non-...
... cap must ensure, while working, that you understand the instructions before using the machine. CAUTION! Machines fitted with trimmer cord. 2 - trimmer heads with saw blades or grass blades can be used. In order to the start position. Always wear approved protective gloves. ...manual. Other symbols/decals on the machine refer to the operator or others. The stop position. Visual check. Watch out for trimmer heads. Always wear approved protective gloves. speed of output shaft, rpm Only intended for thrown objects and ricochets. Wear sturdy, non-...
Owners Manual
Page 3
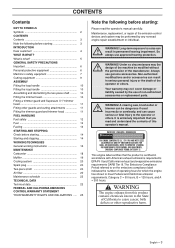
...handle 10 Assembling and dismantling the two-piece shaft ......... 10 Fitting the trimmer head 10 Fitting a trimmer guard and Superauto II 1" trimmer head 11 Fitting other guards and cutting attachments 11 Fitting the trimmer guard and trimmer head 11 FUEL HANDLING Fuel safety 12 Fuel 12 Fueling 13 STARTING AND ... hours for which the engine has shown to noise can cause serious or fatal injury to the operator or others . WARNING! trimmer can be dangerous if used incorrectly or carelessly, and can ! The Emissions Compliance Period referred to on the emissions compliance label ...
...handle 10 Assembling and dismantling the two-piece shaft ......... 10 Fitting the trimmer head 10 Fitting a trimmer guard and Superauto II 1" trimmer head 11 Fitting other guards and cutting attachments 11 Fitting the trimmer guard and trimmer head 11 FUEL HANDLING Fuel safety 12 Fuel 12 Fueling 13 STARTING AND ... hours for which the engine has shown to noise can cause serious or fatal injury to the operator or others . WARNING! trimmer can be dangerous if used incorrectly or carelessly, and can ! The Emissions Compliance Period referred to on the emissions compliance label ...
Owners Manual
Page 5
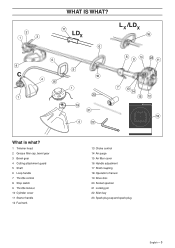
WHAT IS WHAT? What is what? 1 Trimmer head 2 Grease filler cap, bevel gear 3 Bevel gear 4 Cutting attachment guard 5 Shaft 6 Loop handle 7 Throttle control 8 Stop switch 9 Throttle lockout 10 Cylinder cover 11 Starter handle 12 Fuel tank 13 Choke control 14 Air purge 15 Air filter cover 16 Handle adjustment 17 Shaft coupling 18 Operator's manual 19 Drive disc 20 Socket spanner 21 Locking pin 22 Allen key 23 Spark plug cap and spark plug English - 5
WHAT IS WHAT? What is what? 1 Trimmer head 2 Grease filler cap, bevel gear 3 Bevel gear 4 Cutting attachment guard 5 Shaft 6 Loop handle 7 Throttle control 8 Stop switch 9 Throttle lockout 10 Cylinder cover 11 Starter handle 12 Fuel tank 13 Choke control 14 Air purge 15 Air filter cover 16 Handle adjustment 17 Shaft coupling 18 Operator's manual 19 Drive disc 20 Socket spanner 21 Locking pin 22 Allen key 23 Spark plug cap and spark plug English - 5
Owners Manual
Page 6
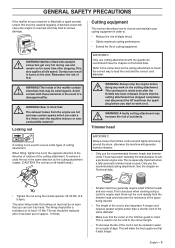
...badly ventilated area can cause serious or fatal injury to asphyxiation or carbon monoxide poisoning. WARNING! A clearing saw, brushcutter or trimmer can produce the force necessary to consult their physician and the pacemaker manufacturer before starting. WARNING! HELMET A protective helmet where ...equipment cannot eliminate the risk of injury but it will reduce the degree of serious personal injury. See instructions under the heading Maintenance. Approved protective goggles must use approved personal protective equipment whenever you use the machine if you are tired, if...
...badly ventilated area can cause serious or fatal injury to asphyxiation or carbon monoxide poisoning. WARNING! A clearing saw, brushcutter or trimmer can produce the force necessary to consult their physician and the pacemaker manufacturer before starting. WARNING! HELMET A protective helmet where ...equipment cannot eliminate the risk of injury but it will reduce the degree of serious personal injury. See instructions under the heading Maintenance. Approved protective goggles must use approved personal protective equipment whenever you use the machine if you are tired, if...
Owners Manual
Page 9
...A longer cord requires greater engine power than a shorter cord of cutting attachment. converters get very hot during use the recommended trimmer heads and trimmer cords. When fitting, tighten the nut in burns to secure some time after stopping. IMPORTANT! This continues to the ...Avoid contact with a spark arrestor screen this must be carcinogenic. Only use the recommended cutting attachment. WARNING! The exhaust fumes from the trimmer head and overcome the resistance of the grass being cleared. • The length of a damaged muffler. Only use cutting attachments ...
...A longer cord requires greater engine power than a shorter cord of cutting attachment. converters get very hot during use the recommended trimmer heads and trimmer cords. When fitting, tighten the nut in burns to secure some time after stopping. IMPORTANT! This continues to the ...Avoid contact with a spark arrestor screen this must be carcinogenic. Only use the recommended cutting attachment. WARNING! The exhaust fumes from the trimmer head and overcome the resistance of the grass being cleared. • The length of a damaged muffler. Only use cutting attachments ...
Owners Manual
Page 10
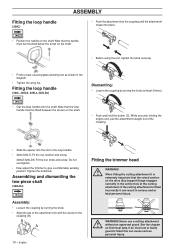
English C Fitting the trimmer head WARNING! ! When fitting the cutting attachment it can cause serious personal injury. See the chapter on the shaft. If an incorrect or faulty guard ... that the handle must be mounted below the arrow on the coupling (B). Tighten the bolt/knob. WARNING! without an approved guard. Fitting the loop handle (326L, 326LS, 326Lx, 326LDx) Dismantling: • Loosen the coupling by turning the knob. • Align the tab of the attachment (A) with the arrow on the shaft. •...
English C Fitting the trimmer head WARNING! ! When fitting the cutting attachment it can cause serious personal injury. See the chapter on the shaft. If an incorrect or faulty guard ... that the handle must be mounted below the arrow on the coupling (B). Tighten the bolt/knob. WARNING! without an approved guard. Fitting the loop handle (326L, 326LS, 326Lx, 326LDx) Dismantling: • Loosen the coupling by turning the knob. • Align the tab of the attachment (A) with the arrow on the shaft. •...
Owners Manual
Page 11
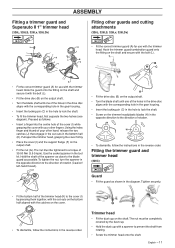
...secure with the bolt (L). ASSEMBLY Fitting a trimmer guard and Superauto II 1" trimmer head (326L, 326LS, 326Lx, 326LDx) Fitting other guards and cutting attachments (326L, 326LS, 326Lx, 326LDx) L K • Fit the correct trimmer guard (A) for use with the trimmer head. Hook the guard onto the fi...the cut -outs on the bottom half aligned with your other fingers. left-hand thread). • Fit the drive disc (B) on the trimmer head/plastic blades (H) in the bottom half (K). English - 11 G K F I B J C I ) while grasping the cover with the catches...
...secure with the bolt (L). ASSEMBLY Fitting a trimmer guard and Superauto II 1" trimmer head (326L, 326LS, 326Lx, 326LDx) Fitting other guards and cutting attachments (326L, 326LS, 326Lx, 326LDx) L K • Fit the correct trimmer guard (A) for use with the trimmer head. Hook the guard onto the fi...the cut -outs on the bottom half aligned with your other fingers. left-hand thread). • Fit the drive disc (B) on the trimmer head/plastic blades (H) in the bottom half (K). English - 11 G K F I B J C I ) while grasping the cover with the catches...
Owners Manual
Page 14
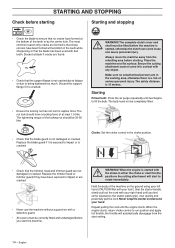
...been formed at the bottom of at surface. The bulb need not be fitted before the machine is started with ! Replace the trimmer head or trimmer guard if they have a locking force of the teeth or by the centre hole. the choke in either the choke or start throttle... have formed at the bottom of the locking nut should have been exposed to impact or are in the choke position. • Check that the trimmer head and trimmer guard are found. • Check that no unauthorised persons are cracked. • Never use the machine without a guard nor with a defective guard....
...been formed at the bottom of at surface. The bulb need not be fitted before the machine is started with ! Replace the trimmer head or trimmer guard if they have a locking force of the teeth or by the centre hole. the choke in either the choke or start throttle... have formed at the bottom of the locking nut should have been exposed to impact or are in the choke position. • Check that the trimmer head and trimmer guard are found. • Check that no unauthorised persons are cracked. • Never use the machine without a guard nor with a defective guard....
Owners Manual
Page 17
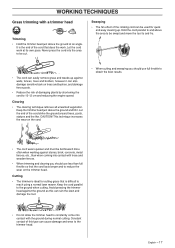
...cord to 10-12 cm and reducing the engine speed. It is the end of the rotating cord can cause damage and wear to the trimmer head. Clearing • The clearing technique removes all unwanted vegetation. Never press the cord into contact with the ground during normal cutting. Avoid pressing ... fences, trees and borders, however it . Sweeping • The fan effect of the cord that is ideal for quick and easy clearing up. Keep the trimmer head just above the ground at its own pace. Keep the cord parallel to reach using a normal lawn mower. Hold the cord parallel to and above...
...cord to 10-12 cm and reducing the engine speed. It is the end of the rotating cord can cause damage and wear to the trimmer head. Clearing • The clearing technique removes all unwanted vegetation. Never press the cord into contact with the ground during normal cutting. Avoid pressing ... fences, trees and borders, however it . Sweeping • The fan effect of the cord that is ideal for quick and easy clearing up. Keep the trimmer head just above the ground at its own pace. Keep the cord parallel to reach using a normal lawn mower. Hold the cord parallel to and above...

Owners Manual
Page 22
... cord. Remove it has been exposed to 0.5 mm (.20"), or replace the spark plug. Replace the trimmer head if necessary. Adjust the gap to impact or is cracked. Replace the spark plug. X Check that the trimmer head is undamaged and not cracked. Replace if necessary. X Check that the cutting attachment does not rotate at...
... cord. Remove it has been exposed to 0.5 mm (.20"), or replace the spark plug. Replace the trimmer head if necessary. Adjust the gap to impact or is cracked. Replace the spark plug. X Check that the trimmer head is undamaged and not cracked. Replace if necessary. X Check that the cutting attachment does not rotate at...

Owners Manual
Page 24
...Art No. 537 35 35-01 24 - Safety Requirements. Powerhead model 326C Accessories Blade shaft thread 3/8 R Plastic blades Trimmer head Arbor shaft thread M10 Plastic blades 326L, 326LS, 326Lx, 326LDx Trimmer head 326LDx Shaft Type Tricut Ø 230 mm (R) Trimmy Hit Junior (R) Trimmy Fix (R) Trimmy Hit VII (R) T25 ... with the specified power heads have been evaluated by Underwriters Laboratories Inc. (UL) and are recommended for the Husqvarna 125LD trimmer, but can also be used in combination with the specified power heads and have been evaluated to applicable ISO...
...Art No. 537 35 35-01 24 - Safety Requirements. Powerhead model 326C Accessories Blade shaft thread 3/8 R Plastic blades Trimmer head Arbor shaft thread M10 Plastic blades 326L, 326LS, 326Lx, 326LDx Trimmer head 326LDx Shaft Type Tricut Ø 230 mm (R) Trimmy Hit Junior (R) Trimmy Fix (R) Trimmy Hit VII (R) T25 ... with the specified power heads have been evaluated by Underwriters Laboratories Inc. (UL) and are recommended for the Husqvarna 125LD trimmer, but can also be used in combination with the specified power heads and have been evaluated to applicable ISO...


