
Owners Manual
Page 2
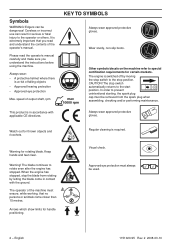
... starting, the spark plug cap must always be dangerous! Keep hands and feet clear. It is a risk of the machine must ensure, while working, that you read the operator's manual carefully and make sure you understand the instructions before using the machine. speed of the operator's manual. Watch out for rotating blade. The engine is required. In order to the stop position. Regular cleaning is switched...
... starting, the spark plug cap must always be dangerous! Keep hands and feet clear. It is a risk of the machine must ensure, while working, that you read the operator's manual carefully and make sure you understand the instructions before using the machine. speed of the operator's manual. Watch out for rotating blade. The engine is required. In order to the stop position. Regular cleaning is switched...
Owners Manual
Page 3
... cutting equipment 13 Assembling the blade (326Ex) 13 Assembling the blade (326ES) 13 FUEL HANDLING Fuel safety 14 Fuel 14 Fueling 15 STARTING AND STOPPING Check before starting 16 Starting and stopping 16 WORKING TECHNIQUES General working instructions 18 Basic working techniques 19 MAINTENANCE Carburetor 21 Muffler 23 Cooling system 23 Spark plug 23 Air filter 24 Angle gear 24 Lubricating the flexible drive shaft (326Ex) 25 Adjusting the edger's cutting depth (326Ex) 25 Adjusting the edger's cutting...
... cutting equipment 13 Assembling the blade (326Ex) 13 Assembling the blade (326ES) 13 FUEL HANDLING Fuel safety 14 Fuel 14 Fueling 15 STARTING AND STOPPING Check before starting 16 Starting and stopping 16 WORKING TECHNIQUES General working instructions 18 Basic working techniques 19 MAINTENANCE Carburetor 21 Muffler 23 Cooling system 23 Spark plug 23 Air filter 24 Angle gear 24 Lubricating the flexible drive shaft (326Ex) 25 Adjusting the edger's cutting depth (326Ex) 25 Adjusting the edger's cutting...
Owners Manual
Page 5
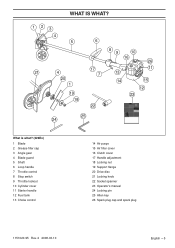
... 13 14 15 12 23 What is what? (326Ex) 1 Blade 2 Grease filler cap 3 Angle gear 4 Blade guard 5 Shaft 6 Loop handle 7 Throttle control 8 Stop switch 9 Throttle lockout 10 Cylinder cover 11 Starter handle 12 Fuel tank 13 Choke control 14 Air purge 15 Air filter cover 16 Clutch cover 17 Handle adjustment 18 Locking nut 19 Support flange 20 Drive disc 21 Locking knob 22 Socket spanner 23 Operator's manual 24 Locking pin 25 Allen key 26 Spark plug cap and spark plug 1151020-95 Rev. 2 2008-03-10 English...
... 13 14 15 12 23 What is what? (326Ex) 1 Blade 2 Grease filler cap 3 Angle gear 4 Blade guard 5 Shaft 6 Loop handle 7 Throttle control 8 Stop switch 9 Throttle lockout 10 Cylinder cover 11 Starter handle 12 Fuel tank 13 Choke control 14 Air purge 15 Air filter cover 16 Clutch cover 17 Handle adjustment 18 Locking nut 19 Support flange 20 Drive disc 21 Locking knob 22 Socket spanner 23 Operator's manual 24 Locking pin 25 Allen key 26 Spark plug cap and spark plug 1151020-95 Rev. 2 2008-03-10 English...
Owners Manual
Page 7
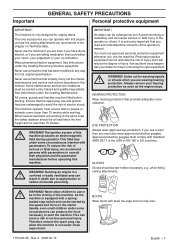
... cutting attachments we recommend persons with a spring- WARNING! An edger can be fitted before operating this engine unit are working . Personal protective equipment cannot eliminate the risk of injury but it will reduce the degree of serious personal injury. Therefore remove the spark plug cap when the machine is equipped with pacemakers to avoid the risk of electric shock. All covers, guards...
... cutting attachments we recommend persons with a spring- WARNING! An edger can be fitted before operating this engine unit are working . Personal protective equipment cannot eliminate the risk of injury but it will reduce the degree of serious personal injury. Therefore remove the spark plug cap when the machine is equipped with pacemakers to avoid the risk of electric shock. All covers, guards...

Owners Manual
Page 8
... handle the throttle control and the throttle lockout both move freely and that See instructions under the heading Start. If your machine fails any of our products we guarantee the availability of professional repairs and service. When you buy any of these checks contact your service agent to their original positions. Check that the throttle control and throttle lockout move back to get it operates correctly. the throttle control...
... handle the throttle control and the throttle lockout both move freely and that See instructions under the heading Start. If your machine fails any of our products we guarantee the availability of professional repairs and service. When you buy any of these checks contact your service agent to their original positions. Check that the throttle control and throttle lockout move back to get it operates correctly. the throttle control...
Owners Manual
Page 10
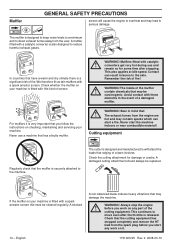
... the engine to overheat and may lead to the skin. before you start any part of screen. WARNING! This continues to the machine. A muffler fitted with a spark arrestor screen. converters get very hot during use a machine that you work on checking, maintaining and servicing your machine is also designed to withstand the loads that : ! Check the cutting attachment for some time...
... the engine to overheat and may lead to the skin. before you start any part of screen. WARNING! This continues to the machine. A muffler fitted with a spark arrestor screen. converters get very hot during use a machine that you work on checking, maintaining and servicing your machine is also designed to withstand the loads that : ! Check the cutting attachment for some time...

Owners Manual
Page 13
... injury. 6 Remove the locking pin. When fitting the cutting attachment it is extremely important that fits in the hole of the cutting attachment. CAUTION! If the cutting attachment is facing outward. 2 Block the blade rotation by inserting the locking pin in the hole behind the blade guard engaging it in the corresponding hole in the drive disc. 3 Fit the blade (B) on the drive disc/support fl...
... injury. 6 Remove the locking pin. When fitting the cutting attachment it is extremely important that fits in the hole of the cutting attachment. CAUTION! If the cutting attachment is facing outward. 2 Block the blade rotation by inserting the locking pin in the hole behind the blade guard engaging it in the corresponding hole in the drive disc. 3 Fit the blade (B) on the drive disc/support fl...
Owners Manual
Page 14
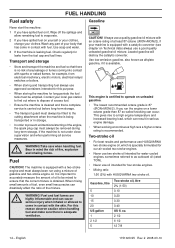
... of fuel, even small inaccuracies can result in storage. • In order to operate on Technical data) always use HUSQVARNA two-stroke engine oil, which can drastically affect the ratio of the engine, the spark plug cap must be removed during long-term storage, if the machine is obtained. This engine is certified to prevent unintentional starting of the mixture. WARNING! If you run using a mixture...
... of fuel, even small inaccuracies can result in storage. • In order to operate on Technical data) always use HUSQVARNA two-stroke engine oil, which can drastically affect the ratio of the engine, the spark plug cap must be removed during long-term storage, if the machine is obtained. This engine is certified to prevent unintentional starting of the mixture. WARNING! If you run using a mixture...
Owners Manual
Page 16
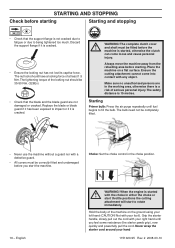
... bulb need not be fitted before the machine is started ! with the choke in either the choke or start throttle positions the cutting attachment will start the machine. Never wrap the starter cord around your left hand (CAUTION! Grip the starter handle, slowly pull out the cord with your right hand until fuel begins to rotate immediately. Replace the blade or blade guard if it is cracked. • Ensure the locking nut has...
... bulb need not be fitted before the machine is started ! with the choke in either the choke or start throttle positions the cutting attachment will start the machine. Never wrap the starter cord around your left hand (CAUTION! Grip the starter handle, slowly pull out the cord with your right hand until fuel begins to rotate immediately. Replace the blade or blade guard if it is cracked. • Ensure the locking nut has...

Owners Manual
Page 17
... stop switch automatically returns to the skin, or electrical shock if the spark plug cap has been damaged. Do not use gloves. When the engine starts. Stopping The engine is fully extended. STARTING AND STOPPING Repeat pulling the cord until the engine starts. CAUTION! Always use a machine with damaged spark plug cap. return choke control to prevent unintentional starting, the spark plug cap must be removed from the start position. the throttle will automatically disengage from the spark plug when assembling, checking...
... stop switch automatically returns to the skin, or electrical shock if the spark plug cap has been damaged. Do not use gloves. When the engine starts. Stopping The engine is fully extended. STARTING AND STOPPING Repeat pulling the cord until the engine starts. CAUTION! Always use a machine with damaged spark plug cap. return choke control to prevent unintentional starting, the spark plug cap must be removed from the start position. the throttle will automatically disengage from the spark plug when assembling, checking...

Owners Manual
Page 18
... described under the heading Personal protective equipment. • Always wear working area. may increase the risk of the operator's manual. 18 - Do not touch the ! Remove all nuts and screws. • Check the blade for . Stop the machine immediately if anyone approaches. • Check the entire machine before starting . English • Check that the blade and blade guard are working with edgers. Safety instructions regarding the...
... described under the heading Personal protective equipment. • Always wear working area. may increase the risk of the operator's manual. 18 - Do not touch the ! Remove all nuts and screws. • Check the blade for . Stop the machine immediately if anyone approaches. • Check the entire machine before starting . English • Check that the blade and blade guard are working with edgers. Safety instructions regarding the...

Owners Manual
Page 19
... immediately. Check that are able to serious engine damage. • Be especially careful when pulling the edger towards you during work. • If any foreign object is running unless you have it has stopped completely. 4 The engine must be thrown up into contact with the cutting attachment or loose objects that the machine is switched off, keep the blade close...
... immediately. Check that are able to serious engine damage. • Be especially careful when pulling the edger towards you during work. • If any foreign object is running unless you have it has stopped completely. 4 The engine must be thrown up into contact with the cutting attachment or loose objects that the machine is switched off, keep the blade close...

Owners Manual
Page 21
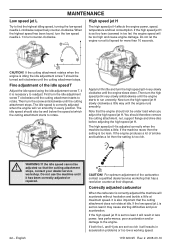
... been correctly adjusted or repaired. The air/fuel mixture is turned clockwise this could cause damage. • Now start the machine according to the starting instructions and let it anti-clockwise gives a lower idle speed. Basic setting • The basic carburetor settings are made, make sure that the cutting attachment stops, contact your dealer/service workshop. adjusted so that the air filter is clean and the air filter cover is...
... been correctly adjusted or repaired. The air/fuel mixture is turned clockwise this could cause damage. • Now start the machine according to the starting instructions and let it anti-clockwise gives a lower idle speed. Basic setting • The basic carburetor settings are made, make sure that the cutting attachment stops, contact your dealer/service workshop. adjusted so that the air filter is clean and the air filter cover is...
Owners Manual
Page 22
... highest speed has been found, turn the low speed needle L 1/4 turn the high speed jet H very slowly clockwise until it has been correctly adjusted or repaired. 22 - The idle speed should also be adjusted so that the engine should therefore remove the cutting attachment, nut, support flange and drive disc before adjusting the high speed jet H. Now turn the high speed jet H very slowly anticlockwise until the cutting attachment stops. Correctly adjusted carburetor When the carburetor is set too...
... highest speed has been found, turn the low speed needle L 1/4 turn the high speed jet H very slowly clockwise until it has been correctly adjusted or repaired. 22 - The idle speed should also be adjusted so that the engine should therefore remove the cutting attachment, nut, support flange and drive disc before adjusting the high speed jet H. Now turn the high speed jet H very slowly anticlockwise until the cutting attachment stops. Correctly adjusted carburetor When the carburetor is set too...

Owners Manual
Page 23
...; Incorrect carburetor adjustment. • An incorrect fuel mixture (too much or incorrect type of the catalytic converter is fitted with a catalytic converter the screen should be cleaned weekly, or replaced if necessary. If the screen is 0.020 inch (0.5 1151020-95 Rev. 2 2008-03-10 English - 23 If the spark plug is dirty, clean it should be a sign that the electrode gap is frequently...
...; Incorrect carburetor adjustment. • An incorrect fuel mixture (too much or incorrect type of the catalytic converter is fitted with a catalytic converter the screen should be cleaned weekly, or replaced if necessary. If the screen is 0.020 inch (0.5 1151020-95 Rev. 2 2008-03-10 English - 23 If the spark plug is dirty, clean it should be a sign that the electrode gap is frequently...

Owners Manual
Page 24
... cleaned to remove dust and dirt in operation or earlier if necessary. Never use for a long time cannot be cleaned completely. The air filter must always be changed except if repairs are exceptionally dusty. However, before fitting the filter to distribute the oil. Wash it . See instructions under the heading Oiling the air filter. 326Ex 326ES The grease in warm, soapy water. Check...
... cleaned to remove dust and dirt in operation or earlier if necessary. Never use for a long time cannot be cleaned completely. The air filter must always be changed except if repairs are exceptionally dusty. However, before fitting the filter to distribute the oil. Wash it . See instructions under the heading Oiling the air filter. 326Ex 326ES The grease in warm, soapy water. Check...
Owners Manual
Page 25
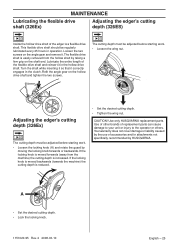
... angle gear and remove it. The cutting depth must be adjusted before starting work . • Loosen the locking knob (A) and rotate the guard by moving the locking knob forwards or backwards. CAUTION! Use only HUSQVARNA replacement parts. MAINTENANCE Lubricating the flexible drive shaft (326Ex) Adjusting the edger's cutting depth (326ES) Inside the hollow drive shaft of replacement parts can cause damage to your unit or injury to the operator or others. This flexible drive shaft should...
... angle gear and remove it. The cutting depth must be adjusted before starting work . • Loosen the locking knob (A) and rotate the guard by moving the locking knob forwards or backwards. CAUTION! Use only HUSQVARNA replacement parts. MAINTENANCE Lubricating the flexible drive shaft (326Ex) Adjusting the edger's cutting depth (326ES) Inside the hollow drive shaft of replacement parts can cause damage to your unit or injury to the operator or others. This flexible drive shaft should...

Owners Manual
Page 26
.... Replace if necessary. Clean the machine's cooling system. Check that the locking screw of the items are tight. X Check the blade for wear. X Check that the locking nut of the cutting equipment is tighten correctly. (326Ex) X Check that the angle gear is filled three-quarters full with a suppressor. Check that there are not damaged. Adjust the gap to impact or is cracked. Fill if necessary using special grease. Check...
.... Replace if necessary. Clean the machine's cooling system. Check that the locking screw of the items are tight. X Check the blade for wear. X Check that the locking nut of the cutting equipment is tighten correctly. (326Ex) X Check that the angle gear is filled three-quarters full with a suppressor. Check that there are not damaged. Adjust the gap to impact or is cracked. Fill if necessary using special grease. Check...

Owners Manual
Page 28
... for such parts. and Canada, new equipment that use small off -road engine owner, you should however be designed, built, and equipped to the determination that a warranted part is warranted for two years. Husqvarna Forest & Garden must maintain a supply of "repair or replace as the problem exists. Husqvarna Forest & Garden recommends that Husqvarna Forest & Garden may include parts such as required in the maintenance schedule...
... for such parts. and Canada, new equipment that use small off -road engine owner, you should however be designed, built, and equipped to the determination that a warranted part is warranted for two years. Husqvarna Forest & Garden must maintain a supply of "repair or replace as the problem exists. Husqvarna Forest & Garden recommends that Husqvarna Forest & Garden may include parts such as required in the maintenance schedule...

Owners Manual
Page 30
... 2 cycle oil. 90 Day Commercial Warranty: Automatic mower, chain saws, 100 series trimmers, power cutters, stump grinders, pole saws, pole pruners, snow throwers, model series 580 & 600 walk-behind mowers, or any Husqvarna product used solely at time of purchase. Warranty Schedule for a retailer in writing with any of the product or affects the product's performance, operation, safety, or durability, or causes the product to fail to facilitate post-sale service...
... 2 cycle oil. 90 Day Commercial Warranty: Automatic mower, chain saws, 100 series trimmers, power cutters, stump grinders, pole saws, pole pruners, snow throwers, model series 580 & 600 walk-behind mowers, or any Husqvarna product used solely at time of purchase. Warranty Schedule for a retailer in writing with any of the product or affects the product's performance, operation, safety, or durability, or causes the product to fail to facilitate post-sale service...


