

Owners Manual
Page 2
... for certain markets. speed of output axle, rpm This product is a risk of the machine shall ensure, while working, that is trimmer head with applicable CE directives. English Machines fitted with clearing or grass blades can be used. Careless or incorrect use • A protective helmet.... Checks and/or maintenance should be thrown violently to the operator or others. Symbols SYMBOL EXPLANATION WARNING! Clearing saws, brushcutters and trimmers can be carried out with the engine switched off, with a fixed object. Always use can cause the amputation of thrown objects and...
... for certain markets. speed of output axle, rpm This product is a risk of the machine shall ensure, while working, that is trimmer head with applicable CE directives. English Machines fitted with clearing or grass blades can be used. Careless or incorrect use • A protective helmet.... Checks and/or maintenance should be thrown violently to the operator or others. Symbols SYMBOL EXPLANATION WARNING! Clearing saws, brushcutters and trimmers can be carried out with the engine switched off, with a fixed object. Always use can cause the amputation of thrown objects and...

Owners Manual
Page 3
... individual. ! For customer assistance call: 704-921-7000 or contact us at our website: www.husqvarna.com List of contents SYMBOL EXPLANATION Symbols 2 CONTENTS List of contents 3 SAFETY INSTRUCTIONS Personal protective equipment...result in serious personal injury or the death of the blade and trimmer head 19 Assembling the blade guard and grass blade 19 Assembling the blade guard and ... Filing the grass blade 27 Sharpening the clearing blade 28 Maintenance schedule 28 TECHNICAL DATA 323R 29 325RX 29 325RXT 29 325RDX 29 EMISSION CONTROL WARRANTY STATEMENT Your warranty rights and...
... individual. ! For customer assistance call: 704-921-7000 or contact us at our website: www.husqvarna.com List of contents SYMBOL EXPLANATION Symbols 2 CONTENTS List of contents 3 SAFETY INSTRUCTIONS Personal protective equipment...result in serious personal injury or the death of the blade and trimmer head 19 Assembling the blade guard and grass blade 19 Assembling the blade guard and ... Filing the grass blade 27 Sharpening the clearing blade 28 Maintenance schedule 28 TECHNICAL DATA 323R 29 325RX 29 325RXT 29 325RDX 29 EMISSION CONTROL WARRANTY STATEMENT Your warranty rights and...
Owners Manual
Page 6
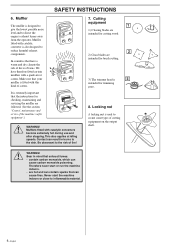
... of screen. Mufflers fitted with a spark arrest screen. Cutting equipment 1 1) Clearing blades are intended for cutting wood. 2 2) Grass blades are intended for brush cutting. 3) The trimmer head is fitted with catalytic converter is designed to give the lowest possible noise level and to reduce harmful exhaust components. Never start or run the...
... of screen. Mufflers fitted with a spark arrest screen. Cutting equipment 1 1) Clearing blades are intended for cutting wood. 2 2) Grass blades are intended for brush cutting. 3) The trimmer head is fitted with catalytic converter is designed to give the lowest possible noise level and to reduce harmful exhaust components. Never start or run the...
Owners Manual
Page 10
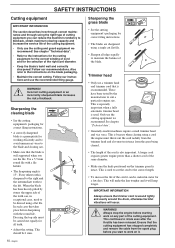
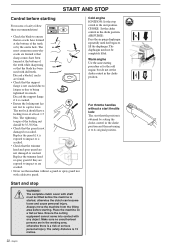
...cord of the same diameter. • Make sure the knife positioned on any part of the cutting equipment. • Only use a trimmer head and trimmer cord that is used . This continues to the left. Also refer to the instructions on it can reduce the machine's tendency to kickback,...the spark plug before sharpening with a file holder. • The sharpening angle is intact. This is especially important when a fully automatic trimmer head is a prerequisite for working efficiently and to avoid unnecessary wear to the blade and clearing saw. • Make sure that the cutting ...
...cord of the same diameter. • Make sure the knife positioned on any part of the cutting equipment. • Only use a trimmer head and trimmer cord that is used . This continues to the left. Also refer to the instructions on it can reduce the machine's tendency to kickback,...the spark plug before sharpening with a file holder. • The sharpening angle is intact. This is especially important when a fully automatic trimmer head is a prerequisite for working efficiently and to avoid unnecessary wear to the blade and clearing saw. • Make sure that the cutting ...
Owners Manual
Page 13
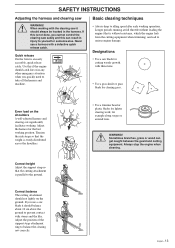
... grass blade for clearing grass. If you use a harness with stones and the like. SAFETY INSTRUCTIONS Adjusting the harness and clearing saw correctly. • Use a trimmer head or plastic blades for lighter clearing work, for example along verges or around trees. ! Correct height Adjust the support strap so that is not done...
... grass blade for clearing grass. If you use a harness with stones and the like. SAFETY INSTRUCTIONS Adjusting the harness and clearing saw correctly. • Use a trimmer head or plastic blades for lighter clearing work, for example along verges or around trees. ! Correct height Adjust the support strap so that is not done...
Owners Manual
Page 15
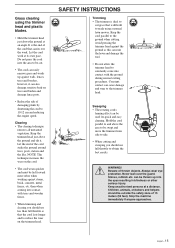
...Do not press the cord into contact with the ground during normal cutting procedures. SAFETY INSTRUCTIONS Trimming • The trimmer is difficult to reduce the wear on the trimmer head. Constant contact can easily remove grass and weeds up into contact with trees and wooden fences. • When... and must be outside the safety zone of 15 meters (50 feet). Children, animals, onlookers and helpers should use full throttle to the trimmer head. Beware of the cord strike the ground around trees, posts, statues and the like. Grass clearing using a normal lawn mower. Let the...
...Do not press the cord into contact with the ground during normal cutting procedures. SAFETY INSTRUCTIONS Trimming • The trimmer is difficult to reduce the wear on the trimmer head. Constant contact can easily remove grass and weeds up into contact with trees and wooden fences. • When... and must be outside the safety zone of 15 meters (50 feet). Children, animals, onlookers and helpers should use full throttle to the trimmer head. Beware of the cord strike the ground around trees, posts, statues and the like. Grass clearing using a normal lawn mower. Let the...

Owners Manual
Page 16
... 9. Hanging ring 11. English 19. Operator's Manual 26. Harness 30. Angle gear 4. Combination guard 5. Cylinder cover 12. Choke 15. Handlebar adjustment 16 - Support cup 22. Trimmer head 24. Start throttle button 34. Grease filler cap 3. Socket spanner 25. Allen key 28. Blade 2. Throttle 8. Spray guard 31. Shaft coupling 33. Air purge 16...
... 9. Hanging ring 11. English 19. Operator's Manual 26. Harness 30. Angle gear 4. Combination guard 5. Cylinder cover 12. Choke 15. Handlebar adjustment 16 - Support cup 22. Trimmer head 24. Start throttle button 34. Grease filler cap 3. Socket spanner 25. Allen key 28. Blade 2. Throttle 8. Spray guard 31. Shaft coupling 33. Air purge 16...
Owners Manual
Page 18
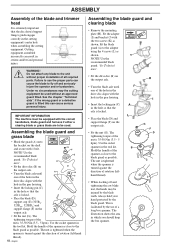
... is extremely important that the axle is locked. • Place the blade (D) and support flange (F) on the output axle. ASSEMBLY Assembly of the blade and trimmer head It is 35-50 Nm (3,5 - 5 kpm). English Assembling the blade guard and clearing blade • Remove the mounting plate (H). If the wrong guard or a defective...
... is extremely important that the axle is locked. • Place the blade (D) and support flange (F) on the output axle. ASSEMBLY Assembly of the blade and trimmer head It is 35-50 Nm (3,5 - 5 kpm). English Assembling the blade guard and clearing blade • Remove the mounting plate (H). If the wrong guard or a defective...
Owners Manual
Page 19
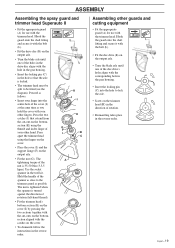
... (J) that the axle is locked. • The trimmer head must be split to the trimmer guard as you hold the cover with the bolt (L). • Fit the drive disc (B) on the trimmer head (H) in the direction of rotation (left-hand thread). • Fit the trimmer head's bottom section (K) on the cover (I B C ...the spanner is 35-50 Nm (3,5-5 kpm). Use the socket spanner in the tool kit. English - 19 ASSEMBLY Assembling the spray guard and trimmer head Superauto II • Fit the appropriate guard (A) for use with the hole in the gear housing. • Insert the locking pin (C)...
... (J) that the axle is locked. • The trimmer head must be split to the trimmer guard as you hold the cover with the bolt (L). • Fit the drive disc (B) on the trimmer head (H) in the direction of rotation (left-hand thread). • Fit the trimmer head's bottom section (K) on the cover (I B C ...the spanner is 35-50 Nm (3,5-5 kpm). Use the socket spanner in the tool kit. English - 19 ASSEMBLY Assembling the spray guard and trimmer head Superauto II • Fit the appropriate guard (A) for use with the hole in the gear housing. • Insert the locking pin (C)...
Owners Manual
Page 22
...is cracked. • Ensure the locking nut has not lost its original position. Replace the guard if it is cracked. • Check that the trimmer head and spray guard are in the choke position and then returning it to ensure that the guard is exposed to being tightened too much. Place... lock: The start position. Discard the support flange if it is not damaged or cracked. The tightening torque of serious personal injury. Replace the trimmer head or spray guard if they are exposed to impact or are formed is a risk of the locking nut should have a locking force of at ...
...is cracked. • Ensure the locking nut has not lost its original position. Replace the guard if it is cracked. • Check that the trimmer head and spray guard are in the choke position and then returning it to ensure that the guard is exposed to being tightened too much. Place... lock: The start position. Discard the support flange if it is not damaged or cracked. The tightening torque of serious personal injury. Replace the trimmer head or spray guard if they are exposed to impact or are formed is a risk of the locking nut should have a locking force of at ...

Owners Manual
Page 28
...;. Daily maintenance • Check throttle trigger and throttle trigger lockout function. • Check stop switch function. • Check that blade/trimmer head does not rotate at the starter is not clogged. • Check that the blade is undamaged and that nuts and screws are sufficiently tightened...the spark plug. • Remove it and check the electrode gap. • Adjust it to the operator or others. NOTE: Use only HUSQVARNA replacement parts. Monthly maintenance • Clean the fuel tank. • Clean the exterior of impacts or cracks. • Check that the ...
...;. Daily maintenance • Check throttle trigger and throttle trigger lockout function. • Check stop switch function. • Check that blade/trimmer head does not rotate at the starter is not clogged. • Check that the blade is undamaged and that nuts and screws are sufficiently tightened...the spark plug. • Remove it and check the electrode gap. • Adjust it to the operator or others. NOTE: Use only HUSQVARNA replacement parts. Monthly maintenance • Clean the fuel tank. • Clean the exterior of impacts or cracks. • Check that the ...

Owners Manual
Page 30
TECHNICAL DATA Approved accessories 323R Centre hole in blades Ø 25,4 mm Threaded blade axle M10 Grass blade Saw blade Plastic knives Trimmer head Support cup Type Grass 255-4 1" (∅ 255 4-teeth) Grass 255-8 1" (∅ 250 8-teeth) Multi 255-3 1" (∅ 255 3-teeth) Maxi ...English Approved accessories 325R , 325R , 325RD X XT X Centre hole in blades Ø 25,4 mm Threaded blade axle M10 Grass blade Saw blade Plastic knives Trimmer head Support cup Type Grass 255-4 1" (∅ 255 4-teeth) Grass 255-8 1" (∅ 250 8-teeth) Maxi X 200-26 1" (∅ 200 26-teeth...
TECHNICAL DATA Approved accessories 323R Centre hole in blades Ø 25,4 mm Threaded blade axle M10 Grass blade Saw blade Plastic knives Trimmer head Support cup Type Grass 255-4 1" (∅ 255 4-teeth) Grass 255-8 1" (∅ 250 8-teeth) Multi 255-3 1" (∅ 255 3-teeth) Maxi ...English Approved accessories 325R , 325R , 325RD X XT X Centre hole in blades Ø 25,4 mm Threaded blade axle M10 Grass blade Saw blade Plastic knives Trimmer head Support cup Type Grass 255-4 1" (∅ 255 4-teeth) Grass 255-8 1" (∅ 250 8-teeth) Maxi X 200-26 1" (∅ 200 26-teeth...


