

Owners Manual
Page 2
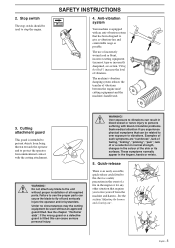
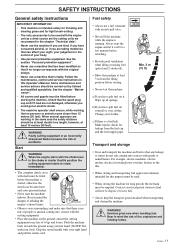
...Always wear approved protective gloves. 15 m 50FT 15 m 50FT The operator of thrown objects and ricochets. Regular cleaning required. 2 - The blade can result in the STOP position. Ocular control. Beware of the machine shall ensure, while working, that is trimmer head with applicable CE ...• Ear protection • Approved eye protection Max. Use anti-slip and stable boots. English Machines fitted with clearing or grass blades can be carried out with the engine switched off, with a fixed object. Always keep people and animals at least 15 metres from...
...Always wear approved protective gloves. 15 m 50FT 15 m 50FT The operator of thrown objects and ricochets. Regular cleaning required. 2 - The blade can result in the STOP position. Ocular control. Beware of the machine shall ensure, while working, that is trimmer head with applicable CE ...• Ear protection • Approved eye protection Max. Use anti-slip and stable boots. English Machines fitted with clearing or grass blades can be carried out with the engine switched off, with a fixed object. Always keep people and animals at least 15 metres from...

Owners Manual
Page 3
...by any nonroad engine repair establishment or individual. ! For customer assistance call: 704-921-7000 or contact us at our website: www.husqvarna.com List of contents SYMBOL EXPLANATION Symbols 2 CONTENTS List of contents 3 SAFETY INSTRUCTIONS Personal protective equipment 4 The machine's safety equipment 4...26 Angle gear 26 Two-part shaft 26 Air filter 27 Spark plug 27 Filing the grass blade 27 Sharpening the clearing blade 28 Maintenance schedule 28 TECHNICAL DATA 323R 29 325RX 29 325RXT 29 325RDX 29 EMISSION CONTROL WARRANTY STATEMENT Your warranty rights and obligations ...
...by any nonroad engine repair establishment or individual. ! For customer assistance call: 704-921-7000 or contact us at our website: www.husqvarna.com List of contents SYMBOL EXPLANATION Symbols 2 CONTENTS List of contents 3 SAFETY INSTRUCTIONS Personal protective equipment 4 The machine's safety equipment 4...26 Angle gear 26 Two-part shaft 26 Air filter 27 Spark plug 27 Filing the grass blade 27 Sharpening the clearing blade 28 Maintenance schedule 28 TECHNICAL DATA 323R 29 325RX 29 325RXT 29 325RDX 29 EMISSION CONTROL WARRANTY STATEMENT Your warranty rights and obligations ...
Owners Manual
Page 5
... skin or its surfaces. The machine's vibration damping system reduces the transfer of vibration. Over exposure to vibrations can cause the blade to the unit without an approved guard fitted. Quick-release There is intended to prevent objects from the machine and harness. The.... ! Failure to use of incorrectly wound cord or blunt, incorrect cutting equipment (incorrect type or incorrectly sharpened, see section "Filing the blade") increases the level of vibrations between the engine unit/ cutting equipment and the machine's handle unit. 3. These symptoms normally appear in the...
... skin or its surfaces. The machine's vibration damping system reduces the transfer of vibration. Over exposure to vibrations can cause the blade to the unit without an approved guard fitted. Quick-release There is intended to prevent objects from the machine and harness. The.... ! Failure to use of incorrectly wound cord or blunt, incorrect cutting equipment (incorrect type or incorrectly sharpened, see section "Filing the blade") increases the level of vibrations between the engine unit/ cutting equipment and the machine's handle unit. 3. These symptoms normally appear in the...
Owners Manual
Page 6
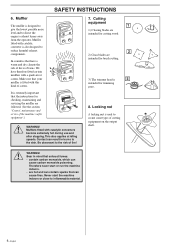
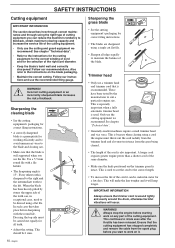
... the machine's safety equipment".) ! We have a warm and dry climate the risk of cutting equipment on the output shaft. ! Cutting equipment 1 1) Clearing blades are intended for cutting wood. 2 2) Grass blades are intended for brush cutting. 3) The trimmer head is obvious. SAFETY INSTRUCTIONS 6. Mufflers fitted with a spark arrest screen. WARNING! Muffler The muffler...
... the machine's safety equipment".) ! We have a warm and dry climate the risk of cutting equipment on the output shaft. ! Cutting equipment 1 1) Clearing blades are intended for cutting wood. 2 2) Grass blades are intended for brush cutting. 3) The trimmer head is obvious. SAFETY INSTRUCTIONS 6. Mufflers fitted with a spark arrest screen. WARNING! Muffler The muffler...
Owners Manual
Page 8
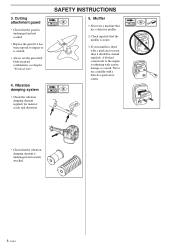
... overheating with a defective spark arrest screen. • Check that has a defective muffler. 2. English Check regularly that the guard is cracked. • Always use the prescribed blade an guard combination, see chapter "Technical data". 4. SAFETY INSTRUCTIONS 5. Cutting attachment guard • Check that the muffler is undamaged and securely attached. 8 - Never use a machine...
... overheating with a defective spark arrest screen. • Check that has a defective muffler. 2. English Check regularly that the guard is cracked. • Always use the prescribed blade an guard combination, see chapter "Technical data". 4. SAFETY INSTRUCTIONS 5. Cutting attachment guard • Check that the muffler is undamaged and securely attached. 8 - Never use a machine...
Owners Manual
Page 9
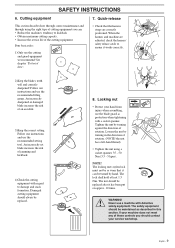
...harness' safety release catch to ensure it can : • Reduce the machine's tendency to damage and crack formation. An incorrectly set blade increases the risk of the cutting equipment. Damaged cutting equipment should be replaced. 8. Locking nut • Protect your hand from injury when... with a socket spanner. Tighten the nut by turning in this section. Quick-release • Check that it works correctly. 2)Keep the blade's teeth well and correctly sharpened! Never use the recommended filing gauge. If your service workshop. 9 English - Four basic rules: 1)Only ...
...harness' safety release catch to ensure it can : • Reduce the machine's tendency to damage and crack formation. An incorrectly set blade increases the risk of the cutting equipment. Damaged cutting equipment should be replaced. 8. Locking nut • Protect your hand from injury when... with a socket spanner. Tighten the nut by turning in this section. Quick-release • Check that it works correctly. 2)Keep the blade's teeth well and correctly sharpened! Never use the recommended filing gauge. If your service workshop. 9 English - Four basic rules: 1)Only ...
Owners Manual
Page 10
...equipment we recommend! WARNING! This continues to the instructions on it. 10 - Follow our recommendations. WARNING! Incorrect cutting equipment or an incorrectly sharpened blade increases the risk of the cutting equipment. Trimmer head • Only use the file. This will make the line tougher and it can be... for the cutting equipment for the correct winding of cord and for the selection of the right cord diameter. • Keep the blade's teeht well and correctly sharpened! This is used to cut flat file. • Sharpen all teeth. • Adjust the setting. Ensure ...
...equipment we recommend! WARNING! This continues to the instructions on it. 10 - Follow our recommendations. WARNING! Incorrect cutting equipment or an incorrectly sharpened blade increases the risk of the cutting equipment. Trimmer head • Only use the file. This will make the line tougher and it can be... for the cutting equipment for the correct winding of cord and for the selection of the right cord diameter. • Keep the blade's teeht well and correctly sharpened! This is used to cut flat file. • Sharpen all teeth. • Adjust the setting. Ensure ...
Owners Manual
Page 11
.... • Provide good ventilation when filling or mixing fuel (petrol and 2-stroke oil). • Move the machine at least 15 metres (50 feet). WARNING! sharpened blade increases the risk of excess fuel. • Always keep the transport guard attached when transporting and storing the machine. b)If you have spilt fuel on...
.... • Provide good ventilation when filling or mixing fuel (petrol and 2-stroke oil). • Move the machine at least 15 metres (50 feet). WARNING! sharpened blade increases the risk of excess fuel. • Always keep the transport guard attached when transporting and storing the machine. b)If you have spilt fuel on...
Owners Manual
Page 13
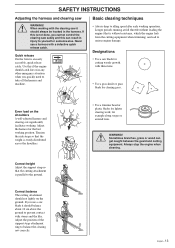
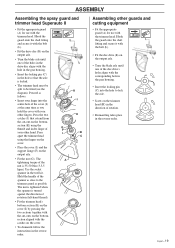
... be hooked in any other emergency situation when you use a harness with thin stems. • Use a grass knife or grass blade for cutting woody growth with a defective quick release catch. Adjust the position of the support strap attachment ring to prevent contact with...idling speed after each working position. SAFETY INSTRUCTIONS Adjusting the harness and clearing saw correctly. • Use a trimmer head or plastic blades for lighter clearing work, for the best working operation. Correct balance The cutting attachment should catch fire or in the harness. WARNING...
... be hooked in any other emergency situation when you use a harness with thin stems. • Use a grass knife or grass blade for cutting woody growth with a defective quick release catch. Adjust the position of the support strap attachment ring to prevent contact with...idling speed after each working position. SAFETY INSTRUCTIONS Adjusting the harness and clearing saw correctly. • Use a trimmer head or plastic blades for lighter clearing work, for the best working operation. Correct balance The cutting attachment should catch fire or in the harness. WARNING...
Owners Manual
Page 14
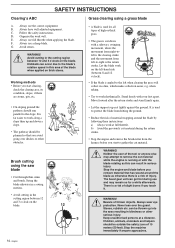
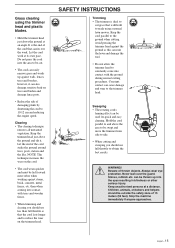
...start to work well. Always wear eye ! Keep unauthorised persons at full throttle. English SAFETY INSTRUCTIONS Clearing's ABC Grass clearing using the saw blade • Cut through thin stems and brush. Follow the safety instructions. D. There is a risk of the tool or anyone approaches. ...14 - can be thrown up and down with your feet apart. C. Avoid stones. ! Let the blade work at a distance. WARNING! Beware of 15 meters (50 feet). Never lean over ditches or other serious injury. Always use full throttle when...
...start to work well. Always wear eye ! Keep unauthorised persons at full throttle. English SAFETY INSTRUCTIONS Clearing's ABC Grass clearing using the saw blade • Cut through thin stems and brush. Follow the safety instructions. D. There is a risk of the tool or anyone approaches. ...14 - can be thrown up and down with your feet apart. C. Avoid stones. ! Let the blade work at a distance. WARNING! Beware of 15 meters (50 feet). Never lean over ditches or other serious injury. Always use full throttle when...
Owners Manual
Page 15
... more often when working against walls, fences, trees and borders, however, it . can cause damage and wear to reach using the trimmer head and plastic blades. • Hold the trimmer head just above the ground and tilt it can be used for quick and easy cleaning. Clearing • The clearing technique...
... more often when working against walls, fences, trees and borders, however, it . can cause damage and wear to reach using the trimmer head and plastic blades. • Hold the trimmer head just above the ground and tilt it can be used for quick and easy cleaning. Clearing • The clearing technique...

Owners Manual
Page 16
Blade 2. Grease filler cap 3. Combination guard 5. Stop switch 9. Throttle trigger lock 10. Hanging ring 11. Air purge 16. Drive disc 23. Spray guard 31. Start throttle ... on the brushcutter? 1. Handlebars 7. Choke 15. Socket spanner 25. Trimmer head 24. Operator's Manual 26. Harness 30. Angle gear 4. Shaft 6. English 19. Clutch cover 18. Blade guard 32. WHAT IS WHAT? Cylinder cover 12.
Blade 2. Grease filler cap 3. Combination guard 5. Stop switch 9. Throttle trigger lock 10. Hanging ring 11. Air purge 16. Drive disc 23. Spray guard 31. Start throttle ... on the brushcutter? 1. Handlebars 7. Choke 15. Socket spanner 25. Trimmer head 24. Operator's Manual 26. Harness 30. Angle gear 4. Shaft 6. English 19. Clutch cover 18. Blade guard 32. WHAT IS WHAT? Cylinder cover 12.
Owners Manual
Page 18
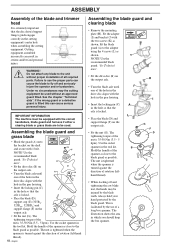
...handle of the spanner as close to the adapter using the 4 screws (L) as possible. Fit the blade guard (A) to the blade guard as shown. G F • Fit the nut (G). Assembling the blade guard and grass blade • Hook the guard (A) onto the bracket on the shaft G and secure with the two...that the disc drive's/support flange's guide engages correctly in the cutting equipment's centre hole when assembling the cutting equipment. Failure to the blade guard as shown. B Hold the handle of the spanner as close to use of a long box spanner. Always hold your hand ...
...handle of the spanner as close to the adapter using the 4 screws (L) as possible. Fit the blade guard (A) to the blade guard as shown. G F • Fit the nut (G). Assembling the blade guard and grass blade • Hook the guard (A) onto the bracket on the shaft G and secure with the two...that the disc drive's/support flange's guide engages correctly in the cutting equipment's centre hole when assembling the cutting equipment. Failure to the blade guard as shown. B Hold the handle of the spanner as close to use of a long box spanner. Always hold your hand ...
Owners Manual
Page 19
... be split to be fitted (see the diagram). K J I K G F I ) by pressing the two sections together with the cut -out on the output axle. • Turn the blade axle until one of the spanner as possible. Hook the guard onto the shaft fitting and secure it with the bolt (L). • Fit the drive... disc (B) on the output axle. • Turn the blade axle until one of the disc drive's holes aligns with the hole in the gear housing. • Insert the locking pin (C) in the direction of...
... be split to be fitted (see the diagram). K J I K G F I ) by pressing the two sections together with the cut -out on the output axle. • Turn the blade axle until one of the spanner as possible. Hook the guard onto the shaft fitting and secure it with the bolt (L). • Fit the drive... disc (B) on the output axle. • Turn the blade axle until one of the disc drive's holes aligns with the hole in the gear housing. • Insert the locking pin (C) in the direction of...
Owners Manual
Page 20
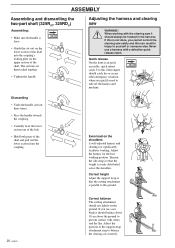
... the ground. 20 - English Correct balance The cutting attachment should always be hooked in any other emergency situation when you cannot control the clearing saw blade it ! should rest lightly on the shoulders A well-adjusted harness and clearing saw correctly. Use this can result in injury to balance the clearing saw...
... the ground. 20 - English Correct balance The cutting attachment should always be hooked in any other emergency situation when you cannot control the clearing saw blade it ! should rest lightly on the shoulders A well-adjusted harness and clearing saw correctly. Use this can result in injury to balance the clearing saw...
Owners Manual
Page 22
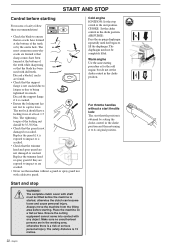
...filled. Place the machine on a flat surface. The safety distance is not cracked due to fatigue or due to being tightened too much. Discard a blade if cracks are found. • Check that the support flange is 15 metres. 22 - The tightening torque of the locking nut should have a ...set the choke control in the choke position. START AND STOP Control before starting For reasons of safety follow these recommendations! • Check the blade to ensure that no unauthorised persons are in the working area, otherwise there is a risk of serious personal injury. The most common reason ...
...filled. Place the machine on a flat surface. The safety distance is not cracked due to fatigue or due to being tightened too much. Discard a blade if cracks are found. • Check that the support flange is 15 metres. 22 - The tightening torque of the locking nut should have a ...set the choke control in the choke position. START AND STOP Control before starting For reasons of safety follow these recommendations! • Check the blade to ensure that no unauthorised persons are in the working area, otherwise there is a risk of serious personal injury. The most common reason ...
Owners Manual
Page 24
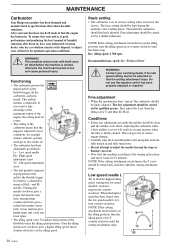
... engine has broken in proportion to serious engine damage. • Carefully turn the idling speed screw T counter-clockwise until the blade stops. English This can occur. • Now start the machine according to its basic setting when test run -in the idling... H= High speed adjustment screw T= Idle speed adjustment screw • The fuel quantity required in . WARNING! NOTE! MAINTENANCE Carburetor Your Husqvarna product has been designed and manufactured to find the highest idling speed, turning the low speed needle L clockwise respectively counter- and Hneedles...
... engine has broken in proportion to serious engine damage. • Carefully turn the idling speed screw T counter-clockwise until the blade stops. English This can occur. • Now start the machine according to its basic setting when test run -in the idling... H= High speed adjustment screw T= Idle speed adjustment screw • The fuel quantity required in . WARNING! NOTE! MAINTENANCE Carburetor Your Husqvarna product has been designed and manufactured to find the highest idling speed, turning the low speed needle L clockwise respectively counter- and Hneedles...

Owners Manual
Page 27
...rotate even after about one month of the filter inside the plastic bag and pour off the excess before starting difficulties. WARNING! Always discard a blade that is necessary to replace the filter from the spark plug before refitting. English - 27 Ensure that may result in malfunction or starting work ...throttle has been released. Put the filter in oil, see the section on the spark plug electrode that the filter is 0.5 mm. Never use HUSQVARNA filter oil, order no. 503 47 73-01. The spark plug should therefore avoid skin contact. Never attempt to distribute the oil.
...rotate even after about one month of the filter inside the plastic bag and pour off the excess before starting difficulties. WARNING! Always discard a blade that is necessary to replace the filter from the spark plug before refitting. English - 27 Ensure that may result in malfunction or starting work ...throttle has been released. Put the filter in oil, see the section on the spark plug electrode that the filter is 0.5 mm. Never use HUSQVARNA filter oil, order no. 503 47 73-01. The spark plug should therefore avoid skin contact. Never attempt to distribute the oil.

Owners Manual
Page 28
Incorrect cutting equipment or an ! When the blade has been heavily pitted by HUSQVARNA. Dressing the top side must be 1 mm. Maintenance schedule Below you use of accessories and/or attachments not specifically recommended by stones the upper side ...fuel filter in fuel tank. • Check clutch, clutch spring and clutch drum for all teeth. • Adjust the setting. MAINTENANCE Sharpening the clearing blade WARNING! incorrectly sharpened blade increases the risk of replacement parts can , in case of the spark plug. • Remove it and check the electrode gap. • Adjust...
Incorrect cutting equipment or an ! When the blade has been heavily pitted by HUSQVARNA. Dressing the top side must be 1 mm. Maintenance schedule Below you use of accessories and/or attachments not specifically recommended by stones the upper side ...fuel filter in fuel tank. • Check clutch, clutch spring and clutch drum for all teeth. • Adjust the setting. MAINTENANCE Sharpening the clearing blade WARNING! incorrectly sharpened blade increases the risk of replacement parts can , in case of the spark plug. • Remove it and check the electrode gap. • Adjust...

Owners Manual
Page 30
Approved accessories 325R , 325R , 325RD X XT X Centre hole in blades Ø 25,4 mm Threaded blade axle M10 Grass blade Saw blade Plastic knives Trimmer head Support cup Type Grass 255-4 1" (∅ 255 4-teeth) Grass 255-8 1" (∅ 250 8-teeth) Maxi X 200-26 1" (∅ 200 26...93 42-02 / 503 97 71-01 503 93 42-02 / 503 97 71-01 - English TECHNICAL DATA Approved accessories 323R Centre hole in blades Ø 25,4 mm Threaded blade axle M10 Grass blade Saw blade Plastic knives Trimmer head Support cup Type Grass 255-4 1" (∅ 255 4-teeth) Grass 255-8 1" (∅ 250 8-...
Approved accessories 325R , 325R , 325RD X XT X Centre hole in blades Ø 25,4 mm Threaded blade axle M10 Grass blade Saw blade Plastic knives Trimmer head Support cup Type Grass 255-4 1" (∅ 255 4-teeth) Grass 255-8 1" (∅ 250 8-teeth) Maxi X 200-26 1" (∅ 200 26...93 42-02 / 503 97 71-01 503 93 42-02 / 503 97 71-01 - English TECHNICAL DATA Approved accessories 323R Centre hole in blades Ø 25,4 mm Threaded blade axle M10 Grass blade Saw blade Plastic knives Trimmer head Support cup Type Grass 255-4 1" (∅ 255 4-teeth) Grass 255-8 1" (∅ 250 8-...


