

Owners Manual
Page 1
WARNING Before using our products, please read this product contains chemicals known to the State of California to understand the proper use of your unit. APPLICABLE SERIAL NUMBERS: 70100101 and up Operator's manual 226HS75S 226HS99S English 115 08 64-95 WARNING The engine exhaust from this manual carefully to cause cancer, birth defects or other reproductive harm.
WARNING Before using our products, please read this product contains chemicals known to the State of California to understand the proper use of your unit. APPLICABLE SERIAL NUMBERS: 70100101 and up Operator's manual 226HS75S 226HS99S English 115 08 64-95 WARNING The engine exhaust from this manual carefully to cause cancer, birth defects or other reproductive harm.

Owners Manual
Page 3
... 11 Operation 12 STARTING ENGINE 12 STOPPING ENGINE 12 RUNNING IN THE ENGINE 12 ADJUSTING IDLING SPEED 13 HEDGE TRIMMING TECHNIQUES 13 Maintenance 14 AIR FILTER 14 FUEL FILTER 14 SPARK PLUG 14 INTAKE AIR COOLING VENT 15 BLADES 15 SHARPENING 15 SAFETY LOCK 16 REDUCTION GEARBOX 16 ANTI-VIBRATION SYSTEM 16 PROCEDURES TO BE PERFORMED AFTER EVERY 100 HOURS OF USE 16 MUFFLER 16 SPARK ARRESTER 16 Storage 17 Disposal 17 Troubleshooting guide...
... 11 Operation 12 STARTING ENGINE 12 STOPPING ENGINE 12 RUNNING IN THE ENGINE 12 ADJUSTING IDLING SPEED 13 HEDGE TRIMMING TECHNIQUES 13 Maintenance 14 AIR FILTER 14 FUEL FILTER 14 SPARK PLUG 14 INTAKE AIR COOLING VENT 15 BLADES 15 SHARPENING 15 SAFETY LOCK 16 REDUCTION GEARBOX 16 ANTI-VIBRATION SYSTEM 16 PROCEDURES TO BE PERFORMED AFTER EVERY 100 HOURS OF USE 16 MUFFLER 16 SPARK ARRESTER 16 Storage 17 Disposal 17 Troubleshooting guide...
Owners Manual
Page 4
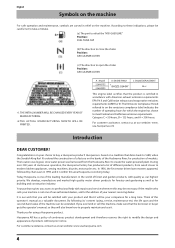
... (using a Husqvarna product. English Symbols on the machine For safe operation and maintenance, symbols are carved in accordance with quality as our highest priority. The location was logical, since water power was harnessed from wood stoves to open the choke Position: AIR CLEANER COVER *2 *1.THE INITIAL NUMBER WILL BE CHANGED EVERY YEAR OF MANUFACTURING. *2.THE ACTUAL MANUFACTURING MONTH WILL BE PRINTED. A : Model 226HS75S 226HS99S B : ENGINE...
... (using a Husqvarna product. English Symbols on the machine For safe operation and maintenance, symbols are carved in accordance with quality as our highest priority. The location was logical, since water power was harnessed from wood stoves to open the choke Position: AIR CLEANER COVER *2 *1.THE INITIAL NUMBER WILL BE CHANGED EVERY YEAR OF MANUFACTURING. *2.THE ACTUAL MANUFACTURING MONTH WILL BE PRINTED. A : Model 226HS75S 226HS99S B : ENGINE...
Owners Manual
Page 5
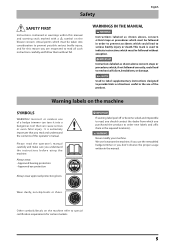
... directions useful in the use the remodeled hedge-trimmer or you understand the instructions before using the machine. It is used to read and understand the contents of a hedge trimmer can cause serious or even fatal injury. Incorrect or careless use of this operator's manual. IMPORTANT... important that can turn it into consideration to prevent possible serious bodily injury, and for certain markets. 5 English Safety SAFETY FIRST Instructions contained in warnings within this manual and warning seals marked with a symbol on the blower concern critical points ...
... directions useful in the use the remodeled hedge-trimmer or you understand the instructions before using the machine. It is used to read and understand the contents of a hedge trimmer can cause serious or even fatal injury. Incorrect or careless use of this operator's manual. IMPORTANT... important that can turn it into consideration to prevent possible serious bodily injury, and for certain markets. 5 English Safety SAFETY FIRST Instructions contained in warnings within this manual and warning seals marked with a symbol on the blower concern critical points ...
Owners Manual
Page 6
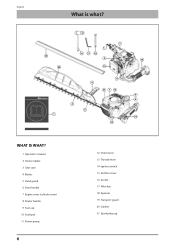
English What is what? 19 20 3 16 17 18 2 15 11 6 21 7 12 4 5 1 10 13 9 8 14 WHAT IS WHAT? 1 Operator's manual 2 Greese nipple 3 Gear case 4 Blades 5 Hand guard 6 Front handle 7 Engine cover (cylinder cover) 8 Starter handle 9 Fuel cap 10 Fuel tank 11 Primer pump 6 12 Chock lever 13 Throttle lever 14 Ignition switch 15 Air filter cover 16 Socket 17 Allen key 18 Spanner 19 Transport guard 20 Catcher 21 Spark plug cap
English What is what? 19 20 3 16 17 18 2 15 11 6 21 7 12 4 5 1 10 13 9 8 14 WHAT IS WHAT? 1 Operator's manual 2 Greese nipple 3 Gear case 4 Blades 5 Hand guard 6 Front handle 7 Engine cover (cylinder cover) 8 Starter handle 9 Fuel cap 10 Fuel tank 11 Primer pump 6 12 Chock lever 13 Throttle lever 14 Ignition switch 15 Air filter cover 16 Socket 17 Allen key 18 Spanner 19 Transport guard 20 Catcher 21 Spark plug cap

Owners Manual
Page 7
.../type of carburetor Trimmer Type Length, inch/mm Pitch, inch/mm Transmission Reduction ratio Durability period, hrs Weight Weight without notice. inch/mm Fuel and ludrication system Fuel Fuel tank capacity. Cam-crank 5.11 300 12.6/5.7 13.2/6.0 95 95 104 104 5.5/4.1 6.5/4.6 5.5/4.1 6.5/4.6 Specifications are subject to change without fuel and grease, Lbs/kg Sound level Sound level, dB(A) Noise emission LwA, dB(A) Vibration level Idling front/rear handle, m/s2 Top spped front/rear handle, m/s2 Air...
.../type of carburetor Trimmer Type Length, inch/mm Pitch, inch/mm Transmission Reduction ratio Durability period, hrs Weight Weight without notice. inch/mm Fuel and ludrication system Fuel Fuel tank capacity. Cam-crank 5.11 300 12.6/5.7 13.2/6.0 95 95 104 104 5.5/4.1 6.5/4.6 5.5/4.1 6.5/4.6 Specifications are subject to change without fuel and grease, Lbs/kg Sound level Sound level, dB(A) Noise emission LwA, dB(A) Vibration level Idling front/rear handle, m/s2 Top spped front/rear handle, m/s2 Air...
Owners Manual
Page 8
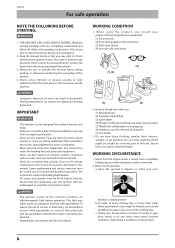
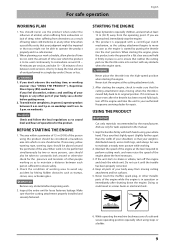
... is faulty. See instructions under the heading Maintenance. • All covers and guards must be difficult to use a machine that could affect your vision, your judgement or your field of vision might be limited and it is slippery or when you . (1) Attached tools (2) Properly reserved fuel (3) Spare blade (4) Things to consult their physician and the pacemaker manufacturer before starting. WORKING CIRCUMSTANCE...
... is faulty. See instructions under the heading Maintenance. • All covers and guards must be difficult to use a machine that could affect your vision, your judgement or your field of vision might be limited and it is slippery or when you . (1) Attached tools (2) Properly reserved fuel (3) Spare blade (4) Things to consult their physician and the pacemaker manufacturer before starting. WORKING CIRCUMSTANCE...
Owners Manual
Page 9
... starting the engine, check to somewhere around or otherwise check for the presence and locations of the area. If it continues to ensure that neither the cutting part nor the throttle come into the high-speed position when starting the engine, place the product onto the ground in general, operate product between each person sufficient to avoid any obstacle when the engine starts. Never touch the muffler, spark plug...
... starting the engine, check to somewhere around or otherwise check for the presence and locations of the area. If it continues to ensure that neither the cutting part nor the throttle come into the high-speed position when starting the engine, place the product onto the ground in general, operate product between each person sufficient to avoid any obstacle when the engine starts. Never touch the muffler, spark plug...
Owners Manual
Page 10
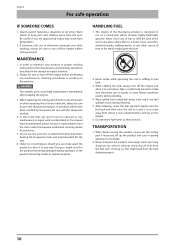
... from the tank during transport. 10 When replacing the cutting attachment or any other part, or when replacing the oil or any lubricant, always be sure to turn off the engine and allow it was refueled before performing any maintenance or repair work not described in the manual at all fuel from where it to turn off the engine before refueling. 4. Under no sparks or open...
... from the tank during transport. 10 When replacing the cutting attachment or any other part, or when replacing the oil or any lubricant, always be sure to turn off the engine and allow it was refueled before performing any maintenance or repair work not described in the manual at all fuel from where it to turn off the engine before refueling. 4. Under no sparks or open...
Owners Manual
Page 11
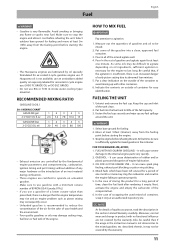
... you use BIA or TCW (2-stroke water-cooling type) mixed oil. RECOMMENDED MIXING RATIO GASOLINE 50:OIL 1 50:1 MIXING CHART GASOLINE gal. 2-CYCLE OIL fl.oz 12345 2.6 5.2 7.8 10.4 13 GASOLINE liter 2-CYCLE OIL ml 12345 20 40 60 80 100 • Exhaust emission are controlled by the fundamental engine parameters and components(eq., carburation, ignition timing and port timing) without addition of any flame or sparks near fuel. Measure...
... you use BIA or TCW (2-stroke water-cooling type) mixed oil. RECOMMENDED MIXING RATIO GASOLINE 50:OIL 1 50:1 MIXING CHART GASOLINE gal. 2-CYCLE OIL fl.oz 12345 2.6 5.2 7.8 10.4 13 GASOLINE liter 2-CYCLE OIL ml 12345 20 40 60 80 100 • Exhaust emission are controlled by the fundamental engine parameters and components(eq., carburation, ignition timing and port timing) without addition of any flame or sparks near fuel. Measure...
Owners Manual
Page 12
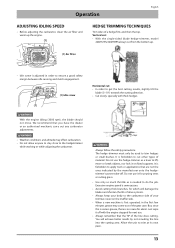
... the blade (5÷10°) towards the cutting direction. • Cut slowly, specially with the engine stopped for alarm. But, since this is excess grease, there is forbidden to apply tools or applications that are not the ones indicated by not crowding the line into the cutting area. English Operation ADJUSTING IDLING SPEED • Before adjusting the carburetor, clean the air filter and warm up . (1) Air filter • Idle screw is adjusted...
... the blade (5÷10°) towards the cutting direction. • Cut slowly, specially with the engine stopped for alarm. But, since this is excess grease, there is forbidden to apply tools or applications that are not the ones indicated by not crowding the line into the cutting area. English Operation ADJUSTING IDLING SPEED • Before adjusting the carburetor, clean the air filter and warm up . (1) Air filter • Idle screw is adjusted...
Owners Manual
Page 13
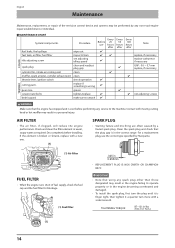
... Note fuel leaks, fuel spillage fuel tank, air filter, fuel filter idle adjusting screw wipe out inspect/clean see adjusting idling speed replace, if necessary replace carburetor if necessary ENGINE spark plug clean and readjust plug gap GAP : 0.6 ~ 0.7 mm replace, if necessary cylinder fins, intake air cooling vent clean muffler, spark arrester, cylinder exhaust port clean throttle lever, ignition switch check operation TRIMMER cutting parts replace if something's wrong gear case screws/nuts/bolts debris guard grease tighten/replace make sure to attach not adjusting screws...
... Note fuel leaks, fuel spillage fuel tank, air filter, fuel filter idle adjusting screw wipe out inspect/clean see adjusting idling speed replace, if necessary replace carburetor if necessary ENGINE spark plug clean and readjust plug gap GAP : 0.6 ~ 0.7 mm replace, if necessary cylinder fins, intake air cooling vent clean muffler, spark arrester, cylinder exhaust port clean throttle lever, ignition switch check operation TRIMMER cutting parts replace if something's wrong gear case screws/nuts/bolts debris guard grease tighten/replace make sure to attach not adjusting screws...
Owners Manual
Page 14
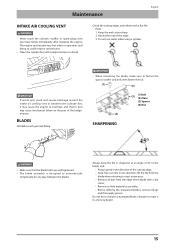
... blade, make sure to start a new pass; • Remove all burr from the edge of the cutting edge; • Note: files cut only in the direction of the blade with your bare hands immediately after stopping the engine. The engine can become very hot when in operation, and doing so could result in turn may cause the engine to overheat, and that the blade bolts...
... blade, make sure to start a new pass; • Remove all burr from the edge of the cutting edge; • Note: files cut only in the direction of the blade with your bare hands immediately after stopping the engine. The engine can become very hot when in operation, and doing so could result in turn may cause the engine to overheat, and that the blade bolts...
Owners Manual
Page 15
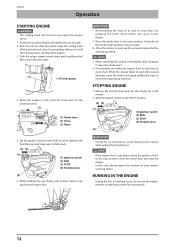
... not use the hedgetrimmer at your nearest servicing dealer. Set the ignition switch to the stop position, close the choke lever and stop when setting the ignition switch to the "RUN" position. NOTE 1. Overchoking can cause starter failures. 7. NOTE If the engine won't stop the engine. Push the primer pump several attempts, open the choke and repeat pulling the rope, or remove the spark plug and dry it. IMPORTANT • Avoid pulling the rope to start after...
... not use the hedgetrimmer at your nearest servicing dealer. Set the ignition switch to the stop position, close the choke lever and stop when setting the ignition switch to the "RUN" position. NOTE 1. Overchoking can cause starter failures. 7. NOTE If the engine won't stop the engine. Push the primer pump several attempts, open the choke and repeat pulling the rope, or remove the spark plug and dry it. IMPORTANT • Avoid pulling the rope to start after...
Owners Manual
Page 16
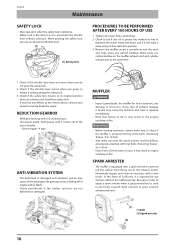
Remove the muffler, insert a screwdriver into the vent, and wipe away any defects at the same time. 1. Wipe away any forest covered, bush covered, or grass covered unimproved land. (1) (1) Bolt (2) Spark arrester (2) 16 IMPORTANT • Before starting operation, always make sure that failing to accelerate the throttle lever without intention. English Maintenance SAFETY LOCK • Stop operation when the safety lock is defective. • Safety lock is equipped with...
Remove the muffler, insert a screwdriver into the vent, and wipe away any defects at the same time. 1. Wipe away any forest covered, bush covered, or grass covered unimproved land. (1) (1) Bolt (2) Spark arrester (2) 16 IMPORTANT • Before starting operation, always make sure that failing to accelerate the throttle lever without intention. English Maintenance SAFETY LOCK • Stop operation when the safety lock is defective. • Safety lock is equipped with...
Owners Manual
Page 17
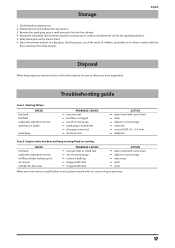
... range ➞ spark plug is fouled/wet ➞ plug gap is built-up ➞ clogged with dust ➞ clogged with dust ACTION ➞ drain it and with our service shop in order to prevent rust. 2. Troubleshooting guide Case 1. Oil the blade to distribute the oil. English Storage 1. Wrap the engine with the floor and away from heat sources. CHECK fuel tank carburetor adjustment screw muffler,cylinder (exhaust port) air cleaner cylinder...
... range ➞ spark plug is fouled/wet ➞ plug gap is built-up ➞ clogged with dust ➞ clogged with dust ACTION ➞ drain it and with our service shop in order to prevent rust. 2. Troubleshooting guide Case 1. Oil the blade to distribute the oil. English Storage 1. Wrap the engine with the floor and away from heat sources. CHECK fuel tank carburetor adjustment screw muffler,cylinder (exhaust port) air cleaner cylinder...

Owners Manual
Page 18
... meet the expected demand for replacement as the carburetor, ignition system, catalytic converter, fuel tank, filters and other associated components. Any warranted part that part. OWNER'S WARRANTY RESPONSIBILITIES • As the small off -road engine, but Husqvarna Forest & Garden cannot deny warranty solely for the lack of time prior to the first scheduled replacement, the part will be repaired or replaced by EPA and CARB, and is warranted for...
... meet the expected demand for replacement as the carburetor, ignition system, catalytic converter, fuel tank, filters and other associated components. Any warranted part that part. OWNER'S WARRANTY RESPONSIBILITIES • As the small off -road engine, but Husqvarna Forest & Garden cannot deny warranty solely for the lack of time prior to the first scheduled replacement, the part will be repaired or replaced by EPA and CARB, and is warranted for...

Owners Manual
Page 19
.... MAINTENANCE, REPLACEMENT AND REPAIR OF EMISSION-RELATED PARTS Any replacement part may not be grounds for the performance of all Husqvarna Forest & Garden authorized servicing dealers. MAINTENANCE STATEMENT The owner is responsible for disallowing a warranty claim. English Federal and California emissions control warranty statement EMISSION WARRANTY PARTS LIST 1 Carburetor and internal parts 2 Intake pipe, airfilter holder and carburetor bolts. 3 Airfilter and fuelfilter covered up to maintenance schedule. 4 Spark Plug, covered up to maintenance schedule 5 Ignition Module 6 Muffler with...
.... MAINTENANCE, REPLACEMENT AND REPAIR OF EMISSION-RELATED PARTS Any replacement part may not be grounds for the performance of all Husqvarna Forest & Garden authorized servicing dealers. MAINTENANCE STATEMENT The owner is responsible for disallowing a warranty claim. English Federal and California emissions control warranty statement EMISSION WARRANTY PARTS LIST 1 Carburetor and internal parts 2 Intake pipe, airfilter holder and carburetor bolts. 3 Airfilter and fuelfilter covered up to maintenance schedule. 4 Spark Plug, covered up to maintenance schedule 5 Ignition Module 6 Muffler with...


