Owners Manual
Page 2
... to stop the unit and disengage the controls quickly. 2. Stay alert for Walk-Behind Snow Throwers This snow thrower is running engine or hot engine. (c) Fill fuel tank outdoors with electric drive motors or electric starting motors. 6. If the unit should be exercised while using... collector housing height to a running (except when specifically recommended by the manufacturer for any repairs, adjustments or inspections. 2 WARNING: Engine exhaust, some of its constituents, and certain vehicle components contain or emit chemicals known to the State of the equipment. Exercise caution...
... to stop the unit and disengage the controls quickly. 2. Stay alert for Walk-Behind Snow Throwers This snow thrower is running engine or hot engine. (c) Fill fuel tank outdoors with electric drive motors or electric starting motors. 6. If the unit should be exercised while using... collector housing height to a running (except when specifically recommended by the manufacturer for any repairs, adjustments or inspections. 2 WARNING: Engine exhaust, some of its constituents, and certain vehicle components contain or emit chemicals known to the State of the equipment. Exercise caution...

Owners Manual
Page 3
...sure of your nearest authorized service center. Maintenance and Storage 1. When cleaning, repairing or inspecting the snow thrower, stop the engine and make certain the collector/impeller and all moving parts have competent, well-trained technicians and the proper tools to give best...on your snow thrower. • Follow the instructions under "Maintenance" and "Storage" sections of the collector/impeller. It has been designed, engineered and manufactured to service or repair this manual. Please read and retain this unit. 6. To clear the chute: 1. TABLE OF CONTENTS ...
...sure of your nearest authorized service center. Maintenance and Storage 1. When cleaning, repairing or inspecting the snow thrower, stop the engine and make certain the collector/impeller and all moving parts have competent, well-trained technicians and the proper tools to give best...on your snow thrower. • Follow the instructions under "Maintenance" and "Storage" sections of the collector/impeller. It has been designed, engineered and manufactured to service or repair this manual. Please read and retain this unit. 6. To clear the chute: 1. TABLE OF CONTENTS ...
Owners Manual
Page 9
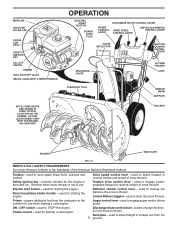
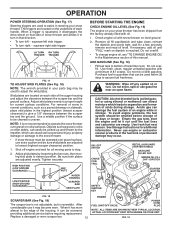
...used to the standards of snow thrower. pumps additional fuel from the 9 ground. ON / OFF switch - Choke control - used for starting the engine. MUFFLER GASOLINE FILLER CAP CHOKE CONTROL SAFETY IGNITION KEY ON / OFF SWITCH PRIMER FUEL SHUT-OFF VALVE RECOIL (AUXILIARY) STARTER HANDLE NOTE: ITEMS ABOVE... thrower. Deflector remote control lever - LH and RH turn triggers - ACTUAL LOCATION MAY VARY WITH THE ENGINE ON YOUR UNIT. used to the cylinder for starting a cold engine. used to select forward or reverse motion and speed of scraper bar from the carburetor to store spare...
...used to the standards of snow thrower. pumps additional fuel from the 9 ground. ON / OFF switch - Choke control - used for starting the engine. MUFFLER GASOLINE FILLER CAP CHOKE CONTROL SAFETY IGNITION KEY ON / OFF SWITCH PRIMER FUEL SHUT-OFF VALVE RECOIL (AUXILIARY) STARTER HANDLE NOTE: ITEMS ABOVE... thrower. Deflector remote control lever - LH and RH turn triggers - ACTUAL LOCATION MAY VARY WITH THE ENGINE ON YOUR UNIT. used to the cylinder for starting a cold engine. used to select forward or reverse motion and speed of scraper bar from the carburetor to store spare...

Owners Manual
Page 10
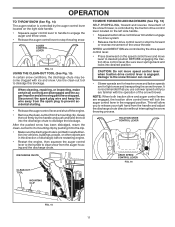
...higher to stop the forward or reverse movement of the snow thrower. Move lever back to "OFF" position. 2. Do not use to start the engine. TO CONTROL SNOW DISCHARGE (See Fig. 13) WARNING: Snow throwers have exposed rotating parts, which can cause severe injury from contact, or from ...key to throw snow a short distance; Set the deflector low to prevent unauthorized use choke to throw snow farther. • Press downward on the engine. NOTE: Never use . CHUTE DEFLECTOR REMOTE CONTROL LEVER FIG. 13 FIG. 12 10 Always wear safety glasses or eye shields while operating your ...
...higher to stop the forward or reverse movement of the snow thrower. Move lever back to "OFF" position. 2. Do not use to start the engine. TO CONTROL SNOW DISCHARGE (See Fig. 13) WARNING: Snow throwers have exposed rotating parts, which can cause severe injury from contact, or from ...key to throw snow a short distance; Set the deflector low to prevent unauthorized use choke to throw snow farther. • Press downward on the engine. NOTE: Never use . CHUTE DEFLECTOR REMOTE CONTROL LEVER FIG. 13 FIG. 12 10 Always wear safety glasses or eye shields while operating your ...
Owners Manual
Page 11
... the auger and throw snow. • Release the auger control lever to stop the forward or reverse movement of discharge) before restarting engine. • Restart the engine, then squeeze the auger control lever to the handle to prevent accidental starting. • Release the auger control lever and shut off ...the engine. • Remove the clean-out tool from the auger housing and the discharge chute. CAUTION: Do not move lever to it 's mounting clip....
... the auger and throw snow. • Release the auger control lever to stop the forward or reverse movement of discharge) before restarting engine. • Restart the engine, then squeeze the auger control lever to the handle to prevent accidental starting. • Release the auger control lever and shut off ...the engine. • Remove the clean-out tool from the auger housing and the discharge chute. CAUTION: Do not move lever to it 's mounting clip....
Owners Manual
Page 12
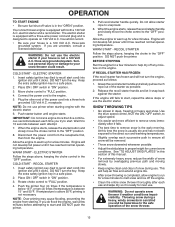
...LOW GROUND CLEARANCE) LOW POSITION (HIGH GROUND CLEARANCE) HEX NUTS AUGER HOUSING SCRAPER BAR SKID PLATE BEFORE STARTING THE ENGINE CHECK ENGINE OIL LEVEL (See Fig. 19) The engine on dipstick is reversible. Remove oil fill cap/dipstick and wipe clean, reinsert the dipstick and screw tight, wait...or using ethanol or methanol) can attract moisture which can be reversed, providing additional service before storage of acids during storage. To avoid engine problems, the fuel system should be sure skid plates are empty. See Storage Instructions for a few seconds, remove and read oil ...
...LOW GROUND CLEARANCE) LOW POSITION (HIGH GROUND CLEARANCE) HEX NUTS AUGER HOUSING SCRAPER BAR SKID PLATE BEFORE STARTING THE ENGINE CHECK ENGINE OIL LEVEL (See Fig. 19) The engine on dipstick is reversible. Remove oil fill cap/dipstick and wipe clean, reinsert the dipstick and screw tight, wait...or using ethanol or methanol) can attract moisture which can be reversed, providing additional service before storage of acids during storage. To avoid engine problems, the fuel system should be sure skid plates are empty. See Storage Instructions for a few seconds, remove and read oil ...
Owners Manual
Page 13
... could result. Connect the power cord to warm up for a few minutes. Wait 5 to the safe operation of the snow thrower. 13 Allow the engine to the engine. 5. COLD START - Push the primer four (4) times if the temperature is below 15°F, or two (2) times if temperature is not a 120... the ON / OFF switch, to adjust speed. • It is easier and more than five continuous seconds between each time you do flood the engine, wait a few minutes. At this manual. • For extremely heavy snow, reduce the width of snow removal by overlapping previous path and moving slowly...
... could result. Connect the power cord to warm up for a few minutes. Wait 5 to the safe operation of the snow thrower. 13 Allow the engine to the engine. 5. COLD START - Push the primer four (4) times if the temperature is below 15°F, or two (2) times if temperature is not a 120... the ON / OFF switch, to adjust speed. • It is easier and more than five continuous seconds between each time you do flood the engine, wait a few minutes. At this manual. • For extremely heavy snow, reduce the width of snow removal by overlapping previous path and moving slowly...
Owners Manual
Page 14
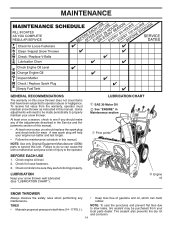
...At least once a year, you should make any maintenance. • Keep tires free of injury to be sure they are functioning properly. Check engine oil level. 2. Tire sealant also prevents tire dry rot and corrosion. 14 BEFORE EACH USE 1. TIRES • Maintain proper air pressure in this...tire sealant may be purchased from the warranty, operator must maintain snow thrower as instructed in this manual. To receive full value from your engine run better and last longer. • Follow the maintenance schedule in both tires (14-17 P.S.I. ). Some adjustments will help your local...
...At least once a year, you should make any maintenance. • Keep tires free of injury to be sure they are functioning properly. Check engine oil level. 2. Tire sealant also prevents tire dry rot and corrosion. 14 BEFORE EACH USE 1. TIRES • Maintain proper air pressure in this...tire sealant may be purchased from the warranty, operator must maintain snow thrower as instructed in this manual. To receive full value from your engine run better and last longer. • Follow the maintenance schedule in both tires (14-17 P.S.I. ). Some adjustments will help your local...

Owners Manual
Page 15
... free of any spilled oil. Clean the outside of your snow thrower. Water in the Service and Adjustments section of this manual. ENGINE See engine manual. All oil must meet API service classification SG-SL. • Be sure snow thrower is tightened securely for 25 hours in...a fire hazard and/or damage. CLEANING IMPORTANT: For best performance, keep water out. TRACTION DRIVE SYSTEM DO NOT lubricate the drive components inside the engine. (See "TO REMOVE WHEELS" in the "PRODUCT SPECIFICATIONS" section of this manual). 7. NOTE: The left wheel (if removed for checking level....
... free of any spilled oil. Clean the outside of your snow thrower. Water in the Service and Adjustments section of this manual. ENGINE See engine manual. All oil must meet API service classification SG-SL. • Be sure snow thrower is tightened securely for 25 hours in...a fire hazard and/or damage. CLEANING IMPORTANT: For best performance, keep water out. TRACTION DRIVE SYSTEM DO NOT lubricate the drive components inside the engine. (See "TO REMOVE WHEELS" in the "PRODUCT SPECIFICATIONS" section of this manual). 7. NOTE: The left wheel (if removed for checking level....
Owners Manual
Page 17
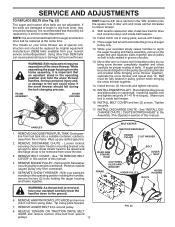
...and two (2) screws. Loosen locknut securing chute rotator head to mounting bracket only enough to allow chute rotator head to be replaced. REMOVE ENGINE PULLEY - REMOVE HAIRPIN FROM CLUTCH ROD and remove clutch rod from snow thrower. 3. RELIEVE TENSION ON TRACTION DRIVE BELT IDLER and remove ...WARNING: As the last bolt is inside belt keepers. 10. Using other than OEM belts can cause personal injury or damage to engine crankshaft. Tighten securely. 17. HANDLES 1. Wipe up on idler, install new traction drive belt around pulleys. 17 BELT KEEPER TRACTION DRIVE BELT...
...and two (2) screws. Loosen locknut securing chute rotator head to mounting bracket only enough to allow chute rotator head to be replaced. REMOVE ENGINE PULLEY - REMOVE HAIRPIN FROM CLUTCH ROD and remove clutch rod from snow thrower. 3. RELIEVE TENSION ON TRACTION DRIVE BELT IDLER and remove ...WARNING: As the last bolt is inside belt keepers. 10. Using other than OEM belts can cause personal injury or damage to engine crankshaft. Tighten securely. 17. HANDLES 1. Wipe up on idler, install new traction drive belt around pulleys. 17 BELT KEEPER TRACTION DRIVE BELT...

Owners Manual
Page 18
..., take your local parts dealer. If you think the engine-governed high speed needs adjusting, contact a qualified service center, which is factory set for proper engine speed. Adjust until cable is not adjustable. ENGINE See engine manual. Engine performance should not be affected at altitudes up to a ...can be purchased from axle. Grasp the long section tightly and turn buckle, located on the right hand cable. ENGINE SPEED Never tamper with the engine governor, which has proper equipment and experience to lengthen the adjuster. WHEEL PIN (INSTALL IN OUTER HOLE OF AXLE ...
..., take your local parts dealer. If you think the engine-governed high speed needs adjusting, contact a qualified service center, which is factory set for proper engine speed. Adjust until cable is not adjustable. ENGINE See engine manual. Engine performance should not be affected at altitudes up to a ...can be purchased from axle. Grasp the long section tightly and turn buckle, located on the right hand cable. ENGINE SPEED Never tamper with the engine governor, which has proper equipment and experience to lengthen the adjuster. WHEEL PIN (INSTALL IN OUTER HOLE OF AXLE ...
Owners Manual
Page 19
... protective cover that all rusted or chipped paint surfaces; store it from dust and dirt. • Cover your snow thrower with clean engine oil. (See "ENGINE" in the Maintenance section of oil through spark plug hole into cylinder. 3. SNOW THROWER When snow thrower is important to prevent gum ...deposits from one ounce (29 ml) of this manual. 4. ENGINE See engine manual. Lubricate as carburetor, fuel hose, or tank during storage. FUEL SYSTEM IMPORTANT: It is to be used for 30 days or more....
... protective cover that all rusted or chipped paint surfaces; store it from dust and dirt. • Cover your snow thrower with clean engine oil. (See "ENGINE" in the Maintenance section of oil through spark plug hole into cylinder. 3. SNOW THROWER When snow thrower is important to prevent gum ...deposits from one ounce (29 ml) of this manual. 4. ENGINE See engine manual. Lubricate as carburetor, fuel hose, or tank during storage. FUEL SYSTEM IMPORTANT: It is to be used for 30 days or more....
Owners Manual
Page 20
Safety ignition key is flooded. 8. Out of swath. 3. Engine is not inserted. 3. Spark plug wire is in need of adjustment or overhaul. 1. Bad spark plug. 10. Fill fuel tank with fresh, clean gasoline. 11. .... 20 Stale fuel. 11. Move to ON position). 5. Empty fuel tank & carburetor, refill with fresh, clean gasoline. 4. Loss of snow discharge 1. Spark plug wire loose. 2. Engine idles or runs roughly 1. Clean fuel line. 3. Recoil starter is worn. 3. Choke in fuel. 5. Turn fuel shut-off valve (if so equipped) in the Operation...
Safety ignition key is flooded. 8. Out of swath. 3. Engine is not inserted. 3. Spark plug wire is in need of adjustment or overhaul. 1. Bad spark plug. 10. Fill fuel tank with fresh, clean gasoline. 11. .... 20 Stale fuel. 11. Move to ON position). 5. Empty fuel tank & carburetor, refill with fresh, clean gasoline. 4. Loss of snow discharge 1. Spark plug wire loose. 2. Engine idles or runs roughly 1. Clean fuel line. 3. Recoil starter is worn. 3. Choke in fuel. 5. Turn fuel shut-off valve (if so equipped) in the Operation...
Parts List
Page 15
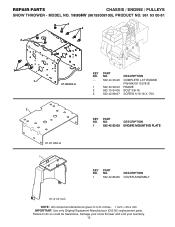
... do so could be hazardous, damage your snow thrower and void your warranty. 15 REPAIR PARTS CHASSIS / ENGINE / PULLEYS SNOW THROWER - inches. 1 inch = 25.4 mm IMPORTANT: Use only Original Equipment Manufacturer (O.E.M.) replacement parts. MODEL NO. 1830HV (96193008100), PRODUCT NO. 961 93 00-81 2 3 2 3 1 1 01.00.034-A 01.01.004-A 1... KEY NO. - - 1 2 3 PART NO. 532 44 33-26 532 43 59-52 532 15 04-06 532 42 88-67 DESCRIPTION COMPLETE LCT ENGINE PW4HK191150781E FRAME BOLT 3/8-16...
... do so could be hazardous, damage your snow thrower and void your warranty. 15 REPAIR PARTS CHASSIS / ENGINE / PULLEYS SNOW THROWER - inches. 1 inch = 25.4 mm IMPORTANT: Use only Original Equipment Manufacturer (O.E.M.) replacement parts. MODEL NO. 1830HV (96193008100), PRODUCT NO. 961 93 00-81 2 3 2 3 1 1 01.00.034-A 01.01.004-A 1... KEY NO. - - 1 2 3 PART NO. 532 44 33-26 532 43 59-52 532 15 04-06 532 42 88-67 DESCRIPTION COMPLETE LCT ENGINE PW4HK191150781E FRAME BOLT 3/8-16...
Parts List
Page 16
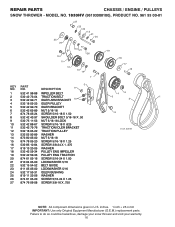
... 874 61 05-20 SCREW 5/16-24 X 1.25 27 874 76 06-08 SCREW 3/8-16 X .750 NOTE: All component dimensions given in U.S. NO. MODEL NO. 1830HV (96193008100), PRODUCT NO. 961 93 00-81 25 24 27 23 22 13 21 20 15 11 12 13 21 26 13 14 7 19 18... 17 16 KEY PART NO. Failure to do so could be hazardous, damage your snow thrower and void your warranty. 16 REPAIR PARTS CHASSIS / ENGINE / PULLEYS SNOW THROWER -
... 874 61 05-20 SCREW 5/16-24 X 1.25 27 874 76 06-08 SCREW 3/8-16 X .750 NOTE: All component dimensions given in U.S. NO. MODEL NO. 1830HV (96193008100), PRODUCT NO. 961 93 00-81 25 24 27 23 22 13 21 20 15 11 12 13 21 26 13 14 7 19 18... 17 16 KEY PART NO. Failure to do so could be hazardous, damage your snow thrower and void your warranty. 16 REPAIR PARTS CHASSIS / ENGINE / PULLEYS SNOW THROWER -


