

Owners Manual
Page 1
APPLICABLE SERIAL NUMBERS: 00100101 and up Operator's manual 130BT 350BT 370BTS 380BTS Original Instructions English 115 31 90-26 WARNING Before using our products, please read this manual carefully to understand the proper use of your unit.
APPLICABLE SERIAL NUMBERS: 00100101 and up Operator's manual 130BT 350BT 370BTS 380BTS Original Instructions English 115 31 90-26 WARNING Before using our products, please read this manual carefully to understand the proper use of your unit.

Owners Manual
Page 3
... 6 FUEL 6 BEFORE STARTING THE ENGINE 6 USING THE PRODUCT 7 MAINTENANCE 8 TRANSPORTATION 8 STORAGE 8 What is what 9 Technical data 13 Assembly 14 FLEXIBLE HOSE AND SWIVEL JOINT 14 CONTROL HANDLE 14 CABLING 14 HANDLEBAR (OPTION 14 BLOW PIPES 14 HARNESS 15 WAIST BELT 15 Fuel 16 FUEL 16 HOW TO MIX FUEL 16 FUELING THE UNIT 16 Operation 17 STARTING ENGINE 17 ADJUSTING IDLE SPEED 18 STOPPING ENGINE 18 Maintenance 19 AIR CLEANER 19 FUEL FILTER 20 SPARK PLUG 20 MUFFLER 20 SPARK...
... 6 FUEL 6 BEFORE STARTING THE ENGINE 6 USING THE PRODUCT 7 MAINTENANCE 8 TRANSPORTATION 8 STORAGE 8 What is what 9 Technical data 13 Assembly 14 FLEXIBLE HOSE AND SWIVEL JOINT 14 CONTROL HANDLE 14 CABLING 14 HANDLEBAR (OPTION 14 BLOW PIPES 14 HARNESS 15 WAIST BELT 15 Fuel 16 FUEL 16 HOW TO MIX FUEL 16 FUELING THE UNIT 16 Operation 17 STARTING ENGINE 17 ADJUSTING IDLE SPEED 18 STOPPING ENGINE 18 Maintenance 19 AIR CLEANER 19 FUEL FILTER 20 SPARK PLUG 20 MUFFLER 20 SPARK...

Owners Manual
Page 4
... protection • Approved eye protection The blower operator must make sure you understand the instructions before using the machine. This product is in accordance with a symbol on the machine refer to indicate instructions which must be a dangerous tool if used incorrectly or carelessly, which must be used when there is used . The blower can bounce back. Noise emission to the...
... protection • Approved eye protection The blower operator must make sure you understand the instructions before using the machine. This product is in accordance with a symbol on the machine refer to indicate instructions which must be a dangerous tool if used incorrectly or carelessly, which must be used when there is used . The blower can bounce back. Noise emission to the...

Owners Manual
Page 5
.... (a) The port to refuel the "MIX GASOLINE" Position: FUEL TANK CAP (b) The direction to close the choke Position: INTAKE CUP (c) The direction to open the choke Position: INTAKE CUP (d) The direction to stop the engine Position: CONTROL HANDLE English Safety Precautions WARNING 1. So always use genuine accessories. A blower is only designed for assistance the event that anyone using your machine without the owner's manul. 5. Failure to do...
.... (a) The port to refuel the "MIX GASOLINE" Position: FUEL TANK CAP (b) The direction to close the choke Position: INTAKE CUP (c) The direction to open the choke Position: INTAKE CUP (d) The direction to stop the engine Position: CONTROL HANDLE English Safety Precautions WARNING 1. So always use genuine accessories. A blower is only designed for assistance the event that anyone using your machine without the owner's manul. 5. Failure to do...

Owners Manual
Page 6
... EN 166 in the fuel line, the exhaust line, or the ignition wiring, do not wear loose clothing, scarves, neck chains, hair longer than 5 minutes of injury associated with objects being drawn into rotating parts, do not use the blower until it gets worse. 8. Check your body warm. c ) Do not refuel a hot engine. BEFORE STARTING THE ENGINE Each time before starting the engine. Wear rubber-soled...
... EN 166 in the fuel line, the exhaust line, or the ignition wiring, do not wear loose clothing, scarves, neck chains, hair longer than 5 minutes of injury associated with objects being drawn into rotating parts, do not use the blower until it gets worse. 8. Check your body warm. c ) Do not refuel a hot engine. BEFORE STARTING THE ENGINE Each time before starting the engine. Wear rubber-soled...

Owners Manual
Page 7
... failing to replace these rubber and spring mounts when they have it might lead to free yourself from its frame during operation and doing so could result in operation or immediately after stopping the engine. Check the area around the engine cover while the engine is operated and controlled with thrown objects. Never touch the muffler, spark plug, or other equipment, CLEAN UP...
... failing to replace these rubber and spring mounts when they have it might lead to free yourself from its frame during operation and doing so could result in operation or immediately after stopping the engine. Check the area around the engine cover while the engine is operated and controlled with thrown objects. Never touch the muffler, spark plug, or other equipment, CLEAN UP...

Owners Manual
Page 8
...; Drain the fuel from the fuel tank before performing any way. WARNING The metallic parts, engine cover, and area around the fuel line, the muffler, and the ignition wiring. 4. Doing so might result in validates the warranty. In order to turn off the engine and disconnect the spark plug before transporting or storing the blower. • Secure the blower so that any part must be performed by Husqvarna...
...; Drain the fuel from the fuel tank before performing any way. WARNING The metallic parts, engine cover, and area around the fuel line, the muffler, and the ignition wiring. 4. Doing so might result in validates the warranty. In order to turn off the engine and disconnect the spark plug before transporting or storing the blower. • Secure the blower so that any part must be performed by Husqvarna...

Owners Manual
Page 9
... machine, do not disassemble the machine. Harness 3. Fuel Tank 10. Pad 11. Choke Lever 16. Band 26. Spark Plug Cap 12. Net 6. Pipes 27. Combination spanner ■ DISPOSAL When disposing your machine, fuel or oil for the machine, be taken off. 9 Control handle 17. Clamp (large) 22. Shock Absorber (spring) 13. Flexible Hose 23. Stop Switch with Throttle Position Setting 18. English 2 3 22 16 4 17 20...
... machine, do not disassemble the machine. Harness 3. Fuel Tank 10. Pad 11. Choke Lever 16. Band 26. Spark Plug Cap 12. Net 6. Pipes 27. Combination spanner ■ DISPOSAL When disposing your machine, fuel or oil for the machine, be taken off. 9 Control handle 17. Clamp (large) 22. Shock Absorber (spring) 13. Flexible Hose 23. Stop Switch with Throttle Position Setting 18. English 2 3 22 16 4 17 20...

Owners Manual
Page 10
... 28 29 18 6 10 1. Harness 3. Elbow 20. Pipes 26. When disposing your machine, do not disassemble the machine. Engine Cover 4. Fuel Tank 10. Swivel joint 24. Pad 11.Spark Plug Cap 12.Shock Absorber (Rubber) 13.Shock Absorber (Rubber) 14.Choke Lever 15.Control handle 16.Stop Switch with Throttle Position Setting 17.Throttle Lever 18. Pipe end 27 Flat nozzle (option) 28. Handle Bar (Option) 19. Volute Case...
... 28 29 18 6 10 1. Harness 3. Elbow 20. Pipes 26. When disposing your machine, do not disassemble the machine. Engine Cover 4. Fuel Tank 10. Swivel joint 24. Pad 11.Spark Plug Cap 12.Shock Absorber (Rubber) 13.Shock Absorber (Rubber) 14.Choke Lever 15.Control handle 16.Stop Switch with Throttle Position Setting 17.Throttle Lever 18. Pipe end 27 Flat nozzle (option) 28. Handle Bar (Option) 19. Volute Case...

Owners Manual
Page 11
... 26 12 14 10 1. Recoil Starter 22. Pipes 12.Shock Absorber (Rubber) 26. Harness 16.Stop Switch with Throttle Position Setting 3. Net 19. Air Cleaner 21. Flat nozzle (option) 14.Choke Lever 28. When disposing your machine, fuel or oil for cabling) 11.Spark Plug Cap 25. Engine Cover 17 Throttle Lever 4. Swivel joint 10.Pad 24. Fan 20. Frame: Harness: Throttle lever: Volute case, Volute cover, Engine cover: Pad: Flexible hose: Pipes...
... 26 12 14 10 1. Recoil Starter 22. Pipes 12.Shock Absorber (Rubber) 26. Harness 16.Stop Switch with Throttle Position Setting 3. Net 19. Air Cleaner 21. Flat nozzle (option) 14.Choke Lever 28. When disposing your machine, fuel or oil for cabling) 11.Spark Plug Cap 25. Engine Cover 17 Throttle Lever 4. Swivel joint 10.Pad 24. Fan 20. Frame: Harness: Throttle lever: Volute case, Volute cover, Engine cover: Pad: Flexible hose: Pipes...

Owners Manual
Page 12
...When disposing your machine, fuel or oil for cabling) 25. Frame: Harness: Throttle lever: Volute case, Volute cover, Engine cover: Pad: Flexible hose:...* The insert nut of 12 Harness 3. Net 6. Fan 7. Fuel Tank 10.Pad 11.Spark Plug Cap 12.Shock absorber (Rubber) 13.Shock absorber (Rubber) 14.Choke Lever 15. Flexible ...Control handle 16.Stop Switch with Throttle Position Setting 17.Throttle Lever 18.Handle Bar (Option) 19. Operator's manual 29. Engine Cover 4. Elbow 20. Clamp (large) 21. pipe end 27. Flat nozzle (option) 28. Frame 2. Volute Case, Cover 5. Air Cleaner 8. Recoil Starter...
...When disposing your machine, fuel or oil for cabling) 25. Frame: Harness: Throttle lever: Volute case, Volute cover, Engine cover: Pad: Flexible hose:...* The insert nut of 12 Harness 3. Net 6. Fan 7. Fuel Tank 10.Pad 11.Spark Plug Cap 12.Shock absorber (Rubber) 13.Shock absorber (Rubber) 14.Choke Lever 15. Flexible ...Control handle 16.Stop Switch with Throttle Position Setting 17.Throttle Lever 18.Handle Bar (Option) 19. Operator's manual 29. Engine Cover 4. Elbow 20. Clamp (large) 21. pipe end 27. Flat nozzle (option) 28. Frame 2. Volute Case, Cover 5. Air Cleaner 8. Recoil Starter...

Owners Manual
Page 13
... Directive 2000/14/EC. Reported sound power level for the machine has been measured with a work cycle of a duration of 1 dB(A). Reported data for the machine has a typical statistical dispersion (standard deviation) of 1/7 for idling and 6/7 for racing. cm Air Filter Carburetor (Diaphragm) valve type Ignition System Spark Plug Muffler Idle speed rpm Operating Engine Speed rpm Fuel Consumption liter/h Air Volume (w/std Pipe) cu. ter CDI...
... Directive 2000/14/EC. Reported sound power level for the machine has been measured with a work cycle of a duration of 1 dB(A). Reported data for the machine has a typical statistical dispersion (standard deviation) of 1/7 for idling and 6/7 for racing. cm Air Filter Carburetor (Diaphragm) valve type Ignition System Spark Plug Muffler Idle speed rpm Operating Engine Speed rpm Fuel Consumption liter/h Air Volume (w/std Pipe) cu. ter CDI...

Owners Manual
Page 14
... be used to the convex on the holder. English Assembly ■ FLEXIBLE HOSE AND SWIVEL JOINT 1. Connect the blower and swivel joint with the second straight pipe. (1) Flat nozzle (option). 14 Adjust the position and angle to blower tube. ■ CONTROL HANDLE 1. NOTE A light lubricant may be replaced by the band attached to the swivel joint and tighten the knob on...
... be used to the convex on the holder. English Assembly ■ FLEXIBLE HOSE AND SWIVEL JOINT 1. Connect the blower and swivel joint with the second straight pipe. (1) Flat nozzle (option). 14 Adjust the position and angle to blower tube. ■ CONTROL HANDLE 1. NOTE A light lubricant may be replaced by the band attached to the swivel joint and tighten the knob on...

Owners Manual
Page 15
NOTE 130BT has no waist belt. Assembly ■ HARNESS. Adjust the harness to remove it from the unit and store it. • There is a risk that the belt will be caught, toppling the unit. • There is a danger that the belt will be sure to give the best ...pressure is attached to always tighten the buckle in injury to yourself or others. Place the waist belt around your body. F8 WARNING The harness must always be sucked into the fan. Failure to do so means you will be worn when working position Tighten the side straps so that you are not using a waist belt...
NOTE 130BT has no waist belt. Assembly ■ HARNESS. Adjust the harness to remove it from the unit and store it. • There is a risk that the belt will be caught, toppling the unit. • There is a danger that the belt will be sure to give the best ...pressure is attached to always tighten the buckle in injury to yourself or others. Place the waist belt around your body. F8 WARNING The harness must always be sucked into the fan. Failure to do so means you will be worn when working position Tighten the side straps so that you are not using a waist belt...

Owners Manual
Page 16
... Husqvarna oil is necessary for the engine to 80% of the gasoline into the fuel tank to last long. As some of the full capacity. 3. Untwist and remove the fuel cap. 2. FOR YOUR ENGINE LIFE, AVOID; 1. Moreover, normal wear and change in product with no functional influence are controlled by the warranty. 16 RECOMMENDED MIXING RATIO GASOLINE 50:OIL 1 • Exhaust emission are not covered...
... Husqvarna oil is necessary for the engine to 80% of the gasoline into the fuel tank to last long. As some of the full capacity. 3. Untwist and remove the fuel cap. 2. FOR YOUR ENGINE LIFE, AVOID; 1. Moreover, normal wear and change in product with no functional influence are controlled by the warranty. 16 RECOMMENDED MIXING RATIO GASOLINE 50:OIL 1 • Exhaust emission are not covered...

Owners Manual
Page 17
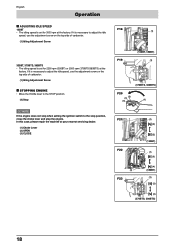
... throttle lever position in the clear tube. 2. Pull the starter knob slowly until fuel flows out in about 1/3 open position. 130BT 350BT, 370BTS, 380BTS Idling About 1/3 open the choke and repeat pulling the rope. F13 (2) F14 (1) (4) (3) (130BT) (1) (3) (2) F15 (4) (350BT) (1) (3) (4) (2) (370BTS, 380BTS) F16 (2) (3) (4) (1) F17 17 Once the engine is running, gradually open the choke if it was set closed, and let the engine run at idle speed. IMPORTANT • Never twist the starter cord...
... throttle lever position in the clear tube. 2. Pull the starter knob slowly until fuel flows out in about 1/3 open position. 130BT 350BT, 370BTS, 380BTS Idling About 1/3 open the choke and repeat pulling the rope. F13 (2) F14 (1) (4) (3) (130BT) (1) (3) (2) F15 (4) (350BT) (1) (3) (4) (2) (370BTS, 380BTS) F16 (2) (3) (4) (1) F17 17 Once the engine is running, gradually open the choke if it was set closed, and let the engine run at idle speed. IMPORTANT • Never twist the starter cord...
Owners Manual
Page 18
... to adjust the idle speed, use the adjustment screw on the top side of carburetor. (1) Idling Adjustment Screw ■ STOPPING ENGINE • Move the throttle lever to the STOP position. (4) Stop NOTE If the engine does not stop the engine. In this case, please repair the machine at the factory. English Operation ■ ADJUSTING IDLE SPEED 130BT • The idling speed is set for 3000 rpm at your nearest servicing dealer. (1) Choke Lever (2) OPEN (3) CLOSE F18 (1) F19 (130BT, 350BT...
... to adjust the idle speed, use the adjustment screw on the top side of carburetor. (1) Idling Adjustment Screw ■ STOPPING ENGINE • Move the throttle lever to the STOP position. (4) Stop NOTE If the engine does not stop the engine. In this case, please repair the machine at the factory. English Operation ■ ADJUSTING IDLE SPEED 130BT • The idling speed is set for 3000 rpm at your nearest servicing dealer. (1) Choke Lever (2) OPEN (3) CLOSE F18 (1) F19 (130BT, 350BT...

Owners Manual
Page 19
...; Check the air cleaner before performing any non-road engine repair establishment or individual. Squeeze the element to remove excess oil so that the engine has stopped and is cool before use. Never forget to 3 times heavier than it weighs 2 to attach the screen properly. Maintenance English Maintenance, replacement, or repair of the emission control device and systems may damage element. • Do not use mixture gasoline. CLEANING AIR FILTER: (130BT) (F24...
...; Check the air cleaner before performing any non-road engine repair establishment or individual. Squeeze the element to remove excess oil so that the engine has stopped and is cool before use. Never forget to 3 times heavier than it weighs 2 to attach the screen properly. Maintenance English Maintenance, replacement, or repair of the emission control device and systems may damage element. • Do not use mixture gasoline. CLEANING AIR FILTER: (130BT) (F24...

Owners Manual
Page 20
...) Remove and inspect the spark plug every 25 hours and clean the electrodes as necessary with a wire brush. (1) Bolt (3) Spark Arrester (2)Bolt (4)Diffuser WARNING Before starting operation, always make sure that the spark arrester and the diffuser are properly attached with new one in the engine becoming overheated and damaged. • To install the spark plug, first turn more with reasonable use the blower and have it . ■ FUEL FILTER • A clogged fuel...
...) Remove and inspect the spark plug every 25 hours and clean the electrodes as necessary with a wire brush. (1) Bolt (3) Spark Arrester (2)Bolt (4)Diffuser WARNING Before starting operation, always make sure that the spark arrester and the diffuser are properly attached with new one in the engine becoming overheated and damaged. • To install the spark plug, first turn more with reasonable use the blower and have it . ■ FUEL FILTER • A clogged fuel...

Owners Manual
Page 21
... 2-cycle oil into the cylider. tion, stop the engine and inspect the air inlet net for blockage by obstacles. • Note that the net is attached in personal injury. Drain the fuel tank and push the primer bulb until it is in a dry, cool and dark, well-ventilated, dust-free place, out of the reach of fuel. 2. Crank the engine several time and install the spark plug. 3. Maintenance...
... 2-cycle oil into the cylider. tion, stop the engine and inspect the air inlet net for blockage by obstacles. • Note that the net is attached in personal injury. Drain the fuel tank and push the primer bulb until it is in a dry, cool and dark, well-ventilated, dust-free place, out of the reach of fuel. 2. Crank the engine several time and install the spark plug. 3. Maintenance...


