

Owners Manual
Page 2
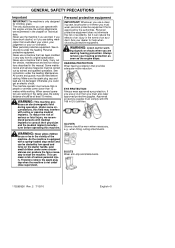
... read the operator's manual carefully and make sure you understand the instructions before using the machine. In order to special certification requirements for certain markets. Approved eye protection must be removed from the spark plug when assembling, checking and/or performing maintenance. Visual check. The stop switch in serious or fatal injury to the start position. speed of output shaft, rpm Sound pressure level at a ratio of the machine...
... read the operator's manual carefully and make sure you understand the instructions before using the machine. In order to special certification requirements for certain markets. Approved eye protection must be removed from the spark plug when assembling, checking and/or performing maintenance. Visual check. The stop switch in serious or fatal injury to the start position. speed of output shaft, rpm Sound pressure level at a ratio of the machine...

Owners Manual
Page 3
... protective equipment 5 Machine's safety equipment 6 Cutting equipment 8 ASSEMBLY Fitting the loop handle 9 Assembling and dismantling the two--piece shaft 9 Fitting the trimmer guard and trimmer head 10 FUEL HANDLING Fuel safety 11 Fuel 11 Fuelling 12 STARTING AND STOPPING Check before starting 13 Starting and stopping 13 WORKING TECHNIQUES General working instructions 15 MAINTENANCE Carburetor 17 Muffler 17 Spark plug 18 Two--piece shaft 18 Air filter 18 Bevel gear 19 Maintenance schedule 20 TECHNICAL DATA Technical data...
... protective equipment 5 Machine's safety equipment 6 Cutting equipment 8 ASSEMBLY Fitting the loop handle 9 Assembling and dismantling the two--piece shaft 9 Fitting the trimmer guard and trimmer head 10 FUEL HANDLING Fuel safety 11 Fuel 11 Fuelling 12 STARTING AND STOPPING Check before starting 13 Starting and stopping 13 WORKING TECHNIQUES General working instructions 15 MAINTENANCE Carburetor 17 Muffler 17 Spark plug 18 Two--piece shaft 18 Air filter 18 Bevel gear 19 Maintenance schedule 20 TECHNICAL DATA Technical data...

Owners Manual
Page 4
Cutting attachment guard 5. Throttle control 9. WHAT IS WHAT? 12 3 7 19 6 4 1 5 9 10 11 12 17 8 16 14 15 18 13 Know your trimmer 1. Upper shaft 6. Fuel tank 14. Handle adjustment 18. Operator's manual 20 21 115299326 Rev. 2 7/15/10 English--- 4 Bevel gear 4. Lower shaft 7. Choke control 15. Starter handle 13. Primer bulb 16. Air filter cover 17. Drive disc 19. Trimmer head 2. Grease filler cap 3. Loop handle 8. Stop switch 10.Throttle lock--out 11. Cylinder cover 12. Shaft coupling 20. Hex wrench 21.
Cutting attachment guard 5. Throttle control 9. WHAT IS WHAT? 12 3 7 19 6 4 1 5 9 10 11 12 17 8 16 14 15 18 13 Know your trimmer 1. Upper shaft 6. Fuel tank 14. Handle adjustment 18. Operator's manual 20 21 115299326 Rev. 2 7/15/10 English--- 4 Bevel gear 4. Lower shaft 7. Choke control 15. Starter handle 13. Primer bulb 16. Air filter cover 17. Drive disc 19. Trimmer head 2. Grease filler cap 3. Loop handle 8. Stop switch 10.Throttle lock--out 11. Cylinder cover 12. Shaft coupling 20. Hex wrench 21.
Owners Manual
Page 5
... may interfere with this manual. The only accessories you must comply with medical implants to consult their physician and the medical implant manufacturer before starting. When several operators are not damaged. See instructions under the heading Maintenance. WARNING: This machine pro- Never use or be started by low speed and force on Technical data. All covers and guards must ensure that has...
... may interfere with this manual. The only accessories you must comply with medical implants to consult their physician and the medical implant manufacturer before starting. When several operators are not damaged. See instructions under the heading Maintenance. WARNING: This machine pro- Never use or be started by low speed and force on Technical data. All covers and guards must ensure that has...

Owners Manual
Page 6
... be carried by two independent return springs. Follow the control, maintenance and service instructions described in the idle position then the carburettor idle setting must contact your service agent. When you need further information please contact your nearest service workshop. See instructions under the heading Start. English--- 6 See the "What is what" section to prevent accidental operation of the throttle control. All servicing and repair work properly. If your machine...
... be carried by two independent return springs. Follow the control, maintenance and service instructions described in the idle position then the carburettor idle setting must contact your service agent. When you need further information please contact your nearest service workshop. See instructions under the heading Start. English--- 6 See the "What is what" section to prevent accidental operation of the throttle control. All servicing and repair work properly. If your machine...
Owners Manual
Page 7
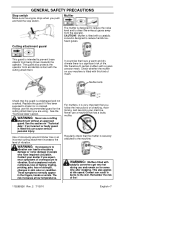
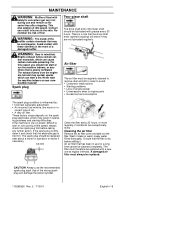
... switch Make sure the engine stops when you follow the instructions on checking, maintaining, and servicing your machine. Muffler Cutting attachment guard The muffler is intended to reduce harmful ex- CAUTION! This guard is designed to reduce the noise level and to vibration. The guard also protects the operator from the operator. We therefore fit certain mufflers with the cutting attachment. Check whether the muffler on "Technical data". Muffler bolts Check that the guard...
... switch Make sure the engine stops when you follow the instructions on checking, maintaining, and servicing your machine. Muffler Cutting attachment guard The muffler is intended to reduce harmful ex- CAUTION! This guard is designed to reduce the noise level and to vibration. The guard also protects the operator from the operator. We therefore fit certain mufflers with the cutting attachment. Check whether the muffler on "Technical data". Muffler bolts Check that the guard...
Owners Manual
Page 9
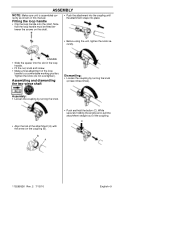
Assembly: S Loosen the coupling by turning the knob (at least three times). While securely holding the engine end, pull the attachment straight out of the loop handle to a comfortable working position. S Push the attachment into the coupling until the attachment snaps into the slot in this manual. S Fit the nut, knob and screw. ENGINE S Slide the spacer into place. Tighten the knob (do not overtighten). S Align the tab...
Assembly: S Loosen the coupling by turning the knob (at least three times). While securely holding the engine end, pull the attachment straight out of the loop handle to a comfortable working position. S Push the attachment into the coupling until the attachment snaps into the slot in this manual. S Fit the nut, knob and screw. ENGINE S Slide the spacer into place. Tighten the knob (do not overtighten). S Align the tab...
Owners Manual
Page 11
... prevent unintentional starting of the engine, the spark plug cap must always be run the engine on a lower octane than 90, it is not available, you run using a mixture of fuel, even small inaccuracies can cause serious injury when inhaled or allowed to come in contact with fuel. When mixing small amounts of petrol and two-stroke engine oil. S Ensure the machine is cleaned and that...
... prevent unintentional starting of the engine, the spark plug cap must always be run the engine on a lower octane than 90, it is not available, you run using a mixture of fuel, even small inaccuracies can cause serious injury when inhaled or allowed to come in contact with fuel. When mixing small amounts of petrol and two-stroke engine oil. S Ensure the machine is cleaned and that...
Owners Manual
Page 12
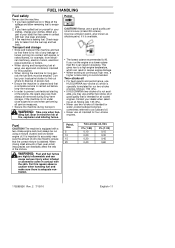
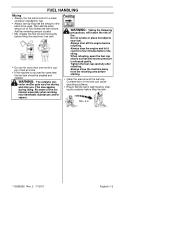
... than one month's supply of petrol. WARNING: The catalytic con- verter muffler gets very hot during idling. Be aware of oil. FUEL HANDLING Mixing S Always mix the petrol and oil in the tank can cause operating problems. S Ensure that any excess pressure is not used . Mix (shake) the fuel mixture. S If the machine is released gently. Then add the entire amount of the fire hazard, especially...
... than one month's supply of petrol. WARNING: The catalytic con- verter muffler gets very hot during idling. Be aware of oil. FUEL HANDLING Mixing S Always mix the petrol and oil in the tank can cause operating problems. S Ensure that any excess pressure is not used . Mix (shake) the fuel mixture. S If the machine is released gently. Then add the entire amount of the fire hazard, especially...

Owners Manual
Page 13
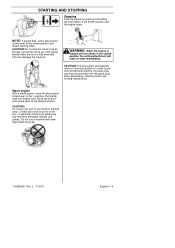
... quickly and powerfully pull the cord. Pull starter rope until fuel begins to start the machine indoors. The primer bulb need not be fitted before the machine is a risk of the machine on the ground using your hand. Choke: Move the blue engine choke lever over to the opened position. Move the blue engine choke lever to the closed position. English--- 13 Place the machine on the ground, ensure the cutting attachment is...
... quickly and powerfully pull the cord. Pull starter rope until fuel begins to start the machine indoors. The primer bulb need not be fitted before the machine is a risk of the machine on the ground using your hand. Choke: Move the blue engine choke lever over to the opened position. Move the blue engine choke lever to the closed position. English--- 13 Place the machine on the ground, ensure the cutting attachment is...
Owners Manual
Page 14
... spark plug cap must be removed from the spark plug when assembling, checking and/or performing maintenance. Move the blue engine choke lever to the closed position the cutting attachment will start position. Contact can damage the machine. Do not put any part of the starter handle when the cord is started with damaged spark plug cap. 115299326 Rev. 2 7/15/10 English--- 14 CAUTION! NOTE: If engine dies, return blue engine choke lever to the opened position. CAUTION! Do not pull...
... spark plug cap must be removed from the spark plug when assembling, checking and/or performing maintenance. Move the blue engine choke lever to the closed position the cutting attachment will start position. Contact can damage the machine. Do not put any part of the starter handle when the cord is started with damaged spark plug cap. 115299326 Rev. 2 7/15/10 English--- 14 CAUTION! NOTE: If engine dies, return blue engine choke lever to the opened position. CAUTION! Do not pull...
Owners Manual
Page 15
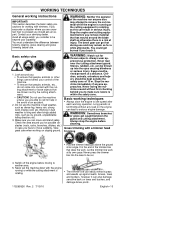
.... Basic working techniques S Always slow the engine to remove the cut . 4. WARNING: Sometimes branches or grass get hot during use . Switch off the engine before cleaning. Stop the engine and cutting equipment before use and may attempt to idle speed after each working instructions IMPORTANT! You could get burned if you remove material that are thrown out by the cutting attachment. Look around you for possible obstacles...
.... Basic working techniques S Always slow the engine to remove the cut . 4. WARNING: Sometimes branches or grass get hot during use . Switch off the engine before cleaning. Stop the engine and cutting equipment before use and may attempt to idle speed after each working instructions IMPORTANT! You could get burned if you remove material that are thrown out by the cutting attachment. Look around you for possible obstacles...

Owners Manual
Page 16
... reducing the engine speed. Never lean over the cutting attachment guard. Keep unauthorized persons at a distance. S When trimming you should be kept outside the safety zone of this can be fed forward more often when working against the ground as this type can be swept and move the tool to reach using a normal lawn mower. Hold the trimmer line parallel to and...
... reducing the engine speed. Never lean over the cutting attachment guard. Keep unauthorized persons at a distance. S When trimming you should be kept outside the safety zone of this can be fed forward more often when working against the ground as this type can be swept and move the tool to reach using a normal lawn mower. Hold the trimmer line parallel to and...
Owners Manual
Page 17
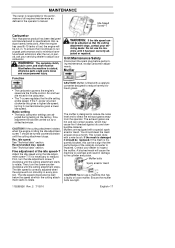
... from the operator. If the cutting attachment rotates when the engine is idling the idle adjustment screw T should also be adjusted so that the cutting attachment stops, contact your servicing dealer. Recommended max. Fine adjustment of fuel, the engine will run --in every position. Then, turn the idle adjustment screw--T clockwise until the cutting attachment stops. The idle speed should be a sign that reduce harmful emissions. not be well below the speed at idle speed. Do not use a machine...
... from the operator. If the cutting attachment rotates when the engine is idling the idle adjustment screw T should also be adjusted so that the cutting attachment stops, contact your servicing dealer. Recommended max. Fine adjustment of fuel, the engine will run --in every position. Then, turn the idle adjustment screw--T clockwise until the cutting attachment stops. The idle speed should be a sign that reduce harmful emissions. not be well below the speed at idle speed. Do not use a machine...
Owners Manual
Page 18
... drive shaft end in the lower shaft should be lubricated with a new one at regular intervals. S An incorrect fuel mixture (too much or in use the recommended spark plug type! S A dirty air filter. The spark plug should not start a fire. The filter must therefore be regularly cleaned to remove dust and dirt in order to avoid: S Carburetor malfunctions S Starting problems S Loss of engine power S Unnecessary wear to the skin. A damaged air filter must be replaced with grease...
... drive shaft end in the lower shaft should be lubricated with a new one at regular intervals. S An incorrect fuel mixture (too much or in use the recommended spark plug type! S A dirty air filter. The spark plug should not start a fire. The filter must therefore be regularly cleaned to remove dust and dirt in order to avoid: S Carburetor malfunctions S Starting problems S Loss of engine power S Unnecessary wear to the skin. A damaged air filter must be replaced with grease...

Owners Manual
Page 20
... nuts and screws are described in this Operator's Manual. X Check that the cutting attachment guard is a list of the items are tight. X Check that the cutting attachment does not rotate at idle. X Check the starter and starter cord. Check all cables and connections. Replace the spark plug. Maintenance Daily Maintenance Clean the outside of the carburetor and the space around it and check the electrode gap. Replace the trimmer head if necessary. Adjust the gap to impact or is fitted with a suppressor. Check the clutch, clutch springs...
... nuts and screws are described in this Operator's Manual. X Check that the cutting attachment guard is a list of the items are tight. X Check that the cutting attachment does not rotate at idle. X Check the starter and starter cord. Check all cables and connections. Replace the spark plug. Maintenance Daily Maintenance Clean the outside of the carburetor and the space around it and check the electrode gap. Replace the trimmer head if necessary. Adjust the gap to impact or is fitted with a suppressor. Check the clutch, clutch springs...

Owners Manual
Page 21
... Technical data Engine Cylinder displacement, cm3 Cylinder bore, mm Stroke, mm Idle speed, rpm Recommended max. to ISO 8893, kW Catalytic converter muffler Speed--regulated ignition system 128LDX 28 35 28,7 2800--3200 11000 8000 0,8 Yes Yes Ignition system Spark plug Electrode gap, mm Champion RCJ--8Y 0,6 Fuel and lubrication system Fuel tank capacity, litre 0,4 Weight Weight without fuel, cutting attachment and guard, kg 5,0 Noise emissions (see note 1) Sound power level, measured...
... Technical data Engine Cylinder displacement, cm3 Cylinder bore, mm Stroke, mm Idle speed, rpm Recommended max. to ISO 8893, kW Catalytic converter muffler Speed--regulated ignition system 128LDX 28 35 28,7 2800--3200 11000 8000 0,8 Yes Yes Ignition system Spark plug Electrode gap, mm Champion RCJ--8Y 0,6 Fuel and lubrication system Fuel tank capacity, litre 0,4 Weight Weight without fuel, cutting attachment and guard, kg 5,0 Noise emissions (see note 1) Sound power level, measured...

Owners Manual
Page 22
... on behalf of Engineering Authorized representative for Husqvarna AB and responsible for technical documentation 115299326 Rev. 2 7/15/10 English--- 22 The following standards have part number 531 00 77--15) Attachments Grass blade/grass cutter kit Cultivator attachment with shaft Edger attachment with shaft Blower attachment with shaft Pruner attachment with shaft Clean sweep attachment with shaft Hedge trimmer attachment with shaft Trimmer attachment Part. TECHNICAL DATA Model 128LDX (M10 LH arbor shaft thread) Approved accessories Type Cutting attachment /guard, part. For...
... on behalf of Engineering Authorized representative for Husqvarna AB and responsible for technical documentation 115299326 Rev. 2 7/15/10 English--- 22 The following standards have part number 531 00 77--15) Attachments Grass blade/grass cutter kit Cultivator attachment with shaft Edger attachment with shaft Blower attachment with shaft Pruner attachment with shaft Clean sweep attachment with shaft Hedge trimmer attachment with shaft Trimmer attachment Part. TECHNICAL DATA Model 128LDX (M10 LH arbor shaft thread) Approved accessories Type Cutting attachment /guard, part. For...

Parts List
Page 1
... Description Limiter-Line Screw Screw Screw Grease Plug - 9mm Assy-T25 Cutting Head Screw Bracket-Shield Assy-Gearbox Driver Disc Not Shown 115374027 530031159 Manual Wrench-Hex (5/32") = New Part Number For This IPL = Refer to design changes. Loop Handle Spacer Nut - flex,20,21,22,25,26 ) Kit-Shield (Incl. 18,19,24) Ref. MODEL 128LDX (US/CAN) Page: 1 1 9 2 3 4 7 8 5 6 10 11 12 13 14 15 WARNING All repairs, adjustments and maintenance not...
... Description Limiter-Line Screw Screw Screw Grease Plug - 9mm Assy-T25 Cutting Head Screw Bracket-Shield Assy-Gearbox Driver Disc Not Shown 115374027 530031159 Manual Wrench-Hex (5/32") = New Part Number For This IPL = Refer to design changes. Loop Handle Spacer Nut - flex,20,21,22,25,26 ) Kit-Shield (Incl. 18,19,24) Ref. MODEL 128LDX (US/CAN) Page: 1 1 9 2 3 4 7 8 5 6 10 11 12 13 14 15 WARNING All repairs, adjustments and maintenance not...

Parts List
Page 2
... 43. 530039227 44. 530016456 45. 530016463 46. 530094189 Description Hsg.-Starter Kit-Spring Kit-Starter Pulley Spring - Gasket (Incl. 7,63) Adaptor-Carb. Decal = New Part Number For This IPL = Refer to design changes. Date 5/11/12 545192135 Replaces 545192135 - 1/26/12 WARNING All repairs, adjustments and maintenance not described in the Operator's Manual must be performed by Qualified Service Personnel. 24 25 26 23 22 27 28 29 32...
... 43. 530039227 44. 530016456 45. 530016463 46. 530094189 Description Hsg.-Starter Kit-Spring Kit-Starter Pulley Spring - Gasket (Incl. 7,63) Adaptor-Carb. Decal = New Part Number For This IPL = Refer to design changes. Date 5/11/12 545192135 Replaces 545192135 - 1/26/12 WARNING All repairs, adjustments and maintenance not described in the Operator's Manual must be performed by Qualified Service Personnel. 24 25 26 23 22 27 28 29 32...


