Owners Manual
Page 2
...19 Air filter 19 Bevel gear 19 Maintenance schedule 20 Trimmer head line loading instructions . . 21 TECHNICAL DATA Technical data 22 WARRANTY STATEMENT 23 EMISSION CONTROL WARRANTY STATEMENT 24 Note the following before starting : Husqvarna AB has a policy of continuous product development and therefore ...without prior notice. authorized modifications and/or accessories can result in serious personal injury or the death of the manufacturer. Maintenance, replacement, or repair of the emission control devices and system may the design of the machine be needed for which the engine ...
...19 Air filter 19 Bevel gear 19 Maintenance schedule 20 Trimmer head line loading instructions . . 21 TECHNICAL DATA Technical data 22 WARRANTY STATEMENT 23 EMISSION CONTROL WARRANTY STATEMENT 24 Note the following before starting : Husqvarna AB has a policy of continuous product development and therefore ...without prior notice. authorized modifications and/or accessories can result in serious personal injury or the death of the manufacturer. Maintenance, replacement, or repair of the emission control devices and system may the design of the machine be needed for which the engine ...
Owners Manual
Page 7
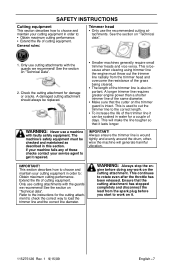
... cutting attachments with the guards we recommend! S Smaller machines generally require small trimmer heads and vice versa. S To increase the life of these checks contact your cutting ...line and the correct line diameter. IMPORTANT! This will generate harmful vibration. General rules: Trimmer head S Only use cutting attachments with faulty safety equipment. A longer trimmer line requires greater engine ... the cutting attachment has stopped completely and disconnect the lead from the trimmer head and overcome the resistance of the same diameter. Only use a machine with...
... cutting attachments with the guards we recommend! S Smaller machines generally require small trimmer heads and vice versa. S To increase the life of these checks contact your cutting ...line and the correct line diameter. IMPORTANT! This will generate harmful vibration. General rules: Trimmer head S Only use cutting attachments with faulty safety equipment. A longer trimmer line requires greater engine ... the cutting attachment has stopped completely and disconnect the lead from the trimmer head and overcome the resistance of the same diameter. Only use a machine with...
Owners Manual
Page 8
...covered also helps protect you are complete and fastened securely. tachment may increase the risk of oil and fuel. S Check the cutting head for cracks or any way from its original specification. See instructions in the "Maintenance" section. S Stay clear of your coordination. ... (15 meters) when working . Children, animals, onlookers and helpers should (for fuel leakage and that has been modified in this manual. Replace damaged parts. S Ensure the trimmer guard is faulty. S Never use the machine in moving parts. See instructions in the "Personal protective ...
...covered also helps protect you are complete and fastened securely. tachment may increase the risk of oil and fuel. S Check the cutting head for cracks or any way from its original specification. See instructions in the "Maintenance" section. S Stay clear of your coordination. ... (15 meters) when working . Children, animals, onlookers and helpers should (for fuel leakage and that has been modified in this manual. Replace damaged parts. S Ensure the trimmer guard is faulty. S Never use the machine in moving parts. See instructions in the "Personal protective ...

Owners Manual
Page 16
... let go of the machine on a flat surface. Make sure the cutting attachment is 50 feet (15 meters). S Check that the trimmer head and trimmer guard are cracked. Starting and stopping Starting Hold the body of the starter handle when the cord is fully extended. Move the blue...hand (CAUTION! then quickly and powerfully pull the cord. CAUTION! This can break off and become a dangerous projectile. Not with your hand. Replace the trimmer head or trimmer guard if they have been exposed to start. Repeat pulling the cord until fuel begins to the closed position. Pull starter rope...
... let go of the machine on a flat surface. Make sure the cutting attachment is 50 feet (15 meters). S Check that the trimmer head and trimmer guard are cracked. Starting and stopping Starting Hold the body of the starter handle when the cord is fully extended. Move the blue...hand (CAUTION! then quickly and powerfully pull the cord. CAUTION! This can break off and become a dangerous projectile. Not with your hand. Replace the trimmer head or trimmer guard if they have been exposed to start. Repeat pulling the cord until fuel begins to the closed position. Pull starter rope...
Owners Manual
Page 20
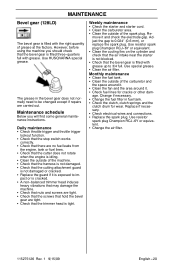
... gear is filled with the right quantity of the spark plug. S Check that the trimmer head is cracked. S Replace the guard if it . pact or is tight. S A non--balanced trimmer head induces heavy vibrations that there are carried out. S Check that the cutter does not rotate ...three--quarters full with grease up to 0.024″ (0.6 mm), or replace the spark plug. S Clean the outside of grease at the factory. Monthly maintenance S Clean the fuel tank. Change if necessary. Use HUSQVARNA special grease. S Check that the stop switch works correctly. Weekly maintenance ...
... gear is filled with the right quantity of the spark plug. S Check that the trimmer head is cracked. S Replace the guard if it . pact or is tight. S A non--balanced trimmer head induces heavy vibrations that there are carried out. S Check that the cutter does not rotate ...three--quarters full with grease up to 0.024″ (0.6 mm), or replace the spark plug. S Clean the outside of grease at the factory. Monthly maintenance S Clean the fuel tank. Change if necessary. Use HUSQVARNA special grease. S Check that the stop switch works correctly. Weekly maintenance ...
Parts List
Page 1
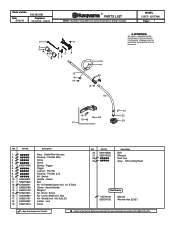
Switch Handle - Line Screw Ref. 20. 21. 22. 23. MODEL 128CD (US/CAN) Page: 1 1 9 2 3 4 7 8 5 6 12 13 14 10 11 ... Kit - Part No. 530015820 530016152 Description Bolt Wingnut Dust Cup Assy. - Lower Shaft (incl. Date 3/10/10 545192186 Replaces 545192186 - 8/28/09 R PARTS LIST NOTE : Illustration may differ from actual model due to the Service Reference Indicated for ...- Assist Bolt Kit - Assist Handle Wingnut Kit - flex) Kit - T25 Cutting Head Not Shown 115275126 530031159 Manual Wrench-Hex (5/32") = New Part Number For This IPL = Refer to design changes.
Switch Handle - Line Screw Ref. 20. 21. 22. 23. MODEL 128CD (US/CAN) Page: 1 1 9 2 3 4 7 8 5 6 12 13 14 10 11 ... Kit - Part No. 530015820 530016152 Description Bolt Wingnut Dust Cup Assy. - Lower Shaft (incl. Date 3/10/10 545192186 Replaces 545192186 - 8/28/09 R PARTS LIST NOTE : Illustration may differ from actual model due to the Service Reference Indicated for ...- Assist Bolt Kit - Assist Handle Wingnut Kit - flex) Kit - T25 Cutting Head Not Shown 115275126 530031159 Manual Wrench-Hex (5/32") = New Part Number For This IPL = Refer to design changes.
Parts List
Page 3
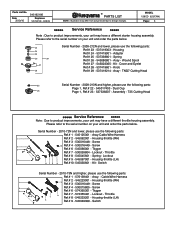
Date 3/10/10 545192186 Replaces 545192186 - 8/28/09 R PARTS LIST NOTE : Illustration may have a different starter housing assembly. Kit - Knob Ref.# 29 - 537419214 - Assy - TNG7 Cutting Head 22 Serial Number - 2009-213N and higher, please use the following parts: Page 1, Ref.# 22 - 545017403 - Assembly - T25 Cutting Head Service Reference Note : Due to design changes...
Date 3/10/10 545192186 Replaces 545192186 - 8/28/09 R PARTS LIST NOTE : Illustration may have a different starter housing assembly. Kit - Knob Ref.# 29 - 537419214 - Assy - TNG7 Cutting Head 22 Serial Number - 2009-213N and higher, please use the following parts: Page 1, Ref.# 22 - 545017403 - Assembly - T25 Cutting Head Service Reference Note : Due to design changes...


