
Owners Manual
Page 2
... starting 15 Starting and stopping 15 MAINTENANCE Carburetor 16 Muffler 17 Spark plug 17 Air filter 18 Bevel gear 18 Maintenance schedule 18 Trimmer head line loading instructions . . 19 TECHNICAL DATA Technical data 21 EMISSION CONTROL WARRANTY STATEMENT 22 Note the following information that you ...may the design of non- For customer assistance, call: 1-800-487-5951 Contact us at our website: www.husqvarna.com WARNING The engine exhaust from this operator's manual. It is extremely important that will be needed for which the engine has been shown to cause cancer, birth ...
... starting 15 Starting and stopping 15 MAINTENANCE Carburetor 16 Muffler 17 Spark plug 17 Air filter 18 Bevel gear 18 Maintenance schedule 18 Trimmer head line loading instructions . . 19 TECHNICAL DATA Technical data 21 EMISSION CONTROL WARRANTY STATEMENT 22 Note the following information that you ...may the design of non- For customer assistance, call: 1-800-487-5951 Contact us at our website: www.husqvarna.com WARNING The engine exhaust from this operator's manual. It is extremely important that will be needed for which the engine has been shown to cause cancer, birth ...
Owners Manual
Page 3
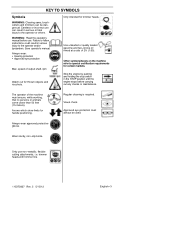
...incorrect use can be used. Always wear: S Hearing protection S Approved eye protection Max. speed of output shaft, rpm Watch out for trimmer heads. Use unleaded or quality leaded gasoline and two--stroke oil mixed at a ratio of the machine must always be dangerous! Stop ... WARNING: Read the operator's manual before carrying out any checks or maintenance. Other symbols/decals on the machine refer to the operator and/or bystanders. Arrows which show limits for certain markets. KEY TO SYMBOLS Symbols WARNING: Clearing saws, brushcutters and trimmers can result in the STOP ...
...incorrect use can be used. Always wear: S Hearing protection S Approved eye protection Max. speed of output shaft, rpm Watch out for trimmer heads. Use unleaded or quality leaded gasoline and two--stroke oil mixed at a ratio of the machine must always be dangerous! Stop ... WARNING: Read the operator's manual before carrying out any checks or maintenance. Other symbols/decals on the machine refer to the operator and/or bystanders. Arrows which show limits for certain markets. KEY TO SYMBOLS Symbols WARNING: Clearing saws, brushcutters and trimmers can result in the STOP ...
Owners Manual
Page 8
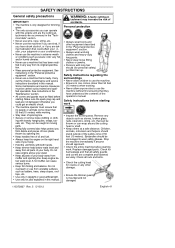
...your vision, your judgment or your body away from muffler and spinning line. S Keep trimmer head below waist level. Keep engine below waist level and away from debris and pieces of the operator's manual. WARNING: A faulty cutting at a safe distance. Safety instructions regarding the surroundings S ...if you are tired, if you have understood the contents of toxic plants thrown by trained and qualified specialists. S Ensure the trimmer guard is only designed for jobs explained in daylight or good artificial light. Carry out the checks, maintenance and service instructions described ...
...your vision, your judgment or your body away from muffler and spinning line. S Keep trimmer head below waist level. Keep engine below waist level and away from debris and pieces of the operator's manual. WARNING: A faulty cutting at a safe distance. Safety instructions regarding the surroundings S ...if you are tired, if you have understood the contents of toxic plants thrown by trained and qualified specialists. S Ensure the trimmer guard is only designed for jobs explained in daylight or good artificial light. Carry out the checks, maintenance and service instructions described ...
Owners Manual
Page 12
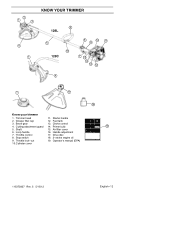
2 1 3 4 1 KNOW YOUR TRIMMER 6 128L 5 16 128C 8 10 9 11 7 15 13 14 12 4 1 17 18 Know your trimmer 1. Fuel tank 3. Air filter cover 6. Throttle lock--out 19. Primer bulb 19 5. Handle adjustment 7. Drive disc 8. Bevel gear 13. Stop switch 18. 2--stroke engine oil 9. Grease filler cap 12. Cutting attachment guard 14. Loop handle 16. Throttle control 17. Operator's manual (EPA) 10.Cylinder cover 115373927 Rev. 5 5/15/12 English--- 12 Starter handle 2. Shaft 15. Trimmer head 11. Choke control 4.
2 1 3 4 1 KNOW YOUR TRIMMER 6 128L 5 16 128C 8 10 9 11 7 15 13 14 12 4 1 17 18 Know your trimmer 1. Fuel tank 3. Air filter cover 6. Throttle lock--out 19. Primer bulb 19 5. Handle adjustment 7. Drive disc 8. Bevel gear 13. Stop switch 18. 2--stroke engine oil 9. Grease filler cap 12. Cutting attachment guard 14. Loop handle 16. Throttle control 17. Operator's manual (EPA) 10.Cylinder cover 115373927 Rev. 5 5/15/12 English--- 12 Starter handle 2. Shaft 15. Trimmer head 11. Choke control 4.

Owners Manual
Page 13
...corresponding hole in the gear housing. S Insert hex wrench (C) in this manual. Note that the handle must be - The nut must be mounted be completely covered by the dust cup. Hook the trimmer guard/combination guard onto the fitting on the shaft. S To dismantle, ...hole to prevent the shaft from rotating. trimmer head (Model 128C) Fitting the loop handle S Position the handle on the shaft and secure with the trimmer head. Hook the trimmer guard/combination guard onto the fitting on the shaft. Fitting the trimmer guard and trimmer head (Model 128L) C S Fit the...
...corresponding hole in the gear housing. S Insert hex wrench (C) in this manual. Note that the handle must be - The nut must be mounted be completely covered by the dust cup. Hook the trimmer guard/combination guard onto the fitting on the shaft. S To dismantle, ...hole to prevent the shaft from rotating. trimmer head (Model 128C) Fitting the loop handle S Position the handle on the shaft and secure with the trimmer head. Hook the trimmer guard/combination guard onto the fitting on the shaft. Fitting the trimmer guard and trimmer head (Model 128L) C S Fit the...


