Owners Manual
Page 5
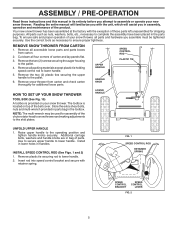
... lay panels flat. 3. Install in lower holes in the toolbox. Your new snow thrower has been assembled at the factory with the exception of the belt cover. Remove all parts and hardware you in the parts bag. Reading the entire manual will familiarize you with retainer spring. LOWER HANDLE UNFOLD UPPER...
... lay panels flat. 3. Install in lower holes in the toolbox. Your new snow thrower has been assembled at the factory with the exception of the belt cover. Remove all parts and hardware you in the parts bag. Reading the entire manual will familiarize you with retainer spring. LOWER HANDLE UNFOLD UPPER...
Owners Manual
Page 14
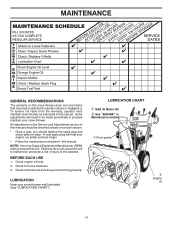
... will need to be made periodically to be checked at least once each season. • Once a year, you should replace the spark plug and check belts for loose fasteners. 3. LUBRICATION CHART ➀ SAE 30 Motor Oil ➁ See "ENGINE" in this manual. Failure to do so can cause the unit to...
... will need to be made periodically to be checked at least once each season. • Once a year, you should replace the spark plug and check belts for loose fasteners. 3. LUBRICATION CHART ➀ SAE 30 Motor Oil ➁ See "ENGINE" in this manual. Failure to do so can cause the unit to...
Owners Manual
Page 15
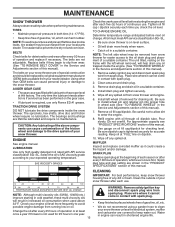
...not recommend using a garden hose to the snow thrower. MAINTENANCE SNOW THROWER Always observe safety rules when performing maintenance. BELTS Check belts for accurate reading. The belts on the frame with spark plug. All oil must meet API service classification SG-SL. • Be sure snow...after every 100 hours of special construction and should be purchased from your snow thrower are of operation, whichever occurs first. The belts are lifetime lubricated and require no lubrication. The bearings and bushings are not adjustable. Install drain plug and tighten securely. 5....
...not recommend using a garden hose to the snow thrower. MAINTENANCE SNOW THROWER Always observe safety rules when performing maintenance. BELTS Check belts for accurate reading. The belts on the frame with spark plug. All oil must meet API service classification SG-SL. • Be sure snow...after every 100 hours of special construction and should be purchased from your snow thrower are of operation, whichever occurs first. The belts are lifetime lubricated and require no lubrication. The bearings and bushings are not adjustable. Install drain plug and tighten securely. 5....
Owners Manual
Page 16
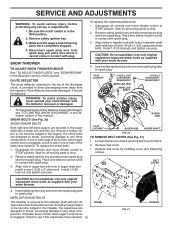
...should be replaced. To replace the capscrew/shear bolts: 1. Align holes in the Operation section of this manual. Remove belt cover. • Replace belt cover by installing cover and tightening screws. If the deflector becomes damaged, it cannot come in impeller shaft and install two...-hand augers are secured to STOP position. Insert safety ignition key and reconnect spark plug wire to frame. 2. Loosen the two (2) screws securing belt cover to spark plug. 1/4-20 LOCKNUT 1/4-20 x 1-5/8 CAPSCREW / SHEAR BOLT IMPELLER HUB IMPELLER SHAFT 1/4-20 x 2 SHOULDER / SHEAR BOLT ...
...should be replaced. To replace the capscrew/shear bolts: 1. Align holes in the Operation section of this manual. Remove belt cover. • Replace belt cover by installing cover and tightening screws. If the deflector becomes damaged, it cannot come in impeller shaft and install two...-hand augers are secured to STOP position. Insert safety ignition key and reconnect spark plug wire to frame. 2. Loosen the two (2) screws securing belt cover to spark plug. 1/4-20 LOCKNUT 1/4-20 x 1-5/8 CAPSCREW / SHEAR BOLT IMPELLER HUB IMPELLER SHAFT 1/4-20 x 2 SHOULDER / SHEAR BOLT ...
Owners Manual
Page 17
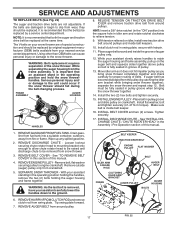
... to the snow thrower. Serious personal injury and/ or damage to relieve tension. 9. Tighten securely. 17. INSTALL DISCHARGE CHUTE - REMOVE BELT COVER - Remove outside (auger) pulley only from fire or flame. It is important that an assistant stand in idler arm and rotate ...hex bolts and tighten securely. 15. INSTALL ENGINE PULLEY - Install flat washer, bolt and tighten securely (41-47 N-m torque). Make sure belt is fully seated in the operating position holding the handles, remove the two (2) bolts holding the auger housing and frame together. REMOVE GASOLINE FROM...
... to the snow thrower. Serious personal injury and/ or damage to relieve tension. 9. Tighten securely. 17. INSTALL DISCHARGE CHUTE - REMOVE BELT COVER - Remove outside (auger) pulley only from fire or flame. It is important that an assistant stand in idler arm and rotate ...hex bolts and tighten securely. 15. INSTALL ENGINE PULLEY - Install flat washer, bolt and tighten securely (41-47 N-m torque). Make sure belt is fully seated in the operating position holding the handles, remove the two (2) bolts holding the auger housing and frame together. REMOVE GASOLINE FROM...

Owners Manual
Page 19
... necessary. 5. Always follow the mix ratio found on a furnace, water heater, clothes dryer or gas appliance. Allow the engine to distribute oil. 4. Inspect and replace belts, if necessary (See "TO REPLACE...
... necessary. 5. Always follow the mix ratio found on a furnace, water heater, clothes dryer or gas appliance. Allow the engine to distribute oil. 4. Inspect and replace belts, if necessary (See "TO REPLACE...
Owners Manual
Page 20
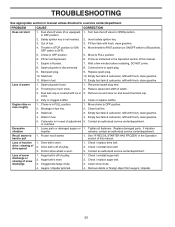
...7. Blockage in STOP position (or ON/ 4. Stale fuel. 3. or overhaul. remains, contact an authorized service center/department. Drive belt is worn. 1. Friction drive wheel is worn. 2. Contact an authorized service center/department. TROUBLESHOOTING See appropriate section in manual unless directed... cap. Clean or replace muffler. Contact an authorized service center/department. hard to OPEN position. Check / replace drive belt. 2. Auger belt is not inserted. 2. Clogged discharge chute. 1. in the Operation section of pulley. 2. Bad spark plug. 9. Fuel...
...7. Blockage in STOP position (or ON/ 4. Stale fuel. 3. or overhaul. remains, contact an authorized service center/department. Drive belt is worn. 1. Friction drive wheel is worn. 2. Contact an authorized service center/department. TROUBLESHOOTING See appropriate section in manual unless directed... cap. Clean or replace muffler. Contact an authorized service center/department. hard to OPEN position. Check / replace drive belt. 2. Auger belt is not inserted. 2. Clogged discharge chute. 1. in the Operation section of pulley. 2. Bad spark plug. 9. Fuel...

Parts List
Page 16
...inches. 1 inch = 25.4 mm IMPORTANT: Use only Original Equipment Manufacturer (O.E.M.) replacement parts. MODEL NO. 12527HV (96193007103), PRODUCT NO. 961 93 00-71 25 24 27 23 22 13 21 20 15 11 12...18 77-86 532 18 05-22 532 05 92-89 873 80 05-00 DESCRIPTION IMPELLER BELT TRACTION BELT IDLER ARM BRACKET IDLER PULLEY IDLER BRACKET NUT 5/16-18 SCREW 5/16-18 X 1.50 ...25 SCREW 3/8-24 X 1 .375 WASHER PULLEY ENG IMPELLER PULLEY ENG TRACTION SCREW 5/16-24 X 1.00 LOCKWASHER 5/16 BELT GUIDE LOCKWASHER 5/16 IDLER BUSHING WASHER SCREW 5/16-24 X 1.25 SCREW 3/8-16 X .750 NOTE: All component dimensions ...
...inches. 1 inch = 25.4 mm IMPORTANT: Use only Original Equipment Manufacturer (O.E.M.) replacement parts. MODEL NO. 12527HV (96193007103), PRODUCT NO. 961 93 00-71 25 24 27 23 22 13 21 20 15 11 12...18 77-86 532 18 05-22 532 05 92-89 873 80 05-00 DESCRIPTION IMPELLER BELT TRACTION BELT IDLER ARM BRACKET IDLER PULLEY IDLER BRACKET NUT 5/16-18 SCREW 5/16-18 X 1.50 ...25 SCREW 3/8-24 X 1 .375 WASHER PULLEY ENG IMPELLER PULLEY ENG TRACTION SCREW 5/16-24 X 1.00 LOCKWASHER 5/16 BELT GUIDE LOCKWASHER 5/16 IDLER BUSHING WASHER SCREW 5/16-24 X 1.25 SCREW 3/8-16 X .750 NOTE: All component dimensions ...


