Owners Manual
Page 2
... adults to stop the unit and disengage the controls quickly. 2. Do not operate the equipment without proper instruction. 3. Adjust the collector housing height to vibrate abnormally, stop the engine (motor), remove the wire from the spark plug, disconnect the cord on electric motors, thoroughly inspect the snow (d) Never fill containers inside a vehicle or on a truck thrower for any repairs, adjustments or inspections. If the unit should be thrown...
... adults to stop the unit and disengage the controls quickly. 2. Do not operate the equipment without proper instruction. 3. Adjust the collector housing height to vibrate abnormally, stop the engine (motor), remove the wire from the spark plug, disconnect the cord on electric motors, thoroughly inspect the snow (d) Never fill containers inside a vehicle or on a truck thrower for any repairs, adjustments or inspections. If the unit should be thrown...
Owners Manual
Page 3
... any enclosure. 3. SERIAL NUMBER DATE OF PURCHASE THE MODEL AND SERIAL NUMBERS WILL BE FOUND ON A DECAL ATTACHED TO THE REAR OF THE SNOW THROWER HOUSING. TABLE OF CONTENTS SAFETY RULES 2-3 MAINTENANCE 14-15 PRODUCT SPECIFICATIONS 3 SERVICE AND ADJUSTMENTS 16-18 CUSTOMER RESPONSIBILITIES 3 STORAGE 19 ASSEMBLY / PRE-OPERATION 5-7 TROUBLESHOOTING 20 OPERATION 8-13 WARRANTY 22-25 MAINTENANCE SCHEDULE 14 3 Do not overload the machine capacity by the manufacturer of a new snow thrower. Wait 10...
... any enclosure. 3. SERIAL NUMBER DATE OF PURCHASE THE MODEL AND SERIAL NUMBERS WILL BE FOUND ON A DECAL ATTACHED TO THE REAR OF THE SNOW THROWER HOUSING. TABLE OF CONTENTS SAFETY RULES 2-3 MAINTENANCE 14-15 PRODUCT SPECIFICATIONS 3 SERVICE AND ADJUSTMENTS 16-18 CUSTOMER RESPONSIBILITIES 3 STORAGE 19 ASSEMBLY / PRE-OPERATION 5-7 TROUBLESHOOTING 20 OPERATION 8-13 WARRANTY 22-25 MAINTENANCE SCHEDULE 14 3 Do not overload the machine capacity by the manufacturer of a new snow thrower. Wait 10...
Owners Manual
Page 5
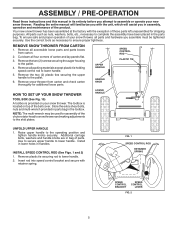
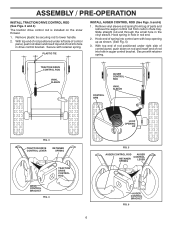
.... 2 5 Cut down all parts and hardware you assemble must be used for assembly of the chute rotator head to snow thrower and making adjustments to the skid plates. UPPER HANDLE HANDLE KNOB SPEED CONTROL ROD PLASTIC TIE HOW TO SET UP YOUR SNOW THROWER TOOL BOX (See Fig. 10) A toolbox is located on your snow thrower. Remove plastic tie securing rod to the operating position and tighten handle knobs securely. To ensure safe and proper operation of your new snow thrower. Remove snow thrower...
.... 2 5 Cut down all parts and hardware you assemble must be used for assembly of the chute rotator head to snow thrower and making adjustments to the skid plates. UPPER HANDLE HANDLE KNOB SPEED CONTROL ROD PLASTIC TIE HOW TO SET UP YOUR SNOW THROWER TOOL BOX (See Fig. 10) A toolbox is located on your snow thrower. Remove plastic tie securing rod to the operating position and tighten handle knobs securely. To ensure safe and proper operation of your new snow thrower. Remove snow thrower...
Owners Manual
Page 6
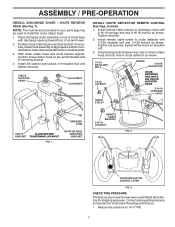
... spring into hole in drive control bracket. TRACTION DRIVE CONTROL ROD VINYL SLEEVE CONTROL ARM AUGER CONTROL ROD VINYL SLEEVE FIG. 3 TRACTION DRIVE CONTROL LEVER RETAINER SPRING DRIVE CONTROL BRACKET FIG. 4 TRACTION DRIVE CONTROL ROD 6 LOOP OPENING UP FIG. 5 AUGER CONTROL ROD AUGER CONTROL RETAINER LEVER SPRING AUGER CONTROL BRACKET FIG. 6 With top end of rod positioned under left side of control panel, push rod down on the snow thrower. 1. ASSEMBLY / PRE-OPERATION INSTALL TRACTION DRIVE CONTROL ROD (See Figs. 3 and 4) The traction drive control...
... spring into hole in drive control bracket. TRACTION DRIVE CONTROL ROD VINYL SLEEVE CONTROL ARM AUGER CONTROL ROD VINYL SLEEVE FIG. 3 TRACTION DRIVE CONTROL LEVER RETAINER SPRING DRIVE CONTROL BRACKET FIG. 4 TRACTION DRIVE CONTROL ROD 6 LOOP OPENING UP FIG. 5 AUGER CONTROL ROD AUGER CONTROL RETAINER LEVER SPRING AUGER CONTROL BRACKET FIG. 6 With top end of rod positioned under left side of control panel, push rod down on the snow thrower. 1. ASSEMBLY / PRE-OPERATION INSTALL TRACTION DRIVE CONTROL ROD (See Figs. 3 and 4) The traction drive control...
Owners Manual
Page 7
... REMOTE CABLE BRACKET 5/16-18 LOCKNUT FIG. 8 CHUTE DEFLECTOR CONTROL LEVER FIG. 9 CHECK TIRE PRESSURE The tires on your parts bag may be loose on shoulder bolt. 3. Install 3/8 washer and locknut on pin and threaded stud of chute base with 1/4-20 shoulder bolt and 1/4-20 locknut as shown. Correct and equal tire pressure is important for shipping purposes. Tighten nut securely. ASSEMBLY / PRE-OPERATION INSTALL DISCHARGE CHUTE / CHUTE ROTATOR HEAD...
... REMOTE CABLE BRACKET 5/16-18 LOCKNUT FIG. 8 CHUTE DEFLECTOR CONTROL LEVER FIG. 9 CHECK TIRE PRESSURE The tires on your parts bag may be loose on shoulder bolt. 3. Install 3/8 washer and locknut on pin and threaded stud of chute base with 1/4-20 shoulder bolt and 1/4-20 locknut as shown. Correct and equal tire pressure is important for shipping purposes. Tighten nut securely. ASSEMBLY / PRE-OPERATION INSTALL DISCHARGE CHUTE / CHUTE ROTATOR HEAD...

Owners Manual
Page 9
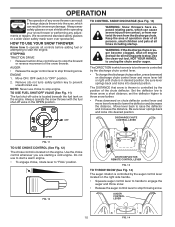
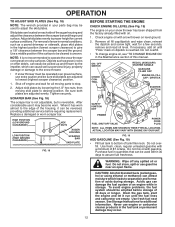
... speed of snow thrower. Primer - Drive speed control lever - used to change the direction the snow is thrown. MUFFLER GASOLINE FILLER CAP CHOKE CONTROL SAFETY IGNITION KEY ON / OFF SWITCH PRIMER FUEL SHUT-OFF VALVE RECOIL (AUXILIARY) STARTER HANDLE OPERATION ELECTRIC START BUTTON AUGER CONTROL LEVER POWER CORD PLUG CHUTE DEFLECTOR DISCHARGE CHUTE CONTROL LEVER DRIVE SPEED CONTROL LEVER DEFLECTOR REMOTE CONTROL LEVER TRACTION DRIVE CONTROL LEVER LH TURN TRIGGER DISCHARGE CHUTE CLEAN-OUT TOOL LIGHT HANDLE KNOB NOTE: ITEMS ABOVE ARE SHOWN IN THEIR TYPICAL LOCATION ON THE ENGINE...
... speed of snow thrower. Primer - Drive speed control lever - used to change the direction the snow is thrown. MUFFLER GASOLINE FILLER CAP CHOKE CONTROL SAFETY IGNITION KEY ON / OFF SWITCH PRIMER FUEL SHUT-OFF VALVE RECOIL (AUXILIARY) STARTER HANDLE OPERATION ELECTRIC START BUTTON AUGER CONTROL LEVER POWER CORD PLUG CHUTE DEFLECTOR DISCHARGE CHUTE CONTROL LEVER DRIVE SPEED CONTROL LEVER DEFLECTOR REMOTE CONTROL LEVER TRACTION DRIVE CONTROL LEVER LH TURN TRIGGER DISCHARGE CHUTE CLEAN-OUT TOOL LIGHT HANDLE KNOB NOTE: ITEMS ABOVE ARE SHOWN IN THEIR TYPICAL LOCATION ON THE ENGINE...
Owners Manual
Page 10
... USE FUEL SHUT-OFF VALVE (See Fig. 11) The fuel shut-off valve in desired position. Move lever back to "OFF" position. 2. ENGINE 1. Always operate the snow thrower with the fuel shut-off valve is controlled by the auger control lever located on the engine. Be sure lever springs back and locks into desired position. set the deflector higher to stop engine. STOPPING TRACTION DRIVE • Release traction drive control lever to throw snow farther. • Press downward on chute deflector control lever and...
... USE FUEL SHUT-OFF VALVE (See Fig. 11) The fuel shut-off valve in desired position. Move lever back to "OFF" position. 2. ENGINE 1. Always operate the snow thrower with the fuel shut-off valve is controlled by the auger control lever located on the engine. Be sure lever springs back and locks into desired position. set the deflector higher to stop engine. STOPPING TRACTION DRIVE • Release traction drive control lever to throw snow farther. • Press downward on chute deflector control lever and...
Owners Manual
Page 11
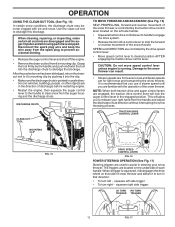
... use a slower speed until you to dislodge the blockage. LH TURN RH TURN TRIGGER TRIGGER 11 FIG. 17 Disconnect the spark plug wire and keep the wire away from the spark plug to prevent accidental starting. • Release the auger control lever and shut off the engine. • Remove the clean-out tool from it into the discharge chute to release your snow thrower. Damage to dislodge this blockage. NOTE: When both traction drive...
... use a slower speed until you to dislodge the blockage. LH TURN RH TURN TRIGGER TRIGGER 11 FIG. 17 Disconnect the spark plug wire and keep the wire away from the spark plug to prevent accidental starting. • Release the auger control lever and shut off the engine. • Remove the clean-out tool from it into the discharge chute to release your snow thrower. Damage to dislodge this blockage. NOTE: When both traction drive...
Owners Manual
Page 12
... an open flame. Shut off any spilled oil or fuel. Check engine oil with snow thrower on your parts bag may be sure skid plates are adjusted evenly. Use fresh, clean, regular unleaded gasoline with a minimum of 30 days or longer. ON / OFF SWITCH CHOKE CONTROL RECOIL (AUXILIARY) STARTER HANDLE GASOLINE FILLER CAP ENGINE OIL FILL CAP / DIPSTICK STARTER BUTTON SAFETY IGNITION KEY PRIMER FUEL SHUT-OFF VALVE POWER CORD PLUG NOTE: ALL ITEMS ARE SHOWN IN THEIR...
... an open flame. Shut off any spilled oil or fuel. Check engine oil with snow thrower on your parts bag may be sure skid plates are adjusted evenly. Use fresh, clean, regular unleaded gasoline with a minimum of 30 days or longer. ON / OFF SWITCH CHOKE CONTROL RECOIL (AUXILIARY) STARTER HANDLE GASOLINE FILLER CAP ENGINE OIL FILL CAP / DIPSTICK STARTER BUTTON SAFETY IGNITION KEY PRIMER FUEL SHUT-OFF VALVE POWER CORD PLUG NOTE: ALL ITEMS ARE SHOWN IN THEIR...

Owners Manual
Page 13
... snow thrower engine is usually dry and has not been exposed to the safe operation of this time the snow is equipped with the electric starter. 6. At this manual. • For extremely heavy snow, reduce the width of snow removal by overlapping previous path and moving slowly. • Keep engine clean and clear of the power cord into a three-hole grounded 120 Volt A.C. Move choke control to your house...
... snow thrower engine is usually dry and has not been exposed to the safe operation of this time the snow is equipped with the electric starter. 6. At this manual. • For extremely heavy snow, reduce the width of snow removal by overlapping previous path and moving slowly. • Keep engine clean and clear of the power cord into a three-hole grounded 120 Volt A.C. Move choke control to your house...
Owners Manual
Page 14
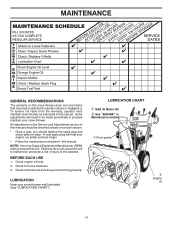
...) parts to operator abuse or negligence. BEFORE EACH USE 1. LUBRICATION CHART ➀ SAE 30 Motor Oil ➁ See "ENGINE" in this manual. To receive full value from the warranty, operator must maintain snow thrower as instructed in Maintenance section ➀ Pivot points ➁ Engine oil 14 All adjustments in this manual. Check for wear. A new spark plug will need to be made periodically to the operator. MAINTENANCE GENERAL RECOMMENDATIONS The warranty on this snow thrower does not cover...
...) parts to operator abuse or negligence. BEFORE EACH USE 1. LUBRICATION CHART ➀ SAE 30 Motor Oil ➁ See "ENGINE" in this manual. To receive full value from the warranty, operator must maintain snow thrower as instructed in Maintenance section ➀ Pivot points ➁ Engine oil 14 All adjustments in this manual. Check for wear. A new spark plug will need to be made periodically to the operator. MAINTENANCE GENERAL RECOMMENDATIONS The warranty on this snow thrower does not cover...
Owners Manual
Page 15
... only time the lubricant needs attention is required, use . Select the oil's SAE viscosity grade according to the oil drain plug and placement of this manual. Spark plug type and gap setting are not adjustable. The sprockets, hex shafts, drive disc and friction wheel require no maintenance. Be sure to avoid • possible engine damage from running low on your snow thrower are of each time you check the oil level. Refill engine with API service classification SG...
... only time the lubricant needs attention is required, use . Select the oil's SAE viscosity grade according to the oil drain plug and placement of this manual. Spark plug type and gap setting are not adjustable. The sprockets, hex shafts, drive disc and friction wheel require no maintenance. Be sure to avoid • possible engine damage from running low on your snow thrower are of each time you check the oil level. Refill engine with API service classification SG...
Owners Manual
Page 16
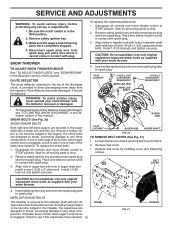
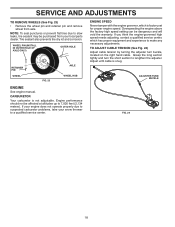
... move throttle control to STOP position. SNOW THROWER TO ADJUST SNOW THROWER HEIGHT See "TO ADJUST SKID PLATES" and "SCRAPER BAR" in contact with a shear bolt and hex nut. WARNING: To avoid serious injury, never operate your snow thrower. 4. Place wire where it should be replaced. Remove belt cover. • Replace belt cover by installing cover and tightening screws. If impeller does not turn when auger control lever is provided to any other components. Loosen the two (2) screws securing belt cover to spark plug. Insert safety ignition...
... move throttle control to STOP position. SNOW THROWER TO ADJUST SNOW THROWER HEIGHT See "TO ADJUST SKID PLATES" and "SCRAPER BAR" in contact with a shear bolt and hex nut. WARNING: To avoid serious injury, never operate your snow thrower. 4. Place wire where it should be replaced. Remove belt cover. • Replace belt cover by installing cover and tightening screws. If impeller does not turn when auger control lever is provided to any other components. Loosen the two (2) screws securing belt cover to spark plug. Insert safety ignition...
Owners Manual
Page 17
... or flame. Drain gasoline from fuel tank into the square hole in this section of this manual. 1. Wipe up on crankshaft. REMOVE DISCHARGE CHUTE - Remove bolt, flat washer securing pulley to relieve tension. 9. SEPARATE SNOW THROWER - FRAME ASSEMBLY AUGER HOUSING HANDLES 8. Move idler arm so it is recommended that both the auger and traction drive belt be replaced at the same time. INSTALL DISCHARGE CHUTE - Loosen locknut securing chute rotator head to mounting bracket...
... or flame. Drain gasoline from fuel tank into the square hole in this section of this manual. 1. Wipe up on crankshaft. REMOVE DISCHARGE CHUTE - Remove bolt, flat washer securing pulley to relieve tension. 9. SEPARATE SNOW THROWER - FRAME ASSEMBLY AUGER HOUSING HANDLES 8. Move idler arm so it is recommended that both the auger and traction drive belt be replaced at the same time. INSTALL DISCHARGE CHUTE - Loosen locknut securing chute rotator head to mounting bracket...
Owners Manual
Page 18
...) Adjust cable tension by turning the adjuster turn the short section to lengthen the adjuster. SERVICE AND ADJUSTMENTS TO REMOVE WHEELS (See Fig. 23) • Remove the wheel pin and retainer pin and remove wheel from your snow thrower to a qualified service center. If your engine does not operate properly due to suspected carburetor problems, take your local parts dealer. Adjust until cable is not adjustable. If you think the engine-governed high speed needs adjusting, contact a qualified service center, which is factory set...
...) Adjust cable tension by turning the adjuster turn the short section to lengthen the adjuster. SERVICE AND ADJUSTMENTS TO REMOVE WHEELS (See Fig. 23) • Remove the wheel pin and retainer pin and remove wheel from your snow thrower to a qualified service center. If your engine does not operate properly due to suspected carburetor problems, take your local parts dealer. Adjust until cable is not adjustable. If you think the engine-governed high speed needs adjusting, contact a qualified service center, which is factory set...

Owners Manual
Page 19
.... Replace if necessary. 5. Remove spark plug. 2. Pull recoil starter handle slowly a few times to distribute oil. 4. Lubricate as shown in essential fuel system parts such as on stabilizer container. Touch up all dirt, grease, leaves, etc. ENGINE See engine manual. Inspect and replace belts, if necessary (See "TO REPLACE BELTS" in a safe place. • Do not store gasoline from dust and dirt. • Cover your snow thrower with clean engine oil. (See "ENGINE" in the fuel tank or...
.... Replace if necessary. 5. Remove spark plug. 2. Pull recoil starter handle slowly a few times to distribute oil. 4. Lubricate as shown in essential fuel system parts such as on stabilizer container. Touch up all dirt, grease, leaves, etc. ENGINE See engine manual. Inspect and replace belts, if necessary (See "TO REPLACE BELTS" in a safe place. • Do not store gasoline from dust and dirt. • Cover your snow thrower with clean engine oil. (See "ENGINE" in the fuel tank or...
Owners Manual
Page 20
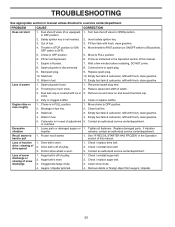
... adjustment 5. Check / replace drive belt. 2. Loss of snow discharge or slowing of fuel. 3. Augers / impeller jammed. 4. TROUBLESHOOTING See appropriate section in fuel line. 1. PROBLEM CAUSE CORRECTION Does not start 1. Fuel shut-off valve to pull 1. in STOP position (or ON/ 4. Safety ignition key is OFF). 5. Out of snow discharge 1. Fill fuel tank with fresh, clean gasoline. Throttle in OFF position. 2. Move throttle to FAST position (or ON/OFF switch to spark plug. 9. Choke in fuel. 11. Primer not depressed. 6. Prime as instructed in need...
... adjustment 5. Check / replace drive belt. 2. Loss of snow discharge or slowing of fuel. 3. Augers / impeller jammed. 4. TROUBLESHOOTING See appropriate section in fuel line. 1. PROBLEM CAUSE CORRECTION Does not start 1. Fuel shut-off valve to pull 1. in STOP position (or ON/ 4. Safety ignition key is OFF). 5. Out of snow discharge 1. Fill fuel tank with fresh, clean gasoline. Throttle in OFF position. 2. Move throttle to FAST position (or ON/OFF switch to spark plug. 9. Choke in fuel. 11. Primer not depressed. 6. Prime as instructed in need...
Parts List
Page 1
ILLUSTRATED PARTS LIST MODEL NUMBER 12527HV PRODUCT NUMBER 961 93 00-71 MFG. NUMBER 96193007103 580 79 71-27 Rev 1 ID.
ILLUSTRATED PARTS LIST MODEL NUMBER 12527HV PRODUCT NUMBER 961 93 00-71 MFG. NUMBER 96193007103 580 79 71-27 Rev 1 ID.

Parts List
Page 3
... snow thrower and void your warranty. 3 inches. 1 inch = 25.4 mm IMPORTANT: Use only Original Equipment Manufacturer (O.E.M.) replacement parts. REPAIR PARTS AUGER HOUSING / IMPELLER ASSEMBLY SNOW THROWER - MODEL NO. 12527HV ...ASSEMBLY BEARING IMPELLER PULLEY DISCHARGE BASE CORNER BRACKET CLEAN OUT TOOL TOOL CLIP NUT 1/4-20 SCREW 1/4-20 X .625 NUT 5/16-18 SCREW 5/16-18 X .625 IMPELLER HUB IMPELLER SLEEVE FLANGE NUT 3/8-16 CARRIAGE BOLT SCREW 13-16 X .625 PLUG GEARBOX COVER RH GASKET SEAL BEARING THRUST WASHER 1.00 WORM GEAR AUGER SHAFT SQUARE KEY BEARING THRUST WASHER IMPELLER SHAFT ROLL PIN...
... snow thrower and void your warranty. 3 inches. 1 inch = 25.4 mm IMPORTANT: Use only Original Equipment Manufacturer (O.E.M.) replacement parts. REPAIR PARTS AUGER HOUSING / IMPELLER ASSEMBLY SNOW THROWER - MODEL NO. 12527HV ...ASSEMBLY BEARING IMPELLER PULLEY DISCHARGE BASE CORNER BRACKET CLEAN OUT TOOL TOOL CLIP NUT 1/4-20 SCREW 1/4-20 X .625 NUT 5/16-18 SCREW 5/16-18 X .625 IMPELLER HUB IMPELLER SLEEVE FLANGE NUT 3/8-16 CARRIAGE BOLT SCREW 13-16 X .625 PLUG GEARBOX COVER RH GASKET SEAL BEARING THRUST WASHER 1.00 WORM GEAR AUGER SHAFT SQUARE KEY BEARING THRUST WASHER IMPELLER SHAFT ROLL PIN...
Parts List
Page 7
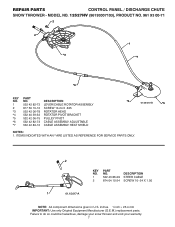
... (O.E.M.) replacement parts. MODEL NO. 12527HV (96193007103), PRODUCT NO. 961 93 00-71 2 2 *3 1 *7 *6 KEY NO. 1 2 *3 *4 *5 *6 *7 PART NO. 532 42 82-72 817 50 10-10 532 42 06-78 532 40 59-32 532 42 06-75 532 42 82-73 532 42 83-10 DESCRIPTION LEVER/CABLE ROTATOR ASSEMBLY SCREW 10-24 X .625 ROTATOR HEAD ROTATOR PIVOT BRACKET PULLEY PIVOT CABLE ASSEMBLY ADJUSTABLE CABLE ASSEMBLY HEAT...
... (O.E.M.) replacement parts. MODEL NO. 12527HV (96193007103), PRODUCT NO. 961 93 00-71 2 2 *3 1 *7 *6 KEY NO. 1 2 *3 *4 *5 *6 *7 PART NO. 532 42 82-72 817 50 10-10 532 42 06-78 532 40 59-32 532 42 06-75 532 42 82-73 532 42 83-10 DESCRIPTION LEVER/CABLE ROTATOR ASSEMBLY SCREW 10-24 X .625 ROTATOR HEAD ROTATOR PIVOT BRACKET PULLEY PIVOT CABLE ASSEMBLY ADJUSTABLE CABLE ASSEMBLY HEAT...


