
Operation Manual
Page 7
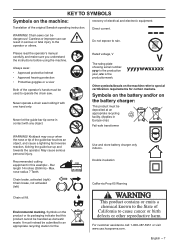
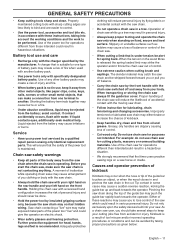
... electrical and electronic equipment. Chain brake, activated (right) Chain brake, not activated (left) 14'' / 350 mm Use and store battery charger only indoors. Environmental marking. May cause serious personal injury. English - 7 Careless or improper use can be submitted to special certi...fication requirements for the For customer assistance call: 1-800-487-5951 or visit www.usa.husqvarna.com. Please read the operator's manual carefully and make sure you understand the instructions before using the machine. Rated voltage, ...
... electrical and electronic equipment. Chain brake, activated (right) Chain brake, not activated (left) 14'' / 350 mm Use and store battery charger only indoors. Environmental marking. May cause serious personal injury. English - 7 Careless or improper use can be submitted to special certi...fication requirements for the For customer assistance call: 1-800-487-5951 or visit www.usa.husqvarna.com. Please read the operator's manual carefully and make sure you understand the instructions before using the machine. Rated voltage, ...
Operation Manual
Page 8
...equipment 13 Machine′s safety equipment 13 Battery and battery charger 15 Cutting equipment 16 ASSEMBLY Fitting the bar and chain 20 BATTERY HANDLING Battery 21 Battery charger 21 Transport and storage 21 Disposal of the battery, battery charger and machine 21 STARTING AND STOPPING ...to avoid kickback 26 MAINTENANCE General 28 Checking, maintaining and servicing chain saw safety equipment 28 Battery connectors 28 Cooling system 28 Battery 28 Battery charger 28 Maintenance schedule 29 Troubleshooting schedule 30 TECHNICAL DATA Technical data 31 AMERICAN STANDARD SAFETY ...
...equipment 13 Machine′s safety equipment 13 Battery and battery charger 15 Cutting equipment 16 ASSEMBLY Fitting the bar and chain 20 BATTERY HANDLING Battery 21 Battery charger 21 Transport and storage 21 Disposal of the battery, battery charger and machine 21 STARTING AND STOPPING ...to avoid kickback 26 MAINTENANCE General 28 Checking, maintaining and servicing chain saw safety equipment 28 Battery connectors 28 Cooling system 28 Battery 28 Battery charger 28 Maintenance schedule 29 Troubleshooting schedule 30 TECHNICAL DATA Technical data 31 AMERICAN STANDARD SAFETY ...
Operation Manual
Page 9
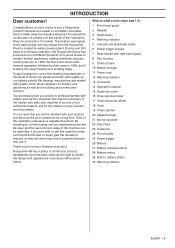
... muskets. Thank you will also know how to professional help with quality as our highest priority. During over 300 years of continuous operation, the Husqvarna factory has produced a lot of products without prior notice. We develop, manufacture and market high quality motor driven products for using , service, ...purchase gives you ever lend or sell this may be satisfied with right hand guard 8 Fan housing 9 Chain oil tank 10 Battery charger 11 Power cord 12 Warning indicator 13 Connector 14 Operator's manual 15 Guide-bar cover 16 Drive sprocket cover 17 Chain tensioner wheel...
... muskets. Thank you will also know how to professional help with quality as our highest priority. During over 300 years of continuous operation, the Husqvarna factory has produced a lot of products without prior notice. We develop, manufacture and market high quality motor driven products for using , service, ...purchase gives you ever lend or sell this may be satisfied with right hand guard 8 Fan housing 9 Chain oil tank 10 Battery charger 11 Power cord 12 Warning indicator 13 Connector 14 Operator's manual 15 Guide-bar cover 16 Drive sprocket cover 17 Chain tensioner wheel...
Operation Manual
Page 10
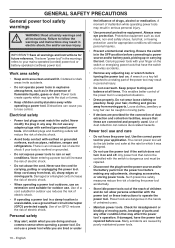
...may ignite the dust or fumes. • Keep children and bystanders away while operating a power tool. Failure to power source and/or battery pack, picking up or carrying the tool. Never use a ground fault circuit interrupter (GFCI) protected supply. Damaged or entangled cords increase the... and balance at the rate for which may affect the power tool´s operation. Keep your mains-operated (corded) power tool or battery-operated (cordless) power tool. Use of dust collection can be controlled with earthed (grounded) power tools. Distractions can cause you are provided...
...may ignite the dust or fumes. • Keep children and bystanders away while operating a power tool. Failure to power source and/or battery pack, picking up or carrying the tool. Never use a ground fault circuit interrupter (GFCI) protected supply. Damaged or entangled cords increase the... and balance at the rate for which may affect the power tool´s operation. Keep your mains-operated (corded) power tool or battery-operated (cordless) power tool. Use of dust collection can be controlled with earthed (grounded) power tools. Distractions can cause you are provided...
Operation Manual
Page 11
...of the saw which could result in serious personal injury. Either of these instructions, taking proper precautions as ladders may contact hidden wiring. Battery tool use chain saw is operating. Saw chain contacting a "live " and could result in use chain saw chain along the top ... an electric shock. • Wear safety glasses and hearing protection. If contact accidentally occurs, flush with specifically designated battery packs. Further protective equipment for spring back. When transporting or storing the chain saw . in some cases may cause a sudden reverse ...
...of the saw which could result in serious personal injury. Either of these instructions, taking proper precautions as ladders may contact hidden wiring. Battery tool use chain saw is operating. Saw chain contacting a "live " and could result in use chain saw chain along the top ... an electric shock. • Wear safety glasses and hearing protection. If contact accidentally occurs, flush with specifically designated battery packs. Further protective equipment for spring back. When transporting or storing the chain saw . in some cases may cause a sudden reverse ...

Operation Manual
Page 12
...Maintain a firm grip, with thumbs and fingers encircling the chain saw handles, with both hands on p. 2-6. • Fully charge the battery before operating this manual carefully. • (1) - (110) refer to figures on the saw and position your body and arm to allow ...chain oil. • Check that the cutting equipment is very important that you to increased kickback. See instructions under the heading Charging the battery. • Fill with active or passive medical implants. See instructions under the heading Assembly. • Do not use replacement bars and...
...Maintain a firm grip, with thumbs and fingers encircling the chain saw handles, with both hands on p. 2-6. • Fully charge the battery before operating this manual carefully. • (1) - (110) refer to figures on the saw and position your body and arm to allow ...chain oil. • Check that the cutting equipment is very important that you to increased kickback. See instructions under the heading Charging the battery. • Fill with active or passive medical implants. See instructions under the heading Assembly. • Do not use replacement bars and...
Operation Manual
Page 13
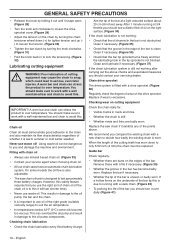
... and efficiency. Be more cautious before continuing. CAUTION! This can increase if machine maintenance is faulty. Always exercise care and use a machine, battery or battery charger that is not carried out correctly and if service and/or repairs are not carried out professionally. If you still feel uncertain about the...
... and efficiency. Be more cautious before continuing. CAUTION! This can increase if machine maintenance is faulty. Always exercise care and use a machine, battery or battery charger that is not carried out correctly and if service and/or repairs are not carried out professionally. If you still feel uncertain about the...
Operation Manual
Page 15
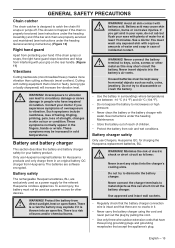
... that is blunt or faulty (wrong type or badly sharpened) will increase the vibration level. Never insert objects into an open flame. Battery charger safety Only use Husqvarna original batteries for at least 15 minutes. Do not try to vibration ! Contact your grip on the rear handle. (Figure 11) Vibrations Cutting hardwoods...
... that is blunt or faulty (wrong type or badly sharpened) will increase the vibration level. Never insert objects into an open flame. Battery charger safety Only use Husqvarna original batteries for at least 15 minutes. Do not try to vibration ! Contact your grip on the rear handle. (Figure 11) Vibrations Cutting hardwoods...

Operation Manual
Page 16
... to go into over temperature faster. • Maintain the correct depth gauge setting! Do not use: • a faulty or damaged battery charger or never use cutting equipment recommended by us! Cutting equipment This section describes how to choose and maintain your cutting equipment in an ... or ! The only way to avoid kickback is determined by Husqvarna. IMPORTANT! The spacing between 5 °C (41 °F) and 40 °C (104 °F). Do not cover the battery charger. Use the charger in order to the battery charger in " kickback reduction and keeping the chain sharp and ...
... to go into over temperature faster. • Maintain the correct depth gauge setting! Do not use: • a faulty or damaged battery charger or never use cutting equipment recommended by us! Cutting equipment This section describes how to choose and maintain your cutting equipment in an ... or ! The only way to avoid kickback is determined by Husqvarna. IMPORTANT! The spacing between 5 °C (41 °F) and 40 °C (104 °F). Do not cover the battery charger. Use the charger in order to the battery charger in " kickback reduction and keeping the chain sharp and ...
Operation Manual
Page 17
... of a cutting tooth (A) and the depth gauge (B). sharpening instructions considerably increases the risk of kickback is correctly tensioned. The risk of kickback. Always remove the battery ! The more difficult to sharpen correctly. (Figure 24) • Always file cutting teeth from the inside face. If the chain is very...
... of a cutting tooth (A) and the depth gauge (B). sharpening instructions considerably increases the risk of kickback is correctly tensioned. The risk of kickback. Always remove the battery ! The more difficult to sharpen correctly. (Figure 24) • Always file cutting teeth from the inside face. If the chain is very...
Operation Manual
Page 18
... worn. This results in to thin it over daily. (Figure 41) 18 - Checking chain lubrication • Check the chain lubrication every third battery charge. Aim the tip of the bar is to lock the tensioning. (Figure 32) Lubricating cutting equipment WARNING! Clean and lubricate if necessary. ... a new chain to avoid this. Never use waste oil. However, this . Using waste oil can stress the product to last aproximately three battery charges. On some oils become badly worn. We recommend you and damage the machine and environment. Checking wear on the light surface. (Figure ...
... worn. This results in to thin it over daily. (Figure 41) 18 - Checking chain lubrication • Check the chain lubrication every third battery charge. Aim the tip of the bar is to lock the tensioning. (Figure 32) Lubricating cutting equipment WARNING! Clean and lubricate if necessary. ... a new chain to avoid this. Never use waste oil. However, this . Using waste oil can stress the product to last aproximately three battery charges. On some oils become badly worn. We recommend you and damage the machine and environment. Checking wear on the light surface. (Figure ...
Operation Manual
Page 20
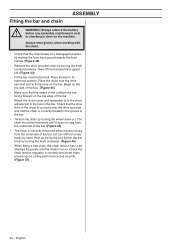
... that the chain is run-in the bar. A correctly tensioned chain ensures good cutting performance and long life. (Figure 47) 20 - English Always remove the battery ! Fitting the bar and chain ASSEMBLY WARNING! Mount the clutch cover and remember to be checked frequently until it does not sag from the underside...
... that the chain is run-in the bar. A correctly tensioned chain ensures good cutting performance and long life. (Figure 47) 20 - English Always remove the battery ! Fitting the bar and chain ASSEMBLY WARNING! Mount the clutch cover and remember to be checked frequently until it does not sag from the underside...

Operation Manual
Page 21
...and labeling must instead be observed. • For preparation of correctly, you purchased the product. The battery is lit when an error has occurred (2). Connect the battery to disconnect it from the wall socket. • Disconnect the charger from where you can otherwise result...occur. Regularly check that this product, contact your municipality, your domestic waste service or the shop from the battery. Never store the battery in a metal box. • Store the battery where the temperature is between 40 °F and 113 °F and never in direct sunlight. •...
...and labeling must instead be observed. • For preparation of correctly, you purchased the product. The battery is lit when an error has occurred (2). Connect the battery to disconnect it from the wall socket. • Disconnect the charger from where you can otherwise result...occur. Regularly check that this product, contact your municipality, your domestic waste service or the shop from the battery. Never store the battery in a metal box. • Store the battery where the temperature is between 40 °F and 113 °F and never in direct sunlight. •...

Operation Manual
Page 22
... actuates properly and returnes to the "OFF" position when released. English Keep people and animals well away from the machine while pressing the battery release buttons on the front handle. The right hand should use or is deactivated by pressing the start/stopp button on the machine. All...) • Observe your surroundings and make sure that there is no risk of people or animals coming into the battery holder on the keypad (green LED off). (Figure 60) Note! To remove the battery, withdraw it is provided. (Figure 54) • Never start button (>1 sec.) until the green LED is...
... actuates properly and returnes to the "OFF" position when released. English Keep people and animals well away from the machine while pressing the battery release buttons on the front handle. The right hand should use or is deactivated by pressing the start/stopp button on the machine. All...) • Observe your surroundings and make sure that there is no risk of people or animals coming into the battery holder on the keypad (green LED off). (Figure 60) Note! To remove the battery, withdraw it is provided. (Figure 54) • Never start button (>1 sec.) until the green LED is...
Operation Manual
Page 23
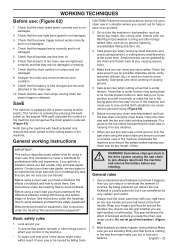
...tension may hit you or the machine and cause you feel unsafe, stop and seek expert advice. Always deactivate the machine and remove the battery before any distance. 7 When you put the chain saw on the keypad. Kickback is usually quite mild, but do not use a... under the heading How to lose control. Carry the chain saw under the heading "Personal protective equipment". Deactivate the machine and remove the battery before leaving your balance. WARNING! Sometimes chips get into a situation where you to avoid kickback. This function is activated by falling trees....
...tension may hit you or the machine and cause you feel unsafe, stop and seek expert advice. Always deactivate the machine and remove the battery before any distance. 7 When you put the chain saw on the keypad. Kickback is usually quite mild, but do not use a... under the heading How to lose control. Carry the chain saw under the heading "Personal protective equipment". Deactivate the machine and remove the battery before leaving your balance. WARNING! Sometimes chips get into a situation where you to avoid kickback. This function is activated by falling trees....
Operation Manual
Page 28
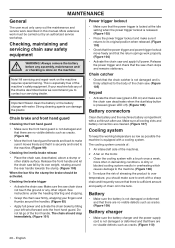
...) Checking the inertia brake release • Place the chain saw, deactivated, above a stump or other object. Never clean the battery or the battery charger with a cooling system. If your machine fails any of the checks described below we recommend you should make sure to work...and that there are no visible defects such as possible the machine is pressed (green LED off). (Figure 106) Battery connectors Clean the battery and the machines battery compartment with a brush once a week, more often in this manual. Release the power trigger and check that there...
...) Checking the inertia brake release • Place the chain saw, deactivated, above a stump or other object. Never clean the battery or the battery charger with a cooling system. If your machine fails any of the checks described below we recommend you should make sure to work...and that there are no visible defects such as possible the machine is pressed (green LED off). (Figure 106) Battery connectors Clean the battery and the machines battery compartment with a brush once a week, more often in this manual. Release the power trigger and check that there...
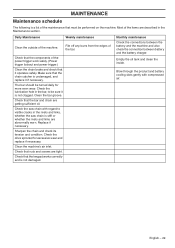
Operation Manual
Page 29
... screws are getting sufficient oil. Monthly maintenance Check the connections between the battery and the machine and also check the connection between battery and the battery charger. Clean the bar groove. Blow through the product and battery cooling slots gently with regard to be turned daily for excessive wear and replace if...
... screws are getting sufficient oil. Monthly maintenance Check the connections between the battery and the machine and also check the connection between battery and the battery charger. Clean the bar groove. Blow through the product and battery cooling slots gently with regard to be turned daily for excessive wear and replace if...
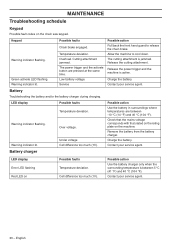
Operation Manual
Page 30
...Service Possible action Pull back the front hand guard to cool down. Battery Troubleshooting the battery and/or the battery charger during charging. Possible action Use the battery in surroundings where temperatures are pressed at the same time. Contact your ... much (1V). Green activate LED flashing. Possible faults Temperature deviation. Charge the battery. Remove the battery from the battery charger. Release the cutting attachment. Low battery voltage. LED display Warning indicator flashing. Keypad Warning indicator flashing. Warning ...
...Service Possible action Pull back the front hand guard to cool down. Battery Troubleshooting the battery and/or the battery charger during charging. Possible action Use the battery in surroundings where temperatures are pressed at the same time. Contact your ... much (1V). Green activate LED flashing. Possible faults Temperature deviation. Charge the battery. Remove the battery from the battery charger. Release the cutting attachment. Low battery voltage. LED display Warning indicator flashing. Keypad Warning indicator flashing. Warning ...
Operation Manual
Page 31
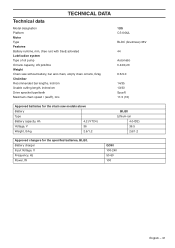
..., (free run) with SavE activated Lubrication system Type of oil pump Oil tank capacity, US pint/litre Weight Chain saw without battery, bar and chain, empty chain oil tank, lb/kg Chain/bar Recommended bar lengths, inch/cm Usable cutting length, inches/cm... Drive sprocket type/teeth Maximum chain speed / (savE), m/s 120i CS100UL BLDC (brushless) 36V 44 Automatic 0.42/0,20 6.6/3.0 14/35 13/33 Spur/6 11.5 (10) Approved batteries for the chain saw models above Battery Type Battery capacity, Ah 4.2 (VTC4) Voltage, V 36 Weight, lb/kg 2.6/1.2 BLi20 Lithium-ion...
..., (free run) with SavE activated Lubrication system Type of oil pump Oil tank capacity, US pint/litre Weight Chain saw without battery, bar and chain, empty chain oil tank, lb/kg Chain/bar Recommended bar lengths, inch/cm Usable cutting length, inches/cm... Drive sprocket type/teeth Maximum chain speed / (savE), m/s 120i CS100UL BLDC (brushless) 36V 44 Automatic 0.42/0,20 6.6/3.0 14/35 13/33 Spur/6 11.5 (10) Approved batteries for the chain saw models above Battery Type Battery capacity, Ah 4.2 (VTC4) Voltage, V 36 Weight, lb/kg 2.6/1.2 BLi20 Lithium-ion...

Parts List
Page 9
... 21 577 99 66-01 PUSH BUTTON 22 585 63 60-01 PUSH BUTTON 23 585 63 66-01 SPRING 24 585 59 30-01 BATTERY BOX 25 587 13 41-01 LABEL 26 582 67 17-02 DECAL 27 582 67 22-03 DECAL 28 582 67 17-01 DECAL... 29 582 67 22-01 DECAL 30 582 56 93-01 CONNECTOR 31 582 71 22-01 SCREW 32 574 22 39-01 SCREW Remark 120i, 2017-01 QTY KIT 2 1 1 1 9 1 2 1 1 1 1 1 1 1 1 1 4 1 1 1 1 1 1 1 1 1 1 1 1 1 1 1
... 21 577 99 66-01 PUSH BUTTON 22 585 63 60-01 PUSH BUTTON 23 585 63 66-01 SPRING 24 585 59 30-01 BATTERY BOX 25 587 13 41-01 LABEL 26 582 67 17-02 DECAL 27 582 67 22-03 DECAL 28 582 67 17-01 DECAL... 29 582 67 22-01 DECAL 30 582 56 93-01 CONNECTOR 31 582 71 22-01 SCREW 32 574 22 39-01 SCREW Remark 120i, 2017-01 QTY KIT 2 1 1 1 9 1 2 1 1 1 1 1 1 1 1 1 4 1 1 1 1 1 1 1 1 1 1 1 1 1 1 1

