Owner's Manual
Page 1
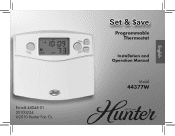
Set & $ave Programmable Thermostat Installation and Operation Manual Model 44377W English Form# 44045-01 20100224 ©2010 Hunter Fan Co.
Set & $ave Programmable Thermostat Installation and Operation Manual Model 44377W English Form# 44045-01 20100224 ©2010 Hunter Fan Co.
Owner's Manual
Page 3
Table of Contents important information...5 Tools...6 uninstalling the existing unit...9 wire labels...10 installing the thermostat...13 settings...23 methods of operation...27 Default Programs Chart...36 ICONS AND FEATURES...43 Important features...54 Wiring Diagrams...55 troubleshooting...58 Warranty...61 3
Table of Contents important information...5 Tools...6 uninstalling the existing unit...9 wire labels...10 installing the thermostat...13 settings...23 methods of operation...27 Default Programs Chart...36 ICONS AND FEATURES...43 Important features...54 Wiring Diagrams...55 troubleshooting...58 Warranty...61 3
Owner's Manual
Page 4
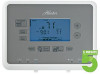
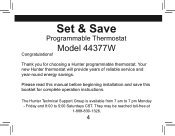
Your new Hunter thermostat will provide years of reliable service and year-round energy savings. Set & Save Programmable Thermostat Model 44377W Congratulations! Please read this manual before beginning installation and save this booklet for choosing a Hunter programmable thermostat. They may be reached toll-free at 1-888-830-1326. 4 Friday and 8:00 to 7 pm Monday - The Hunter Technical Support Group is available from 7 am to 5:00 Saturdays CST. Thank you for complete operation instructions.
Your new Hunter thermostat will provide years of reliable service and year-round energy savings. Set & Save Programmable Thermostat Model 44377W Congratulations! Please read this manual before beginning installation and save this booklet for choosing a Hunter programmable thermostat. They may be reached toll-free at 1-888-830-1326. 4 Friday and 8:00 to 7 pm Monday - The Hunter Technical Support Group is available from 7 am to 5:00 Saturdays CST. Thank you for complete operation instructions.

Owner's Manual
Page 6
Tools This thermostat includes two #8 slotted screws and two wall anchors for mounting. To install your new thermostat, you will need the following supplies: Flat-head screwdriver Small Phillips-head screwdriver Hammer Electric drill and 3/16" bit Two 1.5 Volt (AA) size alkaline batteries 6
Tools This thermostat includes two #8 slotted screws and two wall anchors for mounting. To install your new thermostat, you will need the following supplies: Flat-head screwdriver Small Phillips-head screwdriver Hammer Electric drill and 3/16" bit Two 1.5 Volt (AA) size alkaline batteries 6
Owner's Manual
Page 13
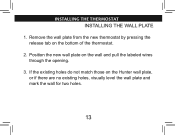
If the existing holes do not match those on the wall and pull the labeled wires through the opening. 3. Position the new wall plate on the Hunter wall plate, or if there are no existing holes, visually level the wall plate and mark the wall for two holes. 13 Remove the wall plate from the new thermostat by pressing the release tab on the bottom of the thermostat. 2. installing the thermostat INSTALLING THE WALL PLATE 1.
If the existing holes do not match those on the wall and pull the labeled wires through the opening. 3. Position the new wall plate on the Hunter wall plate, or if there are no existing holes, visually level the wall plate and mark the wall for two holes. 13 Remove the wall plate from the new thermostat by pressing the release tab on the bottom of the thermostat. 2. installing the thermostat INSTALLING THE WALL PLATE 1.

Owner's Manual
Page 15
installing the thermostat, cont. 4. Tap the plastic anchors into the anchors. Verify that the wall plate is visually level and securely tighten both screws. 15 Reposition the wall plate on the wall, pulling the wires through the wall plate and into the holes until they are flush with the wall. (Do not use plastic anchors if you encounter a stud in the wall.) 6. Remove the wall plate and drill two 3/16" holes where marked. 5. Insert the mounting screws through the opening.
installing the thermostat, cont. 4. Tap the plastic anchors into the anchors. Verify that the wall plate is visually level and securely tighten both screws. 15 Reposition the wall plate on the wall, pulling the wires through the wall plate and into the holes until they are flush with the wall. (Do not use plastic anchors if you encounter a stud in the wall.) 6. Remove the wall plate and drill two 3/16" holes where marked. 5. Insert the mounting screws through the opening.

Owner's Manual
Page 17
... back into the wall to the terminals as shown. Wires should be inserted behind the black terminal shields. CONNECTING THE WIRES Jumper G RC RH Y W 1. installing the thermostat, cont. Match and connect the wires from the wall to prevent interference. 17 Tighten each screw after the connection has been made. (The ends of...
... back into the wall to the terminals as shown. Wires should be inserted behind the black terminal shields. CONNECTING THE WIRES Jumper G RC RH Y W 1. installing the thermostat, cont. Match and connect the wires from the wall to prevent interference. 17 Tighten each screw after the connection has been made. (The ends of...
Owner's Manual
Page 19
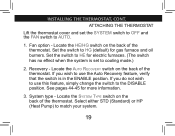
... electric furnaces. (The switch has no effect when the system is in the ENABLE position. Locate the System Type switch on the back of the thermostat. Set the switch to the DISABLE position. System type - Locate the HE/HG switch on the back of the... option - Recovery - Select either STD (Standard) or HP (Heat Pump) to AUTO. 1. See pages 44-45 for gas furnace and oil burners. ATTACHING THE THERMOSTAT Lift the thermostat cover and set to HG (default) for more information. 3. Set the switch to cooling mode.) 2. If you do not wish to use the Auto...
... electric furnaces. (The switch has no effect when the system is in the ENABLE position. Locate the System Type switch on the back of the thermostat. Set the switch to the DISABLE position. System type - Locate the HE/HG switch on the back of the... option - Recovery - Select either STD (Standard) or HP (Heat Pump) to AUTO. 1. See pages 44-45 for gas furnace and oil burners. ATTACHING THE THERMOSTAT Lift the thermostat cover and set to HG (default) for more information. 3. Set the switch to cooling mode.) 2. If you do not wish to use the Auto...

Owner's Manual
Page 21
If the thermostat does not snap into place. Note: Do not force the thermostat onto the wall plate, as the terminal pins may not work. 5. Restore power at the electrical panel or furnace. 21 Lift the front cover and insert two AA alkaline batteries. 6. Place the top of the thermostat over the two tabs on the wall plate. Press the thermostat onto the wall plate and press to snap the bottom tab into place properly, the unit may be damaged. installing the thermostat, cont. 4.
If the thermostat does not snap into place. Note: Do not force the thermostat onto the wall plate, as the terminal pins may not work. 5. Restore power at the electrical panel or furnace. 21 Lift the front cover and insert two AA alkaline batteries. 6. Place the top of the thermostat over the two tabs on the wall plate. Press the thermostat onto the wall plate and press to snap the bottom tab into place properly, the unit may be damaged. installing the thermostat, cont. 4.

Owner's Manual
Page 49
The system will flash until new batteries are installed. 49 Low battery warning - If the batteries become too weak for normal operation, the thermostat enters the second battery power shortage mode (Stage 2). When the batteries are detected as weak, the icon will remain off . ...be lost if the batteries are not replaced within one minute.) The thermostat will resume normal operation after new batteries are installed. (Your programs and time settings will turn off until new AA alkaline batteries are installed (Stage 1). When insufficient battery power is left , the battery icon...
The system will flash until new batteries are installed. 49 Low battery warning - If the batteries become too weak for normal operation, the thermostat enters the second battery power shortage mode (Stage 2). When the batteries are detected as weak, the icon will remain off . ...be lost if the batteries are not replaced within one minute.) The thermostat will resume normal operation after new batteries are installed. (Your programs and time settings will turn off until new AA alkaline batteries are installed (Stage 1). When insufficient battery power is left , the battery icon...
Owner's Manual
Page 62
... batteries. This warranty excludes and does not cover defects, malfunctions or failures or your Hunter Thermostat which were caused by repairs by persons not authorized by the use , including failure to Hunter Fan Company Service Department, 7130 Goodlett Farms Pkwy Suite 400, Memphis, TN 38016. ... responsible for all insurance and freight or other transportation charges to the product caused by us, mishandling, improper installation, modifications or damage to the Hunter Thermostat while in the USA. This warranty neither applies to batteries nor to deterioration of, nor damage to our factory....
... batteries. This warranty excludes and does not cover defects, malfunctions or failures or your Hunter Thermostat which were caused by repairs by persons not authorized by the use , including failure to Hunter Fan Company Service Department, 7130 Goodlett Farms Pkwy Suite 400, Memphis, TN 38016. ... responsible for all insurance and freight or other transportation charges to the product caused by us, mishandling, improper installation, modifications or damage to the Hunter Thermostat while in the USA. This warranty neither applies to batteries nor to deterioration of, nor damage to our factory....

Owner's Manual
Page 10
... press to finish or Done/ Home Back if you need to make a correction to a previous step. 5. Setup Setting Day and Time 4 Once you install the batteries, the thermostat will prompt you to set your programming, see page 14 step 2 if you wish to alter your current day of your settings are saved.... 6. Choose Next to change between am and pm. Your thermostat will next prompt you to the next step. 4. Use the or buttons to move to confirm your screen. You will notice that "Mon" will show...
... press to finish or Done/ Home Back if you need to make a correction to a previous step. 5. Setup Setting Day and Time 4 Once you install the batteries, the thermostat will prompt you to set your programming, see page 14 step 2 if you wish to alter your current day of your settings are saved.... 6. Choose Next to change between am and pm. Your thermostat will next prompt you to the next step. 4. Use the or buttons to move to confirm your screen. You will notice that "Mon" will show...
Owner's Manual
Page 40
When any key is pressed. The display will be operating properly or if you even install the thermostat. System Protection To protect your system from cycling, system turning on for 15 seconds after the last key is pressed, the backlight will stay illuminated ...for up to 4 minutes after it has been shut down. Reset In situations where your thermostat may not seem to be activated. This will prevent your system from the wall and make the necessary changes in the dark. Power Failure Protection...
When any key is pressed. The display will be operating properly or if you even install the thermostat. System Protection To protect your system from cycling, system turning on for 15 seconds after the last key is pressed, the backlight will stay illuminated ...for up to 4 minutes after it has been shut down. Reset In situations where your thermostat may not seem to be activated. This will prevent your system from the wall and make the necessary changes in the dark. Power Failure Protection...
Owner's Manual
Page 44
... WARRANTY, INCLUDING, BUT NOT LIMITED TO, ANY IMPLIED WARRANTY OF MERCHANTABILITY OR FITNESS FOR A PARTICULAR PURPOSE, IN RESPECT TO YOUR HUNTER THERMOSTAT IS LIMITED TO THE PERIOD OF THE EXPRESS WARRANTY SET FORTH ABOVE. This warranty neither applies to batteries nor to deterioration of, nor... damage to the product caused by us, mishandling, improper installation, modifications or damage to the Hunter Thermostat while in your possession, or unreasonable use of purchase to Hunter Fan Company Service Department, 7130 Goodlett Farms Pkwy 44 44040-01 • 05/11/...
... WARRANTY, INCLUDING, BUT NOT LIMITED TO, ANY IMPLIED WARRANTY OF MERCHANTABILITY OR FITNESS FOR A PARTICULAR PURPOSE, IN RESPECT TO YOUR HUNTER THERMOSTAT IS LIMITED TO THE PERIOD OF THE EXPRESS WARRANTY SET FORTH ABOVE. This warranty neither applies to batteries nor to deterioration of, nor... damage to the product caused by us, mishandling, improper installation, modifications or damage to the Hunter Thermostat while in your possession, or unreasonable use of purchase to Hunter Fan Company Service Department, 7130 Goodlett Farms Pkwy 44 44040-01 • 05/11/...


