
Installation Guide
Page 1
...-approved octagonal 4" x 1-1/2" outlet box • Two #8 x 1-1/2" wood screws and washers • Approved connector for electrical wire Checklist for your new Hunter fan. Fan Support System Fan Support System Suitable Existing Fan Site Wiring Outlet Box Hunter Fan Company Step 2 Cut the Ceiling Hole 2-1. Cut a 4" diameter hole through the inner holes of the outlet box. 4-4. If you want...
...-approved octagonal 4" x 1-1/2" outlet box • Two #8 x 1-1/2" wood screws and washers • Approved connector for electrical wire Checklist for your new Hunter fan. Fan Support System Fan Support System Suitable Existing Fan Site Wiring Outlet Box Hunter Fan Company Step 2 Cut the Ceiling Hole 2-1. Cut a 4" diameter hole through the inner holes of the outlet box. 4-4. If you want...
Owner's Manual
Page 2
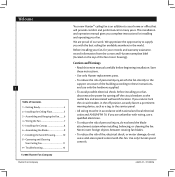
...opportunity to the service panel. • All wiring must be in the world. Before installing your fan, for your records and warranty assistance, record information from the carton and Hunter nameplate label (located on the top of Contents 1 • Getting Ready 4 2 • ... 9 7 • Installing the Switch Housing 10 8 • Operating and Cleaning Your Ceiling Fan 11 9 • Troubleshooting 12 © 2006 Hunter Fan Company Hunter Fan Company Your new Hunter® ceiling fan is an addition to your home or office that will provide comfort and performance for many years....
...opportunity to the service panel. • All wiring must be in the world. Before installing your fan, for your records and warranty assistance, record information from the carton and Hunter nameplate label (located on the top of Contents 1 • Getting Ready 4 2 • ... 9 7 • Installing the Switch Housing 10 8 • Operating and Cleaning Your Ceiling Fan 11 9 • Troubleshooting 12 © 2006 Hunter Fan Company Hunter Fan Company Your new Hunter® ceiling fan is an addition to your home or office that will provide comfort and performance for many years....
Owner's Manual
Page 3
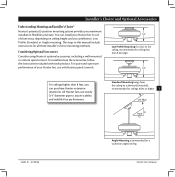
... you maximum installation flexibility and ease. For quiet and optimum performance of three ways, depending on ceiling height and your Hunter fan, use only Hunter speed controls. Standard Mounting hangs from the ceiling by a downrod (included), recommended for ceilings 8 feet or higher 3...and wobble-free performance. Installer's Choice and Optional Accessories Understanding Mounting and Installer's Choice® Hunter's patented 3-position mounting system provides you can install your Hunter fan in one of your preference: Low Profile, Standard, or Angle mounting. e steps in...
... you maximum installation flexibility and ease. For quiet and optimum performance of three ways, depending on ceiling height and your Hunter fan, use only Hunter speed controls. Standard Mounting hangs from the ceiling by a downrod (included), recommended for ceilings 8 feet or higher 3...and wobble-free performance. Installer's Choice and Optional Accessories Understanding Mounting and Installer's Choice® Hunter's patented 3-position mounting system provides you can install your Hunter fan in one of your preference: Low Profile, Standard, or Angle mounting. e steps in...
Owner's Manual
Page 4
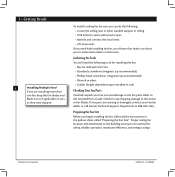
... screwdriver (magnetic tip recommended) • Wrench or pliers • Ladder (height dependent upon installation site) Checking Your Fan Parts Carefully unpack your Hunter fan dealer can do the following tools for safety, reliable operation, maximum efficiency, and energy savings. To install a ceiling... If you to a licensed installer or electrician. Preparing the Fan Site Before you are missing or damaged, contact your Hunter dealer or call Hunter Technical Support Department at 888-830-1326. Proper ceiling fan location and attachment to the included Parts Guide. Gathering the...
... screwdriver (magnetic tip recommended) • Wrench or pliers • Ladder (height dependent upon installation site) Checking Your Fan Parts Carefully unpack your Hunter fan dealer can do the following tools for safety, reliable operation, maximum efficiency, and energy savings. To install a ceiling... If you to a licensed installer or electrician. Preparing the Fan Site Before you are missing or damaged, contact your Hunter dealer or call Hunter Technical Support Department at 888-830-1326. Proper ceiling fan location and attachment to the included Parts Guide. Gathering the...
Owner's Manual
Page 5
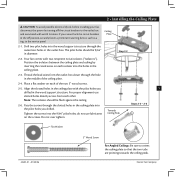
...drilled. Flat Washer 42405-01 • 01/20/06 3" Wood Screw For Angled Ceilings: Be sure to the service panel. Ceiling Plate 2-1. Hunter Fan Company Pass the screws through the slotted holes in the ceiling plate into Steps 2-3 - 2-6 the pilot holes you 5 drilled in the wood...Tighten the screws into the 9/64" pilot holes; 2 • Installing the Ceiling Plate CAUTION: To avoid possible electrical shock, before installing your fan, disconnect the power by inserting the raised areas on each isolator into the holes in the ceiling plate. 2-3. read the lead wires from...
...drilled. Flat Washer 42405-01 • 01/20/06 3" Wood Screw For Angled Ceilings: Be sure to the service panel. Ceiling Plate 2-1. Hunter Fan Company Pass the screws through the slotted holes in the ceiling plate into Steps 2-3 - 2-6 the pilot holes you 5 drilled in the wood...Tighten the screws into the 9/64" pilot holes; 2 • Installing the Ceiling Plate CAUTION: To avoid possible electrical shock, before installing your fan, disconnect the power by inserting the raised areas on each isolator into the holes in the ceiling plate. 2-3. read the lead wires from...
Owner's Manual
Page 6
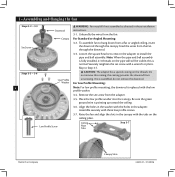
...canopy. Align the holes in the adapter. Assemble securely with the holes in the washer with three low profile screws. 3-7. Raise the fan and align the slots in these installation instructions. 3-1. Loosen the square head set screw with the tabs on the pipe will still ..., the downrod is pointing up toward the ceiling. 3-6. Once assembled, do not remove the downrod. Low Profile Screw Ceiling Plate Tabs Step 3-7 Hunter Fan Company Canopy Slots 42405-01 • 01/20/06 Canopy For Standard or Angled Mounting: Set Screw 3-2. the coating prevents the downrod from unscrewing...
...canopy. Align the holes in the adapter. Assemble securely with the holes in the washer with three low profile screws. 3-7. Raise the fan and align the slots in these installation instructions. 3-1. Loosen the square head set screw with the tabs on the pipe will still ..., the downrod is pointing up toward the ceiling. 3-6. Once assembled, do not remove the downrod. Low Profile Screw Ceiling Plate Tabs Step 3-7 Hunter Fan Company Canopy Slots 42405-01 • 01/20/06 Canopy For Standard or Angled Mounting: Set Screw 3-2. the coating prevents the downrod from unscrewing...
Owner's Manual
Page 7
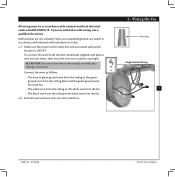
...wire nuts into the outlet box. 4 • Wiring the Fan Wire Nut Single Switch Wiring 7 42405-01 • 01/20/06 Hunter Fan Company Select an acceptable general-use a qualified electrician. Make sure the power to the black wire from the fan 4-2. All wiring must be in accordance with national and local ...from the ceiling to the green ground wire from the ceiling plate and the green ground wire from the fan • e white wire from the ceiling to the white wire from the fan • e black wire from the ceiling to the outlet box and associated wall switch location ...
...wire nuts into the outlet box. 4 • Wiring the Fan Wire Nut Single Switch Wiring 7 42405-01 • 01/20/06 Hunter Fan Company Select an acceptable general-use a qualified electrician. Make sure the power to the black wire from the fan 4-2. All wiring must be in accordance with national and local ...from the ceiling to the green ground wire from the ceiling plate and the green ground wire from the fan • e white wire from the ceiling to the white wire from the fan • e black wire from the ceiling to the outlet box and associated wall switch location ...
Owner's Manual
Page 8
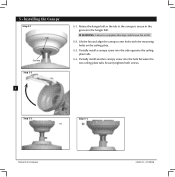
Rotate the hanger ball so the tab in the canopy is secure in the groove in the hanger ball. Securely tighten both screws. 8 Step 5-3 Step 5-4 Hunter Fan Company 42405-01 • 01/20/06 5 • Installing the Canopy Step 5-1 Tab Groove Step 5-2 5-1. Partially install another canopy screw into the side ... plate tabs. 5-4. Partially install a canopy screw into the hole between the two ceiling plate tabs. WARNING: Failure to complete this step could cause fan to fall. 5-2. Lift the fan and align the canopy screw holes with the mounting holes on the ceiling plate. 5-3.
Rotate the hanger ball so the tab in the canopy is secure in the groove in the hanger ball. Securely tighten both screws. 8 Step 5-3 Step 5-4 Hunter Fan Company 42405-01 • 01/20/06 5 • Installing the Canopy Step 5-1 Tab Groove Step 5-2 5-1. Partially install another canopy screw into the side ... plate tabs. 5-4. Partially install a canopy screw into the hole between the two ceiling plate tabs. WARNING: Failure to complete this step could cause fan to fall. 5-2. Lift the fan and align the canopy screw holes with the mounting holes on the ceiling plate. 5-3.
Owner's Manual
Page 9
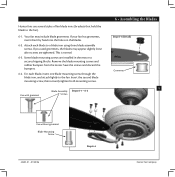
... Grommet 9 Use without grommet Blade Mounting Screw 42405-01 • 01/20/06 Step 6-4 Hunter Fan Company Insert the second blade mounting screw, then securely tighten both mounting screws. Your fan may appear slightly loose after screws are installed in the motor to a blade iron using three ... screw through the blade iron, and attach lightly to the fan). 6-1. Remove the blade mounting screws and rubber bumpers from the motor. Hunter fans use several styles of fan blade irons (brackets that hold the blade to the fan. Some blade mounting screws are tightened. is is ...
... Grommet 9 Use without grommet Blade Mounting Screw 42405-01 • 01/20/06 Step 6-4 Hunter Fan Company Insert the second blade mounting screw, then securely tighten both mounting screws. Your fan may appear slightly loose after screws are installed in the motor to a blade iron using three ... screw through the blade iron, and attach lightly to the fan). 6-1. Remove the blade mounting screws and rubber bumpers from the motor. Hunter fans use several styles of fan blade irons (brackets that hold the blade to the fan. Some blade mounting screws are tightened. is is ...
Owner's Manual
Page 10
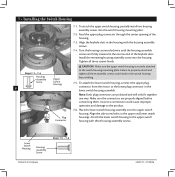
... the switch housing mounting plate. 7-2. Note: Both plug connectors are firmly situated in the lower switch housing assembly. Lower Switch Housing Housing Assembly Screw Steps 7-5 - 7-6 Hunter Fan Company 42405-01 • 01/20/06 7 • Installing the Switch Housing 7-1. Turn the housing counterclockwise until the housing assembly screws are polarized and will...
... the switch housing mounting plate. 7-2. Note: Both plug connectors are firmly situated in the lower switch housing assembly. Lower Switch Housing Housing Assembly Screw Steps 7-5 - 7-6 Hunter Fan Company 42405-01 • 01/20/06 7 • Installing the Switch Housing 7-1. Turn the housing counterclockwise until the housing assembly screws are polarized and will...
Owner's Manual
Page 11
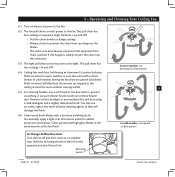
... air flow pattern 11 In cold weather, use an artistic agent, but never abrasive cleaning agents as the fan finish. Reversing Switch 42405-01 • 01/20/06 Hunter Fan Company If this happens, simply reinsert the chain into the blades. • e chain uses a breakaway... connector that separates if the chain is jerked. 8 • Operating and Cleaning Your Ceiling Fan 8-1. Ceiling fans work best by blowing air downward (...
... air flow pattern 11 In cold weather, use an artistic agent, but never abrasive cleaning agents as the fan finish. Reversing Switch 42405-01 • 01/20/06 Hunter Fan Company If this happens, simply reinsert the chain into the blades. • e chain uses a breakaway... connector that separates if the chain is jerked. 8 • Operating and Cleaning Your Ceiling Fan 8-1. Ceiling fans work best by blowing air downward (...
Owner's Manual
Page 12
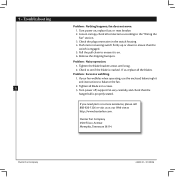
... site at http://www.hunterfan.com. Turn power on . 6. Pull the pull chain to balance the fan. 2. Hunter Fan Company 2500 Frisco Avenue Memphis, Tennessee 38114 Hunter Fan Company 42405-01 • 01/20/06 Turn power off, support fan very carefully, and check that the switch is cracked. Check the plug connection in the switch...
... site at http://www.hunterfan.com. Turn power on . 6. Pull the pull chain to balance the fan. 2. Hunter Fan Company 2500 Frisco Avenue Memphis, Tennessee 38114 Hunter Fan Company 42405-01 • 01/20/06 Turn power off, support fan very carefully, and check that the switch is cracked. Check the plug connection in the switch...
Parts Guide
Page 1
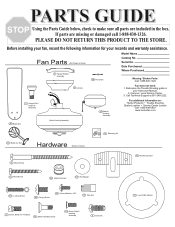
...Washer Call Technical Support at 901-248-2222. 7 Hanger Ball / Downrod Assembly 28 Switch / Housing Assembly For additional information on: Hunter Products Trouble Shooting Dealer Location Service Center Locator Call 1-800-448-6837 www.hunterfan.com 46 Blade Set Motor Housing Assembly 75 Balancing ... 78 Pull Chain Model Name Catalog No. Serial No. Date Purchased Where Purchased Missing / Broken Parts: Call 1-888-830-1326 3 Canopy Fan does not work: 1. Call your Instruction Manual. 2. If parts are included in your Local Service Center. 3. PLEASE DO NOT RETURN THIS...
...Washer Call Technical Support at 901-248-2222. 7 Hanger Ball / Downrod Assembly 28 Switch / Housing Assembly For additional information on: Hunter Products Trouble Shooting Dealer Location Service Center Locator Call 1-800-448-6837 www.hunterfan.com 46 Blade Set Motor Housing Assembly 75 Balancing ... 78 Pull Chain Model Name Catalog No. Serial No. Date Purchased Where Purchased Missing / Broken Parts: Call 1-888-830-1326 3 Canopy Fan does not work: 1. Call your Instruction Manual. 2. If parts are included in your Local Service Center. 3. PLEASE DO NOT RETURN THIS...


