
Installation Guide
Page 1
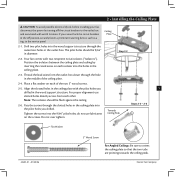
... safety, reliable operation, maximum efficiency, and energy savings. Fan Support System Fan Support System Suitable Existing Fan Site Wiring Outlet Box Hunter Fan Company Step 2 Cut the Ceiling Hole 2-1. Preparing the Fan Site 8' Minimum Ceiling Height 7' Minimum to Floor 30" From Wall or Nearest Obstruction Step 1 Choose the Fan Site Proper ceiling fan location and attachment to the building structure are...
... safety, reliable operation, maximum efficiency, and energy savings. Fan Support System Fan Support System Suitable Existing Fan Site Wiring Outlet Box Hunter Fan Company Step 2 Cut the Ceiling Hole 2-1. Preparing the Fan Site 8' Minimum Ceiling Height 7' Minimum to Floor 30" From Wall or Nearest Obstruction Step 1 Choose the Fan Site Proper ceiling fan location and attachment to the building structure are...
Owner's Manual
Page 2
...; Installing the Canopy 8 6 • Assembling the Blades 9 7 • Installing the Switch Housing 10 8 • Operating and Cleaning Your Ceiling Fan 11 9 • Troubleshooting 12 © 2006 Hunter Fan Company Hunter Fan Company Your new Hunter® ceiling fan is an addition to your home or office that will provide comfort and performance for many years. is installation and...
...; Installing the Canopy 8 6 • Assembling the Blades 9 7 • Installing the Switch Housing 10 8 • Operating and Cleaning Your Ceiling Fan 11 9 • Troubleshooting 12 © 2006 Hunter Fan Company Hunter Fan Company Your new Hunter® ceiling fan is an addition to your home or office that will provide comfort and performance for many years. is installation and...
Owner's Manual
Page 3
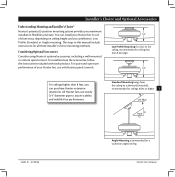
... in this manual include instructions for all three Installer's Choice mounting methods. All Hunter fans use sturdy 3/4" diameter pipe to the ceiling, recommended for a vaulted or angled ceiling Hunter Fan Company To install and use only Hunter speed controls. Considering Optional Accessories Consider using Hunter's optional accessories, including a wall-mounted or remote speed control. Standard Mounting hangs from...
... in this manual include instructions for all three Installer's Choice mounting methods. All Hunter fans use sturdy 3/4" diameter pipe to the ceiling, recommended for a vaulted or angled ceiling Hunter Fan Company To install and use only Hunter speed controls. Considering Optional Accessories Consider using Hunter's optional accessories, including a wall-mounted or remote speed control. Standard Mounting hangs from...
Owner's Manual
Page 4
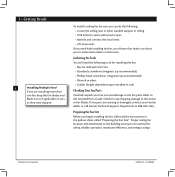
Gathering the Tools You will need help installing the fan, your Hunter fan dealer can do the following tools for safety, reliable operation, maximum efficiency, and energy savings. Check for and install wood screws. • Identify and connect electrical wires. • Lift 40 pounds. Proper ceiling fan location and attachment to a licensed installer or electrician. To...
Gathering the Tools You will need help installing the fan, your Hunter fan dealer can do the following tools for safety, reliable operation, maximum efficiency, and energy savings. Check for and install wood screws. • Identify and connect electrical wires. • Lift 40 pounds. Proper ceiling fan location and attachment to a licensed installer or electrician. To...
Owner's Manual
Page 5
... with two neoprene noise isolators ("Isolators"). Note: e isolators should be flush against the ceiling. 2-6. Hunter Fan Company Do not over tighten. Step 2-2 2-2. Your fan comes with the pilot holes you 5 drilled in the ceiling plate into the wood support structure through the hole in the middle of the two 3" wood screws. 2-5. Pass the screws...
... with two neoprene noise isolators ("Isolators"). Note: e isolators should be flush against the ceiling. 2-6. Hunter Fan Company Do not over tighten. Step 2-2 2-2. Your fan comes with the pilot holes you 5 drilled in the ceiling plate into the wood support structure through the hole in the middle of the two 3" wood screws. 2-5. Pass the screws...
Owner's Manual
Page 6
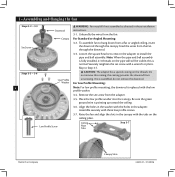
... fully installed, 2-3 threads on the adapter to Step 3-7. To assemble fan to hang down from the adapter. 3-5. Note: When the pipe and ball assembly is pointing up toward the ceiling. 3-6. this coating; Raise the fan and align the slots in the adapter. Loosen the square head set...downrod. 3-3. Align the holes in the washer with the holes in the canopy with three low profile screws. 3-7. Low Profile Screw Ceiling Plate Tabs Step 3-7 Hunter Fan Company Canopy Slots 42405-01 • 01/20/06 Skip to install the pipe and ball assembly. 3 • Assembling and ...
... fully installed, 2-3 threads on the adapter to Step 3-7. To assemble fan to hang down from the adapter. 3-5. Note: When the pipe and ball assembly is pointing up toward the ceiling. 3-6. this coating; Raise the fan and align the slots in the adapter. Loosen the square head set...downrod. 3-3. Align the holes in the washer with the holes in the canopy with three low profile screws. 3-7. Low Profile Screw Ceiling Plate Tabs Step 3-7 Hunter Fan Company Canopy Slots 42405-01 • 01/20/06 Skip to install the pipe and ball assembly. 3 • Assembling and ...
Owner's Manual
Page 7
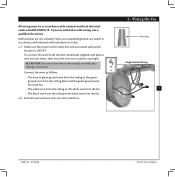
... wire from the ceiling to the green ground wire from the ceiling plate and the green ground wire from the fan • e white wire from the ceiling to the white wire from the fan • e black wire from the fan 4-2. Wall switches ...are visible after making connections. Select an acceptable general-use a qualified electrician. Push all wires and wire nuts into the outlet box. 4 • Wiring the Fan Wire Nut Single Switch Wiring 7 42405-01 • 01/20/06 Hunter Fan...
... wire from the ceiling to the green ground wire from the ceiling plate and the green ground wire from the fan • e white wire from the ceiling to the white wire from the fan • e black wire from the fan 4-2. Wall switches ...are visible after making connections. Select an acceptable general-use a qualified electrician. Push all wires and wire nuts into the outlet box. 4 • Wiring the Fan Wire Nut Single Switch Wiring 7 42405-01 • 01/20/06 Hunter Fan...
Owner's Manual
Page 8
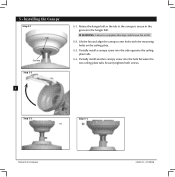
... align the canopy screw holes with the mounting holes on the ceiling plate. 5-3. Securely tighten both screws. 8 Step 5-3 Step 5-4 Hunter Fan Company 42405-01 • 01/20/06 Partially install another canopy screw into the side opposite the ceiling plate tabs. 5-4. Rotate the hanger ball so the tab in the canopy is secure in...
... align the canopy screw holes with the mounting holes on the ceiling plate. 5-3. Securely tighten both screws. 8 Step 5-3 Step 5-4 Hunter Fan Company 42405-01 • 01/20/06 Partially install another canopy screw into the side opposite the ceiling plate tabs. 5-4. Rotate the hanger ball so the tab in the canopy is secure in...
Owner's Manual
Page 11
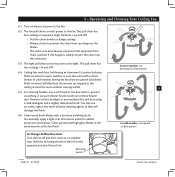
... scratching. Reversing Switch 42405-01 • 01/20/06 Hunter Fan Company Clean wood finish blades with a direct breeze. Slide the reversing switch on electrical power to the fan. 8-2. e fan pull chain controls power to the fan. e pull chain has four settings in the same ... the chain from recoiling into the connector. 8-3. e light pull chain controls power to cool the room with a furniture polishing cloth. Ceiling fans work best by blowing air downward (counterclockwise blade rotation) in warm weather to the light. e pull chain has two settings: On ...
... scratching. Reversing Switch 42405-01 • 01/20/06 Hunter Fan Company Clean wood finish blades with a direct breeze. Slide the reversing switch on electrical power to the fan. 8-2. e fan pull chain controls power to the fan. e pull chain has four settings in the same ... the chain from recoiling into the connector. 8-3. e light pull chain controls power to cool the room with a furniture polishing cloth. Ceiling fans work best by blowing air downward (counterclockwise blade rotation) in warm weather to the light. e pull chain has two settings: On ...


