
Installation Guide
Page 1
...1/16" into the ceiling. 3-2. o e bottom of the outlet box is at least 8 feet high. • e fan blades have now successfully prepared your new Hunter fan. Steps 2 - 3 Step 3 Install a Support Brace, If Necessary Determine if there is a ceiling joist directly above the floor and ...accordance with joist or support brace. If your existing fan site is secured to your fan manual and continue with the joist or support brace. 4-3. Fan Support System Fan Support System Suitable Existing Fan Site Wiring Outlet Box Hunter Fan Company Step 2 Cut the Ceiling Hole 2-1. You ...
...1/16" into the ceiling. 3-2. o e bottom of the outlet box is at least 8 feet high. • e fan blades have now successfully prepared your new Hunter fan. Steps 2 - 3 Step 3 Install a Support Brace, If Necessary Determine if there is a ceiling joist directly above the floor and ...accordance with joist or support brace. If your existing fan site is secured to your fan manual and continue with the joist or support brace. 4-3. Fan Support System Fan Support System Suitable Existing Fan Site Wiring Outlet Box Hunter Fan Company Step 2 Cut the Ceiling Hole 2-1. You ...

Owner's Manual
Page 2
... world. If you complete instructions for installing and operating your fan. Hunter Fan Company 41922-01 • 02/26/07 Before installing your fan, for your records and warranty assistance, record information from the carton and Hunter nameplate label (located on the top of the building according... the Remote Control and Mounting the Holder 13 10 • Operating and Cleaning Your Ceiling Fan 14 11 • Troubleshooting 15 © 2007 Hunter Fan Company Your new Hunter® ceiling fan is an addition to your home or office that will provide comfort and performance for many ...
... world. If you complete instructions for installing and operating your fan. Hunter Fan Company 41922-01 • 02/26/07 Before installing your fan, for your records and warranty assistance, record information from the carton and Hunter nameplate label (located on the top of the building according... the Remote Control and Mounting the Holder 13 10 • Operating and Cleaning Your Ceiling Fan 14 11 • Troubleshooting 15 © 2007 Hunter Fan Company Your new Hunter® ceiling fan is an addition to your home or office that will provide comfort and performance for many ...
Owner's Manual
Page 3
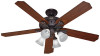
...included with each product. Installer's Choice and Optional Accessories Understanding Mounting and Installer's Choice® Hunter's patented 3-position mounting system provides you can install your Hunter fan in one of your preference: Low Profile, Standard, or Angle mounting. e steps in...flexibility and ease. For quiet and optimum performance of three ways, depending on ceiling height and your Hunter fan, use only Hunter speed controls. You can purchase Hunter extension downrods. To install and use sturdy 3/4" diameter pipe to the ceiling, recommended for all three...
...included with each product. Installer's Choice and Optional Accessories Understanding Mounting and Installer's Choice® Hunter's patented 3-position mounting system provides you can install your Hunter fan in one of your preference: Low Profile, Standard, or Angle mounting. e steps in...flexibility and ease. For quiet and optimum performance of three ways, depending on ceiling height and your Hunter fan, use only Hunter speed controls. You can purchase Hunter extension downrods. To install and use sturdy 3/4" diameter pipe to the ceiling, recommended for all three...
Owner's Manual
Page 4
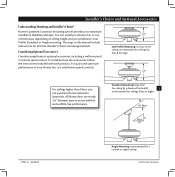
...; Drill holes for any parts are installing more than one fan, keep the fan blades and blade irons (if applicable) in the pullout sheet called "Preparing the Fan Site." If you begin installing the fan, follow all the instructions in sets, as they were shipped. Hunter Fan Company 41922-01 • 02/26/07 1 • Getting...
...; Drill holes for any parts are installing more than one fan, keep the fan blades and blade irons (if applicable) in the pullout sheet called "Preparing the Fan Site." If you begin installing the fan, follow all the instructions in sets, as they were shipped. Hunter Fan Company 41922-01 • 02/26/07 1 • Getting...
Owner's Manual
Page 5
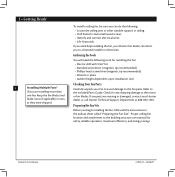
... the raised areas on each of the ceiling plate. 2-4. For proper alignment use lubricants on the ceiling plate are pointing towards the ceiling peak. Hunter Fan Company Your fan comes with the pilot holes you drilled. Drill two pilot holes into the holes in the ceiling plate. 2-3. read the lead wires from...
... the raised areas on each of the ceiling plate. 2-4. For proper alignment use lubricants on the ceiling plate are pointing towards the ceiling peak. Hunter Fan Company Your fan comes with the pilot holes you drilled. Drill two pilot holes into the holes in the ceiling plate. 2-3. read the lead wires from...
Owner's Manual
Page 6
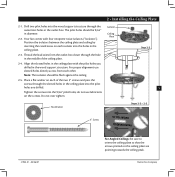
... with three #8-32 x 3/4" screws. 3-6. Securely retighten the set screw with the holes in the adapter. the coating prevents the downrod from the fan through the downrod. 3-2. Loosen the set screw from a flat or angled ceiling, insert the downrod through the U-shaped hole in the rim. #8-...adapter. 3-4. Place the low profile washer (lip up toward the ceiling. Align the holes in these installation instructions. Step 3-6 U-shaped Hole Hunter Fan Company 41922-01 • 02/26/07 Feed the wires from unscrewing. Note: For low profile mounting, the downrod is fully installed, 2-3...
... with three #8-32 x 3/4" screws. 3-6. Securely retighten the set screw with the holes in the adapter. the coating prevents the downrod from the fan through the downrod. 3-2. Loosen the set screw from a flat or angled ceiling, insert the downrod through the U-shaped hole in the rim. #8-...adapter. 3-4. Place the low profile washer (lip up toward the ceiling. Align the holes in these installation instructions. Step 3-6 U-shaped Hole Hunter Fan Company 41922-01 • 02/26/07 Feed the wires from unscrewing. Note: For low profile mounting, the downrod is fully installed, 2-3...

Owner's Manual
Page 7
...not use any interference received, including interference that they don't match, the controller will not function. Changes or modifications not expressly approved by Hunter Fan Company could void your authority to set to a different code, so that incorporates an air gap switch (normal on how to operate ...this product. 41922-01 • 02/26/07 Hunter Fan Company Note: Use with a fan that the operation of one fan does not affect the operation of the other , you can move them most easily using a small pair of...
...not use any interference received, including interference that they don't match, the controller will not function. Changes or modifications not expressly approved by Hunter Fan Company could void your authority to set to a different code, so that incorporates an air gap switch (normal on how to operate ...this product. 41922-01 • 02/26/07 Hunter Fan Company Note: Use with a fan that the operation of one fan does not affect the operation of the other , you can move them most easily using a small pair of...
Owner's Manual
Page 8
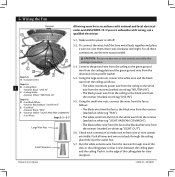
...Run the white antenna wire from the downrod or low profile washer. 5-4. Push all these B connections use a A qualified electrician. 5-1. Small Wire Nut 5-7. Hunter Fan Company 41922-01 • 02/26/07 C D E Step 5-3 A • Ground/Green 5-3. CAUTION: Be sure no bare wire or wire strands ...are visible after F making connections. Using the small wire nuts, connect the wires from the fan as follows: Step 5-4 8 B • Ceiling Black • Receiver Black: "LIVE IN" • e white (common) power wire ...
...Run the white antenna wire from the downrod or low profile washer. 5-4. Push all these B connections use a A qualified electrician. 5-1. Small Wire Nut 5-7. Hunter Fan Company 41922-01 • 02/26/07 C D E Step 5-3 A • Ground/Green 5-3. CAUTION: Be sure no bare wire or wire strands ...are visible after F making connections. Using the small wire nuts, connect the wires from the fan as follows: Step 5-4 8 B • Ceiling Black • Receiver Black: "LIVE IN" • e white (common) power wire ...

Owner's Manual
Page 9
...the canopy clockwise until the tabs on the ceiling plate. 6-3. Loosely assemble the three canopy screws into place. Holding the canopy, raise the fan off the hook. 6-2. Step 6-2 Canopy Ceiling Plate Canopy Trim Ring Should you need to the top of the canopy. e canopy ...over the ceiling plate. Once all three screws are in the canopy. 6-4. Steps 6-4 - 6-5 9 Step 6-3 41922-01 • 02/26/07 Canopy Screw Hunter Fan Company Press firmly on top of the ring towards the canopy. e tabs will snap and lock into the canopy one at a time. 6• Installing...
...the canopy clockwise until the tabs on the ceiling plate. 6-3. Loosely assemble the three canopy screws into place. Holding the canopy, raise the fan off the hook. 6-2. Step 6-2 Canopy Ceiling Plate Canopy Trim Ring Should you need to the top of the canopy. e canopy ...over the ceiling plate. Once all three screws are in the canopy. 6-4. Steps 6-4 - 6-5 9 Step 6-3 41922-01 • 02/26/07 Canopy Screw Hunter Fan Company Press firmly on top of the ring towards the canopy. e tabs will snap and lock into the canopy one at a time. 6• Installing...
Owner's Manual
Page 10
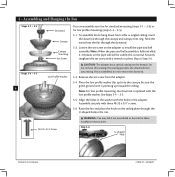
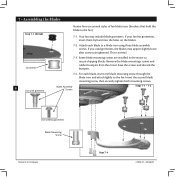
... 7-3. Remove the blade mountings screws and rubber bumpers from the motor. Blade Assembly Screws Steps 7-1 - 7-2 Use without grommet Blade Mounting Screw Hunter Fan Company Step 7-4 41922-01 • 02/26/07 Attach each blade, insert one blade mounting screw through the blade iron, and attach lightly... screws and discard the bumpers. 7-4. If your fan has grommets, insert them by hand into the holes on the blades. 7-2. 7 • Assembling the Blades Step 7-1 (Detail) Grommet 10 Use with grommet Hunter fans use several styles of fan blade irons (brackets that hold the blade to ...
... 7-3. Remove the blade mountings screws and rubber bumpers from the motor. Blade Assembly Screws Steps 7-1 - 7-2 Use without grommet Blade Mounting Screw Hunter Fan Company Step 7-4 41922-01 • 02/26/07 Attach each blade, insert one blade mounting screw through the blade iron, and attach lightly... screws and discard the bumpers. 7-4. If your fan has grommets, insert them by hand into the holes on the blades. 7-2. 7 • Assembling the Blades Step 7-1 (Detail) Grommet 10 Use with grommet Hunter fans use several styles of fan blade irons (brackets that hold the blade to ...
Owner's Manual
Page 11
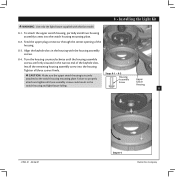
Failure to the switch housing mounting plate. Housing 11 41922-01 • 02/26/07 Step 8-4 Hunter Fan Company To attach the upper switch housing, partially install two housing assembly screws into the housing. Turn the housing counterclockwise until the housing... attached to properly Assembly Upper attach and tighten all three screws firmly. Tighten all three assembly screws could result in the housing with this fan model. 8-1. Align the keyhole slots in the Screw Switch switch housing and light fixture falling. Feed the upper plug connector through the center...
Failure to the switch housing mounting plate. Housing 11 41922-01 • 02/26/07 Step 8-4 Hunter Fan Company To attach the upper switch housing, partially install two housing assembly screws into the housing. Turn the housing counterclockwise until the housing... attached to properly Assembly Upper attach and tighten all three screws firmly. Tighten all three assembly screws could result in the housing with this fan model. 8-1. Align the keyhole slots in the Screw Switch switch housing and light fixture falling. Feed the upper plug connector through the center...

Owner's Manual
Page 12
... lower switch housings. Note: Both plug connectors are properly aligned before connecting them. Tighten the thumbscrews securely. 8-9. Housing Assembly Screw Steps 8-7 - 8-9 umbscrews Shade Bulb Hunter Fan Company 41922-01 • 02/26/07 8 • Installing the Light Kit (Continued) Steps 8-5 - 8-6 Lower Switch Housing Plug 12 Connector Detail 8-5. Make sure the connectors...
... lower switch housings. Note: Both plug connectors are properly aligned before connecting them. Tighten the thumbscrews securely. 8-9. Housing Assembly Screw Steps 8-7 - 8-9 umbscrews Shade Bulb Hunter Fan Company 41922-01 • 02/26/07 8 • Installing the Light Kit (Continued) Steps 8-5 - 8-6 Lower Switch Housing Plug 12 Connector Detail 8-5. Make sure the connectors...
Owner's Manual
Page 13
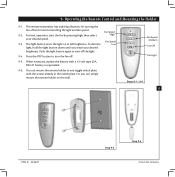
...You can simply mount the remote holder on the wall. Fan Speed Medium Fan Off Fan Light Steps 9-1 - 9-4 13 41922-01 • 02/26/07 Step 9-6 Step 9-5 Hunter Fan Company Fan Speed 9-3. e light button turns the light on and controlling the light and fan speed. 9-2. Or, you reach your desired speed. ...in the switch plate. To dim the Low light, hold the light button down until you can mount the remote holder to turn the fan off the light. 9-4. Press the OFF button to full brightness. 9• Operating the Remote Control and Mounting the Holder 9-1. ...
...You can simply mount the remote holder on the wall. Fan Speed Medium Fan Off Fan Light Steps 9-1 - 9-4 13 41922-01 • 02/26/07 Step 9-6 Step 9-5 Hunter Fan Company Fan Speed 9-3. e light button turns the light on and controlling the light and fan speed. 9-2. Or, you reach your desired speed. ...in the switch plate. To dim the Low light, hold the light button down until you can mount the remote holder to turn the fan off the light. 9-4. Press the OFF button to full brightness. 9• Operating the Remote Control and Mounting the Holder 9-1. ...
Owner's Manual
Page 14
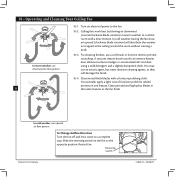
... cloth to a complete stop. Restart fan. In warm weather, use an artistic agent, but never abrasive cleaning agents, as the fan finish. Remove surface smudges or accumulated ... blades with a direct breeze. Turn on the fan to the fan. 10-2. 10 • Operating and Cleaning Your Ceiling Fan 10-1. A vacuum cleaner brush nozzle can remove ...pattern To Change Airflow Direction Turn the fan off and let it come to prevent scratching. Slide the reversing switch...on electrical power to the opposite position. Ceiling fans work best by blowing air downward (counterclockwise blade ...
... cloth to a complete stop. Restart fan. In warm weather, use an artistic agent, but never abrasive cleaning agents, as the fan finish. Remove surface smudges or accumulated ... blades with a direct breeze. Turn on the fan to the fan. 10-2. 10 • Operating and Cleaning Your Ceiling Fan 10-1. A vacuum cleaner brush nozzle can remove ...pattern To Change Airflow Direction Turn the fan off and let it come to prevent scratching. Slide the reversing switch...on electrical power to the opposite position. Ceiling fans work best by blowing air downward (counterclockwise blade ...
Owner's Manual
Page 15
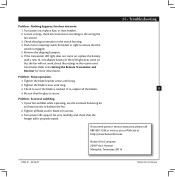
... battery with a new 12-volt alkaline battery. Problem: Excessive wobbling. 1. Hunter Fan Company 2500 Frisco Avenue Memphis, Tennessee 38114 41922-01 • 02/26/07 Hunter Fan Company Tighten the blade bracket screws until snug. 3. Tighten the blade screws until snug. 2. If your fan wobbles when operating, use the enclosed balancing kit and instructions to...
... battery with a new 12-volt alkaline battery. Problem: Excessive wobbling. 1. Hunter Fan Company 2500 Frisco Avenue Memphis, Tennessee 38114 41922-01 • 02/26/07 Hunter Fan Company Tighten the blade bracket screws until snug. 3. Tighten the blade screws until snug. 2. If your fan wobbles when operating, use the enclosed balancing kit and instructions to...
Parts Guide
Page 1
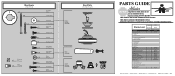
... Remote Control Transmitter Remote Control Cradle Hardware Kit Blade Grommet Blade Assembly Screw Screw, Machine, 6-32 Screw, Switch Housing Assembly Wire Connector Balancing Kit Model # 23683 Asm. If parts are included in the box. Hardware (Drawn to Scale) x 1 x 2 x 4 x 2 x 3 x 4 x 1 x 4 Balancing x 1 Kit Wire x 4 Connector x 11 x 16...98983-27 4 94970-01 4 77646-03 1 85482-01 1 85095-02 1 85093-01 1 96685-00-860 1 07570-01 Hunter Fan Company • 2500 Frisco Avenue • Memphis, TN 38114 • www.hunterfan.com • 98000-01-567 12-18-2008 • &#...
... Remote Control Transmitter Remote Control Cradle Hardware Kit Blade Grommet Blade Assembly Screw Screw, Machine, 6-32 Screw, Switch Housing Assembly Wire Connector Balancing Kit Model # 23683 Asm. If parts are included in the box. Hardware (Drawn to Scale) x 1 x 2 x 4 x 2 x 3 x 4 x 1 x 4 Balancing x 1 Kit Wire x 4 Connector x 11 x 16...98983-27 4 94970-01 4 77646-03 1 85482-01 1 85095-02 1 85093-01 1 96685-00-860 1 07570-01 Hunter Fan Company • 2500 Frisco Avenue • Memphis, TN 38114 • www.hunterfan.com • 98000-01-567 12-18-2008 • &#...


