
Installation Guide
Page 1
...; Installing the Ceiling Plate. Ceiling Hole o e outlet box clearance hole is suitable, go to your existing fan site is directly below a joist or support brace that both the inner and outer holes in contact with the rotating fan blades during normal operation. • e fan blades are aligned with an approved connector, available at least 8 feet high. • e fan blades have now successfully prepared your fan manual and begin with wiring, use...
...; Installing the Ceiling Plate. Ceiling Hole o e outlet box clearance hole is suitable, go to your existing fan site is directly below a joist or support brace that both the inner and outer holes in contact with the rotating fan blades during normal operation. • e fan blades are aligned with an approved connector, available at least 8 feet high. • e fan blades have now successfully prepared your fan manual and begin with wiring, use...

Owner's Manual
Page 1
For Your Records and Warranty Assistance Model Name Catalog/Model No Serial No Date Purchased Where Purchased For reference also attach your receipt or a copy of your receipt to the manual. 41922-01 • 02/26/07
For Your Records and Warranty Assistance Model Name Catalog/Model No Serial No Date Purchased Where Purchased For reference also attach your receipt or a copy of your receipt to the manual. 41922-01 • 02/26/07

Owner's Manual
Page 2
... Installing the Ceiling Plate 5 3 • Assembling and Hanging the Fan..........6 4 • Setting the Remote Transmitter and Receiver 7 5 • Wiring the Fan 8 6 • Installing the Canopy and Canopy Trim Ring 9 7 • Assembling the Blades 10 8 • Installing the Light Kit 11 9 • Operating the Remote Control and Mounting the Holder 13 10 • Operating and Cleaning Your Ceiling Fan 14 11 • Troubleshooting 15 © 2007 Hunter Fan Company Your new Hunter® ceiling fan is an addition to the support structure of our work. Hunter Fan Company 41922...
... Installing the Ceiling Plate 5 3 • Assembling and Hanging the Fan..........6 4 • Setting the Remote Transmitter and Receiver 7 5 • Wiring the Fan 8 6 • Installing the Canopy and Canopy Trim Ring 9 7 • Assembling the Blades 10 8 • Installing the Light Kit 11 9 • Operating the Remote Control and Mounting the Holder 13 10 • Operating and Cleaning Your Ceiling Fan 14 11 • Troubleshooting 15 © 2007 Hunter Fan Company Your new Hunter® ceiling fan is an addition to the support structure of our work. Hunter Fan Company 41922...
Owner's Manual
Page 3
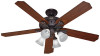
... mounting methods. For quiet and optimum performance of your preference: Low Profile, Standard, or Angle mounting. e steps in one of three ways, depending on ceiling height and your Hunter fan, use the accessories, follow the instructions included with each product. You can purchase Hunter extension downrods. All Hunter fans use sturdy 3/4" diameter pipe to the ceiling, recommended for a vaulted or angled ceiling Hunter Fan Company Considering Optional Accessories Consider using Hunter's optional accessories, including a wall-mounted or remote speed control...
... mounting methods. For quiet and optimum performance of your preference: Low Profile, Standard, or Angle mounting. e steps in one of three ways, depending on ceiling height and your Hunter fan, use the accessories, follow the instructions included with each product. You can purchase Hunter extension downrods. All Hunter fans use sturdy 3/4" diameter pipe to the ceiling, recommended for a vaulted or angled ceiling Hunter Fan Company Considering Optional Accessories Consider using Hunter's optional accessories, including a wall-mounted or remote speed control...
Owner's Manual
Page 4
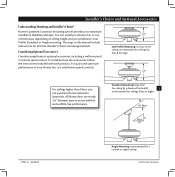
... fan, keep the fan blades and blade irons (if applicable) in sets, as they were shipped. Hunter Fan Company 41922-01 • 02/26/07 1 • Getting Ready 4 Installing Multiple Fans? Preparing the Fan Site Before you are missing or damaged, contact your fan to avoid damage to the included Parts Guide. If you to a licensed installer or electrician. Refer to the fan parts. To install a ceiling fan, be sure you can direct...
... fan, keep the fan blades and blade irons (if applicable) in sets, as they were shipped. Hunter Fan Company 41922-01 • 02/26/07 1 • Getting Ready 4 Installing Multiple Fans? Preparing the Fan Site Before you are missing or damaged, contact your fan to avoid damage to the included Parts Guide. If you to a licensed installer or electrician. Refer to the fan parts. To install a ceiling fan, be sure you can direct...
Owner's Manual
Page 5
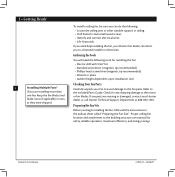
... arrows printed on the screws. 2 • Installing the Ceiling Plate 2-1. Tighten the screws into the pilot holes you drilled in diameter. 2-2. Hunter Fan Company Align the slotted holes in the ceiling plate with four neoprene noise isolators ("Isolators"). Place a flat washer on each isolator into the holes in the ceiling plate. 2-3. read the lead wires from each of the ceiling plate. 2-4. do not use slotted holes directly across from the outlet box down through the slotted...
... arrows printed on the screws. 2 • Installing the Ceiling Plate 2-1. Tighten the screws into the pilot holes you drilled in diameter. 2-2. Hunter Fan Company Align the slotted holes in the ceiling plate with four neoprene noise isolators ("Isolators"). Place a flat washer on each isolator into the holes in the ceiling plate. 2-3. read the lead wires from each of the ceiling plate. 2-4. do not use slotted holes directly across from the outlet box down through the slotted...
Owner's Manual
Page 6
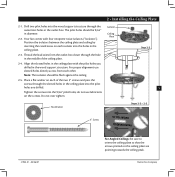
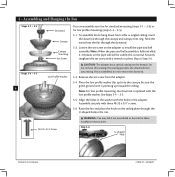
... ball assembly is replaced with the holes in these installation instructions. Note: For low profile mounting, the downrod is fully installed, 2-3 threads on the ceiling plate through the downrod. 3-2. Assemble securely with a wrench or pliers. Step 3-6 U-shaped Hole Hunter Fan Company 41922-01 • 02/26/07 Securely retighten the set screw on the threads. To assemble fan to hang down from unscrewing. Feed the wires from the adapter. 3-4. this coating; Steps 3-4 - 3-5 6 Low Profile Washer CAUTION: e adapter has...
... ball assembly is replaced with the holes in these installation instructions. Note: For low profile mounting, the downrod is fully installed, 2-3 threads on the ceiling plate through the downrod. 3-2. Assemble securely with a wrench or pliers. Step 3-6 U-shaped Hole Hunter Fan Company 41922-01 • 02/26/07 Securely retighten the set screw on the threads. To assemble fan to hang down from unscrewing. Feed the wires from the adapter. 3-4. this coating; Steps 3-4 - 3-5 6 Low Profile Washer CAUTION: e adapter has...

Owner's Manual
Page 7
... the box below. 4-2. Operation is subject to operate this product. 41922-01 • 02/26/07 Hunter Fan Company You can access the jumpers from the battery compartment. e jumpers are located near each fan set to set the jumpers in the remote transmitter and receiver so that they don't match, the controller will not function. 4 • Setting the Remote Transmitter and Receiver You must accept any speed control with a fan that incorporates an air gap switch...
... the box below. 4-2. Operation is subject to operate this product. 41922-01 • 02/26/07 Hunter Fan Company You can access the jumpers from the battery compartment. e jumpers are located near each fan set to set the jumpers in the remote transmitter and receiver so that they don't match, the controller will not function. 4 • Setting the Remote Transmitter and Receiver You must accept any speed control with a fan that incorporates an air gap switch...
Owner's Manual
Page 8
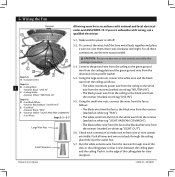
... "NEUTRAL IN") C • Ceiling White • Receiver White: "NEUTRAL IN" • e black power wire from the ceiling to the green ground wire from the ceiling plate and the green ground wire from the receiver through the ceiling plate hole into the outlet box. Check each connection to the edge of the slots in accordance with wiring, use the wire nuts provided. Run the white antenna wire from the downrod or low profile washer. 5-4.
... "NEUTRAL IN") C • Ceiling White • Receiver White: "NEUTRAL IN" • e black power wire from the ceiling to the green ground wire from the ceiling plate and the green ground wire from the receiver through the ceiling plate hole into the outlet box. Check each connection to the edge of the slots in accordance with wiring, use the wire nuts provided. Run the white antenna wire from the downrod or low profile washer. 5-4.

Owner's Manual
Page 9
... Canopy Screw Hunter Fan Company Loosely assemble the three canopy screws into place. Once all three screws are in the canopy. 6-4. Step 6-2 Canopy Ceiling Plate Canopy Trim Ring Should you need to the top of the canopy. e canopy trim ring will flex out releasing the trim ring from the canopy. Align the slots in the canopy with the slots in , tighten them. 6-5. Raise the canopy over the ceiling plate. Locate the tab indicators, small bumps on the ceiling plate. 6-3. 6• Installing...
... Canopy Screw Hunter Fan Company Loosely assemble the three canopy screws into place. Once all three screws are in the canopy. 6-4. Step 6-2 Canopy Ceiling Plate Canopy Trim Ring Should you need to the top of the canopy. e canopy trim ring will flex out releasing the trim ring from the canopy. Align the slots in the canopy with the slots in , tighten them. 6-5. Raise the canopy over the ceiling plate. Locate the tab indicators, small bumps on the ceiling plate. 6-3. 6• Installing...
Owner's Manual
Page 10
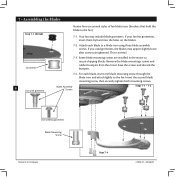
...you used grommets, the blades may include blade grommets. Attach each blade, insert one blade mounting screw through the blade iron, and attach lightly to the fan). 7-1. Save the screws and discard the bumpers. 7-4. Blade Assembly Screws Steps 7-1 - 7-2 Use without grommet Blade Mounting Screw Hunter Fan Company Step 7-4 41922-01 • 02/26/07 Your fan may appear slightly loose after screws are installed in the motor to a blade iron using three blade assembly screws. Remove the blade mountings screws and rubber bumpers from the motor. Insert the second blade mounting screw...
...you used grommets, the blades may include blade grommets. Attach each blade, insert one blade mounting screw through the blade iron, and attach lightly to the fan). 7-1. Save the screws and discard the bumpers. 7-4. Blade Assembly Screws Steps 7-1 - 7-2 Use without grommet Blade Mounting Screw Hunter Fan Company Step 7-4 41922-01 • 02/26/07 Your fan may appear slightly loose after screws are installed in the motor to a blade iron using three blade assembly screws. Remove the blade mountings screws and rubber bumpers from the motor. Insert the second blade mounting screw...
Owner's Manual
Page 11
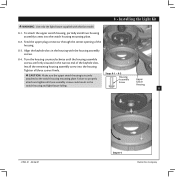
... slots in the housing with this fan model. 8-1. Tighten all three assembly screws could result in the narrow end of the housing. 8-3. Housing 11 41922-01 • 02/26/07 Step 8-4 Hunter Fan Company 8 • Installing the Light Kit WARNING: Use only the light fixture supplied with the housing assembly screws. 8-4. Install the remaining housing assembly screw into the switch housing mounting plate. 8-2. Turn the housing counterclockwise until the housing assembly screws are firmly situated in the Screw Switch switch housing and light fixture falling. To attach...
... slots in the housing with this fan model. 8-1. Tighten all three assembly screws could result in the narrow end of the housing. 8-3. Housing 11 41922-01 • 02/26/07 Step 8-4 Hunter Fan Company 8 • Installing the Light Kit WARNING: Use only the light fixture supplied with the housing assembly screws. 8-4. Install the remaining housing assembly screw into the switch housing mounting plate. 8-2. Turn the housing counterclockwise until the housing assembly screws are firmly situated in the Screw Switch switch housing and light fixture falling. To attach...

Owner's Manual
Page 12
... Plug Connector operation and damage to the lower plug connector in the upper and lower switch housings. Note: Glass shade style may vary. To install each ). Tighten the thumbscrews securely. 8-9. Housing Assembly Screw Steps 8-7 - 8-9 umbscrews Shade Bulb Hunter Fan Company 41922-01 • 02/26/07 Note: Both plug connectors are properly aligned before connecting them. 8 • Installing the Light Kit (Continued) Steps 8-5 - 8-6 Lower Switch Housing Plug 12 Connector Detail 8-5. Make sure the connectors are polarized and will only fit together...
... Plug Connector operation and damage to the lower plug connector in the upper and lower switch housings. Note: Glass shade style may vary. To install each ). Tighten the thumbscrews securely. 8-9. Housing Assembly Screw Steps 8-7 - 8-9 umbscrews Shade Bulb Hunter Fan Company 41922-01 • 02/26/07 Note: Both plug connectors are properly aligned before connecting them. 8 • Installing the Light Kit (Continued) Steps 8-5 - 8-6 Lower Switch Housing Plug 12 Connector Detail 8-5. Make sure the connectors are polarized and will only fit together...
Owner's Manual
Page 13
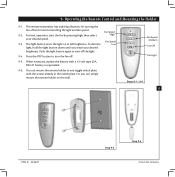
... 9-5 Hunter Fan Company When necessary, replace the battery with the screws already in the switch plate. Press the OFF button to turn the fan off. 9-5. 9• Operating the Remote Control and Mounting the Holder 9-1. e remote transmitter has individual buttons for turning the fan off and on the wall. For best operation, start the fan by pressing high, then select Fan Speed High your desired brightness. You can simply mount the remote holder on and controlling the light...
... 9-5 Hunter Fan Company When necessary, replace the battery with the screws already in the switch plate. Press the OFF button to turn the fan off. 9-5. 9• Operating the Remote Control and Mounting the Holder 9-1. e remote transmitter has individual buttons for turning the fan off and on the wall. For best operation, start the fan by pressing high, then select Fan Speed High your desired brightness. You can simply mount the remote holder on and controlling the light...
Owner's Manual
Page 14
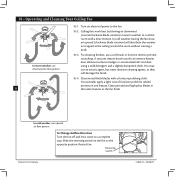
... blades with a direct breeze. For cleaning finishes, use an artistic agent, but never abrasive cleaning agents, as the fan finish. Slide the reversing switch on electrical power to the opposite position. Reversing Switch Hunter Fan Company 41922-01 • 02/26/07 Occasionally, apply a light coat of furniture polish for added protection and beauty. Clean painted and high-gloss blades in warm weather to prevent scratching. Ceiling fans work best by blowing air downward (counterclockwise blade...
... blades with a direct breeze. For cleaning finishes, use an artistic agent, but never abrasive cleaning agents, as the fan finish. Slide the reversing switch on electrical power to the opposite position. Reversing Switch Hunter Fan Company 41922-01 • 02/26/07 Occasionally, apply a light coat of furniture polish for added protection and beauty. Clean painted and high-gloss blades in warm weather to prevent scratching. Ceiling fans work best by blowing air downward (counterclockwise blade...
Owner's Manual
Page 15
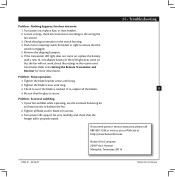
... plug connection in the receiver and transmitter. Tighten the blade bracket screws until snug. 3. If the transmitter LED light does not come on , replace fuse, or reset breaker. 2. Be sure that the glass is cracked. If your fan wobbles when operating, use the enclosed balancing kit and instructions to 4• Setting the Remote Transmitter and Receiver for more information. Loosen canopy, check all connections according to ensure that the hanger ball is engaged. 5. Push motor reversing switch...
... plug connection in the receiver and transmitter. Tighten the blade bracket screws until snug. 3. If the transmitter LED light does not come on , replace fuse, or reset breaker. 2. Be sure that the glass is cracked. If your fan wobbles when operating, use the enclosed balancing kit and instructions to 4• Setting the Remote Transmitter and Receiver for more information. Loosen canopy, check all connections according to ensure that the hanger ball is engaged. 5. Push motor reversing switch...
Parts Guide
Page 1
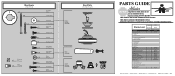
... List Item Name Hanging System Kit Ceiling Plate Canopy Canopy Trim Ring Hanger Ball / Downrod Assembly Low Profile Washer Screw, Low Profile Mounting Isolator Canopy Screw Wood Screw Flat Washer Setscrew Blade Iron Set Blade Set Screw, Blade Iron Armature Switch Housing Assembly Globe/Shade Light bulb / Bulb Remote Control Receiver Remote Control Transmitter Remote Control Cradle Hardware Kit Blade Grommet Blade Assembly Screw Screw, Machine, 6-32 Screw, Switch Housing Assembly Wire Connector Balancing Kit Model # 23683 Asm. REFER TO THE INSTALLATION MANUAL FOR FULL ASSEMBLY INSTRUCTIONS...
... List Item Name Hanging System Kit Ceiling Plate Canopy Canopy Trim Ring Hanger Ball / Downrod Assembly Low Profile Washer Screw, Low Profile Mounting Isolator Canopy Screw Wood Screw Flat Washer Setscrew Blade Iron Set Blade Set Screw, Blade Iron Armature Switch Housing Assembly Globe/Shade Light bulb / Bulb Remote Control Receiver Remote Control Transmitter Remote Control Cradle Hardware Kit Blade Grommet Blade Assembly Screw Screw, Machine, 6-32 Screw, Switch Housing Assembly Wire Connector Balancing Kit Model # 23683 Asm. REFER TO THE INSTALLATION MANUAL FOR FULL ASSEMBLY INSTRUCTIONS...


